Conair LLT2 Bruksanvisning
Conair Inte kategoriserad LLT2
Läs gratis den bruksanvisning för Conair LLT2 (2 sidor) i kategorin Inte kategoriserad. Guiden har ansetts hjälpsam av 30 personer och har ett genomsnittsbetyg på 4.2 stjärnor baserat på 3 recensioner. Har du en fråga om Conair LLT2 eller vill du ställa frågor till andra användare av produkten? Ställ en fråga
Sida 1/2
®
Instruction Guide
Model LLT2
IMPORTANT SAFETY
INSTRUCTIONS
When using an electrical appliance, basic
precautions should always be taken, including
the following:
READ ALL INSTRUCTIONS
BEFORE USING
FOR HOUSEHOLD USE ONLY
KEEP AWAY FROM WATER
To reduce the risk of electrical shock:
1. Do not reach for an appliance that has
fallen into water.
2. Do not use while bathing or in the shower.
3. Do not place or store appliance where it can
fall or be pulled into a tub or sink. Do not place
in or drop into water or other liquids.
WARNING – To reduce the risk of burns,
fire, electrical shock, or injury to persons:
1. This appliance should not be used by, on,
or near children or by individuals with certain
disabilities.
2. Use this appliance only for its intended use as
described in this manual. Do not use attach-
ments not recommended by the manufacturer.
3. Never operate this appliance if it is not
working properly, if it has been dropped,
damaged, or dropped into water. Return the
appliance to a service center for examination
and repair.
4. Never operate the appliance with the air
openings blocked or while on a soft surface,
used battery promptly. This will increase the life of
your trimmer.
2. After inserting the battery, replace the
battery compartment cover.
3. Now your unit is ready to be used.
*Do not use in the shower. To clean, simply rinse
trimmer blade under faucet.
4. To use your trimmer, push On/Off switch
upward to the “On” position.
5. After you finish using your trimmer, push down
on the On/Off switch to turn the trimmer off.
6. Always purchase the correct size and grade of
battery most suitable for the intended use.
7. Clean the battery contacts and also those of the
devise prior to battery installation.
8. Ensure the battery is installed correctly with
regard to polarity (+ and -).
9. Remove battery from equipment, which is not to
be used for an extended period of time.
10. Never short-circuit batteries. Store unused
batteries in their original packaging away from any
metal objects as that could cause a short-circuit.
11. Never dispose of batteries in fire, except under
conditions of controlled incineration. Failure to
observe this precaution may result in an explosion.
Never attempt to recharge primary batteries as
this may cause leakage, fire, or explosion
TO OPERATE TRIMMER
This trimmer comes with a large trimming
blade that can be used for trimming all body
hair and eyebrows.
It also comes with two
attachment combs
that help you achieve
an even cut when
you do not want to
completely remove the
hair. The larger attachment comb leaves hair longer,
approximately 7mm (see Fig. 1).
The smaller attachment comb leaves hair
shorter, approximately 4mm (see Fig. 2).
To use the attachment combs, be sure the unit
is in the off position and slide the comb over the
trimming blade. Make sure that the teeth of the
comb are facing in the same direction as the
trimming blade, and that the top of the comb is
even with the top of the trimmer.
If you want to completely remove hair, use the
trimmer without any attachment combs.
To operate the trimmer, slide the On switch
toward the trimming blades. When you are
fi nished trimming, slide the On switch away
from the blades.
To store the trimmer, slide one of the attach-
ment combs over the trimming blade for added
protection.
TO SWITCH TRIMMER HEADS
Hold the handle of the trimmer while turning
the trimmer head counterclockwise until the
“I” mark is aligned properly with the “I” mark
(see Fig. 3). At this point you should be able to
easily lift the trimmer head from the handle.
To use the new nose and ear trimmer head on
the unit, properly install the head into position
such as a bed or couch, where the air openings
may be blocked. Keep the air openings free of
lint, hair and the like.
5. Never drop or insert any object into any opening.
6. Do not use outdoors or operate where aerosol
(spray) products are being used or where oxygen is
being administered.
7. Do not place appliance on any surface while
it is operating.
8. Do not use this appliance with a damaged
or broken comb or with teeth missing from the
blades, as injury may occur.
9. Avoid skin contact with moving blades.
SAVE THESE
INSTRUCTIONS
OPERATING
INSTRUCTIONS
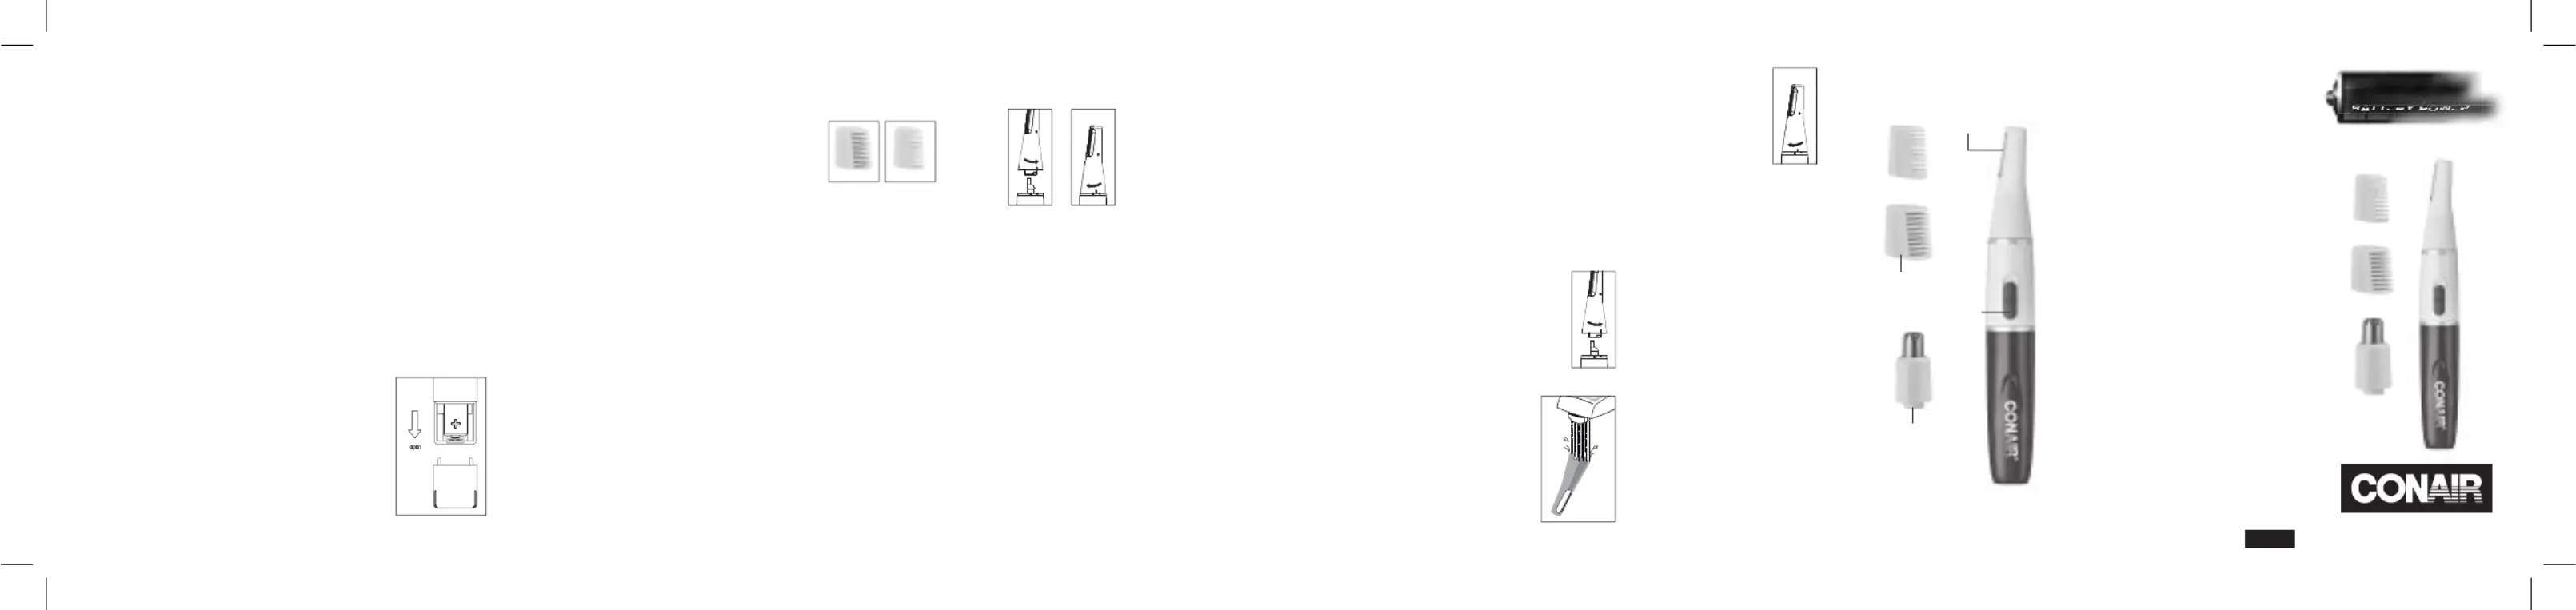
PERSONAL GROOMING KIT
1. To insert battery, remove
compartment cover at the
back of the unit by pull-
ing straight down (Fig. 1).
Insert one AAA lithium ion
battery, negative end up.
If you are not going to use
the unit for a long period
of time, or if the battery is
dead, remove the battery
from the unit. Remove
Fig. 2Fig. 1
making sure the “I” mark is aligned with the “I”
mark, then turn clockwise until the “I” marks are
aligned and lock into position (see Fig. 4).
TO TRIM YOUR BODY HAIR
To shape and defi ne, move the trimmer slowly so
as not to cut any hair you do not intend to trim.
TO TRIM YOUR NOSE AND EAR HAIR
Attach the nose and ear trimmer head to the
trimmer handle. Turn unit on. Gently insert trim-
mer head into nostril. Gently move trimmer in
and out of the nostril to remove unwanted hair.
Avoid inserting the trimmer more than ¼" to
ensure safe trimming.
Turn unit on. Gently insert trimmer head no more
than ¼" into outer ear canal. Gently move trim-
mer around the outer ear to remove unwanted
hair extending beyond the outer ear. Guide the
trimmer around the outer surface of ear to trim
protruding hairs. Never insert trimmer more
than ¼ into ear canal."
Large
trimmer
blade
2 Comb attachments
Nose/ear hair trimmer
LIMITED TWO-YEAR WARRANTY
Conair will repair or replace (at our option) your unit
free of charge for 24 months from the date of pur-
chase if the appliance is defective in workmanship
or materials.
To obtain service under this warranty, return the defec-
tive product to the service center listed below, together
with your purchase receipt and $3.00 for postage and
handling. California residents need only provide proof of
purchase and should call 1-800-3-CONAIR for shipping
instructions. In the absence of a purchase receipt, the
warranty period shall be 24 months from the date
of manufacture.
ANY IMPLIED WARRANTIES, OBLIGATIONS, OR
LIABILITIES, INCLUDING BUT NOT LIMITED TO
THE IMPLIED WARRANTY OF MERCHANTABILITY
AND FITNESS FOR A PARTICULAR PURPOSE,
SHALL BE LIMITED IN DURATION TO THE
24- MONTH DURATION OF THIS WRITTEN, LIMITED
WARRANTY. Some states do not allow limitations on
how long an implied warranty lasts, so the above
limitations may not apply to you.
IN NO EVENT SHALL CONAIR BE LIABLE FOR
ANY SPECIAL, INCIDENTAL, OR CONSEQUENTIAL
DAMAGES FOR BREACH OF THIS OR ANY OTHER
WARRANTY, EXPRESS OR IMPLIED, WHATSOEVER.
Some states do not allow the exclusion or limitation
of special, incidental, or consequential damages,
so the above limitation may not apply to you.
This warranty gives you specific legal rights, and you
may also have other rights, which vary from state
to state.
Please register this product at: www.conair.com/registration
Service Center
Conair Corporation
Service Department
7475 N. Glen Harbor Blvd.
Glendale, AZ 85307
©2014 Conair Corporation
Power switch
14PG007981IB-13221
D!
Precision Trimmer
BATT
BATT
ERY
ER
ERY
POWE
E
POWE
R
RED
LITHIUM
GET TO KNOW YOUR TRIMMER
Fig. 1
TRIMMING TIPS
1. Place the trimmer at a slight right angle to
the skin and trim in the direction of hair growth.
2. Continue trimming in the direction of growth.
Be careful not to apply excess pressure to the
blade. This may damage the blade, and can
result in injury to the skin during trimming.
3. Pull the skin fi rmly with one hand during
the trimming process to ensure the closest
possible shave.
REPLACING THE BATTERY
To replace battery, remove the lower housing
and remove/replace battery and reassemble to
cover housing. Dispose of battery properly after
removal. Do not incinerate.
1. Be sure appliance is off and hold the
upper part of the trimmer fi rmly and pull off
battery cover.
2. Insert 1 AAA Lithium Ion battery. Pay close at-
tention, making sure that the battery is inserted
in the correct direction (+ / - poles). If you
expect that the trimmer will go unused for some
time, please remove the battery.
Do not use in the shower or submerse unit
in water.
TAKING CARE
OF YOUR TRIMMER
BLADE CARE
Because the trimmer blades are precision made
for a very special use, they should always be
handled with care. Each time you finish using the
trimmer, take a cleaning brush and brush away
any loose hair that has collected in the blades,
then rinse blades under water only, dry throughly
and store the trimmer in its storage stand until the
next use.
To promote the long life of the appliance, use
your trimmer only for the purpose intended by
the manufacturer.
TO CLEAN YOUR TRIMMER
Make sure trimmer is off.
1. To remove the trimmer head for
cleaning, turn the head counter clock-
wise until the “I” mark aligns with
the “I” mark, then lift the head gently
(Fig. 5).
2. Only rinse the head under water
(Fig. 6). For proper functioning
of the unit, the handle
cannot touch or be
immersed in water.
3. After cleaning, make
sure to shake dry the head
before replacing it to
the body.
Fig. 4Fig. 3
Fig. 5
4. To reassemble the head
onto the body, align the “I”
mark on the head with the
“I” mark on the body and
then turn clockwise until the
“I” marks are aligned and
lock into position (Fig. 7).
CAUTION: When removing the blade or comb
attachment, be careful not to cut your fingers.
Fig. 6
Fig. 7
llt2_14pg007981_ib_final.indd 19/23/14 12:36 PM
Produktspecifikationer
| Varumärke: | Conair |
| Kategori: | Inte kategoriserad |
| Modell: | LLT2 |
| Batterityp: | Inbyggt batteri |
| Antal batterier: | 1 |
| Produktens färg: | Purple, White |
| Batterier medföljer: | Ja |
| Tillbehör med kammar: | Ear, Nose |
| Precisionstrimmerns användningsområde: | Ear, Eyebrow, Nose |
Behöver du hjälp?
Om du behöver hjälp med Conair LLT2 ställ en fråga nedan och andra användare kommer att svara dig
Inte kategoriserad Conair Manualer

28 December 2024
27 December 2024
27 December 2024
27 December 2024
27 December 2024
27 December 2024
27 December 2024
26 December 2024
26 December 2024
10 December 2024
Inte kategoriserad Manualer
Nyaste Inte kategoriserad Manualer
9 April 2025
9 April 2025
9 April 2025
9 April 2025
9 April 2025
9 April 2025
9 April 2025
9 April 2025
9 April 2025
9 April 2025