Cres Cor 1000CHSSSPLITSTKDE Bruksanvisning
Läs gratis den bruksanvisning för Cres Cor 1000CHSSSPLITSTKDE (13 sidor) i kategorin Ugn. Guiden har ansetts hjälpsam av 9 personer och har ett genomsnittsbetyg på 5.0 stjärnor baserat på 5 recensioner. Har du en fråga om Cres Cor 1000CHSSSPLITSTKDE eller vill du ställa frågor till andra användare av produkten? Ställ en fråga
Sida 1/13

Call Toll-free: 877-CRES COR (273-7267) • Fax: 800-822-0393 • www.crescor.com
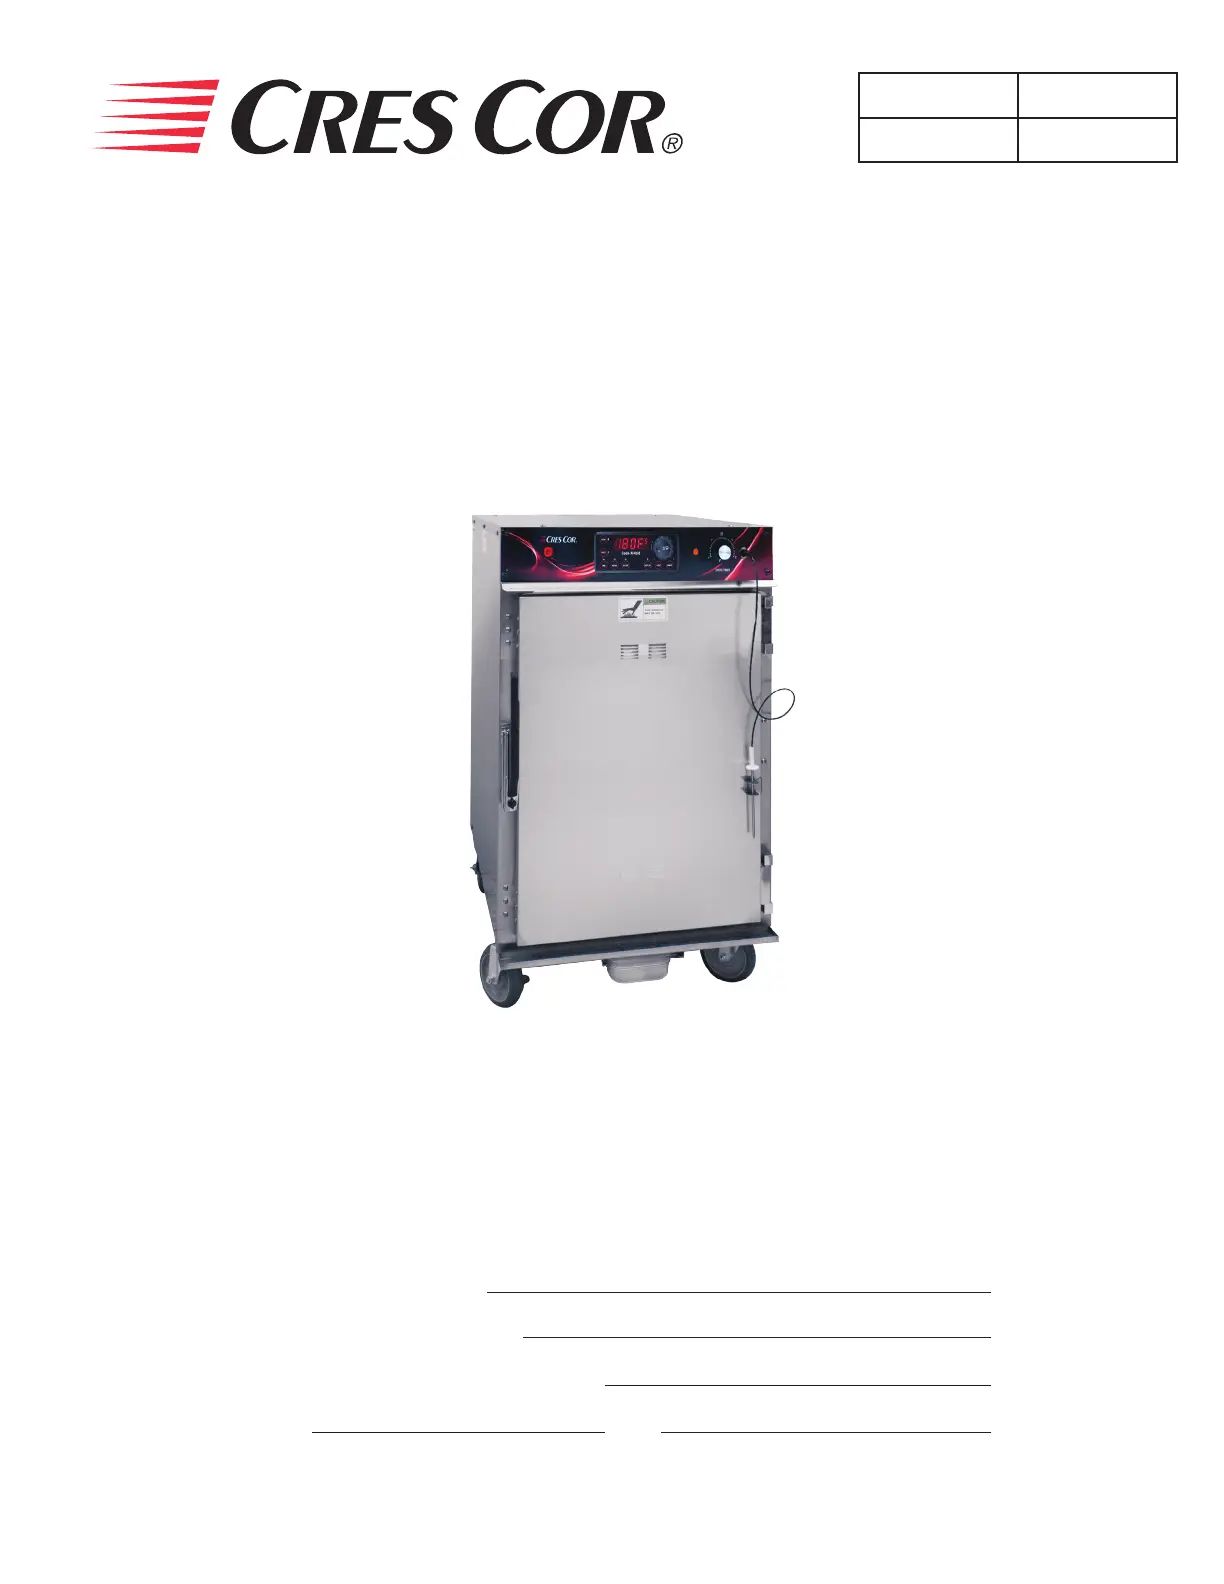
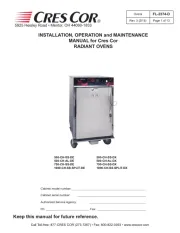
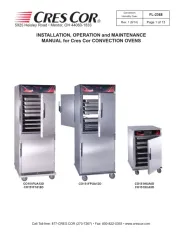
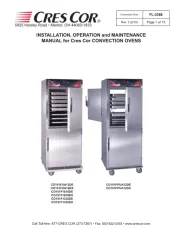
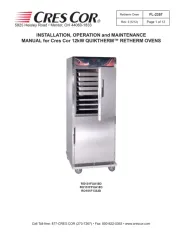
INSTALLATION, OPERATION and MAINTENANCE
MANUAL for Cres Cor
RADIANT OVENS
Ovens
FL-2374-D
Rev. 3 (2/15) Page 1 of 13
5925 Heisley Road • Mentor, OH 44060-1833
500-CH-SS-DE 500-CH-SS-DX
500-CH-AL-DE 500-CH-AL-DX
750-CH-SS-DE 750-CH-SS-DX
1000-CH-SS-SPLIT-DE 1000-CH-SS-SPLIT-DX
Cabinet model number:
Cabinet serial number:
Authorized Service Agency:
Ph: Fax:
Keep this manual for future reference.

Ovens
FL-2374-D
Rev. 3 (2/15) Page 2 of 13
Call Toll-free: 877-CRES COR (273-7267) • Fax: 800-822-0393 • www.crescor.com
5925 Heisley Road • Mentor, OH 44060-1833
TABLE OF CONTENTS
SUBJECT PAGE
INSTALLATION INSTRUCTIONS ...........................................3, 4
OPERATING INSTRUCTIONS
First Time Operation ....................................................4
How to Use Control for Cooking & Holding:
For “-DE” Series Ovens .................................................5
For “-DX” Series Ovens .................................................6
“Recipes” for “-DX” Series Ovens .........................................7
MAINTENANCE INSTRUCTIONS
How to Clean the Unit ..................................................8
Trouble Shooting Guide .................................................9
Oven Illustration .....................................................10
Oven Replacement Parts ...............................................11
Wiring Diagram For 120/208/240 Volt, 1 Phase .............................12
Wiring Diagram for 208/240 Volt, 3 Phase .................................13
SERVICE POLICY and AGENCY LIST ....................................FL-1400
WARNING: TO REDUCE THE RISK OF FIRE OR ELECTRIC SHOCK,
DO NOT REMOVE COVER (OR BACK)
NO USER-SERVICEABLE PARTS INSIDE
REPAIR SHOULD BE DONE BY AUTHORIZED SERVICE
PERSONNEL ONLY
RISK OF FIRE OR ELECTRIC SHOCK
DO NOT OPEN
WARNING
REGISTERING YOUR EQUIPMENT AT www.crescor.com/service/register
COMPLETING A SURVEY EARNS AN EXTRA 90-DAY LABOR WARRANTY!
If the equipment will not go into service immediately, please indicate
that on the warranty registration. Scan QR code to register your
equipment today! If you need a QR reader, visit your App Store on
your Smartphone or Tablet.

Ovens
FL-2374-D
Rev. 3 (2/15) Page 3 of 13
Call Toll-free: 877-CRES COR (273-7267) • Fax: 800-822-0393 • www.crescor.com
5925 Heisley Road • Mentor, OH 44060-1833
INSTALLATION INSTRUCTIONS
SPECIFICATIONS: All units are rated 3000 watts/2650 watts at 208 Volts/240 Volts
CMP MODEL NOS.
ELECTRICAL SPECS
(AC SERVICE)
ELEC. LOAD POWER SUPPLY REQUIREMENT
SINGLE OVENS Volts Ph Hz. Amps Volts Amps Ph Wire Volts NEMA
500CHSSDE
500CHALDE
750CHSSDE
1000CHSSSPLITDE
208
240
208
240
1
1
1
1
60
60
60
60
14
11
14
13
208
240
208
240
20
20
20
20
1
1
1
1
2
2
2
2
208
240
208
240
6-20P
6-20P
6-20P
6-20P
500CHSSDE3
500CHALDE3
750CHSSDE3
1000CHSSSPLITDE3
208
240
208
240
3
3
3
3
60
60
60
60
8
7
8
7
208
240
208
240
20
20
20
20
3
3
3
3
3
3
3
3
208
240
208
240
L15-20P
L15-20P
L15-20P
L15-20P
SPECIFICATIONS: All units are rated 2000 watts.
CMP MODEL NOS.
ELECTRICAL SPECS
(AC SERVICE)
ELEC. LOAD POWER SUPPLY REQUIREMENT
SINGLE OVENS Volts Ph Hz. Amps Volts Amps Ph Wire Volts NEMA
500CHSSDE120
750CHSSDE120
1000CHSSSPLITDE120
120 1 60 16.6 120 20 1 2 120 5-20P
Model number “AL” is aluminum outer body with stainless steel doors and interior.
“DE” in model number will be substituted with “DX” for “Deluxe” Ovens.
All models designed for AC Service. Model number may include a variety of informational sufx letters.
NOTE: OVENS NEED TO BE INSTALLED BY A
QUALIFIED PERSON.
For models rated at 208/240 Volts:
Check the voltage selector switch which is under an access
cover on the back of the oven near the power cord.
Flip the switch “UP” for 208 Volts
Flip the switch “DOWN” for 240 Volts
MAKE SURE THE SWITCH POSITION MATCHES
YOUR POWER SOURCE.
VENTING YOUR OVEN:
1. This cabinet passes the EPA 202 test and complies
with section 59 of UL710B for emission of grease-
laden air.
2. According to UL, this cabinet does not need to be
placed under a ventilation hood.
3. Installation must conform with local codes. The
authority having jurisdiction of enforcement of
the codes will have the responsibility for making
interpretations of the rules.

Ovens
FL-2374-D
Rev. 3 (2/15) Page 4 of 13
Call Toll-free: 877-CRES COR (273-7267) • Fax: 800-822-0393 • www.crescor.com
5925 Heisley Road • Mentor, OH 44060-1833
HOW TO INSTALL CABINETS:
1. Remove all packing material from the inside and all
vinyl from the outside of oven.
2. Place the oven in a well ventilated area on level oor.
Clearance requirements: 3” (76mm) at the back, 2”
(51mm) at the top, 1” (25mm) at both sides.
3. Install the pan slide racks on the sidewalls, if necessary.
4. Slide drip pan(s) onto the bottom of the compartment(s).
INSTALLATION INSTRUCTIONS (continued)
HOW TO REVERSE THE DOOR OPENINGS, IF
NEEDED:
1. Unscrew and remove the latch from the door and
magnetic strike from the cabinet.
2. Unscrew the hinges from the cabinet body and remove
door.
3. Remove the screws plugging the mating hinge, latch
and strike holes on the opposite sides of the cabinet
body and door.
4. Re-mount the hinges to the opposite side of the cabinet
and door.
5. Remount the latch and strike to the opposite side
FOR FIRST-TIME OPERATION ONLY:
NOTE: A new oven needs to “burn off” factory oils and
glue before its rst use. Do NOT load food into oven until
this has been done!
1. Push switch to “ON”; the light will come on.
NOTE: The letters “LOtPr” (low temperature) will show on
the control panel until it reaches 140°F (60°C).
2. Press the “COOK” button.
3. Turn the control knob to show 350°F. Push the knob
3 times to heat the unit. Run the unit like this for one
(1) hour.
4. Turn the unit off and let cool.
5. Wipe the inside clean with detergent and hot water.
DOOR VENT ADJUSTMENT:
Open the door(s) and move the vent tabs on the
inner door(s) as needed to release humidity.
WARNING
Air is VERY HOT when door is opened.
INSTALLATION INSTRUCTIONS (continued)
UPPER RIGHT CABINET CORNER
FAA-K5645C-001
1
60
1000CH
FAA-K5645C-001
29
208/240
3000
1
60
SAMPLE
R
C
US
R
R
MOD.
Hz.
SER.
PH.
WATTS
VOLTS
AMPS
MOD.
Hz.
SER.
PH.
WATTS
VOLTS
AMPS
5925 HEISLEY RD. MENTOR, OHIO 44060
COMMERCIAL COOKING APPLIANCE
MADE IN USA
CSA certified to UL 197 Rev. 9
IDENTIFYING YOUR CABINET:
Look for this label on the back of your cabinet. This information is needed when calling for questions or service.
HOW TO CHANGE FROM °F TO °C (if needed)
1. Push the switch on; the light will come on.
2. Push and hold the “SET” button and the button in the
lower left hand corner together for 5 seconds.
You have now entered into the menu.
3. Scroll over the”Unit” and change it to “C” , then scroll
to the “END”.

Ovens
FL-2374-D
Rev. 3 (2/15) Page 7 of 13
Call Toll-free: 877-CRES COR (273-7267) • Fax: 800-822-0393 • www.crescor.com
5925 Heisley Road • Mentor, OH 44060-1833
OPERATING INSTRUCTIONS (continued)
-DX OVENS, continued
RECIPES:
The -DX control can hold up to 18 saved recipes.
To save a recipe:
1. Press the RECIPE button.
2. Turn the knob through the menu until you get to “Edit”
and press the knob.
3. Turn the knob to reach the recipe you want to edit.
There are 18 blank recipes to customize and save.
4. Press the knob and enter the cook, hold and time values.
5. After the entering the nal value, “Edt” will show
again, allowing you to edit another recipe.
6. Press the knob to edit more recipes or turn to “End”
to exit the menu.
To use one of the recipes:
1. Push the RECIPE button.
2. Turn the knob to the desired recipe; “rcP01”, “rcP02”,
“rcP03”, etc.
3. Push the set button to select and start the preset process.
Unit will begin to preheat.
4. Run the cycle as described above by pressing START
button after oven has preheated.
Note: The display button will cycle through all the values
as before, but will include the recipe number, if
using a saved recipe.
Additional Menu Settings:
Press and hold both the TIME button and the knob for 5
seconds to get into the menu.
Here you can set the recipes, temperature units (°C or °F),
PUSH START reminder and the datalog settings
(USB connection required):
”RECE” allows you to enable or disable the data
record feature.
“RECF” allows you set how often (in minutes) a
datapoint will be recorded.
“RECD” allows you to set how long (in days) you would
like the data to be stored in memory.

Ovens
FL-2374-D
Rev. 3 (2/15) Page 8 of 13
Call Toll-free: 877-CRES COR (273-7267) • Fax: 800-822-0393 • www.crescor.com
5925 Heisley Road • Mentor, OH 44060-1833
BEFORE cleaning the cabinet:
1. Unplug cord from wall. Allow cabinet to cool.
2. Do NOT hose cabinet with water.
3. Do NOT get water on controls.
4. Do NOT use abrasives or harsh chemicals.
Wipe up spills as soon as possible.
Clean regularly to avoid heavy dirt build-up.
Cleaning Hints:
1. Use the mildest cleaning procedure that will do the job.
2. Always rub in the direction of polish lines to avoid
scratching the surface.
3. Use only a soft cloth, sponge, brous brushes, plastic or
stainless steel pads for cleaning and scouring.
4. Rinse thoroughly with fresh water after every cleaning
operation.
5. Always wipe dry to avoid water marks.
MODELS: 500-CH-SS-D, 750-CH-SS-D & 1000-CH-SS-SPLIT-D SERIES
SOIL CLEANER METHOD
STAINLESS
STEEL
CABINET
Inside and
Outside
Routine Cleaning
Soap or mild detergent* and
water.
1. Sponge on with cloth
2. Rinse
Stubborn Spots, Stains
Mild abrasive made for
Stainless Steel.
1. Apply with damp sponge or cloth.
2. Rub lightly.
Burnt on Foods or Grease
Chemical oven cleaner made
for Stainless Steel.
Follow oven cleaner manufacturer’s
directions.
Hard Water Spots & Scale Vinegar
1. Swab or wipe with cloth.
2. Rinse and dry.
HOW TO CLEAN THE UNIT:
MODEL: 500-CH-AL-D SERIES (Aluminum cabinet outside only with stainless steel door and pan slides)
SOIL CLEANER METHOD
ALUMINUM
CABINET
Outer body
ONLY
Dirt
Mild detergent* and hot water,
or mild abrasive cleaner.
1. Use soft, damp cloth.
2. Rinse with hot water.
3. Wipe dry.
Steam (no strong alkaline
additive).
1. Rinse after steam cleaning.
2. Wipe dry.
Fingerprints, Grease, Oil
Detergent* and hot water.
1. Wipe with soft, damp cloth.
2. Rinse with hot water.
3. Wipe dry.
Chemical oven cleaner made
for aluminum.
Follow oven cleaner manufacturer’s
directions
Mild abrasive cleaner.
Oily or waxy cleaner.
Apply with soft, clean cloth.
Water Spots Mild abrasive cleaner. Wipe with damp cloth.
*Mild detergents include soaps and non-abrasive cleaners.
WARNING

Ovens
FL-2374-D
Rev. 3 (2/15) Page 9 of 13
Call Toll-free: 877-CRES COR (273-7267) • Fax: 800-822-0393 • www.crescor.com
5925 Heisley Road • Mentor, OH 44060-1833
MAINTENANCE INSTRUCTIONS
TROUBLE-SHOOTING GUIDE
IF UNIT GETS TOO HOT OR WON’T SHUT OFF, DISCONNECT
POWER AT BRANCH PANEL. DO NOT UNPLUG CORD!
1. Cord is unplugged from wall outlet.
2. Circuit breaker/fuse to wall outlet is blown.
3. Switch(es) are turned off.
4. Thermostat(s) are turned off, or are set too low.
If hot unit is NOT working, rst check the following causes:
WARNING
IF THE OVEN TURNS ON:
PROBLEM POSSIBLE CAUSE SOLUTION
Oven does not heat, or doesn’t heat
properly
1. Sensor
2. Heater relay
3. Loose connection
4. Oven control
5. High Limit
1. Replace
2. Replace
3. Replace
4. Replace
5. Replace
Heater will not shut off
1. Control defective
2. Heater relay
1. Replace
2. Replace
Vent fans do not shut off
1. Vent fan switch defective
2. Control compartment is still hot.
1. Replace
2. Wait until it cools
Check “Heater will not shut off”
Vent fans do not operate (See Note)
1. Vent fan switch defective
2. Vent fan defective
1. Replace
2. Replace
Control will not switch from “COOK” to
“HOLD” (timed mode)
1. Oven is in “PROBE” mode (“DX” ovens).
2. Oven control defective
1. Cancel recipe and switch to “TIMED” mode
2. Replace
Control will not switch from “COOK” to
“HOLD” (probe mode in “DX” ovens only)
1. Oven is in the “TIMED” mode
2. Probe not plugged in
3. Probe defective
4. Oven control defective
1. Cancel recipe and switch to “PROBE” mode
2. Plug in probe
3. Replace
4. Replace
Control will not switch to “COOK”
(probe mode in “DX” ovens only)
1. Oven in “TIMED” mode
2. Probe temperature setting lower than
probe temperature
3. Probe not plugged in
4. Oven control defective
1. Switch to “PROBE” mode
2. Set probe temperature to desired
temperature
3. Plug in probe
4. Replace
ERROR CODES:
CODE DISPLAYED CAUSE SOLUTION
no p No meat probe Plug in probe
Err0 Temp probe bad Replace
NOTE: Vent fans will not operate until the control compartment requires ventilation to limit temperatures. Replacement
of electrical components must be done by a qualied electrician.
Refer to our Service Agency list, FL-1400 (found in the back of this manual), of authorized service centers.
Instructions for replacing parts are included in replacement parts list.

Ovens
FL-2374-D
Rev. 3 (2/15) Page 10 of 13
Call Toll-free: 877-CRES COR (273-7267) • Fax: 800-822-0393 • www.crescor.com
5925 Heisley Road • Mentor, OH 44060-1833
REPLACEMENT PARTS
Include all information on nameplate when ordering parts
INSULATION
SIDE
PANEL
HEATER
WIRE COVER
1
2
3
4
5
6
7
8 9
10
21
22
22
18
19
20
11
24
23
17
16
25
26
13
15
12
27
28
14
2A
“DE” COOK-N-HOLD CONTROL
2B
“DX” COOK-N-HOLD CONTROL
Produktspecifikationer
Varumärke: | Cres Cor |
Kategori: | Ugn |
Modell: | 1000CHSSSPLITSTKDE |
Behöver du hjälp?
Om du behöver hjälp med Cres Cor 1000CHSSSPLITSTKDE ställ en fråga nedan och andra användare kommer att svara dig
Ugn Cres Cor Manualer
19 Juni 2025
19 Juni 2025
19 Juni 2025
19 Juni 2025
19 Juni 2025
19 Juni 2025
19 Juni 2025
19 Juni 2025
19 Juni 2025
19 Juni 2025
Ugn Manualer
- Globe Fire
- TZS First Austria
- Oranier
- Kogan
- Hotpoint-Ariston
- Char-Broil
- Eltac
- Riviera And Bar
- New.Up!
- Frilec
- Boretti
- ARC
- Trebs
- Bourgini
- LAFE
Nyaste Ugn Manualer
19 Augusti 2025
19 Augusti 2025
19 Augusti 2025
19 Augusti 2025
19 Augusti 2025
19 Augusti 2025
19 Augusti 2025
19 Augusti 2025
19 Augusti 2025
19 Augusti 2025