Crestron C2N-CBD-P-IVR-S Bruksanvisning
Crestron Tangentbord C2N-CBD-P-IVR-S
Läs gratis den bruksanvisning för Crestron C2N-CBD-P-IVR-S (2 sidor) i kategorin Tangentbord. Guiden har ansetts hjälpsam av 52 personer och har ett genomsnittsbetyg på 4.5 stjärnor baserat på 9 recensioner. Har du en fråga om Crestron C2N-CBD-P-IVR-S eller vill du ställa frågor till andra användare av produkten? Ställ en fråga
Sida 1/2
C2N-CBD-P/C2N-CBD-P-KP/C2N-CBD-E/C2N-CBF-P/C2N-CBV-P/C2N-CBV2-P
Cameo
®
Keypads
Installation & Operation Guide
Screws (2)
2-28 x 3/16˝
Bezel
Light sensor
(C2N-CBD-P Only)
LEDs
LED
holes
Screws (2)
2-28 x 3/16˝
Bezel
Light sensor
LEDs
LED
holes
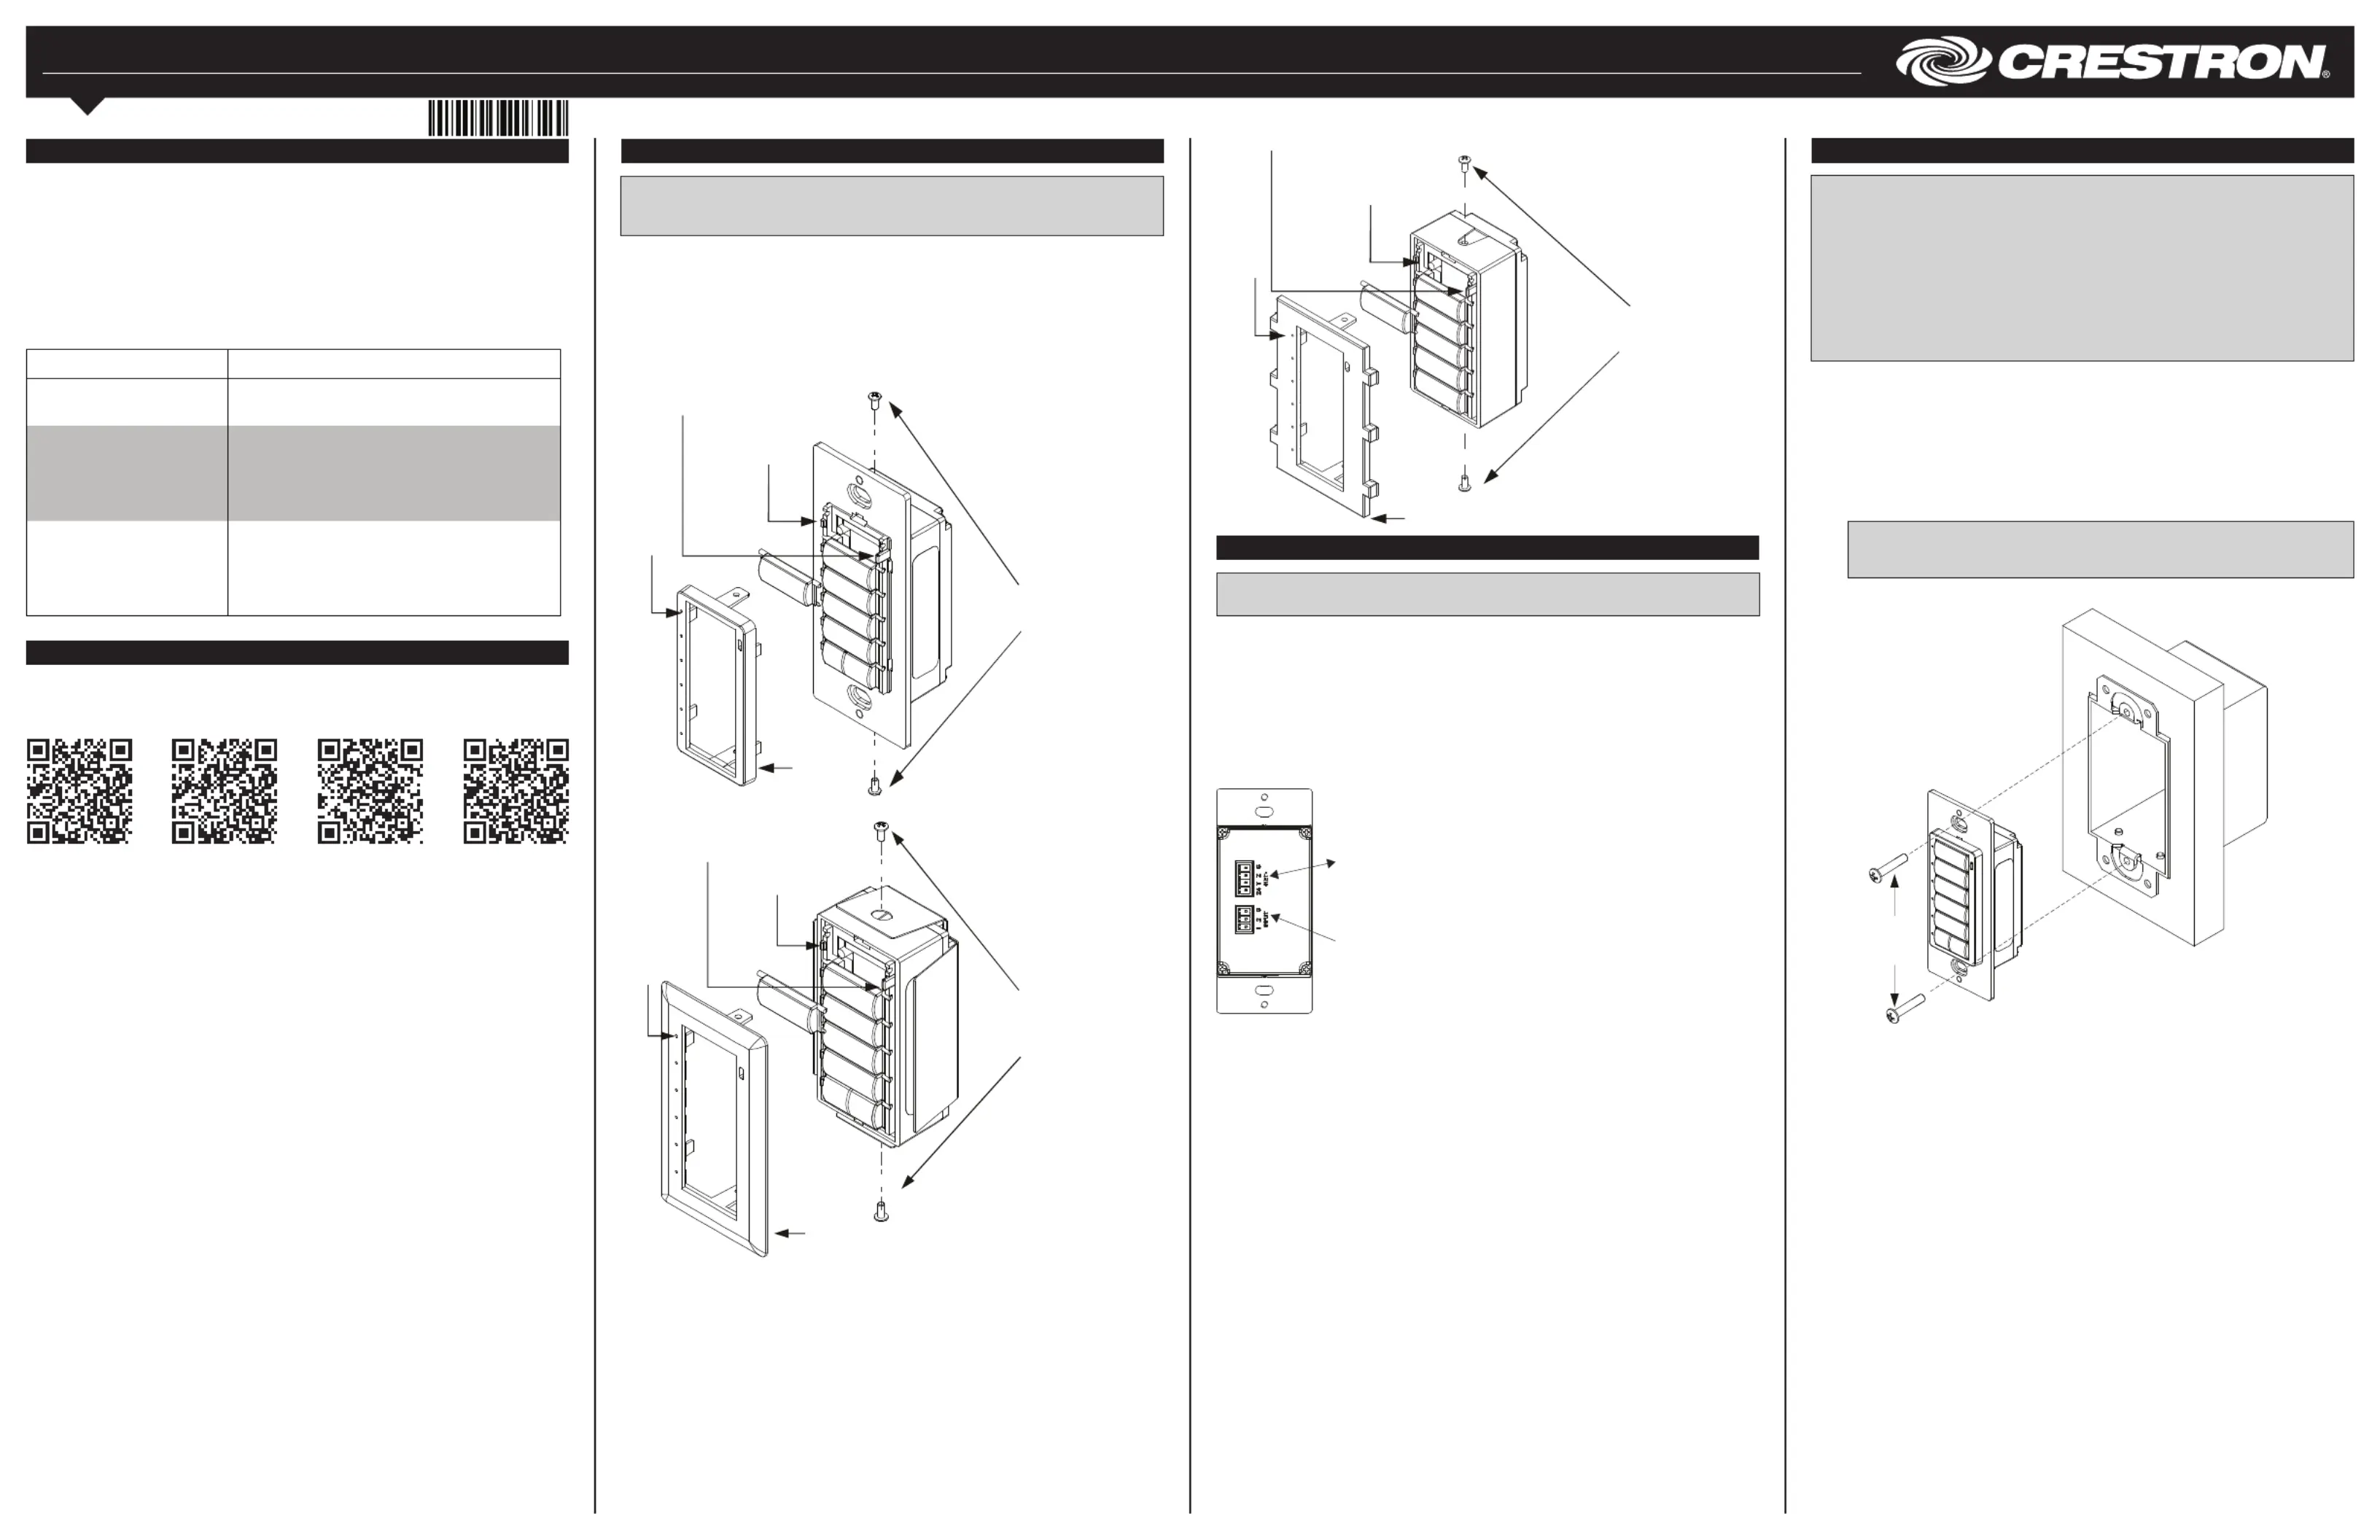
Assembling the Keypad (C2N-CBF-P Shown)
Assemble the Keypad
NOTE: The C2N-CBD-P-KP comes preassembled with either and buttons or ON OFF
SCENE 1 4UPDOWNOFF to , , , and buttons. The devices do not come with extra
button caps.
Attach the buttons to the keypad.
1. Arrange the button caps in position on the rear housing assembly according to the
program plan.
2. Carefully position the bezel over the button caps on the rear housing assembly.
3. Install and tighten the two supplied #2-28 x 3/16˝ screws.
4. Press and release each button to ensure that the button caps move freely.
Assembling the Keypad (C2N-CBD-P Shown)
Hardware Hookup
CAUTION: Turn the Cresnet system power off before making connections. Do not
turn the system power on until the device is fully installed in the mounting surface.
When making terminal block connections, strip the ends of the wires approximately 1/4
in (6 mm). Use care to avoid nicking the conductors. Twist together the ends of the wires
that share a connection.
Make connections to the NET and INPUT ports.
• Using the supplied 4-pin connector, connect the Cresnet cable to the NET port of
the keypad.
• Using the supplied 3-pin connector (all except C2N-CBD-E), connect the contact
closure input cable to the INPUT port of the keypad.
Hardware Hookup
Description
The Crestron
®
Cameo keypads present a fresh, innovative concept in keypad design,
featuring a highly congurable 1-gang wall mount form factor that is at once inviting to
the touch and appealing to the eye. The C2N-CBD-P, C2N-CBD-P-KP, C2N-CBD-E,
C2N-CBF-P, C2N-CBV-P, and C2N-CBV2-P easily install alongside other low-voltage
in-wall devices to deliver a fully customizable keypad control solution as part of a
complete Crestron control system.
The C2N-CBD-P, C2N-CBD-P-KP, C2N-CBD-E, C2N-CBF-P, C2N-CBV-P, and
C2N-CBV2-P are functionally identical. For simplicity within this guide, the term
“C2N-CBD/CBF/CBV” is used except where noted.
Specications
Additional Resources
Visit the product page on the Crestron website (www.crestron.com) for additional
information and the latest rmware updates. Use a QR reader application on your mobile
device to scan the QR image.
Screws (2)
2-28 x 3/16˝
Bezel
Light sensor
LEDs
LED
holes
NET:
To control system or
other network devices
INPUT:
From contact closure
(not available on C2N-CBD-E)
Installation
NOTES: Observe the following points:
• Install and use this product in accordance with appropriate electrical codes and
regulations.
• A licensed electrician should install this product.
NOTE: Before using the C2N-CBD/CBF/CBV, ensure the device is using the latest
rmware. Check for the latest rmware for the C2N-CBD/CBF/CBV at
www.crestron.com/rmware. Load rmware onto the device using Crestron Toolbox™
software.
NOTE: Ensure that Cresnet power is off until the keypad is fully installed.
The C2N-CBD/CBF/CBV can be installed into an electrical box (C2N-CBD-P,
C2N-CBD-P-KP, C2N-CBD-E), ush mounted (C2N-CBF-P), or installed into a Vimar box
(C2N-CBV-P). Refer to the appropriate procedure below.
Electrical Box Installation
After the Cresnet network wiring has been installed and veried, install the keypad into a
standard 1-gang electrical box.
1. Holding the keypad with the LEDs on the left, place it in the electrical box.
2. Secure the keypad using the included #6-32 x 3/4˝ screws.
CAUTION: Excess wire pinched between the keypad and electrical box could
short out. Make sure all excess wire is completely inside the electrical box and
not between the box and the keypad.
Mounting the Keypad in a 1-Gang Electrical Box
Screws (2)
#6-32 x 3/4˝
3. Attach the desired decorator style faceplate (not supplied).
4. Turn the Cresnet system power on.
C2N-CBD-E
C2N-CBF-P
C2N-CBV2-P/
C2N-CBV-P
SPECIFICATION DETAILS
Power Requirements
Cresnet
®
Power Usage
1 W (0.05 A @ 24 Vdc)
Environmental
Temperature
32º to 113 ºF (0º to 45 ºC)
Humidity
10% to 90% RH (noncondensing)
Heat Dissipation
3.4 Btu/h
Weight
Standard Mount
3 oz (64 g)
Flush Mount
3 oz (75 g)
Vimar Mount
2 oz (50 g)
C2N-CBD-P/
C2N-CBD-P-KP
Produktspecifikationer
| Varumärke: | Crestron |
| Kategori: | Tangentbord |
| Modell: | C2N-CBD-P-IVR-S |
| Bredd: | 44 mm |
| Djup: | 30 mm |
| Höjd: | 105 mm |
| Antal per förpackning: | 1 styck |
Behöver du hjälp?
Om du behöver hjälp med Crestron C2N-CBD-P-IVR-S ställ en fråga nedan och andra användare kommer att svara dig
Tangentbord Crestron Manualer

18 Augusti 2025
18 Augusti 2025
18 Augusti 2025
29 Mars 2025
12 Mars 2025
Tangentbord Manualer
Nyaste Tangentbord Manualer
3 April 2026
2 April 2026
1 April 2026
31 Mars 2026
31 Mars 2026
29 Mars 2026
29 Mars 2026
29 Mars 2026
28 Mars 2026