CTA Digital LT-DMCGCF Bruksanvisning
CTA Digital datatillbehör LT-DMCGCF
Läs gratis den bruksanvisning för CTA Digital LT-DMCGCF (1 sidor) i kategorin datatillbehör. Guiden har ansetts hjälpsam av 10 personer och har ett genomsnittsbetyg på 4.3 stjärnor baserat på 3 recensioner. Har du en fråga om CTA Digital LT-DMCGCF eller vill du ställa frågor till andra användare av produkten? Ställ en fråga
Sida 1/1
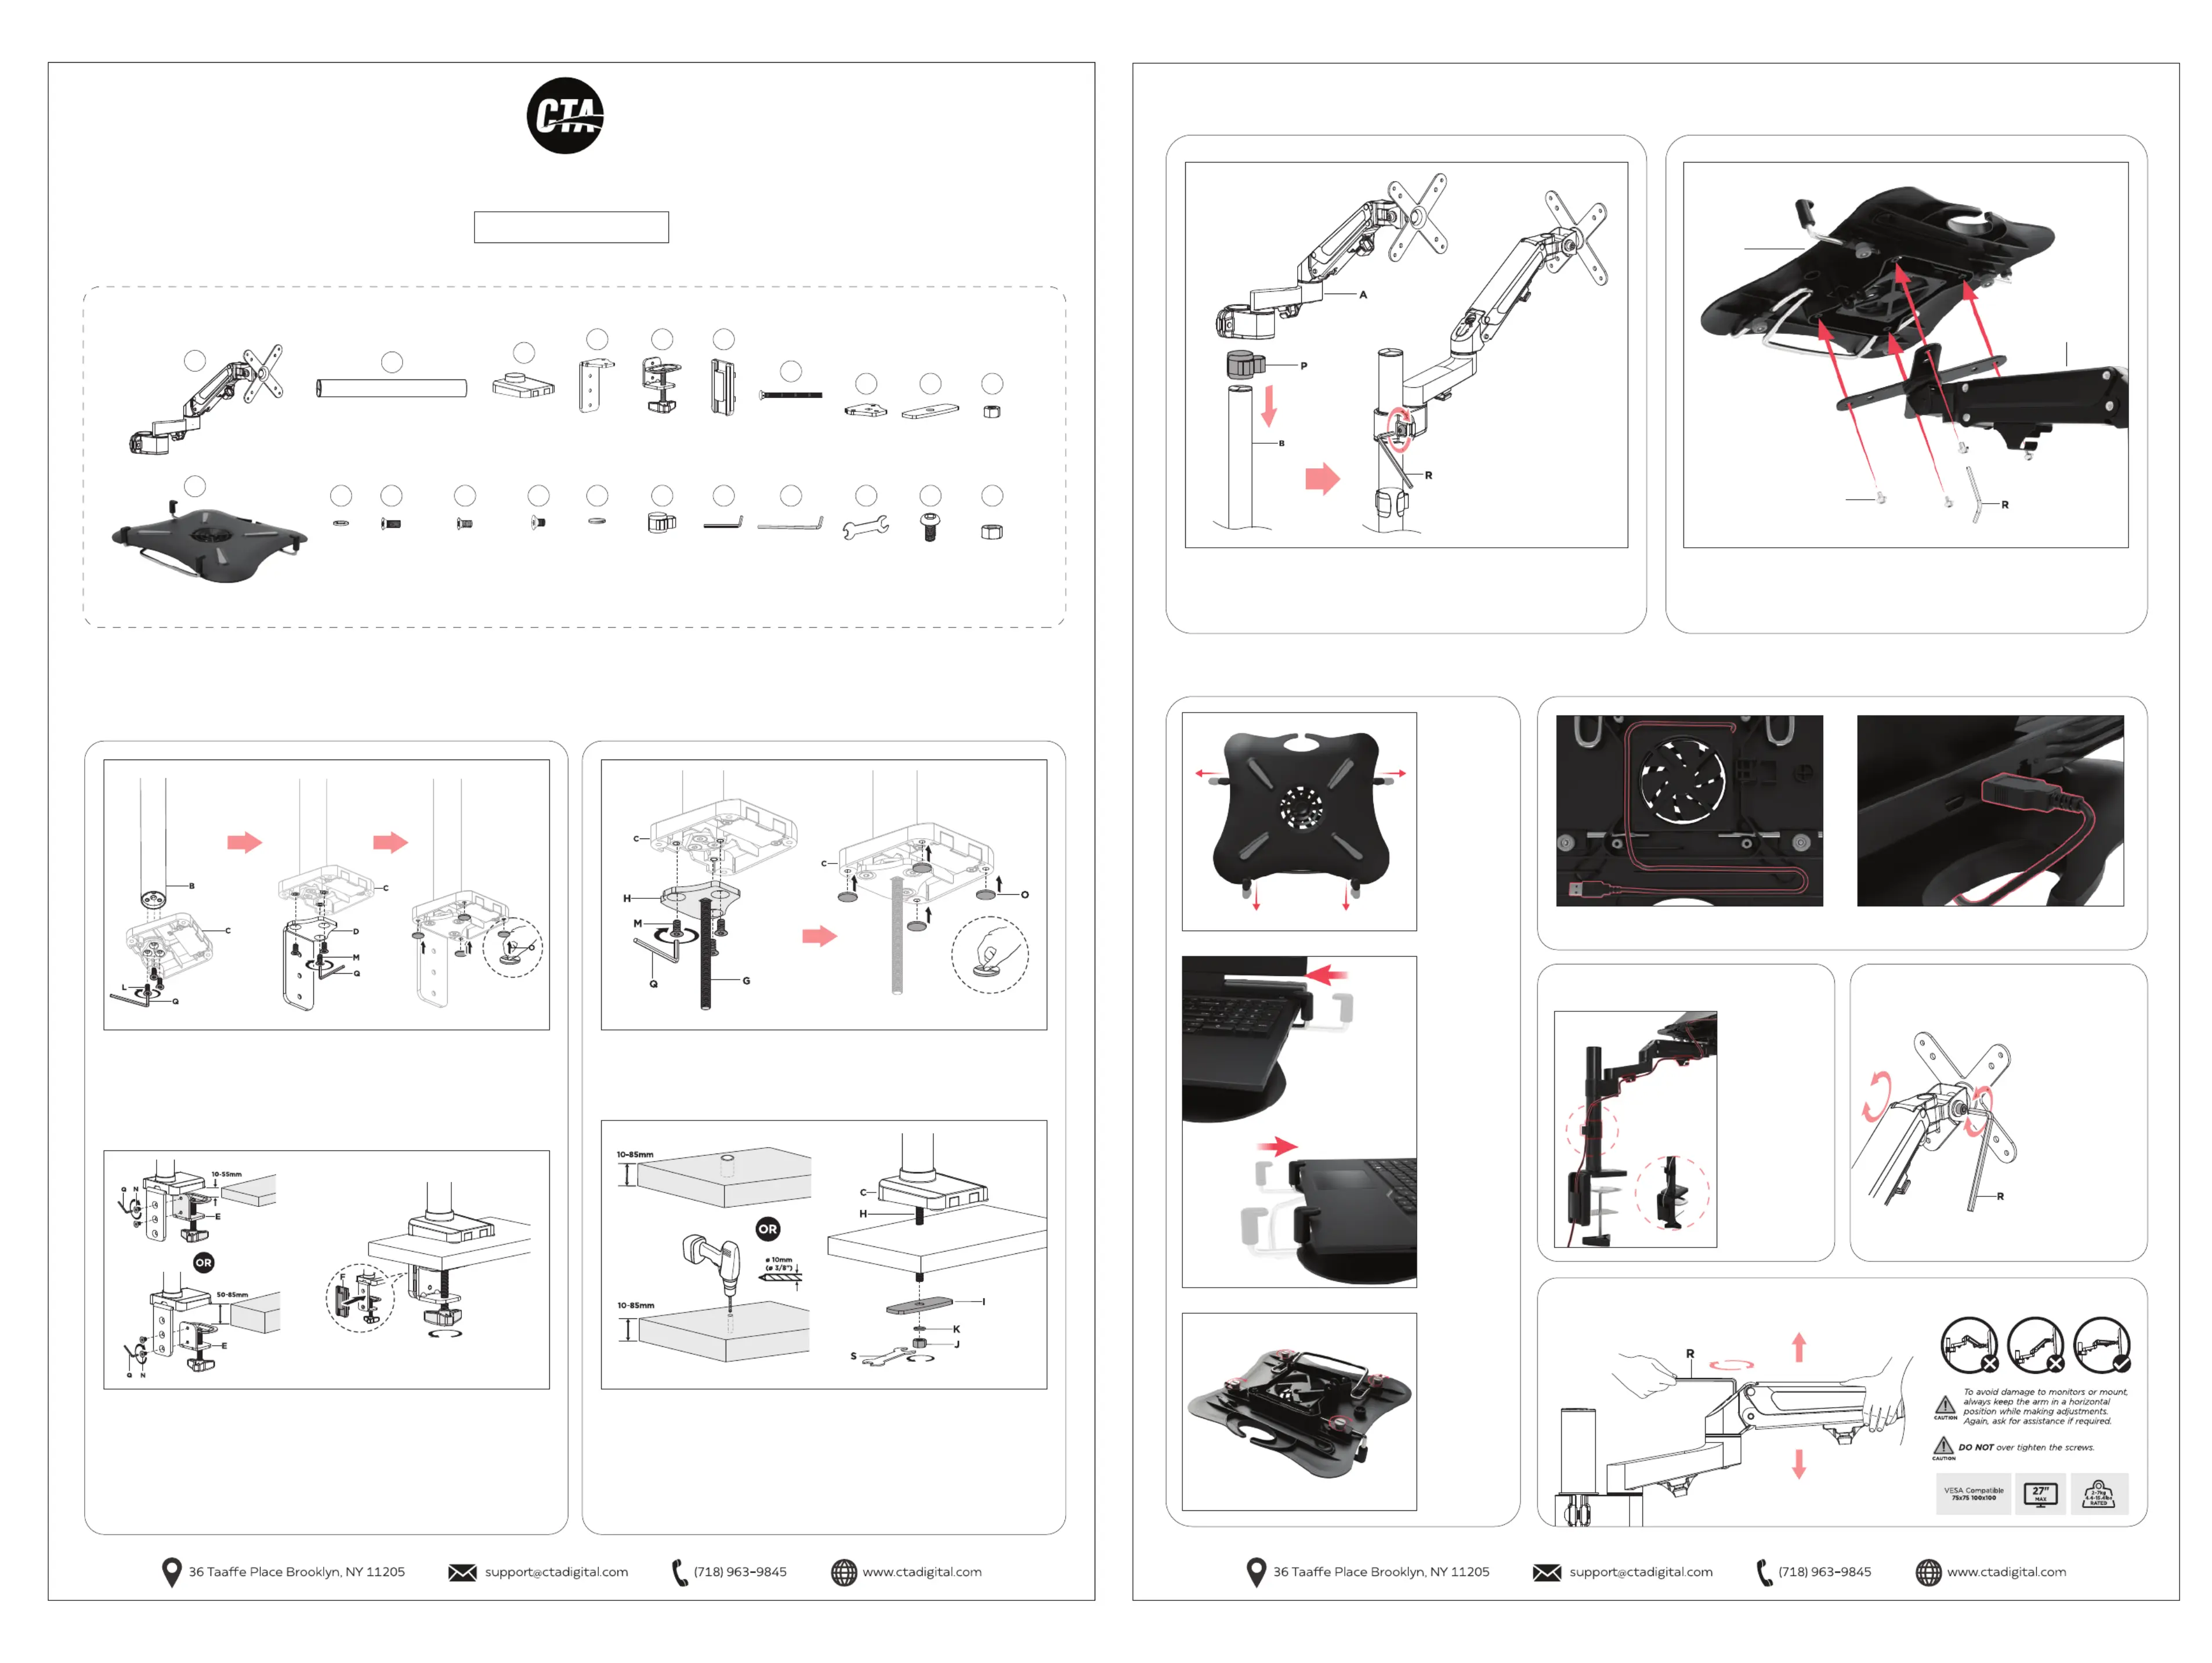
1A. Option 1. Clamp Mount Installation1B. Option 2. Grommet Mount Installation
2. Mounting Arm to Pole3. Mounting Laptop Holder to VESA Plate
Adjusting Arm
INSTALLATION:
5A. Find the integral USB cable below.5B. Plug into your laptop for power.
4A. Extend
the holder
brackets.
5. Powering Up Cooling Fan4. How to Setup your Holder
4C. Once
laptop is
securely in
place,
tighten four
knobs as
shown until
securily
fastened.
Cable RoutingAdjusting Tilt
4B. Adjust
the holder
to your
laptop by
sliding the
brackets
towards it.
**Laptop only
shown for
illustration
purposes, not
included.
T
B
x1
x1
K
x1
L
x3
M6x16
M
x3
M6x12
N
x2
M6x10
O
x4
P
x1
Q
x1
4mm
R
x1
5mm
S
x1
U
x4
V
x4
C
DEF
G
HIJ
x1
x1x1x1
x1
x1x1x1
A
x1
CONTENTS:
Articulating Desk Mount Clamp for Laptops with Built-In Cooling Fan
LT-DMCGCF
INSTALLATION - MANUAL
1AA. Rotate in the (3) screws (L) through the base (C) and pole (B)
using the allen key tool (Q). Then, rotate in the (3) screws (M)
through the component (D) and base (C). At last, adhere the (4)
rubber pads (O) to the base (C) as shown by removing the covers.
1AB. If clamping to a 10-55mm surface, rotate in the (2) screws (N)
in the top holes of component (D) using the allen key tool (Q). If
clamping to a 50-85mm surface, rotate in the (2) screws (N) in the
bottom holes of component (D) using the allen key tool (Q). At last,
attach the tool holder (F) to component (E) from the back to cover
the holes as shown above.
1BA. Rotate in the (3) screws (M) through the grommet component
(H) and base (C) using the allen key tool (Q). Then, adhere the (4)
rubber pads (O) to the base (C) as shown by removing the covers.
3A. Insert component (P) and (A) through the pole (B). Once in the
desired position, rotate the hex screw on component (A) base using
the included allen key tool (R) until securely tightened.
1BB. Use a pre-dilled surface or drill a hole on the surface as shown
above. Insert the grommet component (H) inside the hole. Then,
insert through the rod the component (I), then the washer (K) and at
last the hex nut (J), and use the included wrench (S) to securely
tighten the assembly to the desired surface.
3B. Install the laptop holder (T) to VESA plate (A) by aligning the
holes and rotating in the provided screws (U) using the included
allen key tool (H) as shown above.
U
T
A
Using the
provided
clips, route
the wire from
your device
to the power
source as
illustrated to
the left.
Adjust to the
desired angle,
then tighten the
screws using
the allen key
(R) as shown,
alternating from
each screw as
you tighten
them.
Produktspecifikationer
| Varumärke: | CTA Digital |
| Kategori: | datatillbehör |
| Modell: | LT-DMCGCF |
| Produkttyp: | Arm till bärbara datorer |
| Vikt: | 3084.43 g |
| Bredd: | 256.54 mm |
| Djup: | 299.72 mm |
| Höjd: | 419.1 mm |
| Justerbar: | Ja |
| Förbättrad kabelhantering: | Nej |
| Maxvikt: | 6.8 kg |
| Produktens färg: | Svart |
| VESA-fäste: | Ja |
| USB-ström: | Ja |
| Gränsssnitt för panelmontering: | 75 x 75, 100 x 100 mm |
| Höjdjustering: | Ja |
| Antal stödda enheter: | 1 |
| Höjdjusteringsintervall: | 335.28 - 495.3 mm |
| Antiglidyta: | Ja |
| Minsta kompatibla skärmstorlek för bärbar dator: | 7 " |
| Största kompatibla skärmstorlek för bärbar dator: | 15 " |
| Antalet inbyggda fläktar: | 1 styck |
Behöver du hjälp?
Om du behöver hjälp med CTA Digital LT-DMCGCF ställ en fråga nedan och andra användare kommer att svara dig
datatillbehör CTA Digital Manualer

27 Mars 2026
26 Mars 2026
26 Mars 2026
datatillbehör Manualer
Nyaste datatillbehör Manualer
13 Mars 2026
10 Mars 2026
8 Mars 2026
6 Mars 2026
5 Mars 2026
14 Februari 2026
10 Februari 2026
30 Januari 2026
26 Januari 2026
25 Januari 2026