Dragonshock PopTop Bruksanvisning
Dragonshock Kontroller PopTop
Läs gratis den bruksanvisning för Dragonshock PopTop (1 sidor) i kategorin Kontroller. Guiden har ansetts hjälpsam av 9 personer och har ett genomsnittsbetyg på 4.2 stjärnor baserat på 4 recensioner. Har du en fråga om Dragonshock PopTop eller vill du ställa frågor till andra användare av produkten? Ställ en fråga
Sida 1/1
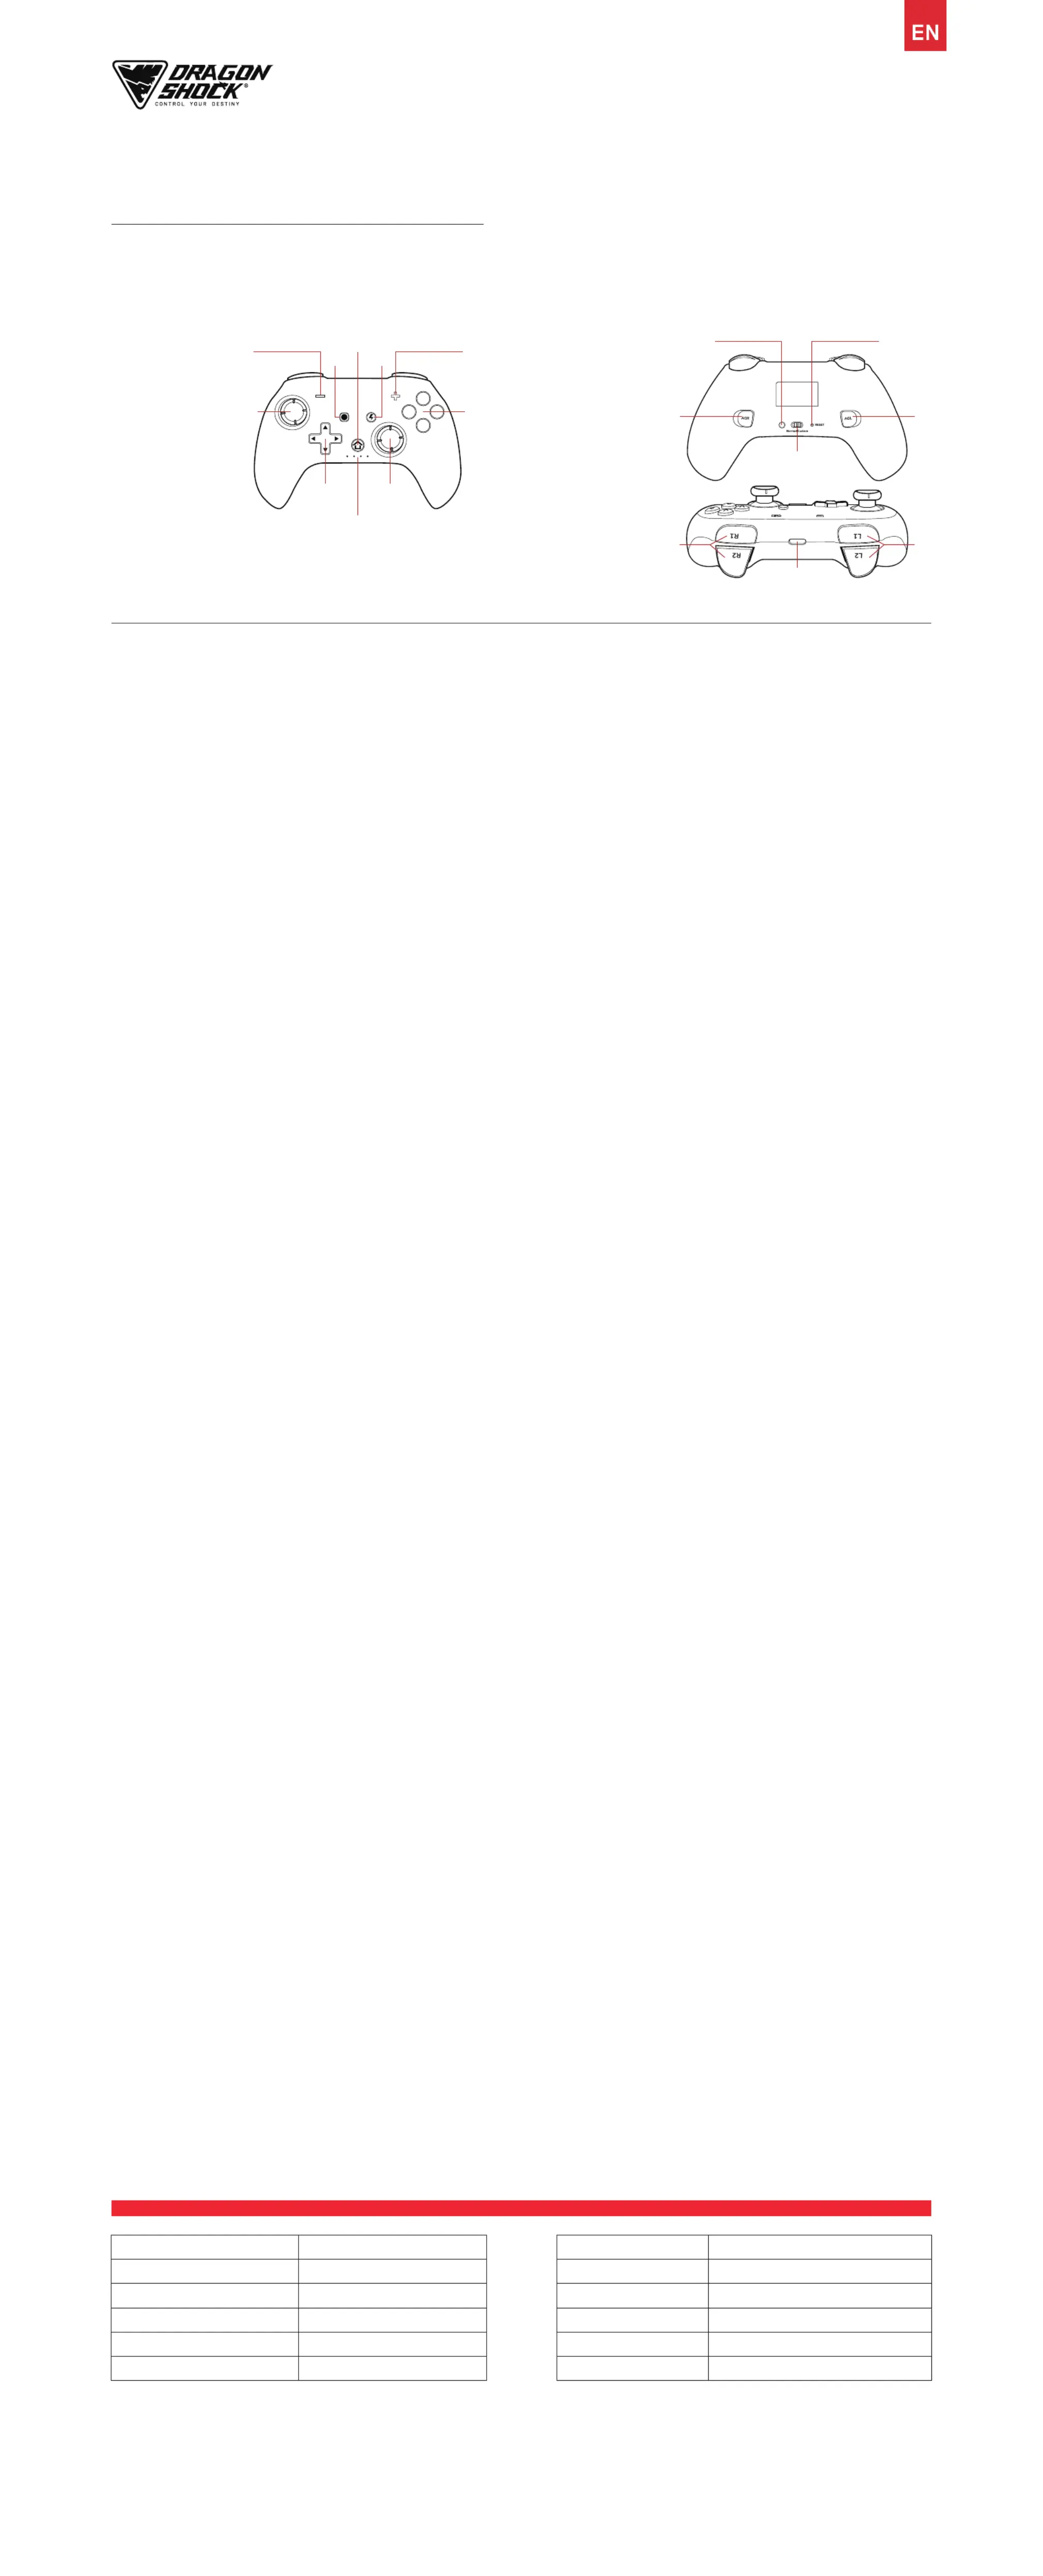
LEDS- 4 LED that represent the players
COMPACT WIRELESS CONTROLLER
USER MANUAL
BUTTONS
01. - (SELECT)
02. CAP
03. HOME
04. TURBO
05. + (START)
06. ABXY
07. R3
08. 4 X LED INDICATORS
09. D-PAD
10. L3
11. Pairing button
12. Reset button
13. AGL
14. Programming button
15. AGR
16. R1 / R2
17. Type-C charging port
18. L1 / L2
CHARGING PORT- TYPE-C port
For Switch™
The Bluetooth function of the controller needs to be paired when connecting to the Switch Console or mobile phone for the first time.
To Pair with Switch console:While controller is off, press and hold the 'PAIRING' button. When LED starts to flash, it has entered the pairing mode. Follow on the screen directions
to pair with Switch console. If the controller is not connected to any console within 2 minutes, it will automatically turn off.
Reconnecting - If the controller has been paired with the Switch console or with a mobile phone, you won't need to re-pair it. It will automatically reconnect.
For PC / Mobile
*Only compatible with the devices with BT function.
Wireless BT / D-INPUT
1. While controller is off, press the 'PAIRING' button, release the button when 4 LEDs flash, now the controller is in pairing mode.
2. Select "Pro Controller" on the list of your Bluetooth device.
3. Once connected, the 4 LEDs stop flashing and the LED1 lights up.
Wireless BT / X-input
1. Turn off the controller, press and hold the ‘X + HOME’ buttons together for 3-5 seconds. the LED1 + LED4 indicators flash.
2. Look for "Xbox Wireless Controller" in the list of Bluetooth devices on your device, select it to pair.
3. Once successfully connected, LED1 + LED4 will stop flashing and stay on.
For PC
Wired
1. Turn off the controller, connect it with your PC via the USB cable provided.
2. Once connected, the default mode is X-input, LED1 & LED4 light up.
Switching to D-input mode
1. Press and hold - (Select) and + (Start) buttons for 3-5 seconds
2. LED2 & LED3 light up, now the controller is on D-input mode.
X-INPUT: Showing Xbox 360 Controller for Windows
D-INPUT: Showing Poptop Controller
PAIRING UP
Press Turbo and the START (+) button to improve the intensity of the motor vibration. Press the Turbo and the SELECT (-) button to save the motor vibration intensity. There are
4 levels of vibration intensity.
MOTORS- Left and right motors
Press the HOME button to turn on the controller and wake up Switch console as long as the console is not in airplane mode. Controller will auto shut off if its not connected to
any console within 10 seconds.
Automatic sleeping mode- When the console screen is off and there is no action on the controller, the controller will go into auto sleep mode within 5 minutes.
OPERATING MODES
Charging - When the controller is charging, the LED 1-4 will flash slowly. When the controller is fully charged, the LED will stay on. The controller can also charge when it is
connected to the computer or console.
When the controller's battery is low, the charging LED indicator will flash quickly as an alert.
- The indicator will turn off when the battery is fully charged.
POWER
TURBO
Support buttons- ABXY L1 / R1, L2 / R2, cross keys. The turbo function will clear every time when controller is off.
Set up- Press and hold the button that wishes to be turbo. Then press the Turbo button 1 time to set as turbo. Press turbo button again to set it as full auto. Press the button 3
times to clear the button of turbo.
Speed adjustment- Press and hold the Turbo button. Push up the right stick for the maximum speed (+). Push down the right stick for the minimum speed (-). This will change
the speed interval of the turbo button.
Support buttons- ABXY L1 / R1, L2 / R2, direction pad. One programming key supports up to 12 buttons. When there are more than 12 keys, the controller automatically records
the first 12 buttons and exits the Macro recording.
Quitting the Macro programming function without saving- To quit the macro programming, Switch the Switch on the back of the controller to normal. This also applies to
deactivate the AGL / AGR buttons.
Programming the macro - First Switch the back of the switch to "custom”. Press and hold AGL / AGR, then press the start (+) button. The LED will turn on, as well as the start
recording button (Supports recording key time). Press the desired combination or remap buttons as needed.
In Macro recording - if only one key is recorded, the function of the programming key will be the same as the key. Pressing the programming key is equivalent to pressing the
key and releasing the programming key is equivalent to releasing the key.
MACRO PROGRAMMING
SPECIFICATIONS
Type-C Charging cable
Wireless Connection
Battery type
Battery capacity
Charging hour
Frequency band
2.0m
Bluetooth 2.1+EDR
Li-ion
550mah
2.5h
2402-2480MHz(1MHz)
Input power rating
Mass
Maximum radio-frequency
Operating temperature
Play hour
Radio frequency
DC5V/ 1A
Approx. 165g
0dbm
-10--- 60℃℃
8h (this test base on non Rumble, the
channel light Strip light up)
ISM 2.4G
*Design and specifications are subject to change without notice.
DSCNSW V.009
Press and hold the HOME button for 3-5 seconds.
TURN OFF THE CONTROLLER
If you experience the controller dysfunctional, please reset the controller.
Please use a pin, press and hold on the small hole on the back of the controller for 3-5 seconds.
Note: The controller must be powered on to reset.
RESET
X
B
YA
9
10
5
6
1
24
7
3
8
12
13
15
11
14
18
17
16
Produktspecifikationer
| Varumärke: | Dragonshock |
| Kategori: | Kontroller |
| Modell: | PopTop |
Behöver du hjälp?
Om du behöver hjälp med Dragonshock PopTop ställ en fråga nedan och andra användare kommer att svara dig
Kontroller Dragonshock Manualer

19 Februari 2026
20 September 2024
Kontroller Manualer
Nyaste Kontroller Manualer
2 April 2026
1 April 2026
28 Mars 2026
15 Mars 2026
14 Mars 2026
1 Mars 2026
6 Februari 2026
30 Januari 2026