Ferroli Oscar W Bruksanvisning
Ferroli Inte kategoriserad Oscar W
Läs gratis den bruksanvisning för Ferroli Oscar W (2 sidor) i kategorin Inte kategoriserad. Guiden har ansetts hjälpsam av 37 personer och har ett genomsnittsbetyg på 4.1 stjärnor baserat på 2 recensioner. Har du en fråga om Ferroli Oscar W eller vill du ställa frågor till andra användare av produkten? Ställ en fråga
Sida 1/2
EN
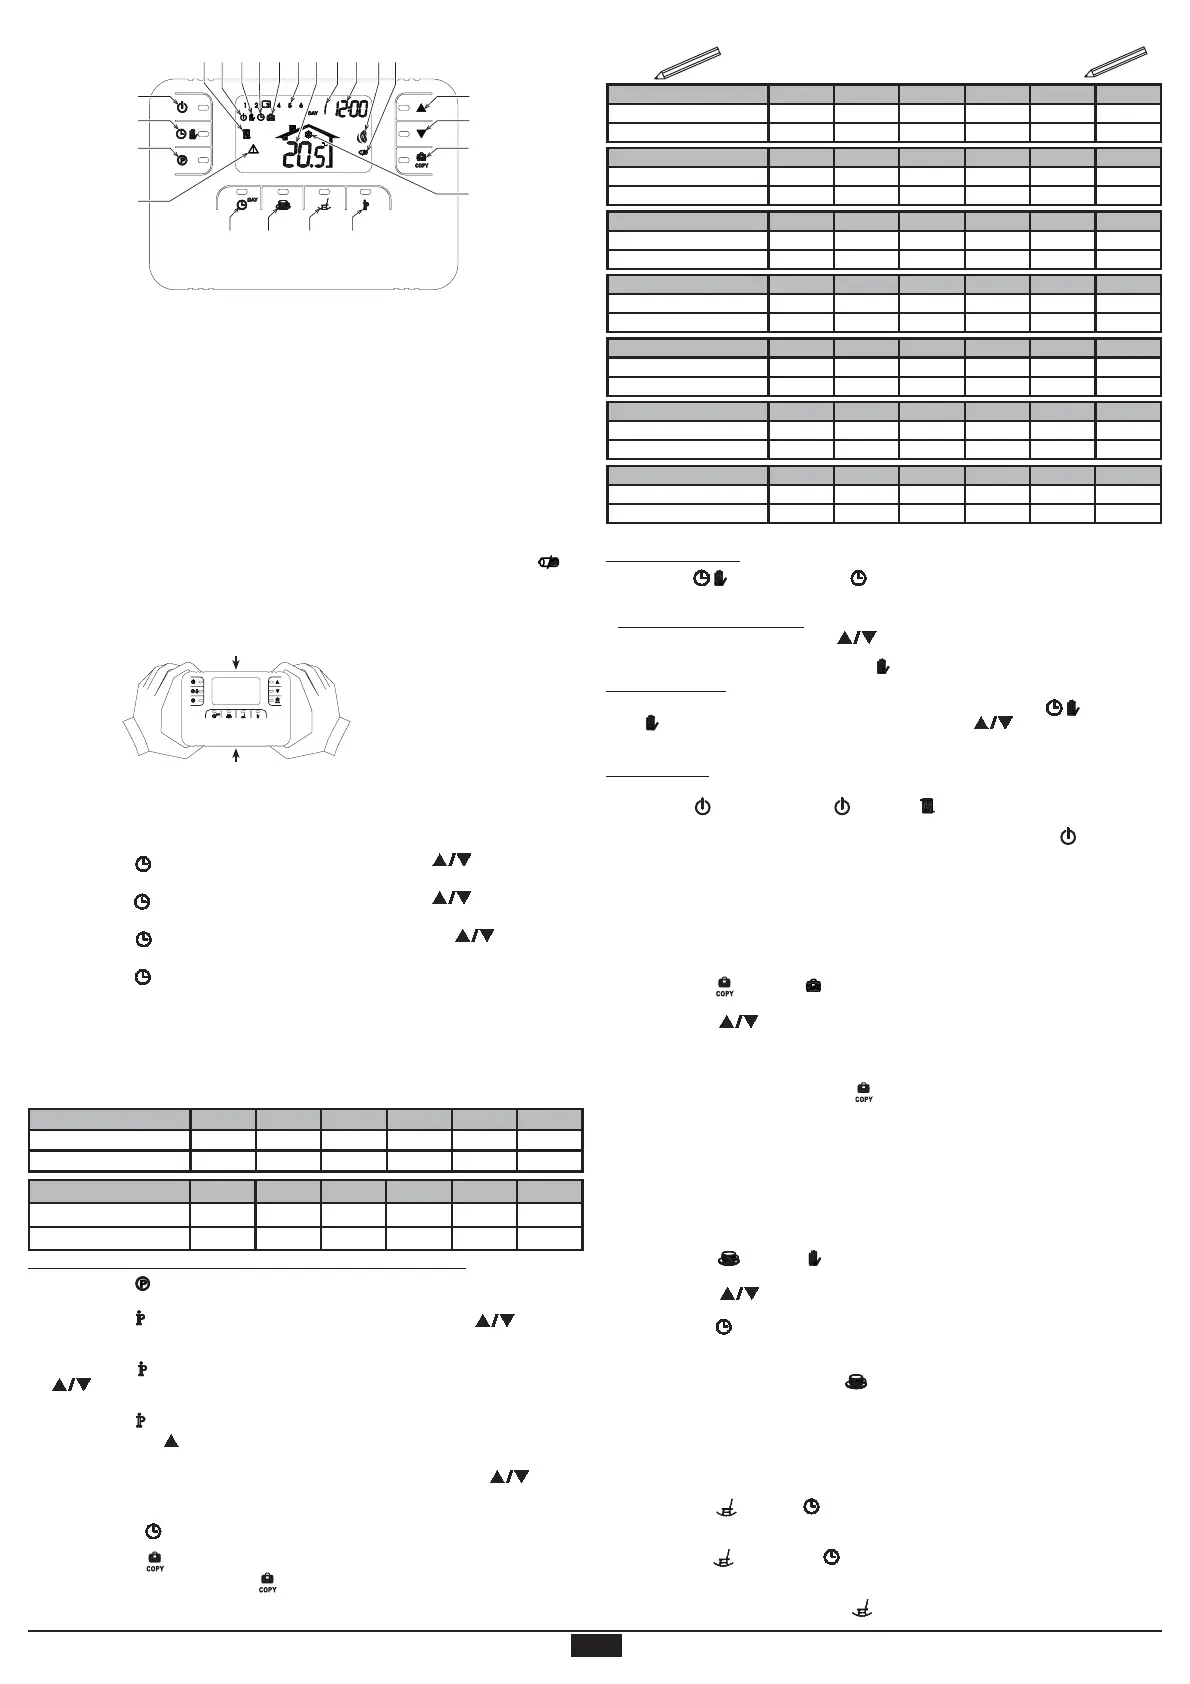
CHRONOTHERMOSTAT (PROGRAMMABLE THERMOSTAT) OVERVIEW
1
2
3
10
9
8
4567
1415161711201213181921
22
23
CHRONOTHERMOSTAT CONFIGURATION AND ACTIVATION IN 4 EASY STEPS
Step 1. Installing the batteries
Note: Follow the instructions in this section only if the Chronothermostat display activates the symbol or if
the display is off (symbols or numbers do not appear). Otherwise go straight to Step 2 : Correct setting of time
and day.
To install the batteries:
1. With the Chronothermostat fixed to the wall: to access the batteries remove the front by prising with a screwdriver
at points A and B, as shown in the fi gure.
2. Insert the two AA LR6 type 1.5 V alkaline batteries supplied with the Chronothermostat, making sure to fi t them
in the right direction (as shown on the inside of the front).
3. Refit the front part of the Chronothermostat. (Make sure to centre the front on the rear part to ensure correct
insertion of the contacts)
Step 2. Correct setting of time and day
1. Press the button
DAY
. The day indication starts flashing: press the buttons to set the correct day,
considering that DAY 1 is Monday and DAY 7 is Sunday.
2. Press the button
DAY
. The hour indication starts fl ashing: press the buttons to set the correct hour
from 00 to 23.
3. Press the button
DAY
. The minutes indication starts flashing: press the buttons to set the correct
minutes from 00 to 59.
4. Press the button
DAY
.
Step 3. Setting the weekly automatic programme
After setting the time and day, the chronothermostat will carry out the preset automatic programme.
The heating programme provides for 6 daily temperature time bands, numbered 1 to 6. The bands can be set between
00:00h and 24:00h, adjusting them by increments of 10 minutes. Each temperature level can be set between 7°C
and 32.5°C, adjusting it by increments of 0.1°C. Any combination of time and temperature during the day can be
programmed, and each day of the week can be different from the others.
The preset automatic programme is as follows:
Carry out the following instructions to modify the preset automatic programme.
1. Press the button . The 6 daily time bands fl ash and the number 1 of DAY 1 in a box indicates that the time
band 1 of Monday can be modifi ed.
2. Press the button
. The hour and minutes indication starts fl ashing: press the buttons to modify the
time band start hour by increments of 10 minutes. Keep the button pressed and the hours and minutes will
change quickly.
3. Press the button
. The indication of room temperature inside the home starts fl ashing: press the buttons
to modify the temperature level by increments of 0.1°C. Keep the button pressed and the temperature
will change quickly.
4. Press the button
. The 6 daily time bands fl ash.
5. Then press the button
to display time band 2 of Monday, which can be modified by repeating points 2 to
4.
6. The other time bands can be displayed by selecting bands 3, 4, 5 or 6 with the buttons , repeating
point 5.
7. The programme setting for the next day can now be selected:
a. Press the button
DAY
to display DAY 2. The programme for Tuesday can be modified by repeating points
2 to 6.
b. Press the button
to copy Monday's programme in Tuesday. To copy the same programme even on the
next days of the week, press the button
repeatedly.
A
B
Important! Set the programme, making sure that each band has a different start time.
Step 4. Operation mode selection
Heating automatic mode
Press the button , displaying the symbol . The chronothermostat will work according to the weekly
automatic programme, displaying the 6 time bands: the one in a box will be active at that moment. If the display
does not show the box, it means that the current time is between 00:00h and the start of time band 1.
Exclusion of set temperature level
During automatic mode, press the
buttons
to temporarily change the room temperature value by
increments of 0.1°C. Keep the button pressed and the temperature will change quickly. The exclusion function,
indicated on the display by flashing of the symbol
, will be cancelled at the fi rst change of time band.
Heating manual mode
To use the chronothermostat with a fixed room temperature level press the button , displaying the
symbol
(the 6 time bands are not displayed). Then press the
buttons
to set the room temperature
value, by increments of 0.1°C. Keep the button pressed and the temperature will change quickly. Manual
mode will be maintained until another operation mode is selected.
Turning off heating
In case of a prolonged absence from the home (also see Vacation Function) or simply to turn the heating off,
press the button , displaying the symbol (the symbol is not displayed). Heating is turned off, and
activated only if the room temperature falls below 5°C: function for protection against freezing in the home.
To reactivate heating and return to the previously set operation mode, press the button
again.
SPECIAL FUNCTIONS
Vacation Function
This function turns the heating off for a fi xed period of time, from 1 hour to 45 days, adjusting it by increments of
1 hour. This offers savings in energy and related costs when away from home, whereas the previously set operation
mode resumes when the Vacation function ends. Heating is activated only if the room temperature falls below 5°C:
function for protection against freezing in the home.
Carry out the following instructions to activate and set the Vacation function.
1. Press the button. The symbol starts fl ashing and the hour and minutes indication becomes –00:01,
which is the time remaining until the end of the Vacation function.
2. Press the buttons
to prolong the time remaining until the end of the Vacation function, by increments
of 1 hour (-00:01 means 1 hour; -45:00 means 45 days). Keep the button pressed and the time and days will
change quickly.
3. During the Vacation function, the display will continue to indicate the time remaining until the function ends.
To cancel the Vacation function, press the button
or any other button associated with a different operation
mode.
Party Function
This function adjusts the heating to a room temperature level, which can be set between 7°C and 32.5°C, adjusting
it by increments of 0.1°C, for a fixed time period of 1 hour to 24 hours, adjusted by increments of 1 hour. This is
useful especially for maintaining or increasing the temperature during a special occasion, such as a party or when
there are guests. The function can also be used to lower the temperature when away from the home for a short time
(e.g. for shopping, visiting friends, etc.), saving energy and money; the previously set operation mode resumes
when the Party function ends.
Carry out the following instructions to activate and set the Party function.
1. Press the button
. The symbolstartsflashing and the hour and minutes indication becomes –01:00,
which is the time remaining until the Party function ends.
Press the buttons
to modify the temperature level by increments of 0.1°C. Keep the
button pressed and the temperature will change quickly.
3. Press the button
DAY
to prolong the time remaining until the end of the Party function by increments of 1
hour (-01:00 means 1 hour; -24:00 means 24 hours).
4. During the Party function, the display will continue to indicate the time remaining until the functions ends.
To cancel the Party function, press the button
or any other button associated with a different operation
mode.
Holiday Function
This function temporarily carries out the Sunday heating automatic programme, for the current day or the next day.
It is useful when there is a holiday during the week or when staying home on a work day in case of sickness, etc.;
the previously set operation mode resumes when the Holiday function ends.
Carry out the following instructions to activate and set the Holiday function.
1. Press the button
. The symbol startsfl ashing together with the current day of the week and the DAY
symbol, indicating that heating will be controlled according to the Sunday heating automatic programme until
23:59 on the current day.
2. Press the button
again. The symbol flashes together with the next day of the week and the DAY symbol,
indicating that heating will be controlled according to the Sunday heating automatic programme from 00:00h
until 23:59h on the next day.
To cancel the Holiday function, press the button
or any other button associated with a different operation
mode.
1Heating On/Off button
2Heating automatic/manual mode button
3Heating programming button
4Time and day setting button
5Party function button
6Holiday function button
7Information/user settings button
8Vacation function/copy heating programme day
button
9Manual room temperature decrease button
10Manual room temperature increase button
11Heating programme time bands
12Day of the week indication
13Hours and minutes indication
14Heating turning off indication
15Heating manual mode indication
16Heating automatic mode indication
17Vacation function indication
18Boiler lighting request indication
19Batteries low indication
20Room temperature indication
21Heating mode indication
22Room antifreeze operation indication
23 Fault indication
From Monday to FridayBand 1Band 2Band 3Band 4Band 5Band 6
Start time06:3008:0012:0014:0018:0022:30
Temperature level21°C18°C21°C18°C21°C16°C
From Saturday to SundayBand 1Band 2Band 3Band 4Band 5Band 6
Start time08:0010:0012:0014:0018:0022:30
Temperature level21°C21°C21°C21°C21°C16°C
Personal programme note
MondayBand 1Band 2Band 3Band 4Band 5Band 6
Start time
Temperature level
TuesdayBand 1Band 2Band 3Band 4Band 5Band 6
Start time
Temperature level
WednesdayBand 1Band 2Band 3Band 4Band 5Band 6
Start time
Temperature level
ThursdayBand 1Band 2Band 3Band 4Band 5Band 6
Start time
Temperature level
FridayBand 1Band 2Band 3Band 4Band 5Band 6
Start time
Temperature level
SaturdayBand 1Band 2Band 3Band 4Band 5Band 6
Start time
Temperature level
SundayBand 1Band 2Band 3Band 4Band 5Band 6
Start time
Temperature level
If the batteries are not com-
pletelyflat, the chronother-
mostat will activate all the
symbols of the display.
Produktspecifikationer
| Varumärke: | Ferroli |
| Kategori: | Inte kategoriserad |
| Modell: | Oscar W |
| Färg på produkten: | Zwart, zilver |
| Snäll: | AV-zender & ontvanger |
| Nuvarande: | 0.4 A |
| Maximal upplösning: | - Pixels |
| Anslutning för nätadapter: | Ja |
| Ljud (L,R) ut: | 1 |
| Extern anpassning: | Ja |
| Mått (B x D x H): | 90 x 74 x 20 mm |
| Driftspänning: | 4.5 V |
| Maximal-räckvidd: | 100 m |
| Drifttemperatur (TT): | 10 - 50 °C |
Behöver du hjälp?
Om du behöver hjälp med Ferroli Oscar W ställ en fråga nedan och andra användare kommer att svara dig
Inte kategoriserad Ferroli Manualer

25 Januari 2025
20 September 2024
13 September 2024
30 Augusti 2024
20 Augusti 2024
18 Augusti 2024
17 Augusti 2024
16 Augusti 2024
13 Augusti 2024
12 Augusti 2024
Inte kategoriserad Manualer
Nyaste Inte kategoriserad Manualer
9 April 2025
9 April 2025
9 April 2025
9 April 2025
9 April 2025
9 April 2025
9 April 2025
9 April 2025
9 April 2025
9 April 2025