Forte Lighting 6029-03-55 Bruksanvisning
Forte Lighting Lättnad 6029-03-55
Läs gratis den bruksanvisning för Forte Lighting 6029-03-55 (1 sidor) i kategorin Lättnad. Guiden har ansetts hjälpsam av 17 personer och har ett genomsnittsbetyg på 4.4 stjärnor baserat på 7 recensioner. Har du en fråga om Forte Lighting 6029-03-55 eller vill du ställa frågor till andra användare av produkten? Ställ en fråga
Sida 1/1
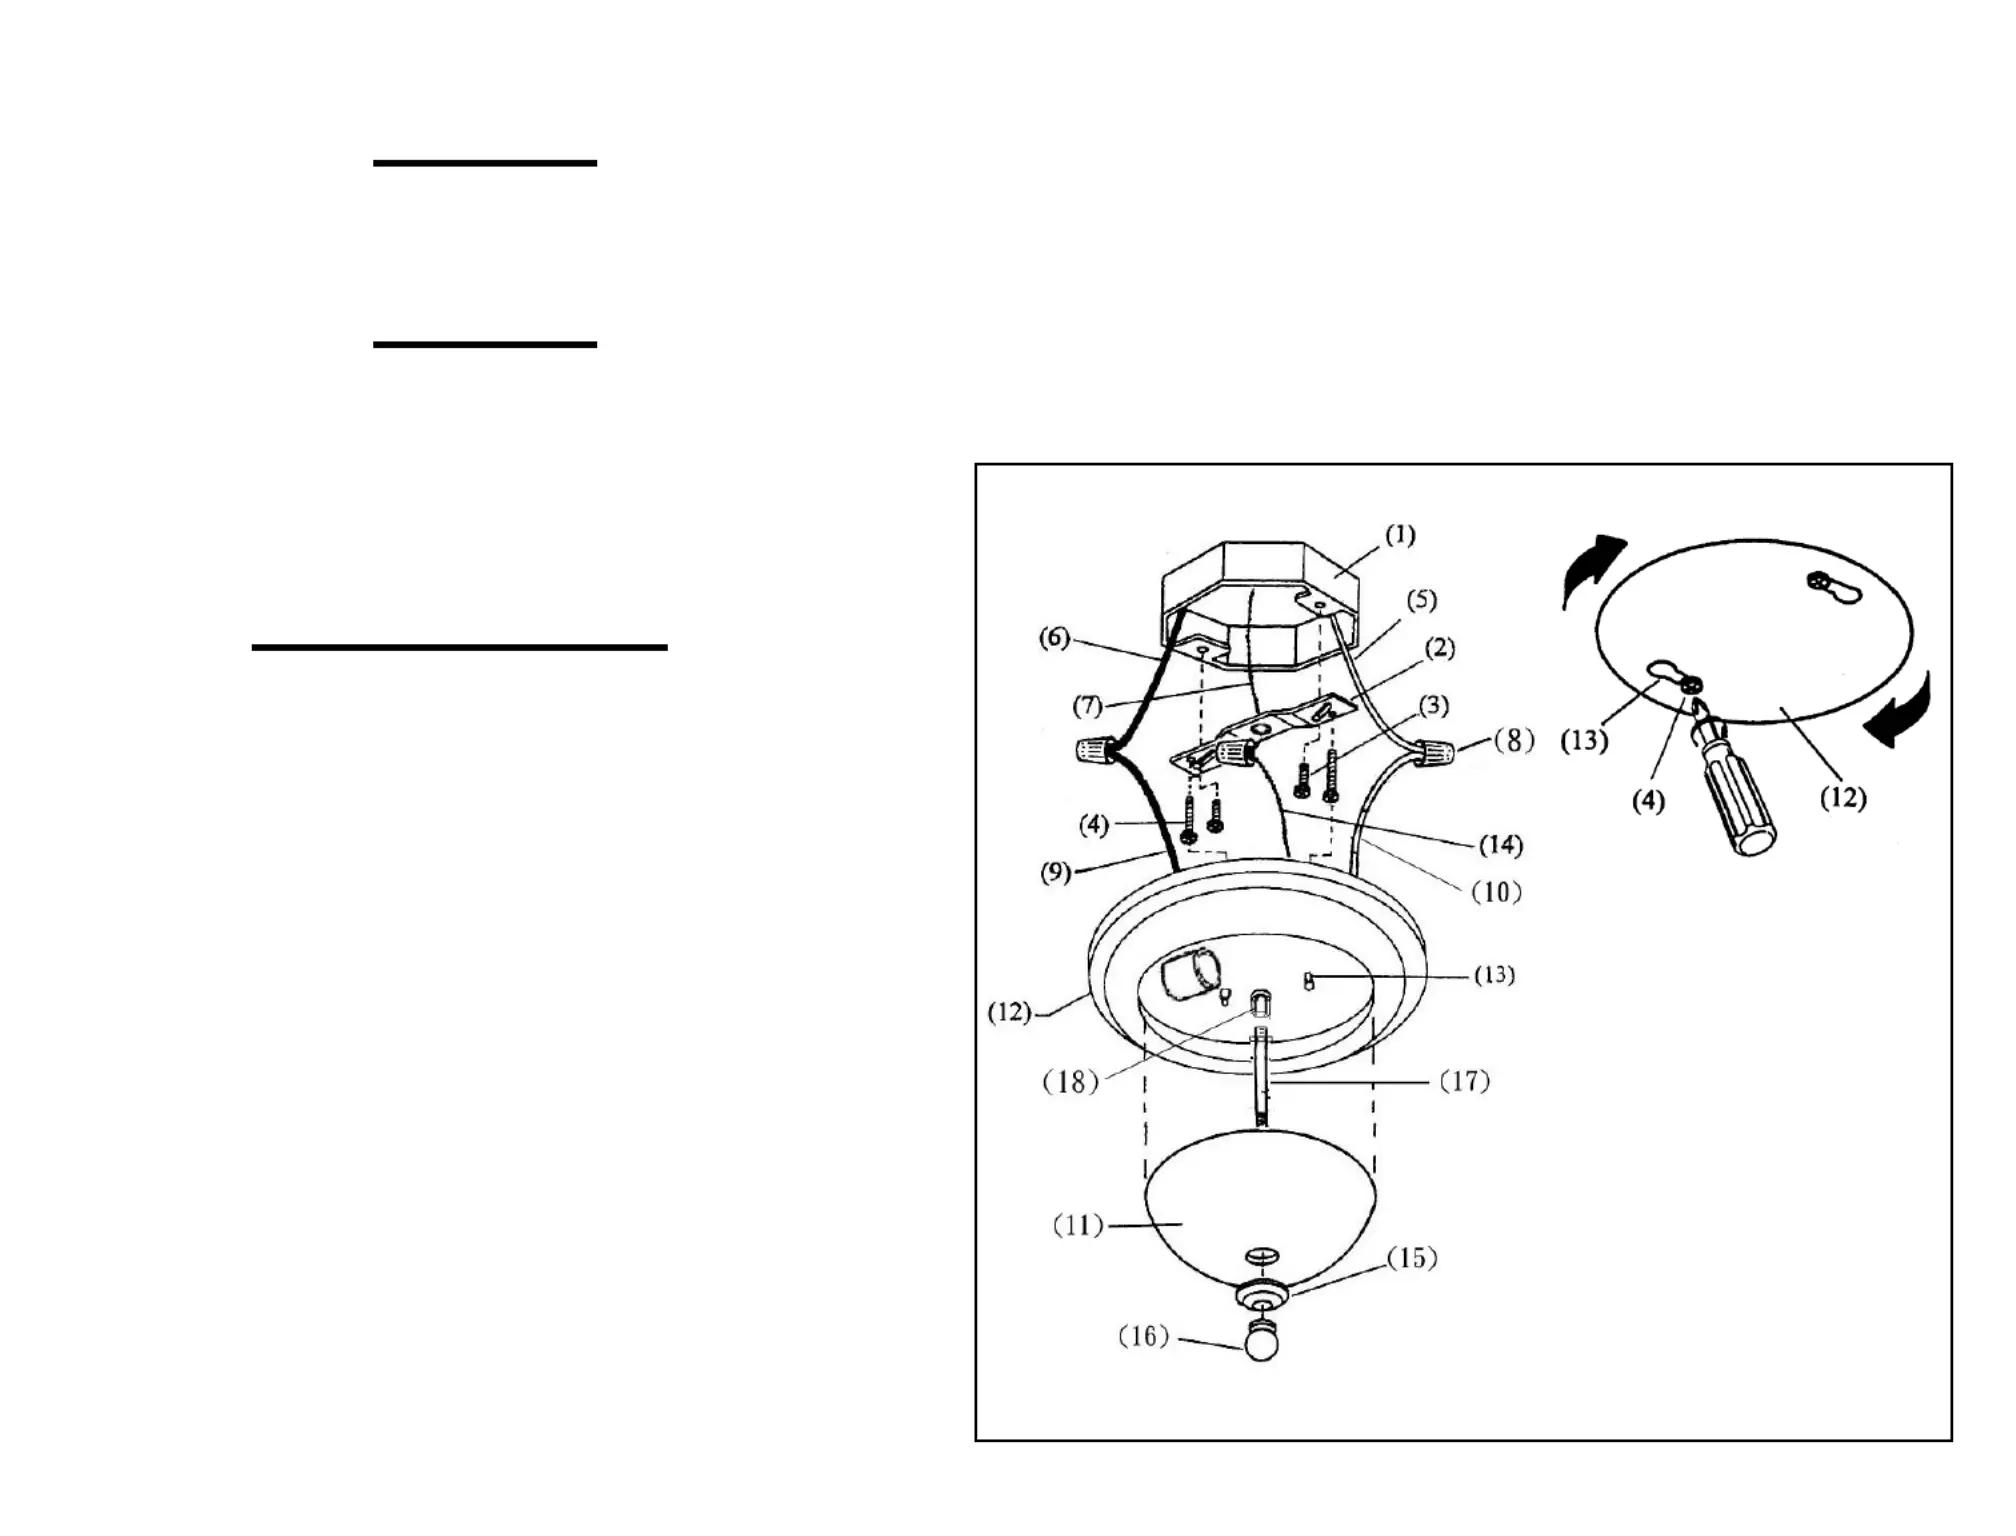
Fig. 1
ASSEMBLY AND INSTALLATION
1.PulltheSUPPLYWIRES(5&6)andtheHOUSEGROUNDWIRE(7)outfrom
theOUTLETBOX(1)(noinclude)andattachtheMOUNTINGBRACKET(2)to
theOUTLETBOX(1)(noinclude)usingtheslottedholestheMOUNTINGon
BRACKET(2)andtheMOUNTINGSCREWS(3)provided.
2.ThreadtheFIXTURESCREWS(4)twofullturnsintotheappropriatethreaded
holestheMOUNTINGBRACKET(2).(ChecktheMOUNTINGBRACKETin
(2)againstthextureKEYHOLESLOTS()ensurepropert.)13to
3.AttachthepowersupplywiresthextureleadwiresconnectingtheBLACKtoby
FIXTUREWIRE(9)theBLACKSUPPLYWIRE(6andtheWHITEto),
FIXTUREWIRE()theWHITESUPPLYWIRE(5)usingWIRE10to
CONNECTOR(8).ConnecttheremainingFIXTUREGROUNDWIRE()14to
theSUPPLYGROUNDWIRE(7)usingaWIRECONNECTOR(8).Place
wiringandconnectionsinsidetheOUTLETBOX(1)(noinclude)
4.CarefullytuckallwiringbackintotheOUTLETBOX(1)(noinclude).Locatethe
FIXTUREPAN()overtheOUTLETBOX(1)(noinclude),positioningthe12
FIXTURESCREW(4)headsthroughthelargeopeningstheKEYHOLEof
SLOTS().RotatetheFIXTUREPAN()seatthescrews,andtighten1312to
securely.(see.2)Fig
ASSEMBLY AND INSTALLATION (Continued)
5.Installthebulbs.(Seemarkingsand/orlabelsthextureformaximumwattages-on
DONOTOVER-LAMP.)
6.ScrewtheTHREADEDPIPE()ontocenterCOUPLING()theFIXTURE1718of
PAN().InstalltheGLASSSHADE()andCAP()ontotheTHREADED121115
PIPE()andsecureusingtheFINIAL().(See.1)17KNOB16Fig
INSTALLATION IS NOW COMPLETED
1. OUTLET BOX
2. MOUNTING BRACKET
3. MOUNTING SCREW
4. FIXTURE SCREW
5. WHITE SUPPLY WIRE
6. BLACK SUPPLY WIRE
7. HOUSE GROUND WIRE
8. WIRE CONNECTOR
9. BLACK FIXTURE WIRE
10. WHITE FIXTURE WIRE
11. GLASS SHADE
12. FIXTURE PAN
13. KEY HOLE SLOT
14. FIXTURE GROUND WIRE
15. CAP
17. THREADED PIPE
18. COUPING
Fig. 2
CAUTION
Turn o the main power at the circuit breaker before installing the xture, in order to
prevent possible shock.
GENERAL
All electrical connections must be in accordance with local and National Electrical
Code (N.E.C.) standards. If you are unfamiliar with proper electrical wiring
connections obtain the services of a qualied electrician.
Remove the xture and the mounting package from the box and make sure that no
parts are missing by referencing the illustrations on the installation instructions.
Produktspecifikationer
| Varumärke: | Forte Lighting |
| Kategori: | Lättnad |
| Modell: | 6029-03-55 |
Behöver du hjälp?
Om du behöver hjälp med Forte Lighting 6029-03-55 ställ en fråga nedan och andra användare kommer att svara dig
Lättnad Forte Lighting Manualer

5 Januari 2025
Lättnad Manualer
Nyaste Lättnad Manualer
9 April 2025
9 April 2025
9 April 2025
8 April 2025
8 April 2025
8 April 2025
7 April 2025
5 April 2025
5 April 2025
5 April 2025