Frigidaire GCFI3070BF Bruksanvisning
Frigidaire Spis GCFI3070BF
Läs gratis den bruksanvisning för Frigidaire GCFI3070BF (4 sidor) i kategorin Spis. Guiden har ansetts hjälpsam av 15 personer och har ett genomsnittsbetyg på 4.0 stjärnor baserat på 3 recensioner. Har du en fråga om Frigidaire GCFI3070BF eller vill du ställa frågor till andra användare av produkten? Ställ en fråga
Sida 1/4
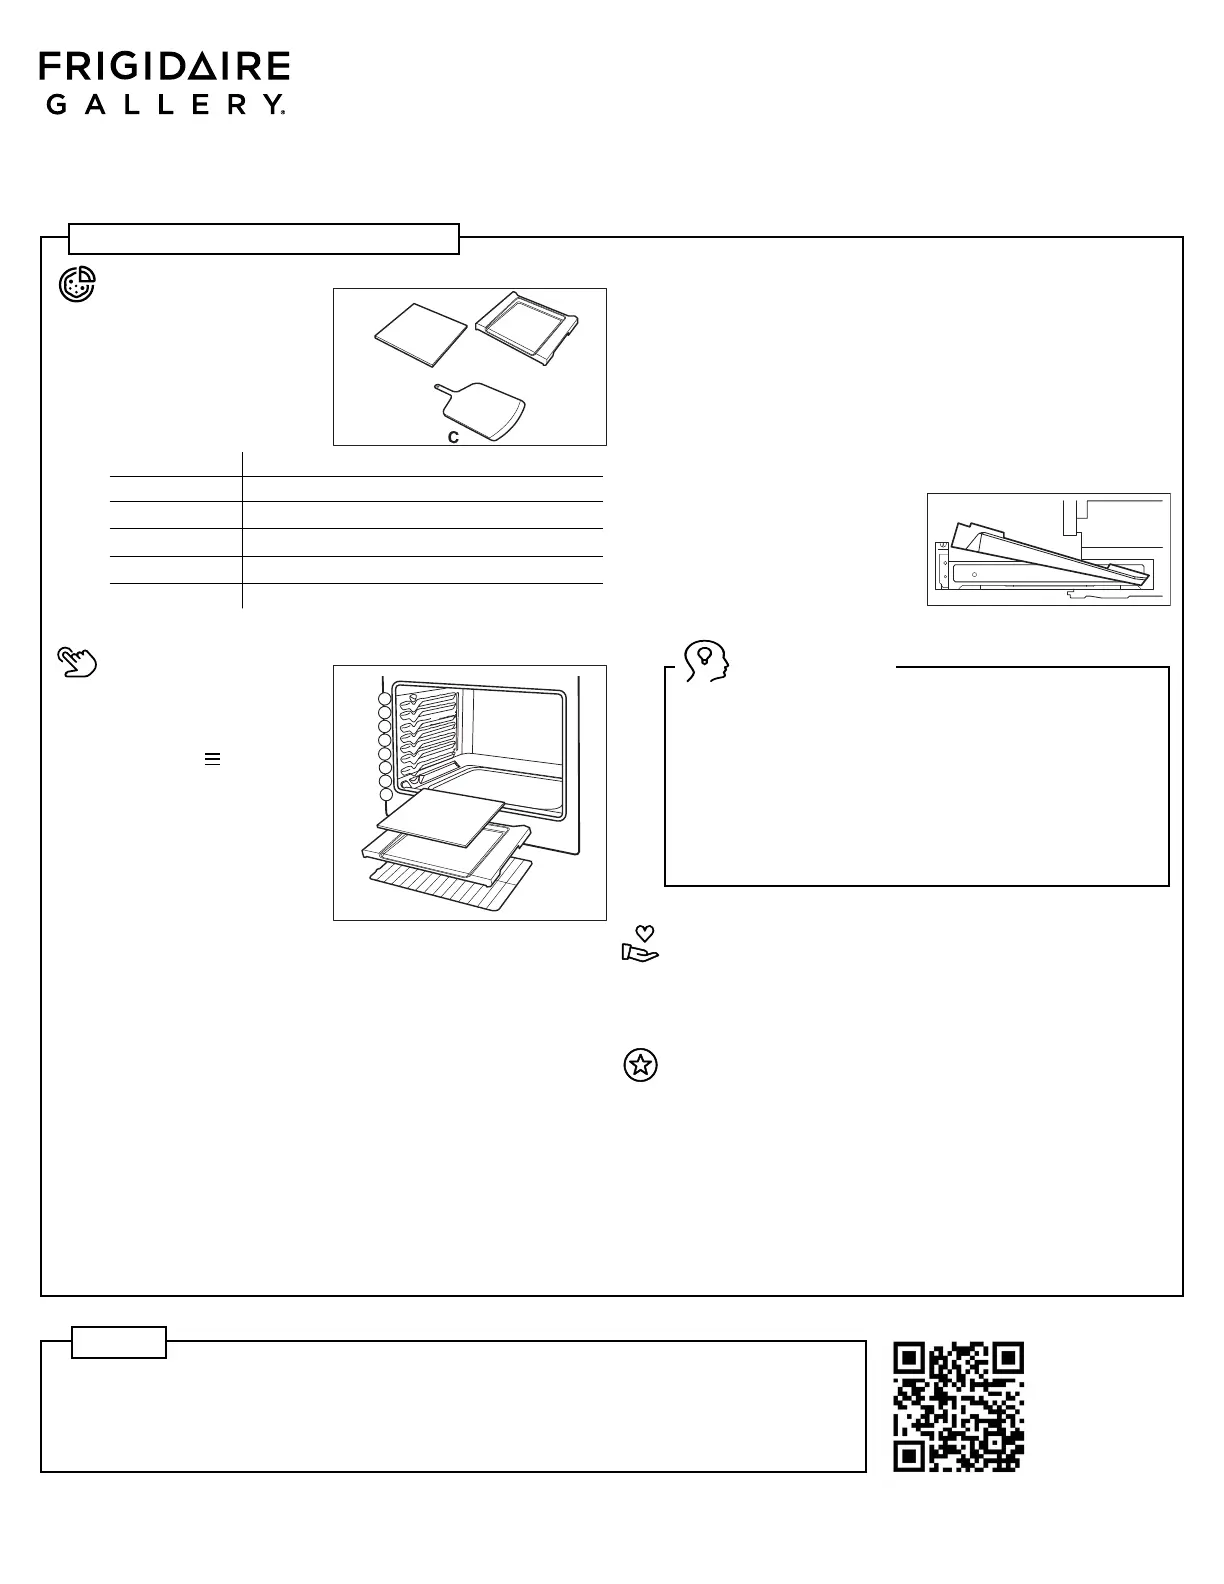
Your oven is equipped with the following accessories required for Stone-Baked
Pizza:
A. Pizza Stone
B. Pizza Shield
C. Pizza Peel
IngredientAmount
Fresh Dough8–11 oz. (10-12” pizzas) / 11-14 oz. (12-14” pizzas)
Cornmeal
½ tablespoon
Pizza Sauce
¼ cup
Cheese
¾ cup
Other toppingsas desired
Before using Stone-Baked Pizza:
• Wipe the Pizza Shield, Stone,
and Peel with a soft, dry cloth
to remove debris. Do not use
water on the pizza shield.
• To hear timing alerts during the
cooking process, touch Menu
options bars
go to General
Settings and select Volume
Level.
• Place Pizza Shield (B) with
Pizza Stone (A) on the oven
rack at the rack position
7. Check the rack position
number on the left side of the
oven’s front frame.
Prepping & Assembling:
• Select Stone-Baked Pizza
on the control panel and follow instructions. The oven will preheat for
approximately 30 minutes.
• While preheating – make your pizzas! Stretch your fresh, room-temperature
dough on afl at, fl oured surface – a cutting board or on the countertop.
• Do not stretch or roll out your dough on the peel.
• Once you have rolled out your dough, sprinkle½tbsp of cornmeal on the peel
before placing the dough on the peel, ensuring it stays within the 14” circular
marks.
• Place dough on the cornmeal dusted peel and add your sauce, cheese and
toppings. All proteins should be pre-cooked.
• Before placing the pizza into the oven, gently shake the peel to ensure the pizza
isn’t sticking. If needed, lift edges and add more cornmeal.
Transferring Pizza Into Oven:
• Once the oven has preheated, it will say Insert Pizza – you are ready to insert
your fi rst pizza!
• To transfer the pizza, tilt the peel, touching the tip to the hot stone and push
forward, using the pizza shield as a backstop to slide it off.
• Once the pizza touches the hot stone, do not try to move it—let it cook
undisturbed for the best results.
• Important! After your pizza is placed in the oven, select Confi rm and the oven
will begin the 2-minute countdown.
Cooking your Pizza:
• The oven will give you an alert with 30 seconds left, that’s your cue to grab the
pizza peel and get ready (Reminder: Make sure your oven volume is on).
• After 2 minutes, the pizza is cooked. Open the door and check your pizza. If you
prefer for the pizza to cook longer, you can add 15 seconds by selecting +15S.
If it looks good, use the peel to remove your pizza and select Done.
• Tip: Use the backstop to help the pizza slide back onto the peel.
• To make another pizza, select Continue and the oven will begin a short reheat
cycle.
• After the reheat cycle, the oven will signal Pizza Ready and repeat instructions.
After Cooking:
• Wait at least one hour before removing the Pizza Shield and Stone.
Use protective gloves or oven mitts to remove.
• Sweep off the ashes with a brush
and discard.
• To store the Pizza Stone and Shield
in the storage drawer, place the
stone in fi rst, and turn the pizza
shield upside down, placing it on
top of the stone.
• Do not store the peel in the storage
drawer.
Caring for your Pizza Stone:
• Do not season the pizza stone with oil.
• Do not use any chemicals to clean the stone, as the stone absorbs them and
may release them when heated.
• Do not wash the stone in the dishwasher.
• Over time, the stone and shield will discolor, this will not impact the quality of
pizzas.
PRO TIPS for making pizzas!
• Store-bought fresh pizza dough is usually 16 oz (1 lb.)—enough for two pizzas.
• Let refrigerated dough sit at room temperature for at least 1 hour before baking.
Frozen dough will vary, follow packaged instructions.
• To shape by hand, press from the center outward avoiding the edges for a
lighter, puffi er crust.
• If the dough keeps shrinking back, let it rest for 5–10 minutes.
• If the dough tears, pinch it back together or let it rest for a few minutes.
• A pizza roller creates a more uniform shape but may result in a less puffy crust.
• Too many toppings or too much sauce can make the crust soggy and diffi cult to
cook evenly.
• Add fresh ingredients like basil and arugula after cooking for the best fl avor.
• Cheese matters! Fresh, high-moisture mozzarella works better than shredded
mozzarella cheese.
USING STONE-BAKED PIZZA
A
B
1
2
3
4
5
6
8
7
• Stone-Baked Pizza Mode was designed for fresh dough only.
• Do not cook frozen pizzas, partially baked premade pizzas, or premade
crusts in Stone-Baked Pizza mode—the pizza will not cook properly and
could damage the stone.
• Do not clean the pizza stone in between making each pizza, the stone will
be hot.
• Do not leave the Peel on the Pizza Stone while cooking.
• Wipe off the excess cornmeal on the peel before inserting the pizza into the
oven to keep the oven cleaner and reduce smoking.
• Excess cornmeal/fl our may cause smoking or small fl ames—if fl ames appear,
keep the oven door closed; they will extinguish themselves.
• Remove the Pizza Shield and Stone prior to using any other cooking mode,
as this will impact the performance of your oven.
IMPORTANT
Single 12-14” Pizza Amount
Recommendations
How do I cook a frozen pizza if I can’t use Stone-Baked pizza mode? Bake on the middle rack, using No Preheat, Bake or Convection
Bake cooking modes.
Why are there small flames on my pizza stone during use? Leftover debris like cornmeal and flour can ignite at high temperatures,
which is normal during cooking. When that happens, KEEP THE OVEN DOOR CLOSED; the fl ames will extinguish themselves.
FAQs
Watch
how to
videos
here!
A22474837/A (2025/03)
QUICK GUIDE
BRIEF INSTRUCTIONS
Produktspecifikationer
| Varumärke: | Frigidaire |
| Kategori: | Spis |
| Modell: | GCFI3070BF |
Behöver du hjälp?
Om du behöver hjälp med Frigidaire GCFI3070BF ställ en fråga nedan och andra användare kommer att svara dig
Spis Frigidaire Manualer

5 Oktober 2025
5 Oktober 2025
5 Oktober 2025
4 Oktober 2025
31 Augusti 2025
29 Juli 2025
29 Juli 2025
29 Juli 2025
29 Juli 2025
29 Juli 2025
Spis Manualer
Nyaste Spis Manualer
2 April 2026
1 April 2026
1 April 2026
1 April 2026
1 April 2026
1 April 2026
1 April 2026
1 April 2026
31 Mars 2026
31 Mars 2026