Furuno FELCOM20 Bruksanvisning
Furuno ej kategoriserat FELCOM20
Läs gratis den bruksanvisning för Furuno FELCOM20 (2 sidor) i kategorin ej kategoriserat. Guiden har ansetts hjälpsam av 23 personer och har ett genomsnittsbetyg på 4.6 stjärnor baserat på 2 recensioner. Har du en fråga om Furuno FELCOM20 eller vill du ställa frågor till andra användare av produkten? Ställ en fråga
Sida 1/2
INMARSAT-C MES
Model FELCOM20
Operator's Guide
English
This guide provides the basic
operating procedures for this
equipment. For detailed information,
see the Operator’s Manual.
The brand, product names,
trademarks, registered trademarks,
or service marks mentioned in this
document belong to their respective
holders.
Login/Logout
Login
The terminal unit must be “idle” to login. ([IDLE] appears in
[Current Status] on the [Dashboard] screen.
1.Confirm that [SYNC (NCS)] appears in [Frame Sync] on
the [Dashboard] screen.
2.Tap [Menu] on the left side of the screen (keyboard: F6
key) to open the [Menu] screen.
3.Tap [Login] (keyboard: select [Login] using the arrow keys
→Enter key).
4.The confirmation mesage “Login process starting. Are you
sure?” appears. Tap [OK] (keyboard: Enter key).
When login is completed, the [Current Status] indication on
the [Dashboard] screen changes from [LOGIN] to [IDLE],
and [Successful Login] appears below the [Current Status].
Also, [Login] appears in [Login Status].
Logout
1.Tap [Menu] on the left side of the screen (keyboard: F6
key) to open the [Menu] screen.
2.Tap [Logout] (keyboard: select [Logout] using the arrow
keys → Enter key).
3.The confirmation mesage “Logout process starting. Are
you sure?” appears. Tap [OK] (keyboard: Enter key).
When logout is completed, the [Current Status] indication on
the [Dashboard] screen changes from [LOGOUT] to [IDLE].
[Successful Logout] appears below [Current Status], and
[Logout] appears in [Login Status]. Turn off the FELCOM20.
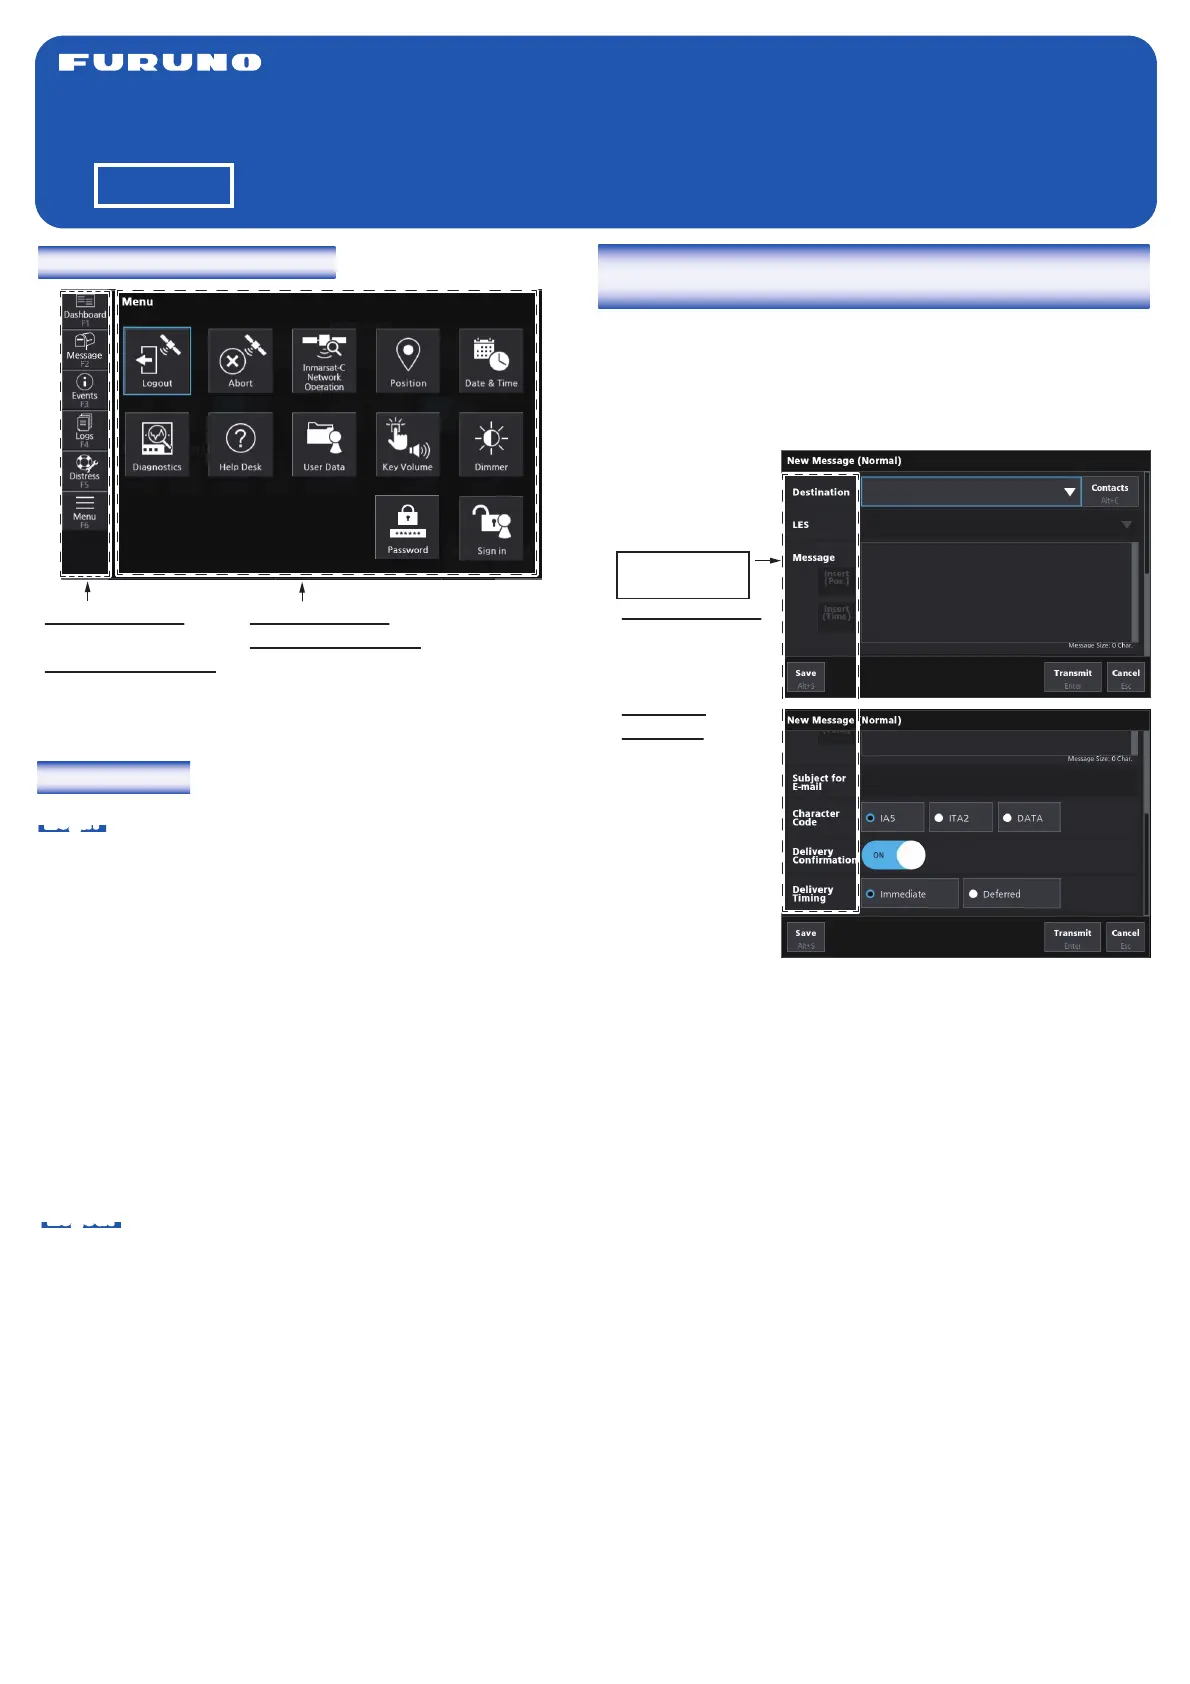
How to send a message to a destination registered
on the Contacts list
1.Tap [Message] on the left side of the screen (keyboard: F2
key) to open the message screen.
2.Tap [New MSG (Normal)] at the bottom of the screen
(keyboard: Alt + N key) to open the [New Message
(Normal)] window.
3.Enter your message in the [Message] area.
4.Tap [Contacts] at the top right corner of the window
(keyboard: Alt + C key) to open the [Contacts List]
window.
5.Tap ▼ of [Type] (keyboard: space bar) to open the
[Destination Type] window.
6.Tap the destination type (keyboard: select the destination
type using the arrow keys), then tap [OK] (keyboard:
Enter key).
7.Tap the address(es) to put check mark(s) in the box(es)
(keyboard: select the address(es) using the Tab key →
press the space bar to put check mark(s)), then tap
[Select] (keyboard: Enter key).
8.Tap ▼ of [LES] (keyboard: space bar) to open the [Select
E-mail/SMS Service LES] or [Select LES] window.
9.Tap the LES (keyboard: select the LES using the arrow
keys), then tap [OK] (keyboard: Enter key).
10.To insert the current position, place the cursor where to
insert the information in [Message], then tap [Insert (Pos.)]
(keyboard: Alt + P key).
11.To insert the current time, place the cursor where to insert
the information in [Message], then tap [Insert (Time)]
(keyboard: Alt + T key).
12.For e-mail, enter the subject in [Subject for E-mail]. For
other communication formats, go to step 13.
13.Tap [IA5] (for e-mail, fax, SMS), [ITA2] (for telex), or
[DATA] as appropriate in [Character Code] (keyboard:
select [IA5], [ITA2], or [DATA] using the arrow keys).
Screen operation overview
Touch operation:
Tap an icon.
Keyboard operation:
Press any key from
F1 to F6.
How to focus/
select an item
Touch operation:
Tap an input field
for the appropri-
ate item.
Keyboard
operation: Press
the Tab key to
focus to the next
item (to below or
right). Press the
Shift + Tab key
to focus to the
previous item (to
above or left).
Touch operation: Tap an icon.
Keyboard operation: Select an
icon using the arrow keys, then
press the Enter key to confirm
the selection.
Produktspecifikationer
| Varumärke: | Furuno |
| Kategori: | ej kategoriserat |
| Modell: | FELCOM20 |
Behöver du hjälp?
Om du behöver hjälp med Furuno FELCOM20 ställ en fråga nedan och andra användare kommer att svara dig
ej kategoriserat Furuno Manualer

28 September 2025
20 September 2025
20 September 2025
29 Juli 2025
29 Juli 2025
29 Juli 2025
29 Juli 2025
28 Juli 2025
28 Juli 2025
28 Juli 2025
ej kategoriserat Manualer
Nyaste ej kategoriserat Manualer
3 April 2026
3 April 2026
3 April 2026
3 April 2026
3 April 2026
3 April 2026
3 April 2026
3 April 2026
3 April 2026