Geemarc CL8150 Bruksanvisning
Läs gratis den bruksanvisning för Geemarc CL8150 (2 sidor) i kategorin Mobil. Guiden har ansetts hjälpsam av 31 personer och har ett genomsnittsbetyg på 5.0 stjärnor baserat på 2 recensioner. Har du en fråga om Geemarc CL8150 eller vill du ställa frågor till andra användare av produkten? Ställ en fråga
Sida 1/2
1 2 34
QUICK USER GUIDE
!!! Please refer to our website: www.geemarc.comfor an up to date
user guide, as there may be important updates and changes you
need to be aware of !!!
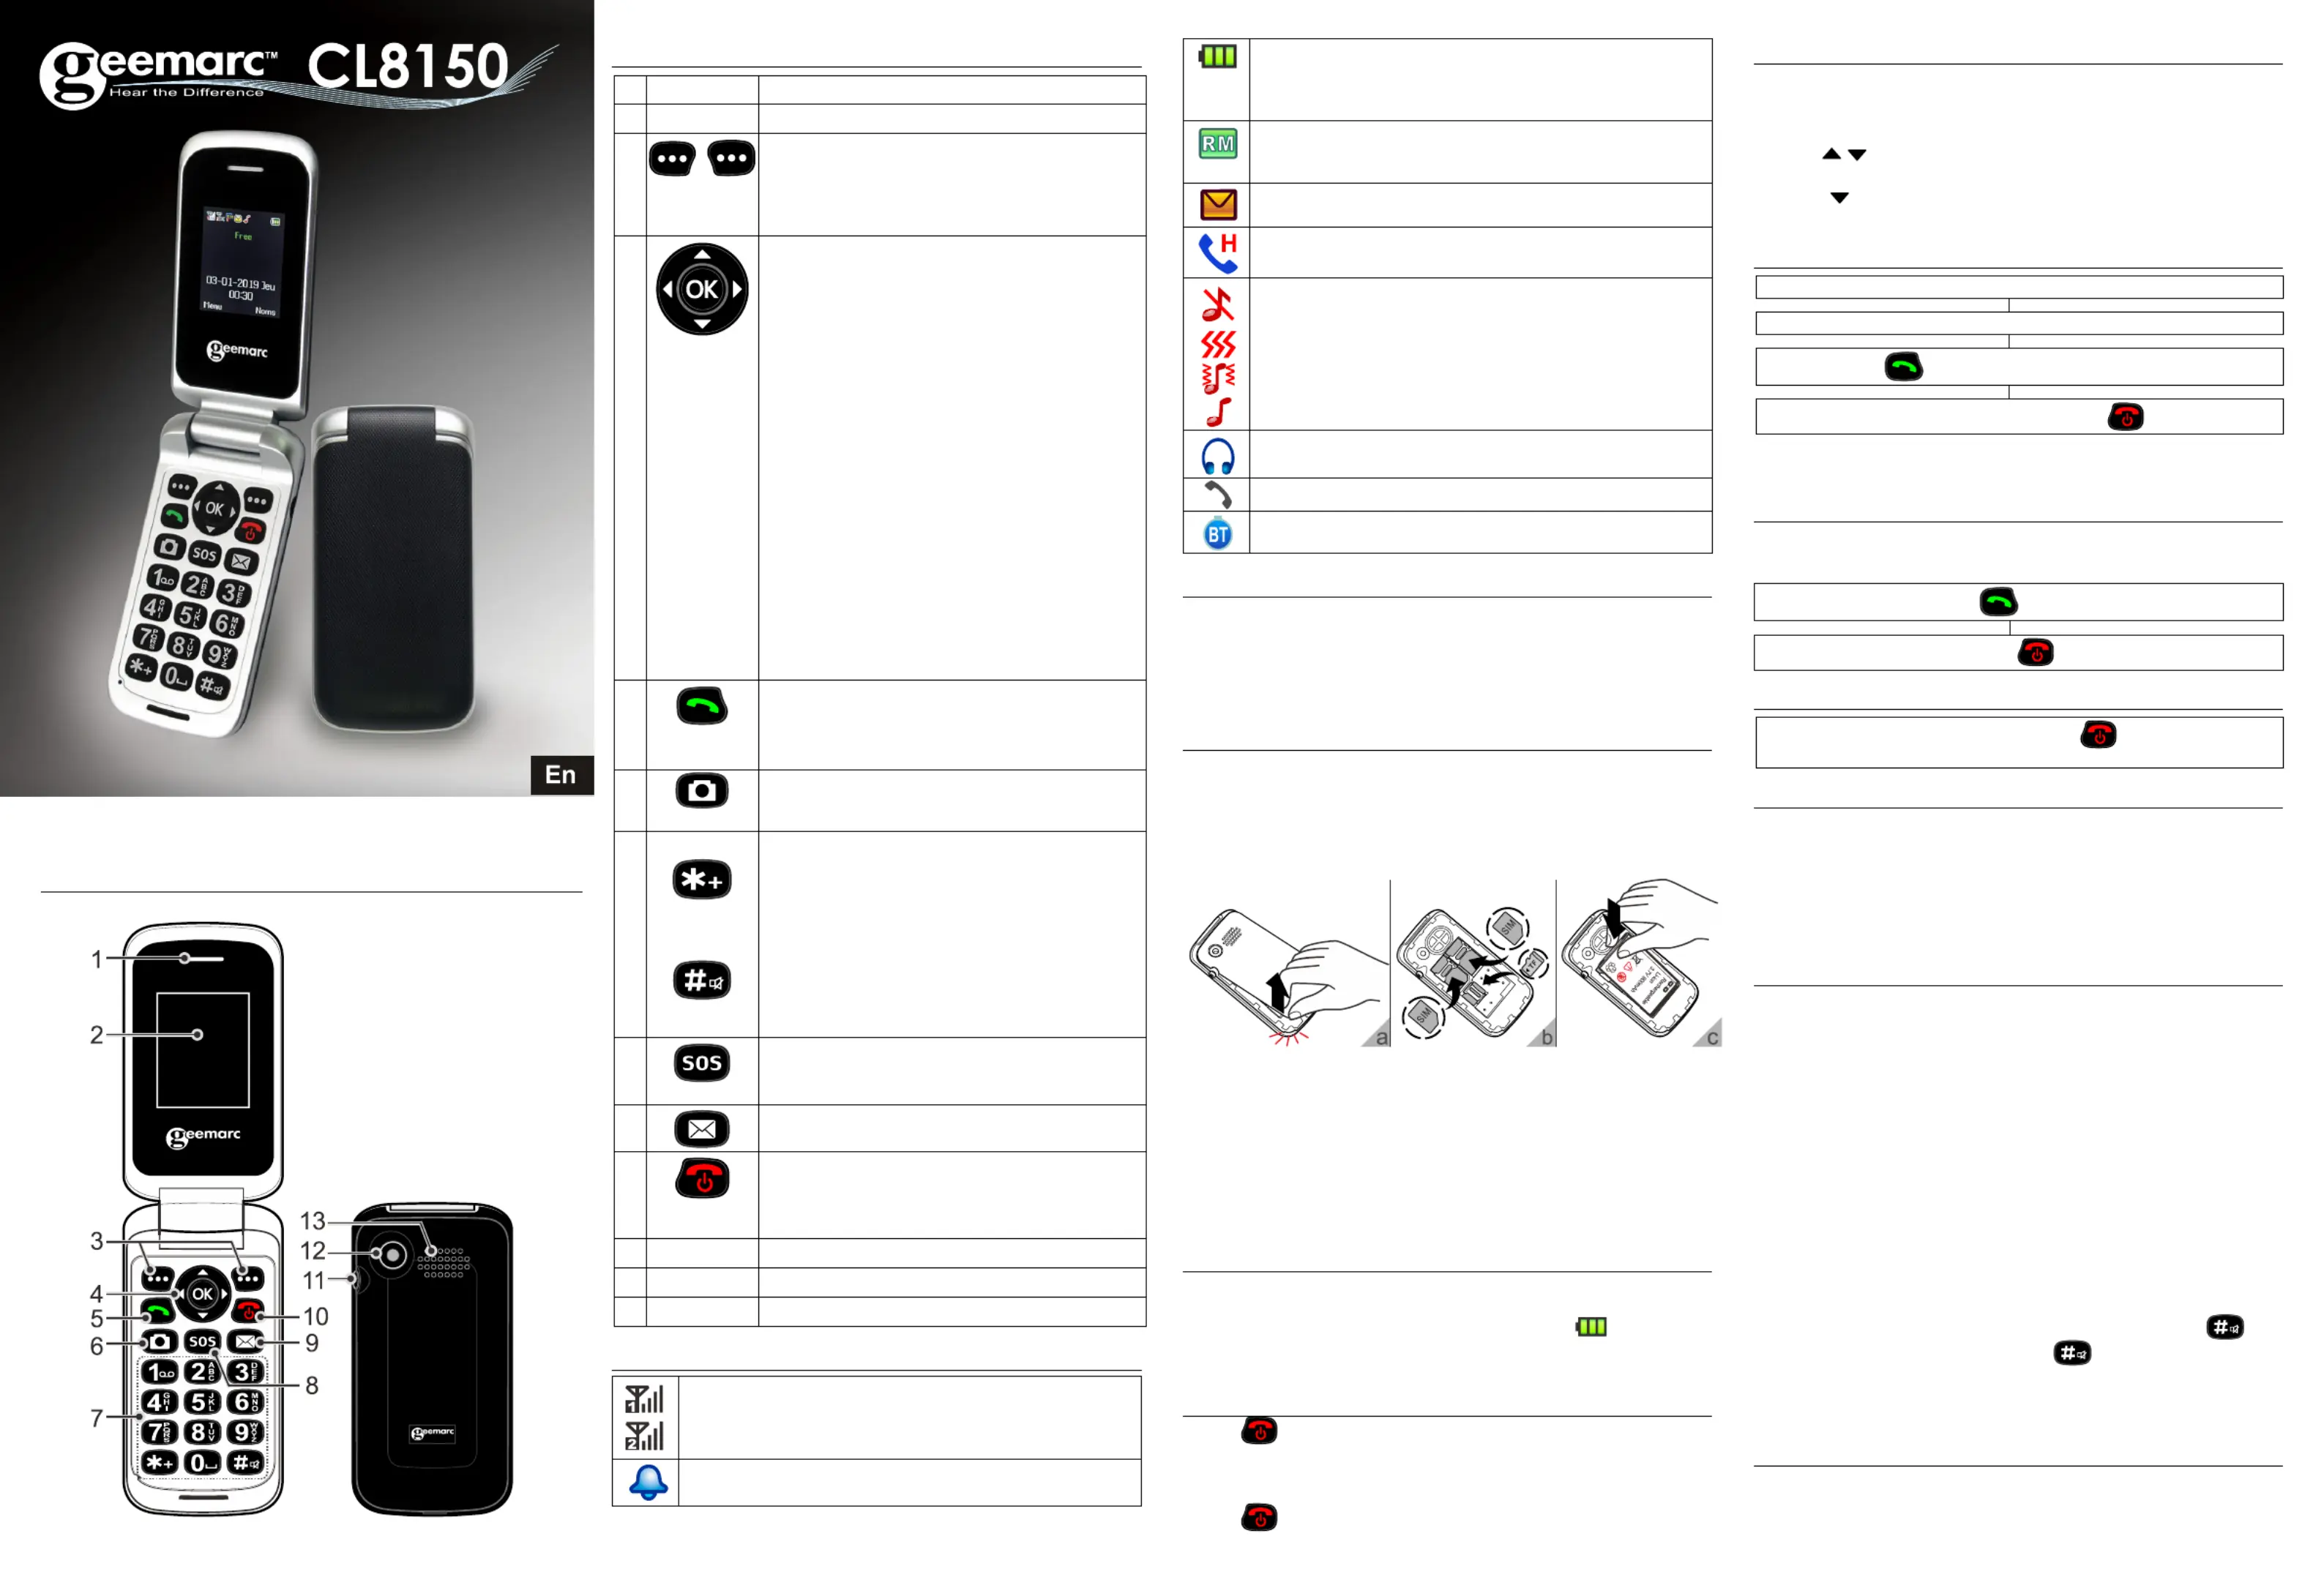
Geral Description en
HandsetDescription
Description
1
Earpiece
2
Display
3
Left / Right key
These are soft keys i.e. they take on different
functions depending on the menu displayed.
The current function is always displayed by
the text above the key.
4
Navigation Button
OK key : To valid or conrm a choice.
Up key
Scroll up through lists and menu options.
This is a dedicated key in Standby (Shortcuts). It
can be set up in Handset Settings in standby mode.
Scroll up the volume in conversation.
Scroll up the ringer volume during the ringer.
Down key
Scroll down through lists and menu options.
This is a dedicated key in Standby (Calendar). It
can be set up in Handset Settings.
Scroll down the volume in conversation.
Scroll down the ringer volume during the ringer.
Right key
This is a dedicated key in Standby (Audio player).
It can be set up in Handset Settings.
Left key
This is a dedicated key in Standby (User proles).
It can be set up in Handset Settings.
5
Call key
Make a call after dialling the number.
Receive a call.
Choose one of the last number dialled.
6
Camera
Press this key to enter in Camera function.
7
To enter phone number
Asterisk key
Press this key quickly to insert one or more symbols
( or +P/W) while composing a message or editing
a phonebook entry name. Then use the navigation
keys to move to the symbols you want to insert .
Hash Key
Press to switch between different input modes
while composing a text message or editing a
contact name.
8
SOS key
After to press 3 seconds, the procedure is started.
9
Press this key to write a new message.
10
Power key / -hook key On
Long press to power the telephone on and o.
End a call.
Cancel current process and return to standby.
11
Headset jack 3.5mm
12
Camera lens
13
Loudspeaker
LCD Screen Description
,
Signal Strength icon
This is always displayed when your telephone is switched
on. It shows the current signal strength. More bars indicate
more signal strength. There is one of these icons per SIM.
Alarm icon
The alarm has been set to ring at a specied time.
Battery Status icon
This is always displayed when your telephone is switched
on. It shows the level of battery charge. More bars indicate
more battery charge.
Roaming icon
A roaming call is taking place i.e. International call–outgoing
or incoming.
SMS icon
A new SMS (text message) has been received.
Mute icon
The microphone is temporarily muted during the conversation.
Silent icon
The telephone is in silent mode. There will be no call alert.
Only vibrator active.
Ringer + vibrator activated.
Only ringer activated.
Headset icon
The headset is plugged in.
Missed call
Bluetooth function activated
Unpacking the Telephone
When unpacking the telephone, you should nd the following in the
box:
1 GSM CL8150 mobile telephone handset
1 Mains power adaptor+ 1 USB cable
1 x Li-Polymer rechargeable battery
1 User Guide
Install SIM Card and Battery
Always switch the telephone o and disconnect the charger before
removing the battery.
Unclip the cover in the direction shown and pull it o (diagram a).
Remove the battery (if battery already inside).
Slide a SIM with the gold contacts face down under the silver SIM
holder as shown below (diagram ). b
Micro SD card.
You can insert one micro SD card to save the pictures. Maximum 32G.
You can insert 2 SIM cards into this telephone. There are many
reasons to do this, however, one important reason is that if you use
two SIMS from dierent providers you will probably get better network
coverage. However, just using one will be ne too!
Observe the battery contacts (the gold coloured contacts must face
towards the bottom right).and insert the battery.
Place the battery cover into position and press down lightly (schéma c).
Charging the Battery
Plug the charger into a wall socket.
Connect the lead from the charger into the Mini USB port on the bottom
of the telephone. During charging, the battery icon starts to fill.
Before the handset is rst used, the battery must be charged
for a minimum of 4 hours.
Switching On / O
Press for 3 seconds or longer to switch the telephone on.
If no SIM card has been inserted, LIMITED SERVICE will be displayed
if you try to dial a number. Only emergency calls can be made until
the SIM has been inserted.
Press again for 3 seconds to switch the telephone o.
First commissioning
During the rst start-up you will be asked to select the language
and to enter the time and date .
1. Enter the PIN for your SIM card(s) and press OK (Left soft key).
2. Press (left soft key) two times, select the language with the YES
keys and press . OK
3. Press and enter the hours and the minutes. YES
4. Press and enter the date.
5. Press on “SAVE” (Left soft key).
Making a Call
Flip open the cover and dial the number on the keypad.
Press soft key to delete an incorrect digit.CLEAR
Press the number is automatically dialled. ,
To end the call simply press .
To place an international call, you need to press + before the country
code. Simply, press
*
key twice.
Receiving a Call
When an incoming call is received on the telephone, the caller’s
telephone number will be displayed. If this caller’s number is stored
in the Phonebook, the associated name will be displayed.
Rejecting a Call
To reject an incoming call, simply press or soft key SILENT
and then .REJECT
Options During a Call
You can use a variety of functions during a call by pressing the
OPTION soft key.
You get the option to do the following.
Place a call on Hold / End a Single Call
Enter the Phonebook Call History / View
Messages / Sound Recorder - Record the call
Mute / Volume
Create a Phone Book Entry
1. Press Names or Menu Phonebook
.
2. Select then press . Add New ContactOK
3. Select To SIMTo Phone or then press OK.
4. Enter name and telephone number (press each time OPTIONS
Edit Options Done
Enter the information
and select , press
▼and make the same procedure. Entry using the numeric keypad.
5. . Options Save
The numeric keypad also has characters printed on the keys. These
characters are used for entering text for the purposes of phonebook
entry and modification, SMS text writing and searching for an entry in
the phonebook.
Press each key the relevant number of times to get the letter you need
e.g. to get the letter J, press the 5 key once, to get the letter S, press
the 7 key four times in quick succession.
To move on to the next letter, wait a few seconds and the cursor will
appear | after the last letter you entered. You may now enter the next
letter. To switch between upper and lower case use the key.
You can also switch to numbers using key. The input mode will
be indicated on the right hand side of the name entry eld indicated
by a pencil.
Press 0 to insert a space.
Options within Phonebook
1. then press key. Menu Phonebook
OK
2. Use ▼and▲ to scroll through the list until you find the desired
contact.
Press to answer.
To end the call simply press or ip the cover closed.
Produktspecifikationer
| Varumärke: | Geemarc |
| Kategori: | Mobil |
| Modell: | CL8150 |
Behöver du hjälp?
Om du behöver hjälp med Geemarc CL8150 ställ en fråga nedan och andra användare kommer att svara dig
Mobil Geemarc Manualer

7 Januari 2025
30 Augusti 2024
29 Augusti 2024
28 Augusti 2024
24 Augusti 2024
23 Augusti 2024
21 Augusti 2024
21 Augusti 2024
Mobil Manualer
Nyaste Mobil Manualer
8 Januari 2025
7 Januari 2025
22 December 2024
19 December 2024
21 Oktober 2024
18 Oktober 2024
5 Oktober 2024
5 Oktober 2024
5 Oktober 2024
5 Oktober 2024