Gigaset A120A Bruksanvisning
Läs gratis den bruksanvisning för Gigaset A120A (16 sidor) i kategorin Telefon. Guiden har ansetts hjälpsam av 24 personer och har ett genomsnittsbetyg på 4.4 stjärnor baserat på 12.5 recensioner. Har du en fråga om Gigaset A120A eller vill du ställa frågor till andra användare av produkten? Ställ en fråga
Sida 1/16

Lombok / Großbritannien - Irland / A31008-M2401-L101-2-7619 / Lombok.fm / 25.09.2012
Version 4, 16.09.2005
1
Gigaset A120/A120A/A220/A220A
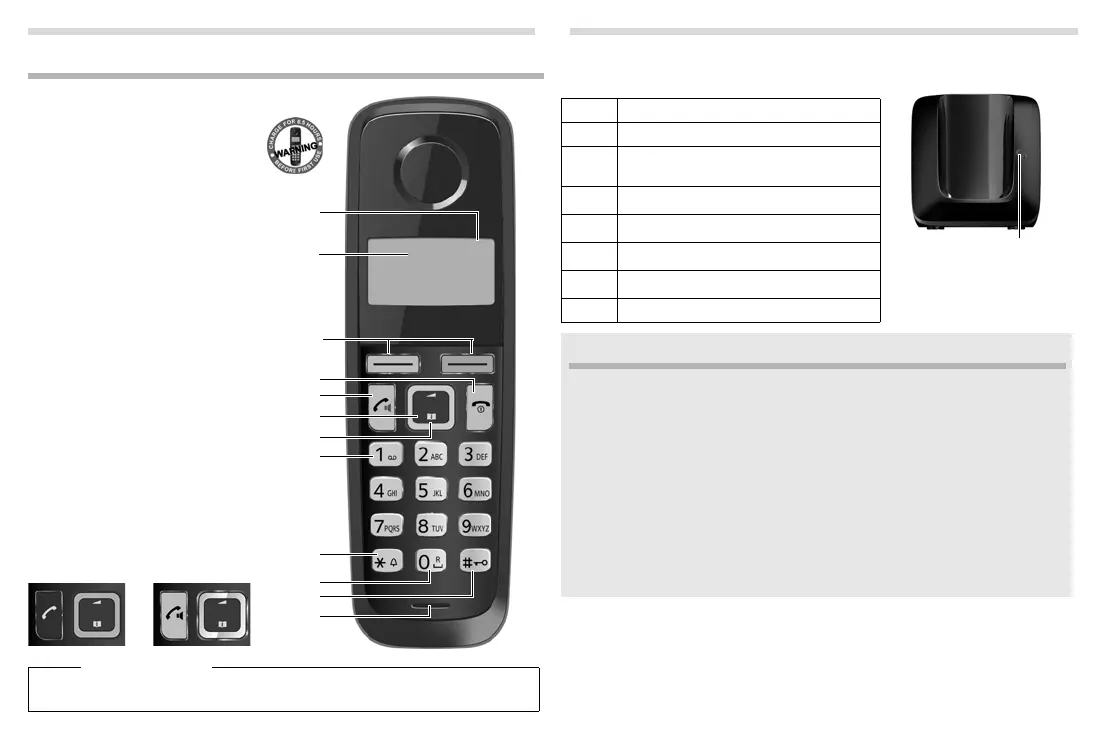
The handset at a glance
1 Charge status of the batteries:
= e V U
(flat to full)
= flashes: batteries almost flat
e V U flashes: charging
2 Answering machine icon (A120A/
A220A only)
3Display keys
4 End call key and On/Off key
5 Talk key/Handsfree key
6 Control key (
u)
7 Directory key (press down on the
control key)
8 Key 1
Open the answering machine
(A120A/A220A only)/network mailbox
9 Star key
Ringers on/off (press and hold); with
an open connection: switch from pulse
dialling to tone dialling (press briefly)
10 Key 0/recall key
Consultation call (flash): press and hold
11 Hash key
Keypad lock on/off (press and hold);
toggles between upper/lower case
and digits; inserts a dialling pause
(press and hold)
12 Microphone
(handsfree mode A220/A220A only)
A120/A120A A220/A220A
1 ±V
11.12. 11:56
INT MENU
1
2
3
4
5
6
7
8
9
10
11
12
Please note
New messages in the calls list/answering machine list/network mailbox list (¢ page 6)
are indicated in the display by the message New messages.
Display keys:
Pressing a key launches the function that appears above
that ke
y in the display.
Gigaset service contact numbers:
For personal advice on our range of products and for repairs or guarantee/warranty claims
call:
Service Centre UK: 0845 3670 812 (local call cost charge)
Service Centre IE: 1850 777 277 (6.6561 Ct./Call)
Please have your proof of purchase ready when calling.
Display Function when pressed
INT Call other registered handsets
¢ page 9.
MENU Open main/submenu (see menu overview
¢ page 15).
“
Go back one menu level.
U
Scroll up/down or adjust volume with u.
T
Move cursor to left/right with u.
˜
Backspace deletes one character at a time.
OK
Confirm menu function or save entry.
ECO DECT
During a call, the level of the handset's radio signal adjusts automatically according to
the distance between the handset and base station: the shorter the distance, the lower
the signal strength (radiation).
The handset’s radio signal is switched off when it is in standby mode. The base station,
ho
we
ver, maintains contact with the handset with fewer radio signals.
In addition, the base station radio signals are switched off when the No
Ra
diation
setting is enabled.
MENU
¤ u Settings ¤ OK ¤ u Base ¤ OK ¤ u ECO DECT ¤ OK ¤ No Radiation
¤ OK (‰= radiation switched off, icon ½ in the left-hand corner of the display)
Please note
◆ All registered handsets must support this feature.
◆ For quick connection of incoming calls the handset repeatedly switches to recep-
tion mode for short periods. This increases energy consumption and therefore
reduce
s the standby and talk times.
The base station at a
glance
Registration/paging key:
Search for handsets (press
briefly, "Paging"
¢ page 9)
Register handsets (press and
hold
¢ page 9).

Lombok / Großbritannien - Irland / A31008-M2401-L101-2-7619 / Lombok.fm / 25.09.2012
Version 4, 16.09.2005
2
Safety precautions
Read the safety precautions and the user guide before use.
Explain their content and the potential hazards associated with using the telephone to
your
children.
Use only the power adapter supplied, as i
ndicated on the devices.
Use only rechargeable batteries that corresp
ond to the specification (see
„Technical Data“). Never use a conventional (non-rechargeable) battery or other
battery types as this could result in significant health risks and personal injury.
Rechargeable batteries, which are noticeably damaged, must be replaced.
Using your telephone may affect nearby medical equipment. Be aware of the
tech
ni
cal conditions in your particular environment, e.g., doctor's surgery.
If you use a medical device (e.g., a pacemaker), please contact the device
manu
facturer. They will be able to advise you regarding the susceptibility of the
device to external sources of high frequency energy (for the specifications of your
Gigaset product see „Technical Data“).
Do not hold the rear of the handset to your
ear wh
en it is ringing or when speaker
mode is activated. Otherwise you risk serious and permanent damage to your
hearing.
Your Gigaset is compatible with the majority of digital hearing aids on the market.
Howe
ver, perfect function with all hearing aids cannot be guaranteed.
The phone may cause interference in analogue hearing aids (humming or
whis
tling) or cause them to overload. If you require assistance, please contact the
hearing aid supplier.
The base and charger are not splashproof. For
th
is reason do not install them in a
damp environment such as bathrooms or shower rooms.
Do not use your phone/phone system in environments with a potential explosion
hazard (e
.g., paint shops).
If you give your Gigaset to a third party, make sure you also give them the user
guide
.
Remove
faulty devices from use or have them repaired by our Service team, as
th
ese c
ould interfere with other wireless services.
First steps
Check the pack contents
One Gigaset A120/A120A/A220/A220A base station, one mains adapter, one Gigaset
handset, one phone cord, two batteries, one battery cover, one user guide.
If you have purchased a model with multiple handsets, the package should contain
two batteries
, a battery cover and a charging cradle with mains adapter for each addi-
tional handset.
Setting up the base station and charging cradle (if included)
◆ Set up the base station at a central location on a flat, non-slip surface in your house
or apartment. You can also mount the base station and charging cradle on the
wall.
◆ Pay attention to the range of the base station. This is up to 300 m in unobstructed
outdoor areas and up to 50 m inside buildings.
◆ The base station and charging cradle are designed for use in enclosed dry rooms
in a temperature range of +5 °C to +45 °C.
◆ Care: Wipe down the base station and handset with a damp cloth (no solvents) or
an antistatic cloth. Never use a dry cloth. This can cause static.
◆ The phone's feet do not usually leave any marks on surfaces. However, due to the
multitude of different varnishes and polishes used on today's furnishings, the risk
of marks on the surfaces cannot be completely ruled out.
◆ Never expose the telephone to the influence of heat sources, direct sunlight or
other electrical devices.
◆ Protect your Gigaset from moisture, dust, corrosive liquids and vapours.
◆ The device cannot be used in the event of a power failure. It is also not possible to
transmit emergency calls.
◆ Emergency numbers cannot be dialled if the keypad lock is activated!

Lombok / Großbritannien - Irland / A31008-M2401-L101-2-7619 / Lombok.fm / 25.09.2012
Version 4, 16.09.2005
3
Connecting the base station
¤ First connect the mains adapter
1.
¤ Then connect the telephone
jack
2 and insert the cables
into the cable ducts.
Please note:
◆ The mains adapter must always
be connected, as the phone will
not operate without mains con-
nection.
◆ Use only the mains adapter and phone cord supplied. Pin connections on tele-
phone cables can vary.
◆ The answering machine (A120A/A220A only) is ready for use approx. 30 seconds
after the base has been connected.
Connecting the charging cradle (if included)
1
1
1
2
¤ Connect the flat plug to the power
supply
1.
¤ Plug the mains adapter into the plug
socket
2.
If you need to disconnect
the plug from the charg-
ing cradle, press the
release button
3 and
disconnect the plug
4.
1
2
3
4
Setting up the handset for use
The display is protected by a plastic film. Please remove the protective film!
Inserting the batteries and closing the battery cover
Warning
Use only the rechargeable batteries recommended by Gigaset Communications
GmbH (
¢ page 11), i.e. never use conventional (non-rechargeable) batteries as
this could result in significant health risks and personal injury. For example, the
batt
eries could explode. The phone could also malfunction or be damaged as a
result of using batteries that are not of the recommended type.
¤ Insert the batteries with
the polarity in the correct
direction.
The polarity is indicated in the
battery compartment.
¤ First insert the battery cover at the top a.
¤ Then press the cover b until it clicks into
place.
¤ To reopen the battery cover, grip into the
cavity on the casing, then pull the battery
cover in an upward direction.
a
b
Produktspecifikationer
Varumärke: | Gigaset |
Kategori: | Telefon |
Modell: | A120A |
Inbyggd display: | Ja |
Strömförsörjning: | 230V, 50Hz |
Laddningstid: | 6.5 h |
Snabbstartsguide: | Ja |
Volymkontroll: | Digital |
Modell: | DECT-telefon |
Väckarklocka: | Ja |
Antal knappar: | 19 |
Telefonbokskapacitet: | 50 poster |
Trådlösa anslutningar: | Ja |
Maximal räckvidd inomhus: | 300 m |
Inspelningstid: | 25 min |
Batteriteknik: | Nickel-metallhydrid (NiMH) |
Batterityp: | AAA |
Antal batterier: | 2 |
Produktens färg: | Svart |
bruksanvisning: | Ja |
Temperatur vid drift: | 5 - 45 ° C |
Intervall för relativ operativ luftfuktighet: | 20 - 75 % |
Antal produkter som medföljer: | 1 styck |
Nummerpresentation: | Ja |
Maximal räckvidd utomhus: | 50 m |
Monteringssätt: | Bord |
Likströmsingång: | Ja |
Högtalartelefon: | Nej |
Plug & Play-kompatibel: | Ja |
Mac-kompatibel: | Nej |
Inbyggd telefonsvarare: | Ja |
Funktion för återuppringningslista: | 10 |
Namn och uppringnings-ID: | Ja |
Återuppringning: | Ja |
Antal telefoner som ingår: | 1 |
Färg på bakgrundsbelysning: | Bärnsten |
Samtalstimer: | Ja |
Samtalstid: | 18 h |
Klarar konferenssamtal: | Ja |
Navigationstangent: | Ja |
Stand-by tid: | 200 h |
Basenhet inkluderat: | Ja |
Indikator för låg batterinivå: | Ja |
Handset-tangenter: | 18 |
Handenhet: | 1 |
Indikator för batterikapacitet: | Ja |
Basenhetstangenter: | 1 |
Indikator för fullt batteri: | Ja |
Funktioner för flera telefonlurar: | 4 |
Kapacitet för samtalslista: | 25 |
Behöver du hjälp?
Om du behöver hjälp med Gigaset A120A ställ en fråga nedan och andra användare kommer att svara dig
Telefon Gigaset Manualer
5 Augusti 2025
5 Augusti 2025
4 Augusti 2025
4 Augusti 2025
4 Augusti 2025
4 Augusti 2025
31 Juli 2025
31 Juli 2025
31 Juli 2025
31 Juli 2025
Telefon Manualer
- Medion
- AEG
- Pioneer
- Airis
- Sennheiser
- Xiaomi
- Logik
- Tador
- Telefunken
- Linksys
- Nordmende
- Olympia
- Yeastar
- Huawei
- Jacob Jensen
Nyaste Telefon Manualer
5 Augusti 2025
5 Augusti 2025
5 Augusti 2025
5 Augusti 2025
5 Augusti 2025
5 Augusti 2025
5 Augusti 2025
5 Augusti 2025
4 Augusti 2025
4 Augusti 2025