GPX PJS909 Bruksanvisning
Läs gratis den bruksanvisning för GPX PJS909 (2 sidor) i kategorin Beamer. Guiden har ansetts hjälpsam av 29 personer och har ett genomsnittsbetyg på 4.0 stjärnor baserat på 2 recensioner. Har du en fråga om GPX PJS909 eller vill du ställa frågor till andra användare av produkten? Ställ en fråga
Sida 1/2
INDOOR/OUTDOOR
PROJECTOR SCREEN
User’s Guide for Model PJS909-01
For the most up-to-date version of this User’s Guide, go to www.gpx.com
Please read through this user guide before utilizing the screen.
Correct usage and maintenance will ensure a long product life.
Care & User Instructions
• Please be sure to distinguish between the front and back of the screen fabric when setting up the
projection screen. CineWhite
TM
(front projection) has a black backing and Wraith Veil (rear projection)
is labeled front, back.
• Dust, dirt and scratches on the projection surface will affect the picture quality, please take note of the
points below to prevent that from occurring:
1. Do not touch the projection surface with your hands
2. Do not write or draw on the projection surface
3. Do not use fingers or sharp objects to point on the projection surface; this will damage the screen
material.
4. Use a soft-damp cloth to clean the projection surface; do not use chemical cleaning agents or alcohol.
5. Use clean water when dampening the cleaning cloth and do not rub against the material to clean it.
• After using the screen, disassemble it and store it in the carrying bag provided.
• To avoid damage and injury, the screen should only be operated by adults.
Product Description
Design: The aluminum frame is designed to be light weight and easily operated making it easy to carry,
assemble and disassemble.
Screen Fabric: The screen fabric is attached to the rectangular frame and held in place by several press
studs, which ensure and evenly stretched and flat surface. The CineWhite
TM
(front projection) and
WraithVeil (rear projection) screen materials are durable and can be folded many times without causing
damage or distortion to the surface.
1
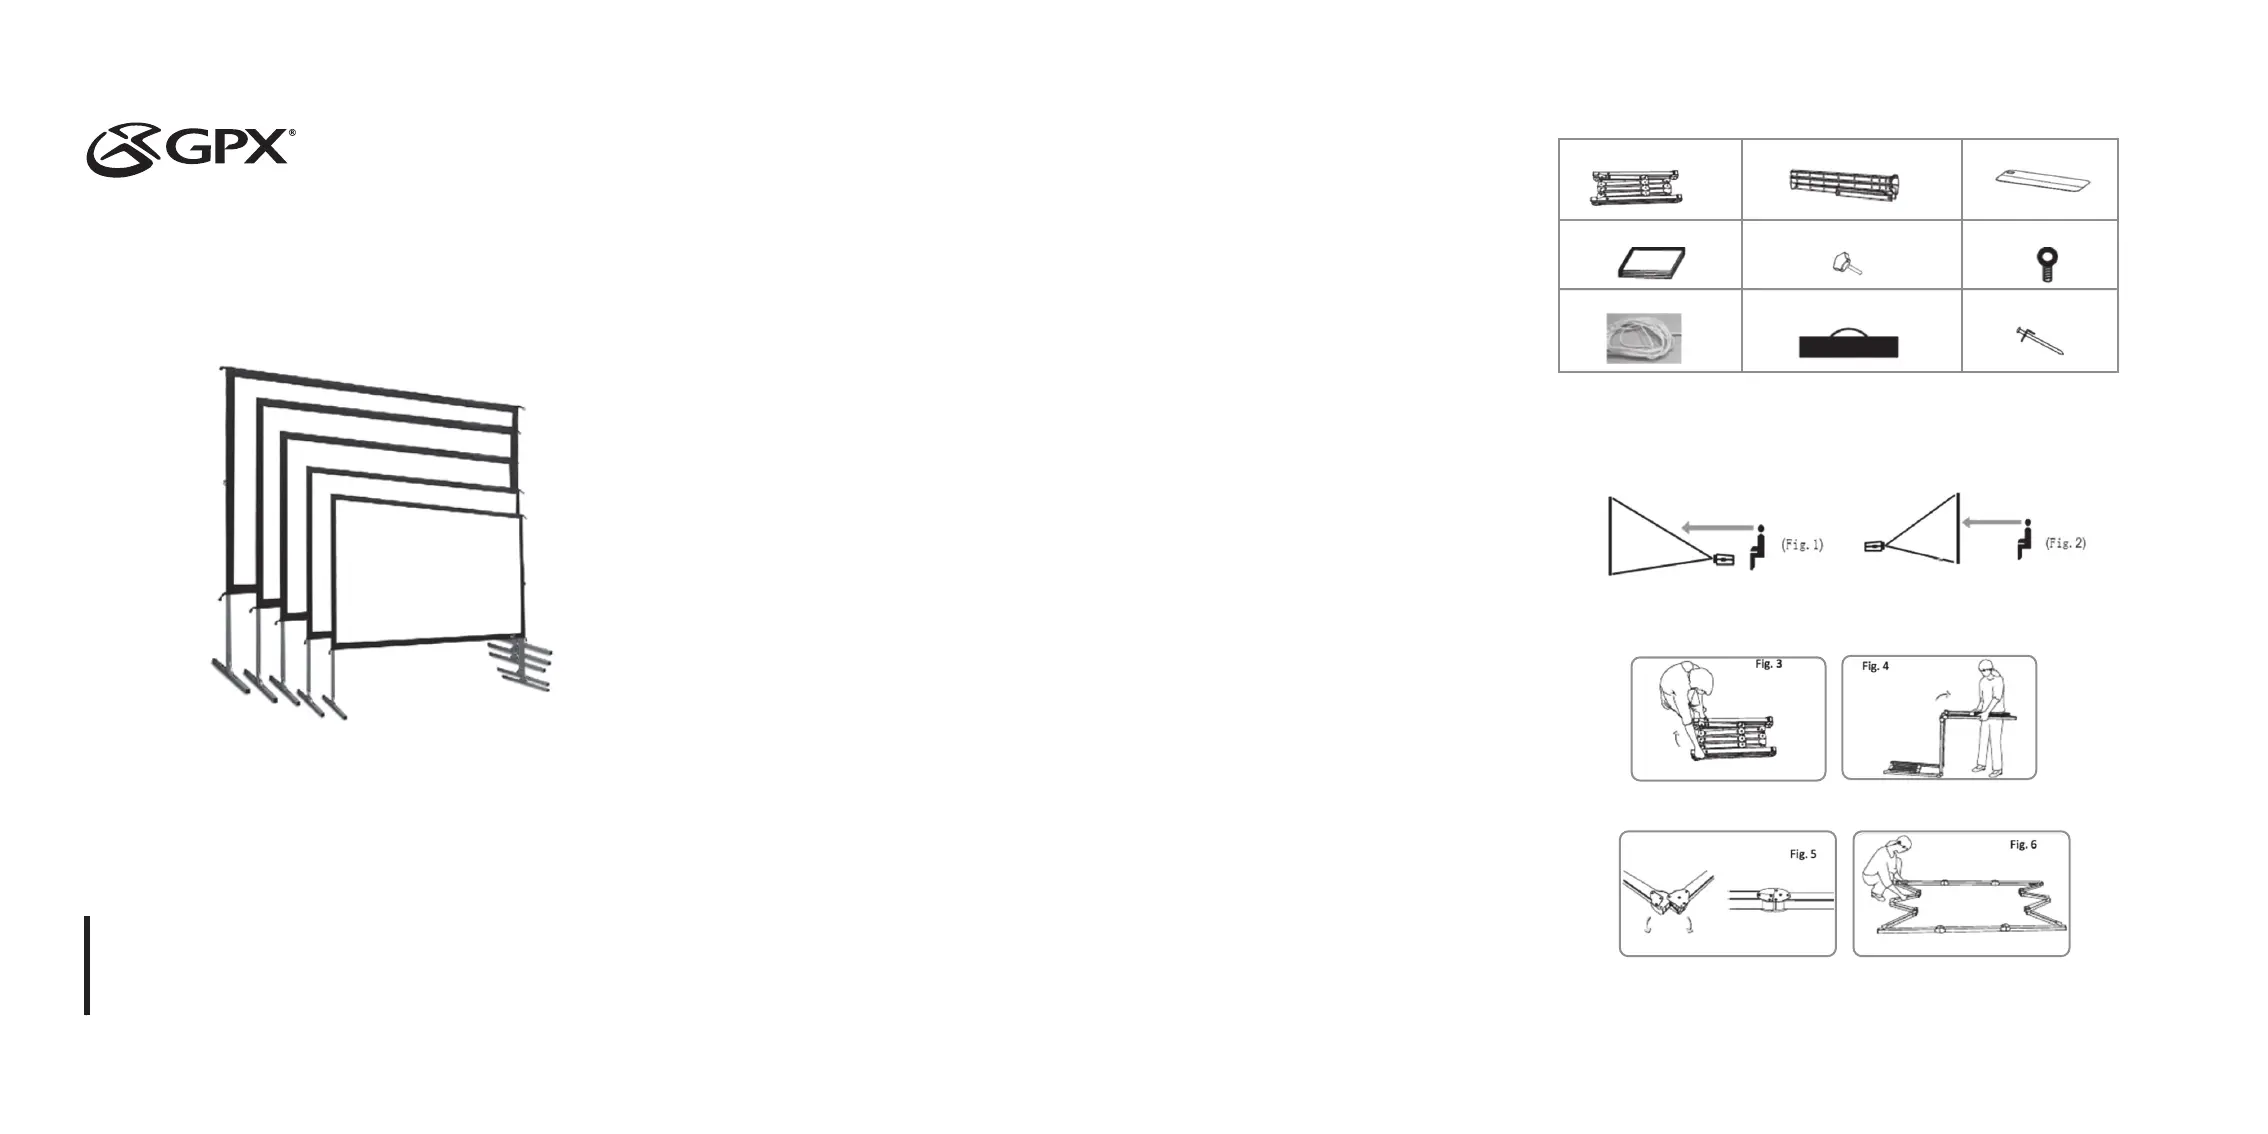
2
A. Folding frame x 1
D. Projection screen material x 1
G. Rope x 2
B. Left and right folding legs x 2
E. Knob screw x 2
H. Carrying Bag x 1
C. Screen material bag x 1
F. Eye bolt x 2
I. Stake x 4
Parts Diagram
Note: The parts list above is subject to change without notice.
Correct usage of the projection screen will ensure better viewing results.
For front projection, assemble and view the screen as indicated in Fig. 1
For rear projection, assemble and view the screen as indicated in Fig. 2
Frame Assembly and Screen Material Attachment
1. Take the folding frame (A) out of the carrying bag (H) and place it on a flat surface. Unfold the longer
sections first as shown in Fig. 3-4.
2. Unfold the frame until the latch on the hinge “ clicks” into place. Repeat the procedure for the shorter
sections. (Fig. 5-6)
Produktspecifikationer
| Varumärke: | GPX |
| Kategori: | Beamer |
| Modell: | PJS909 |
Behöver du hjälp?
Om du behöver hjälp med GPX PJS909 ställ en fråga nedan och andra användare kommer att svara dig
Beamer GPX Manualer

21 September 2024
21 September 2024
11 September 2024
11 September 2024
11 September 2024
Beamer Manualer
Nyaste Beamer Manualer
9 April 2025
9 April 2025
2 April 2025
5 Mars 2025
5 Mars 2025
3 Mars 2025
1 Mars 2025
26 Februari 2025
20 Februari 2025
20 Februari 2025