Graff G-4425-LM53 Bruksanvisning
Läs gratis den bruksanvisning för Graff G-4425-LM53 (4 sidor) i kategorin Kran. Guiden har ansetts hjälpsam av 19 personer och har ett genomsnittsbetyg på 4.2 stjärnor baserat på 8 recensioner. Har du en fråga om Graff G-4425-LM53 eller vill du ställa frågor till andra användare av produkten? Ställ en fråga
Sida 1/4
1
Dear CustomerEstimado Cliente
Thank you for selecting our product. We are confident we can fully satisfy Muchas gracias por elegir nuestro producto. Estamos seguros que podemos
satisfacer completamente sus expectativas ofreciéndole una amplia variedad
your expectations by offering you a wide range of technologically advanced
products which directly result from our many years of experience in faucet
de productos tecnológicamente avanzados que resultan directamente de
and fitting production.
muchos años de experiencia en grifos y su producción apropiada.
ENGLISH
~
ESPANOL
For care, use soft towel with soap and water only! Under no
circumstances should you use any chemicals. For faucets
with ORB (oil rubbed bronze) finish please be extra careful
not to damage, scuff or ruin the finish during the installation
and cleaning!
ATTENTION!
ATENCIÓN!
Para el cuidado, utilice solamente una toalla suave con jabón y aqua!
Bajo ninguna circunstancia no use productos químicos. Conlos grifos
de acabado ORB (bronce frotado con aceite) hay que tener un cuidado
especial para no dańar, arańar o destruir elacabado durante su
instalación o limpieza!
This faucet complies with NSF61/9, ASME/ANSI A112.18.1
and CSA B 125 Standards.
Este grifo se encuentra conforme con losestandares de NSF61/9,
de ASME/ANSI A112.18.1 y de CSA B 125.
Installation Instructions l Instrucciones de Instalación
KITCHEN FAUCET with PULL-OUT spray
LA LLAVE DE LA COCINA CON RETIRADA DE ROCIADA
LEVER
SCREW
CAP
CARTRIDGE COVER
NUT
CARTRIDGE
SLEEVE
PTFE WASHER
HOUSING
INNER BODY
SHOWER HOSE
SEAL
FLOW REG. CHECK VALVE
SHOWER HEAD
O-RING
AREATOR
RING
FLEXIBLE WASHER
8” PLATE
FLEXIBLE WASHER
STUD BOLT
NUT
RUBBER WASHER
STEEL WASHER
FLEXIBLE HOSE
INLET CHECK VALVE
HOSE WITH LONG ENDING
SEAL
HOSE WEIGHT
1
2
3
4
5
6
7
8
9
10
11
12
13
14
15
16
17
18
19
20
21
22
23
24
25
26
27
28
29
~
ESPANOL
ENGLISH
MANILLA
TORNILLO
TAPA
CUBIERTADELCARTUCHO
TUERCA
CARTUCHO
ANILLO
EMPAQUETADURAPTFE
BASTIDOR
CUERPOINTERIOR
MANGUERADELADUCHA
EMPAQUETADURA
VALVULADECHEQUEODEFLUIDO
CABEZADELADUCHA
ANILLO“O”
AREADOR
ANILLO
ARANDELAFLEXIBLE
PLACADE8”
ARANDELAFLEXIBLE
TORNILLO
TUERCA
ARANDELADEGOMA
ARANDELAMETALICA
MANGUERAFLEXIBLE
VALVULADECHEQUEODEENTRADA
MANGUERACONTERMINACIONALARGADA
EMPEQUETADURA
PESODELAMANGUERA
VISTA PULL-OUT4400
IOG 2035.00
Rev. 4 January 2007
2
For easy installation of your Para la instalación fácil de su grifo
GRAFF faucet you will need:de la GRAFF usted necesitará:
to READ ALL the instructions completely before beginning,LEER TODAS las instrucciones completamente antes de comenzar,
to READ ALL the warnings, care and maintenance information.LEER TODA la información sobre las advertencias,
To complete the project, you should:cuidado y mantenimiento.
gather the tools and all the parts you will need,Para terminar el proyecto, usted debe:
prepare the mounting area,recolectar las herramientas y todas las piezas que usted necesitará,
mount the faucet,prepare el área para el montaje,
connect the supply lines,monte el grifo,
finally test and flush the faucet.conecte las líneas de fuente,
You should have the following tools:finalmente pruebe y limpie el grifo con un chorro de agua.
Usted debe tener las herramientas siguientes:
Philips screwdriver,
destornillador Philips,
adjustable wrench,
llave ajustable,
channel pliers.
alicates acanalados.
l l
l l
l
l l
l l
l l
l l
l
l
l
l
l
l
l
~
ESPANOL
ENGLISH
This faucet complies with NSF61/9, ASME/ANSI A112.18.1
and CSA B 125 Standards.
Este grifo se encuentra conforme con losestandares de NSF61/9,
de ASME/ANSI A112.18.1 y de CSA B 125.
Installation Instructions lInstrucciones de Instalación
KITCHEN FAUCET with PULL-OUT spray
LA LLAVE DE LA COCINA CON RETIRADA DE ROCIADA
FIG. B
LEVER
CARTRIDGE COVER
NUT
CARTRIDGE
SLEEVE
PTFE WASHER
INNER BODY
HOUSING
SHOWER HOSE 59” (1500mm)
SEAL
FLOW REG. CHECK VALVE
SHOWER HEAD
SEAL
AREATOR
SLEEVE
O-RING SEAL
8” PLATE
FLEXIBLE WASHER
STUD BOLT
NUT
RUBBER WASHER
STEEL WASHER
FLEXIBLE HOSE 17-23/32” (450mm)
INLET CHECK VALVE
HOSE WITH LONG ENDING
7-7/8”(200mm)
SEAL
HOSE WEIGHT
1
2
3
4
5
6
7
8
9
10
11
12
13
14
15
16
17
18
19
20
21
22
23
24
25
26
27
~
ESPANOL
ENGLISH
MANILLA
CUBIERTADELCARTUCHO
TUERCA
CARTUCHO
ANILLO
EMPAQUETADURAPTFE
CUERPOINTERIOR
BASTIDOR
MANGUERADELADUCHA59”(1500mm)
EMPAQUETADURA
VALVULADECHEQUEODEFLUIDO
CABEZADELADUCHA
EMPAQUETADURA
AREADOR
ANILLO
EMPAQUETADURADEANILLO
PLACADE8”
ARANDELAFLEXIBLE
TORNILLO
TUERCA
ARANDELADEGOMA
ARANDELAMETALICA
MANGUERAFLEXIBLE17-23/32”(450mm)
VALVULADECHEQUEODEENTRADA
MANGUERACONTERMINACION
ALARGADA7-7/8”(200mm)
EMPAQUETADURA
PESODELAMANGUERA
PRESCOTT PULL-OUT 4730
FIG. C
LEVER
CARTRIDGE COVER
NUT
CARTRIDGE
BODY
SCREW
PTFE WASHER
HANDLE TUBE
SHOWER HOSE 59” (1500mm)
SEAL
FLOW REG. CHECK VALVE
SHOWER HEAD
SEAL
AREATOR
BASE
O-RING SEAL
8” PLATE
FLEXIBLE WASHER
STUD BOLT
NUT
RUBBER WASHER
STEEL WASHER
FLEXIBLE HOSE 17-23/32” (450mm)
INLET CHECK VALVE
HOSE WITH LONG ENDING
7-7/8” (200mm)
SEAL
HOSE WEIGHT
1
2
3
4
5
6
7
8
9
10
11
12
13
14
15
16
17
18
19
20
21
22
23
24
25
26
27
~
ESPANOL
ENGLISH
MANILLA
CUBIERTADELCARTUCHO
TUERCA
CARTUCHO
CUERPO
TORNILLO
EMPAQUETADURAPTFE
MANGUERADELADUCHA59”(1500mm)
EMPAQUETADURA
VALVULADECHEQUEODEFLUIDO
CABEZADELADUCHA
EMPAQUETADURA
AREADOR
BASE
EMPAQUETADURADEANILLO
PLACADE8”
ARANDELAFLEXIBLE
TORNILLO
TUERCA
ARANDELADEGOMA
ARANDELAMETALICA
MANGUERAFLEXIBLE17-23/32”(450mm)
VALVULADECHEQUEODEENTRADA
MANGUERACONTERMINACION
ALARGADA7-7/8”(200mm)
EMPAQUETADURA
PESODELAMANGUERA
TUBOFLEXIBLEDETELEDUCHA
7
6
5
15
16
19
21
22
23
20
26
9
27
25
18
17
234
8
1
24
91011
12
14
13
PERFEQUE PULL-OUT 4620
IOG 2035.00
Rev. 4 January 2007
3
1
2
3
4
5
6
7
6
15
16
18
23
24
26
9
25
21
22
19
20
27
17
8
91011
12
13
14
This faucet complies with NSF61/9, ASME/ANSI A112.18.1
and CSA B 125 Standards.
Este grifo se encuentra conforme con losestandares de NSF61/9,
de ASME/ANSI A112.18.1 y de CSA B 125.
Installation Instructions lInstrucciones de Instalación
KITCHEN FAUCET with PULL-OUT spray
LA LLAVE DE LA COCINA CON RETIRADA DE ROCIADA
1
The following parts are in the mounting assembly set inside box (fig. 1a 21,22,23,24).
Connect flexible hose (25)and hose with long ending (27)into proper holes (see bottom view at
fig. 1a). Screw stud bolts (21)into small holes.
If the sink has three holes use the 8” plate (19)(see fig. 1b). Insert the faucet into the fitting hole of
the sink making sure to insert ring (17)and flexible washer (18). The use of a deck plate is
optional. When installing the faucet without the deck plate on non-metal sinks please take care not
to overtighten it to avoid cracking the sink.
Insert the rubber washer (23), steel washer (24)on the stud bolt (21)then screw nut (22). The
faucet is mounted to the sink now.
Laspiezassiguientesestándentrodelacajadelcompletodemontaje(dis.1a21,22,23,24).
Conecte la manguera flexible (25)y la manguera con terminación alargada (27)dentro de los
agujeros apropiados (vea vista inferior de la dis. 1a). Entornillar el tornillo (21)en los agujeros
pequeńos.
Si el lavatorio tiene 3 agujeros use la placa de 8” (19) (vea fig. 1b). Inserte el grifo en el agujero
apropiado del lavatorio cerciorándose de insertar el anillo (17)y la arandela flexible (18). El uso de
la placa de apoyo es opcional. Instalando el grifo sin la placa en pilas que no estén hechas de
metal, tengan cuidado de no sobre apretarlo para evitar que se quiebre la pila.
Coloque la arandela de goma (23), y la arandela metálica (24)en el tornillo (21)entonces ajustar
la tuerca (22). El grifo ahora está ya instalado.
~
ESPANOL
ENGLISH
SINK
FREGADERO
FIG. 1b
1920
FIG. 1a
27
25
21
21
25
BOTTOMVIEW
VISTAINFERIOR
COLD
FRÍA
HOT
CALIENTE
17
18
23
24
22
21
25
27
IOG 2035.00
Rev. 4 January 2007
4
FIG. D
LEVER
FAUCET BODY
SPOUT
O-RING SEAL
SHOWER HOSE70” (1800 mm)
SEAL
PLASTIC INSERT
SPRAY BODY
SEAL
AERATOR INSERT
AERATOR BODY
FLEXIBLE HOSES
INLET CHECK VALVE
FLEXIBLE HOSE
OUTLET CHECK VALVE
RUBBER WASHER
STEEL WASHER
STUD BOLT
NUT
HOSE WEIGHT
1
2
3
4
5
6
7
8
9
10
11
12
13
14
15
16
17
18
19
20
~
ESPANOL
ENGLISH
MANILLA
CUERPODELGRIFO
GRIFO
EMPAQUETADURADEANILLO
MANGUERADELADUCHA70”(1800mm)
EMPAQUETADURA
INSERTORPLASTICO
CUERPODELPULVERIZADOR
EMPAQUETADURA
INSERTORDELAIREADOR
CUERPODELAIREADOR
MANGUERASFLEXIBLES
VALVULADECHEQUEODEENTRADA
MANGUERAFLEXIBLE
VALVULADECHEQUEODEEXITO
ARANDELADEGOMA
ARANDELAMETALICA
TORNILLO
TUERCA
PESODELAMANGUERA
BOLLERO PULLDOWN 4830
3
20
14
13
15
6
5
12
2
1
5
6
7
8
9
10
11
4
16
17
18
19
This faucet complies with NSF61/9, ASME/ANSI A112.18.1
and CSA B 125 Standards.
Este grifo se encuentra conforme con losestandares de NSF61/9,
de ASME/ANSI A112.18.1 y de CSA B 125.
Installation Instructions lInstrucciones de Instalación
KITCHEN FAUCET with PULL-OUT spray
LA LLAVE DE LA COCINA CON RETIRADA DE ROCIADA
IOG 2035.00
Rev. 4 January 2007
5
2
FIG. 2bFIG. 2cFIG. 2a
FIG. 2d
27
11
27
11
11
14
12
29
28
Supply pipe instalation
Las tuberias de instalación proporcionadas
9/16"-24UNEF
29
26
26
25
Redsticker
Etiquetaroja
Bluesticker
Etiquetaazul
l
l
For BOLLERO 4830Model (see fig.2d & exploded diagram on fig.D)
Screw stud bolts (18)into small holes of the faucet.
Insert the rubber washer (16), steel washer (17)on the stud bolt
(18), and then screw the nut (19).
Complete the installation by connecting the hose (14)and outlet
check valve (15)with shower hose (5)making sure to install the seal (6).
In order to ensure a slide run long enough to pullout the shower
head attach the hose weight (20), just above the bend (use screws
provided).
Connect the flexible hoses (12)and inlet check valves (13)with
supply pipe installation. Please check the label on a hose for identification
of hot (red sticker)or cold (blue sticker) water.
CONGRATULATIONS!Your installation in now complete!
Para el modelo BOLLERO 4830(veadis.2d y dis.D)
Entornillar eltornillo (18)en los agujeros pequeńos.
Coloque la arandela de goma (16), y la arandela metálica (17)en el
tornillo (18)entonces ajustar la tuerca (19).
Complete la instalacion conectando a la manguera (14)y valvula de
chequeo de exito (15)a la mangura de la ducha (5)asegurandose de
colocar la empaquetadura (6).
Para asegurar un buen deslice altirar de la ducha, instale el peso de la
manguera (20), apenas sobre la curva (use los tornillos proporcionados).
Conecte las mangueras flexibles (12)y la válvula de chequeo de
entrada (13)a las tuberias de instalación proporcionadas.Comprobar la
etiqueta de la manguera para identificar si es para agua caliente
(etiqueta roja) o agua fria (etiqueta azul).
FELICIDADES!Su instalacion esta completa ahora!
ENGLISH
~
ESPANOL
ll
ll
For the VISTAmodel:Para el modelo VISTA:
Place the shower hose (11)into faucet spout with the thinner ending Coloque la manguera (11)en canalón del grifo con el terminación más
through the sink hole (see fig.2a).fina a través del agujero del lavatorio (vea dis. 2a).
For the VISTA, PRESCOTTand PERFEQUEmodels:Para el modelo VISTA, PRESCOTTy PERFEQUE:
Connect the shower hose (11)to the shower head (14)making sure to Conecte la manguera de ducha (11)al cabezal de la ducha (14)
insert seal (12), (see fig.2b).asegurándose de colocar la empaquetadura (12),(vea dis. 2b).
Complete the installation by connecting the hose (27) with the shower Complete la instalación conectando a la manguera (27)a la manguera de
hose (11)making sure to insert seal (28)(see fig. 2b).la ducha (11) asegurándose de colocar la empaquetadura (28) (vea dis. 2b).
In order to ensure a slide run long enough to pull out the shower head Para asegurar un buen deslice al tirar de la ducha, instale el peso de la manguera
attach hose weight (29), just above bend (use screws provided). (see fig 2b).(29), apenas sobre la curva (use los tornillos proporcionados) (vea dis. 2b).
Connect the inlet check valves (26)with supply pipe installation (see fig. Conecte la válvula de chequeo de entrada (26)a las tuberias de
2c)then connect flexible hoses (25)to the inlet check valves (26).Please instalación proporcionadas (vea dis. 2c)entonces conecte las mangueras
check label on hose for identification of hot (red sticker) or cold (blue sticker) flexibles (25)la válvula de chequeo de entrada (26).Comprobar la etiqueta
water.de la manguera para identificar si es para aguacaliente (etiqueta roja) o agua
fria (etiqueta azul).
CONGRATULATIONS!Your installation in now complete!FELICIDADES!Su instalacion esta completa ahora!
ENGLISH
~
ESPANOL
14
14
6
20
5
12
18
12
BOTTOM VIEW
VISTA INFERIOR
This faucet complies with NSF61/9, ASME/ANSI A112.18.1
and CSA B 125 Standards.
Este grifo se encuentra conforme con losestandares de NSF61/9,
de ASME/ANSI A112.18.1 y de CSA B 125.
Installation Instructions lInstrucciones de Instalación
KITCHEN FAUCET with PULL-OUT spray
LA LLAVE DE LA COCINA CON RETIRADA DE ROCIADA
IOG 2035.00
Rev. 4 January 2007
6
3
TAP FUNCTION VERIFICATION lVERIFICACION DE LA FUNCION DE TAPADO
~
ESPANOL
When the tap is turned on, by pressing front push-button A(see fig.
3)the water flows out of the aerator and is then diverted to the shower. To
get the flow back to aerator position press rear push-button B (see fig. 3).
When the tap is turned off the flow is automatically diverted back to
the aerator.
Cuando la tapa esta abierta, presionanando el botón frontal A (vea
dis. 3)el agua fluira hacia afuera hacia el aereador y de alli transferido a la
ducha. Para regresar el flujo al. aereador, presione el botón trasero B(vea
dis. 3).
Cuando la tapa esta cerrada, el agua es diriguida automaticamente
al. aereador.
ENGLISH
FIG. 3
AB
All dimensions and drawings are for reference only. For details, pleaserefer to actual products.
Todas las dimensiones y dibujos sirven únicamente de referencia. Paraconsultar detalles, ver los productos.
ENGLISH
~
ESPANOL
ENGLISH
~
ESPANOL
4
CAREANDMAINTENANCElCUIDADOYMANTENIMIENTO
Your Graff faucet is designed and engineered in accordance with Su grifo de la Graffesta diseńado y dirigido acuerdocon los
the highest quality and performance standards. Be sure not to estándares de funcionamiento y calidad más altos. Esteseguro no
damage the finish during installation. Care should be given to the dańar las terminaciones del grifo durante la instalación.Cuide el
cleaning of this product. Although its finish is extremely durable, it producto manteniendolo siempre limpio. Aunque su acabado es
can be damaged by harsh abrasives or polish. Never use extremadamente durable, puede ser dańado por los abrasivos o
abrasive cleaners, acids, solvents, etc. to clean any Graff pulientes ásperos. Nunca utilice limpiadoresabrasivos, ácidos,
product. To clean, simply wipe gently with a damp cloth and solventes, el etc. para limpiar cualquier producto de la Graff.
blot dry with a soft towel.Para limpiar, simplemente use un pańo húmedo y seque con
una toalla suave.
WARRANTYlGARANTÍA
Warranty conditions and warranty registration card are outlined on a Las condiciones de la garantía y la tarjeta del registro de la garantía
separate sheet.se encuentran en una pagina separada.
This faucet complies with NSF61/9, ASME/ANSI A112.18.1
and CSA B 125 Standards.
Este grifo se encuentra conforme con losestandares de NSF61/9,
de ASME/ANSI A112.18.1 y de CSA B 125.
Installation Instructions lInstrucciones de Instalación
KITCHEN FAUCET with PULL-OUT spray
LA LLAVE DE LA COCINA CON RETIRADA DE ROCIADA
BACKFLOW PROTECTION AND FLOW RATE INFORMATION
This faucet is manufactured using 3 spring loaded check valves. Two are located in the hot and cold water inlets and one is located in the shower handset. The
check valves are a non-return type and prevent contaminants from entering the potable water system in a home. DO NOT REMOVE from faucet!
Maxflowrate1.8gpm(6.8L/min.)at60psi(4.1bar).
INFORMACIÓN SOBRE LA PROTECCIÓN DE LA EXPULSIÓN
Este grifo es manufacturado con 3 válvulas de chequeo por resorte. Dos están situadas en las entradas de agua caliente y agua fría, la tercera está localizada
en la cabeza de la ducha. Las válvulas de chequeo son del tipo de no retorno y evitan que los contaminantes se incorporen al sistema de agua potable en la
casa. NO QUITAR DEL GRIFO!
Flujomáximo1.8gpm(6.8L/min.)con60psi(4.1bar).
l
l
l
l
~
ESPANOL
ENGLISH
REMOVE OLD FAUCETQUITE EL GRIFO VIEJO
Turn off the water supplies (hot and cold water).Limpie las tuberias a fondo y cierre las llaves de suministro de agua
Disconnect supply lines and remove old faucet.(agua caliente y fría).
Clean the sink surface of putty, dirt., etc.Desconecte las líneas de suministro y quite el grifo viejo.
BEFORE INSTALLINGLimpie la superficie del fregadero de la masilla, suciedad, etc.
Before installing the faucet, it is good to rinse the supply pipelinesANTES DE LA INSTALACIÓN
in order to do away with the dirty residue.Antes de instalar el grifo, es bueno enjuagar las tuberías suministro para
We recommend installing the filter taps.eliminar residuos.
Recomendamos el instalar los tapones de filtro.
ll
l
ll
l
l
l
l
l
K
Rev. 1 July 2014
IOG 2847.00
For easy installation of your Para la instalación fácil de su grifo
GRAFF faucet you will need:de la GRAFF usted necesitará:
to READ ALL the instructions completely before beginning,LEER TODAS las instrucciones completamente antes de comenzar,
to READ ALL the warnings, care and maintenance information.LEER TODA la información sobre las advertencias,
To complete the project, you should:cuidado y mantenimiento.
gather the tools and all the parts you will need,Para terminar el proyecto, usted debe:
prepare the mounting area,recolectar las herramientas y todas las piezas que usted necesitará,
mount the faucet,prepare el área para el montaje,
connect the supply lines,monte el grifo,
finally test and flush the faucet.conecte las líneas de fuente,
You should have the following tools:finalmente pruebe y limpie el grifo con un chorro de agua.
Usted debe tener las herramientas siguientes:
Philips screwdriver,
destornillador Philips,
adjustable wrench,
llave ajustable,
channel pliers.
alicates acanalados.
l l
l l
l
l l
l l
l l
l l
l
l
l
l
l
l
l
~
ESPANOL
ENGLISH
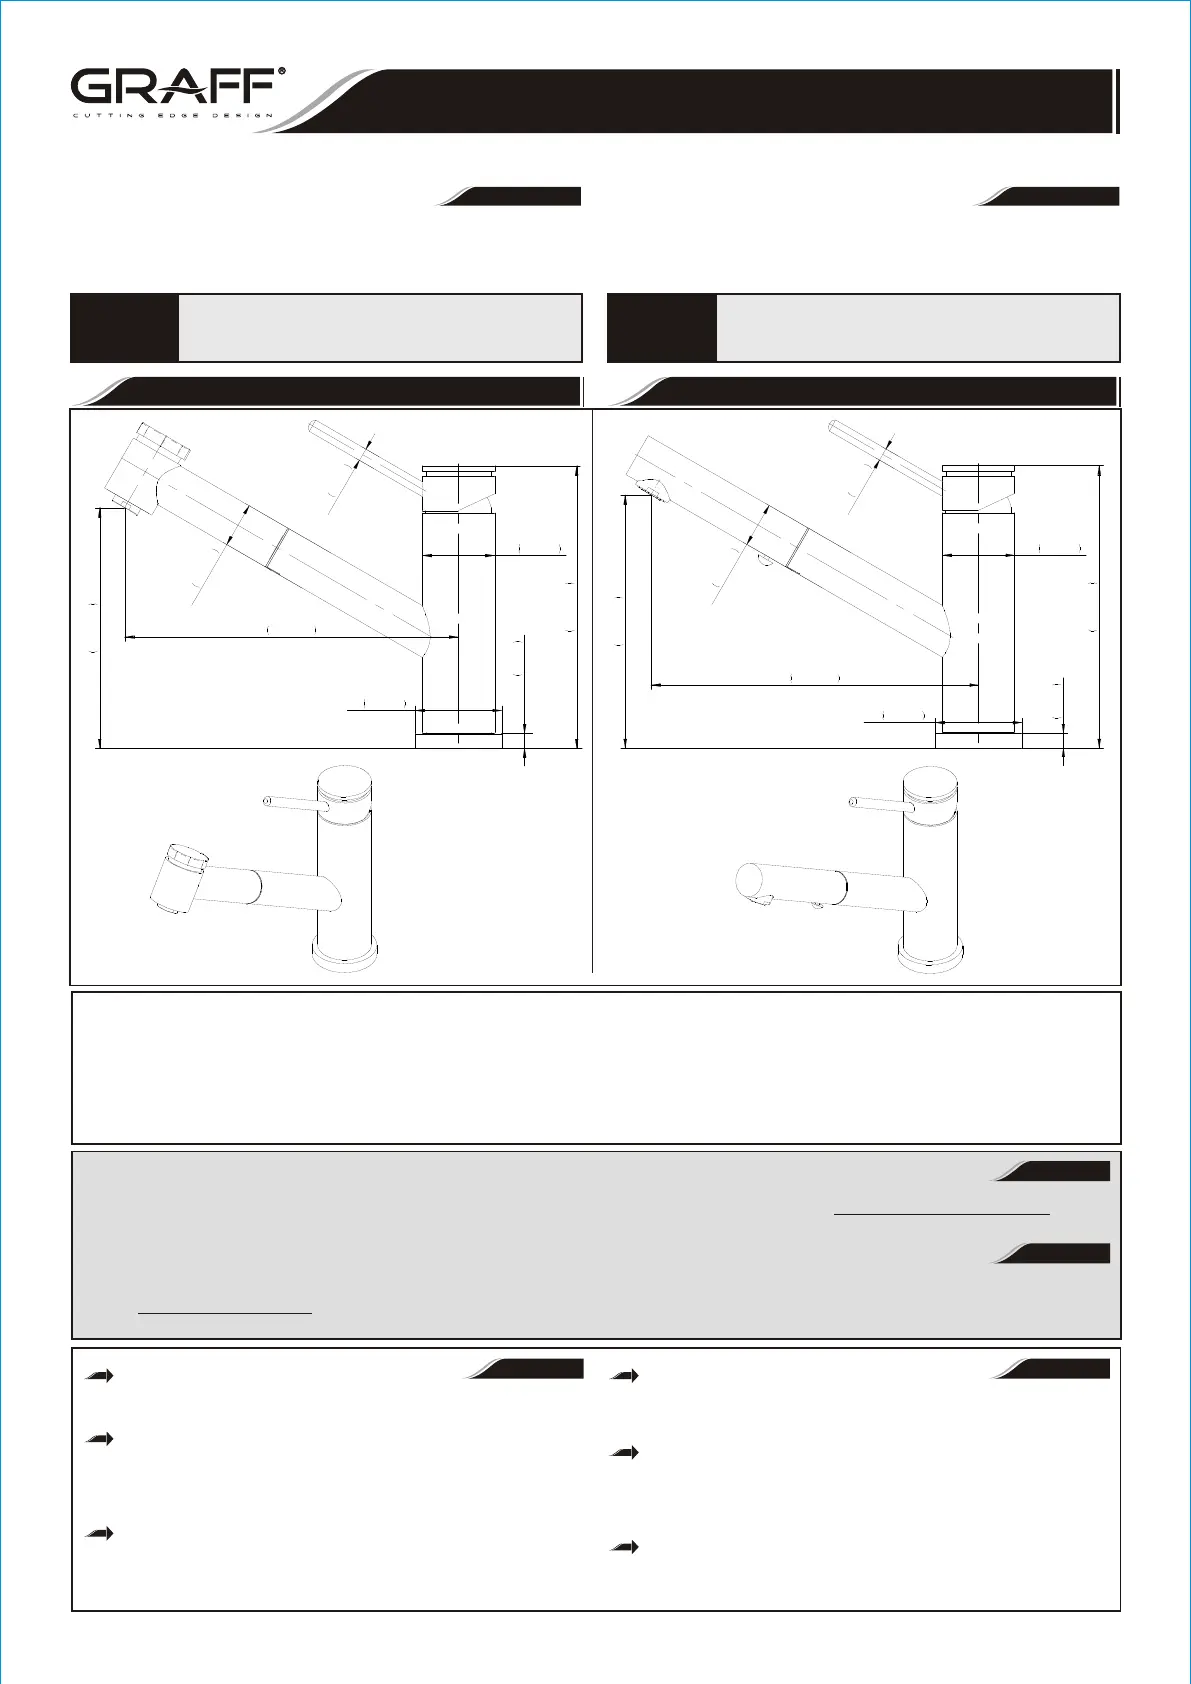
-
G 4425 LM53
-
Modelo
Model
G 4430 LM53
--
Modelo
Model
max.max.
max.max.
3/8"
9mm
6-15/16"
176mm
1-3/4"
45mm
O
8-3/16"
208mm
5-7/8"
150mm
1
-
1
/
8
"
2
8
m
m
O
2-1/8"
54mm
O
5
/
1
6
"
8
m
m
O
3/8"
9mm
6-15/16"
176mm
1-3/4"
45mm
O
1
-
1
/
8
"
2
8
m
m
O
2-1/8"
54mm
O
5
/
1
6
"
8
m
m
O
6-3/16"
158mm
8-1/16"
204mm
Produktspecifikationer
| Varumärke: | Graff |
| Kategori: | Kran |
| Modell: | G-4425-LM53 |
Behöver du hjälp?
Om du behöver hjälp med Graff G-4425-LM53 ställ en fråga nedan och andra användare kommer att svara dig
Kran Graff Manualer

28 Augusti 2025
27 Augusti 2025
26 September 2024
Kran Manualer
Nyaste Kran Manualer
3 April 2026
3 April 2026
3 April 2026
3 April 2026
3 April 2026
2 April 2026
2 April 2026
26 Mars 2026
26 Mars 2026
26 Mars 2026