Hager WBMDUR Bruksanvisning
Läs gratis den bruksanvisning för Hager WBMDUR (2 sidor) i kategorin vägguttag. Guiden har ansetts hjälpsam av 14 personer och har ett genomsnittsbetyg på 4.3 stjärnor baserat på 8 recensioner. Har du en fråga om Hager WBMDUR eller vill du ställa frågor till andra användare av produkten? Ställ en fråga
Sida 1/2
6LE007713B
01
WBMDUR
Rotary dimmer
Hager Electro Pty. Ltd., Unit 17/2-8 South Street, RYDALMERE NSW 2116, AUSTRALIA
The terminal block must be mounted in either
its original shipped position or on the rear of the
module by means of the enclosed cable tie.
(1) Rotary knobs
(2) Retaining lugs for Rotoloc
®
fastening
(3) Connection cable
(4) Terminal block
Function
Correct use
-Switching and dimming of incandescent lamps,
HV halogen lamps and dimmable 230 V LED
lamps; electronic transformers with low voltage
halogen lamps.
-Unsuitable for fans and motors
-Suitable for indoor use only, but no drip and no
spray water.
-Suitable for Hager Rotoloc switch plates only
Product characteristics
-Phase cut-o dimmers
-Wide dimming range down to the lowest
brightness for many lamps
-Programmable minimum brightness
-Additional congurable functions
-Automatic storage of the switch-o brightness
level as switch-on brightness level
-Electronic short circuit, overload and thermal
protection
-Multi-way dimming available only with use of
the WBMSLL slave mechanisms
-Non volatile device settings
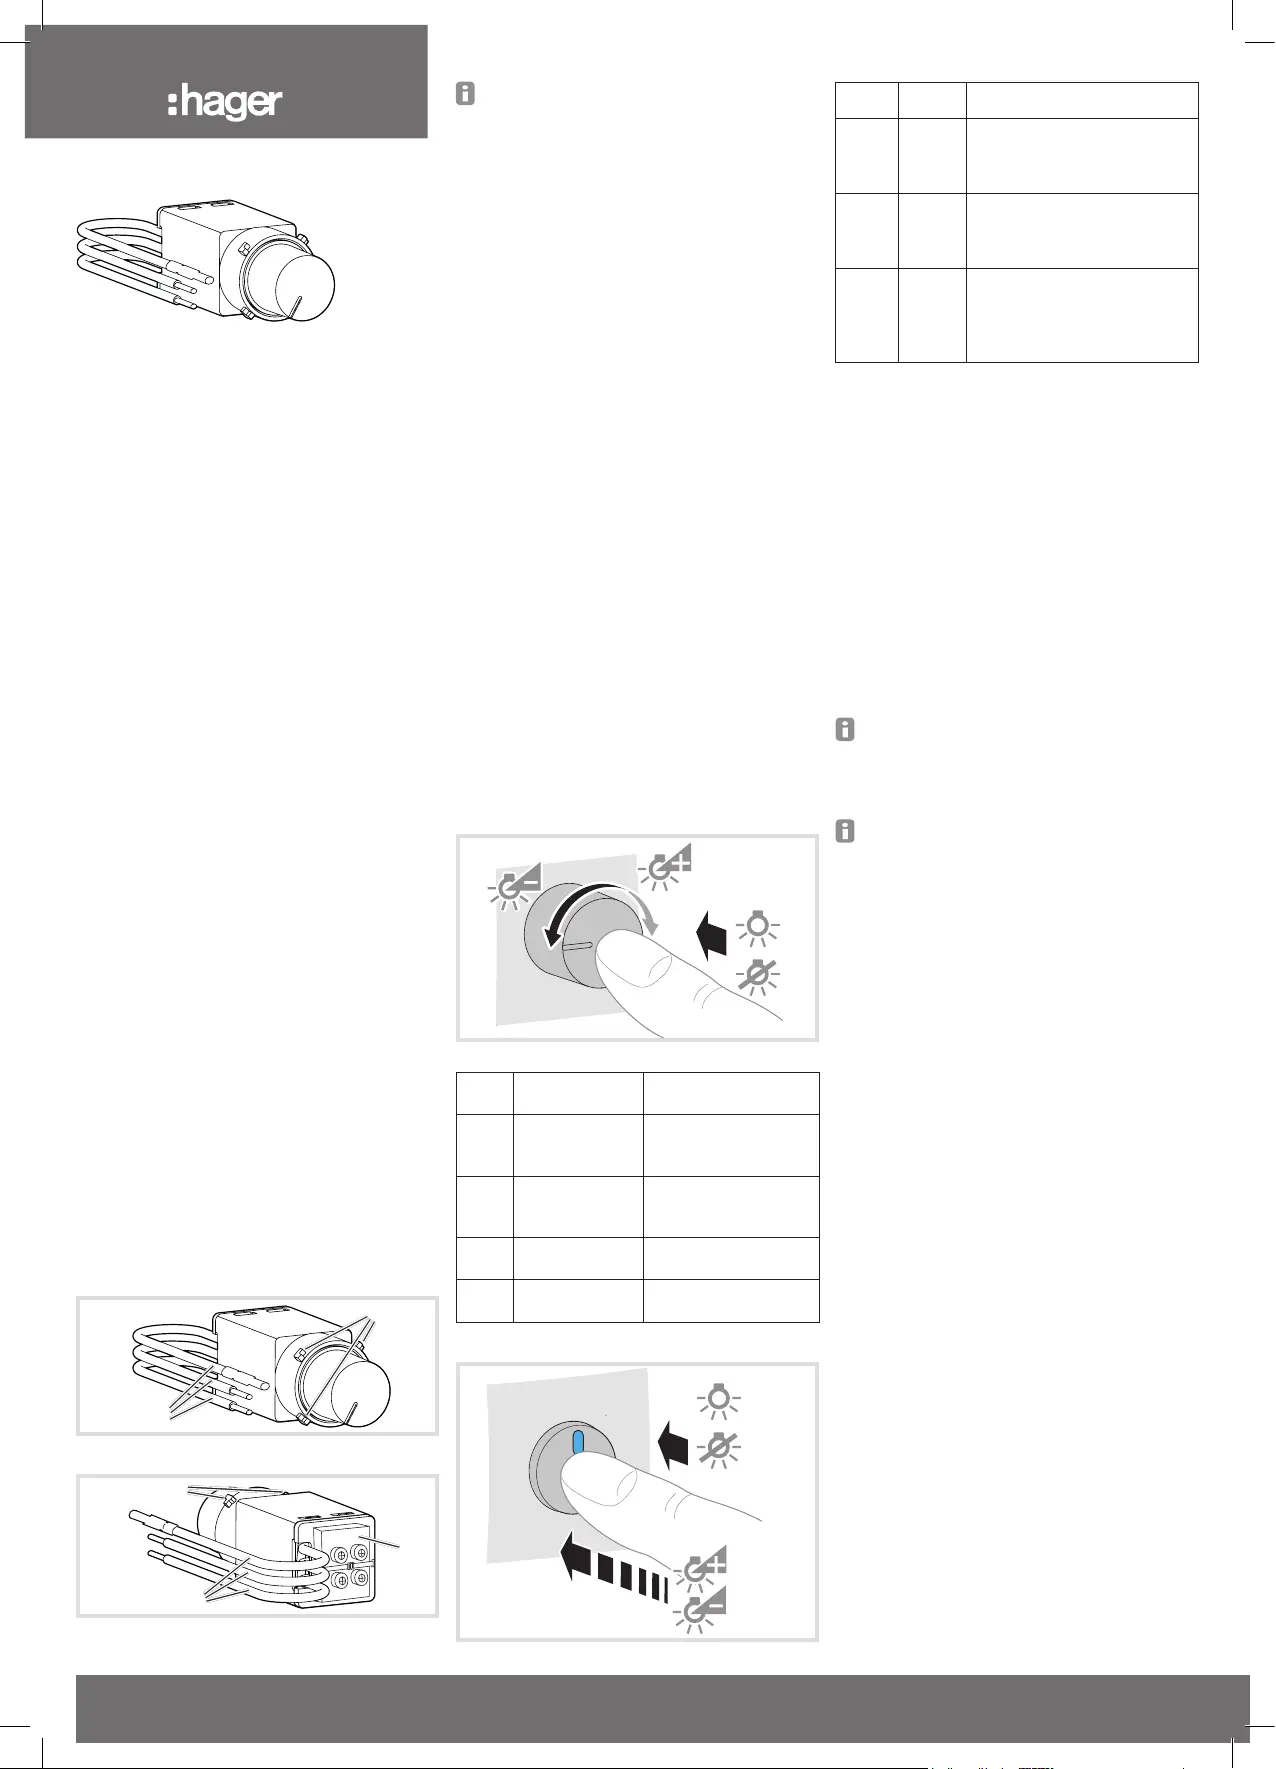
Control
Fig. 3: Rotary dimmer operation
Load
state
ActionResult
OFFShort press
rotary knob
Switch ON with saved
switch-on brightness
level.
> 0%Short press
rotary knob
Switch OFF and save
brightness as switch-
on brightness level.
> 0%Turn rotary knob
anticlockwise
Dim down the light.
> 0%Turn rotary knob
clockwise
Dim up the light.
Table 1: Rotary dimmer operation
Fig. 4: Optional slave unit operation
Load
status
ActionResult
OFFShort
press of
push-
button
Switch ON with saved switch-
on brightness level.
> 0%Short
press of
push-
button
Switch OFF and save bright-
ness as switch-on brightness
level.
> 0%Long
press of
button
With every long push-
button operation within 12 sec:
Dimming with alternating direc-
tion, otherwise device will dim
up, until max. level is reached.
Table 2: Operation on slave unit / push-button
Adjusting the minimum brightness for the
rotary dimmer
The minimum brightness level can be adjusted to
prevent poor switch-on behaviour or ickering of
the load in the lower dimming range.
Switch o load.
Press and hold rotary knob for approx 10
seconds.
The load will ash once after 3 seconds and
then ash a second time after 10 seconds.
Release the rotary knob.
The device is in ne adjustment mode for the
minimum brightness level and the lamp is
switched on at the minimum brightness level.
Depending on the lamp, the minimum bright-
ness level of the lights installed may be too
low and the lights may appear o, gradually
increase the brightness level by rotating the
knob clockwise.
If no actions are performed within 10 seconds,
the dimmer exits programing operation.
Gradually turn the rotary knob anticlockwise.
This reduces the minimum brightness.
Gradually turn the rotary knob clockwise.
This increases the minimum brightness.
Once desired min lighting level is reached, wait
10 seconds for device to store the setting.
The load will be switched o, the dimmer re-
turns to normal operation.
Congurable additional functions
The additional functions can be congured by
pressing the rotary dimmer for the required number
of times.
Kick-start
A short voltage burst when lamp is initially turned
on to support lamp start-up.
Reduced maximum brightness
A non-adjustble voltage reduction for suppressing
ickering at maximum brightness.
Recovering the previous load state when power
is restored after a power cut
The status of the load prior to power loss will be
restored at power-on.
Conguration additional functions
Switch o load.
Press and hold rotary knob for approx 10
seconds.
The load will ash once after 3 seconds and
then ash a second time after 10 seconds.
Release the rotary knob.
The device is in ne adjustment mode for the
minimum brightness level and the lamp is
switched on at the minimum brightness level.
Safety instructions
Electrical equipment must only be installed and
assembled by a qualied electrician in accord-
ance with the relevant installation standards,
guidelines, regulations, directives, safety and ac-
cident prevention regulations of the country.
Failure to comply with these instructions may re-
sult in damage to the device, re or other hazards.
Hazard due to electric shock. The device is not
suitable for safe disconnection of the mains sup-
ply. Even when the device is switched o, the
load is not isolated from the mains supply.
Do not connect non-dimmable lamps, their trans-
formers or operating devices. Observe manufac-
turer's data.
These instructions are an integral component of
the product and must be retained by the end user.
Design and layout of the device
(2)
(1)
(3)
Fig. 1: Front view
(2)
(3)
(4)
Fig. 2: Rear view
Produktspecifikationer
| Varumärke: | Hager |
| Kategori: | vägguttag |
| Modell: | WBMDUR |
Behöver du hjälp?
Om du behöver hjälp med Hager WBMDUR ställ en fråga nedan och andra användare kommer att svara dig
vägguttag Hager Manualer

11 September 2025
10 September 2025
10 September 2025
19 Juni 2025
18 Juni 2025
18 Juni 2025
18 Juni 2025
18 Juni 2025
18 Juni 2025
18 Juni 2025
vägguttag Manualer
Nyaste vägguttag Manualer
26 Mars 2026
23 Mars 2026
22 Mars 2026
14 Mars 2026
11 Mars 2026
6 Mars 2026
25 Februari 2026
31 Januari 2026
30 Januari 2026
15 Oktober 2025