High One HI3227HD-GM Bruksanvisning
Läs gratis den bruksanvisning för High One HI3227HD-GM (2 sidor) i kategorin Tv. Guiden har ansetts hjälpsam av 15 personer och har ett genomsnittsbetyg på 5.0 stjärnor baserat på 6 recensioner. Har du en fråga om High One HI3227HD-GM eller vill du ställa frågor till andra användare av produkten? Ställ en fråga
Sida 1/2
TELEVISION SETX 1
REMOTE CONTROLX 1
STANDX 2
WHAT'S IN THE BOX
SCREWSX 2
QUICK USER GUIDEX 1
1.Place the TV flat on a table
(Caution: Place a foam pad under the machine to prevent scratching.)
2.Align the screw threads on the bracket and the underside of the TV (Figure 2)
3. Attach the stand and screen with the 2 screws provided. (Figure 3)
4.Rear view appearance after installation. (Figure 4)
5. Sleep: To TURN the TV on and off.
Remark:
- Unplug the power plug first when installing or removing the TV stand. To prevent damage to the TV, contact
one or more partners for assistance installing or removing the TV stand.
BASE INSTALLATION & CONNECTION
WALL MOUNTING
Usstandard BM*12 e 4
screws( screws,not 4
included) to mount this
TV
*Imp
ortantUse75interference: a Ωantennacabletoeliminate. Theantennacablebe shouldnot
closeinsert75jackdirectly . TV, tothepowercordWhenusingcable the Ωantenna intothewall
outlet,beorofwhichshouldconnectedantennatothebuilding'scommunaltheroofantennathe
house
Hanging the TV on a wall
WarningForinstallation,:safe follow these safety instructions:
• Checkthatthenatureof thewallorpartitioniscapableofsupportingtheweightof theTV and
wall mount.
• Makesureyouusetherighttypeofdowelaccordingtothenaturewall ofthe (concrete,brick,
plasterboard, plaster tile, etc.). Ifin doubt, seek professional advice.
• Followtheinstallationinstructionsthatcamewiththewallmountandusethescrews
recommended by the manufacturer.
• the InstallTV on a .verticalwall
• the Checkthatcable routing is safe for people
(Stumble, fall).
●
●
●
●●
UsestandardBMmmscrewsscrews, 4*12 (4 not included) to mount this TV. The use of
differentscrewsdamage ofthespecifiedtypewill thewall mountbracketandvoidtheproduct
warranty.
●
●
●
●● a Contactprofessional for helpwith wall mounting your TV.
●
●
●
●● Donotmount the TV on the wall when itis turnedon.
●
●
●
●● to the Referinstructions for your wall mount bracket.
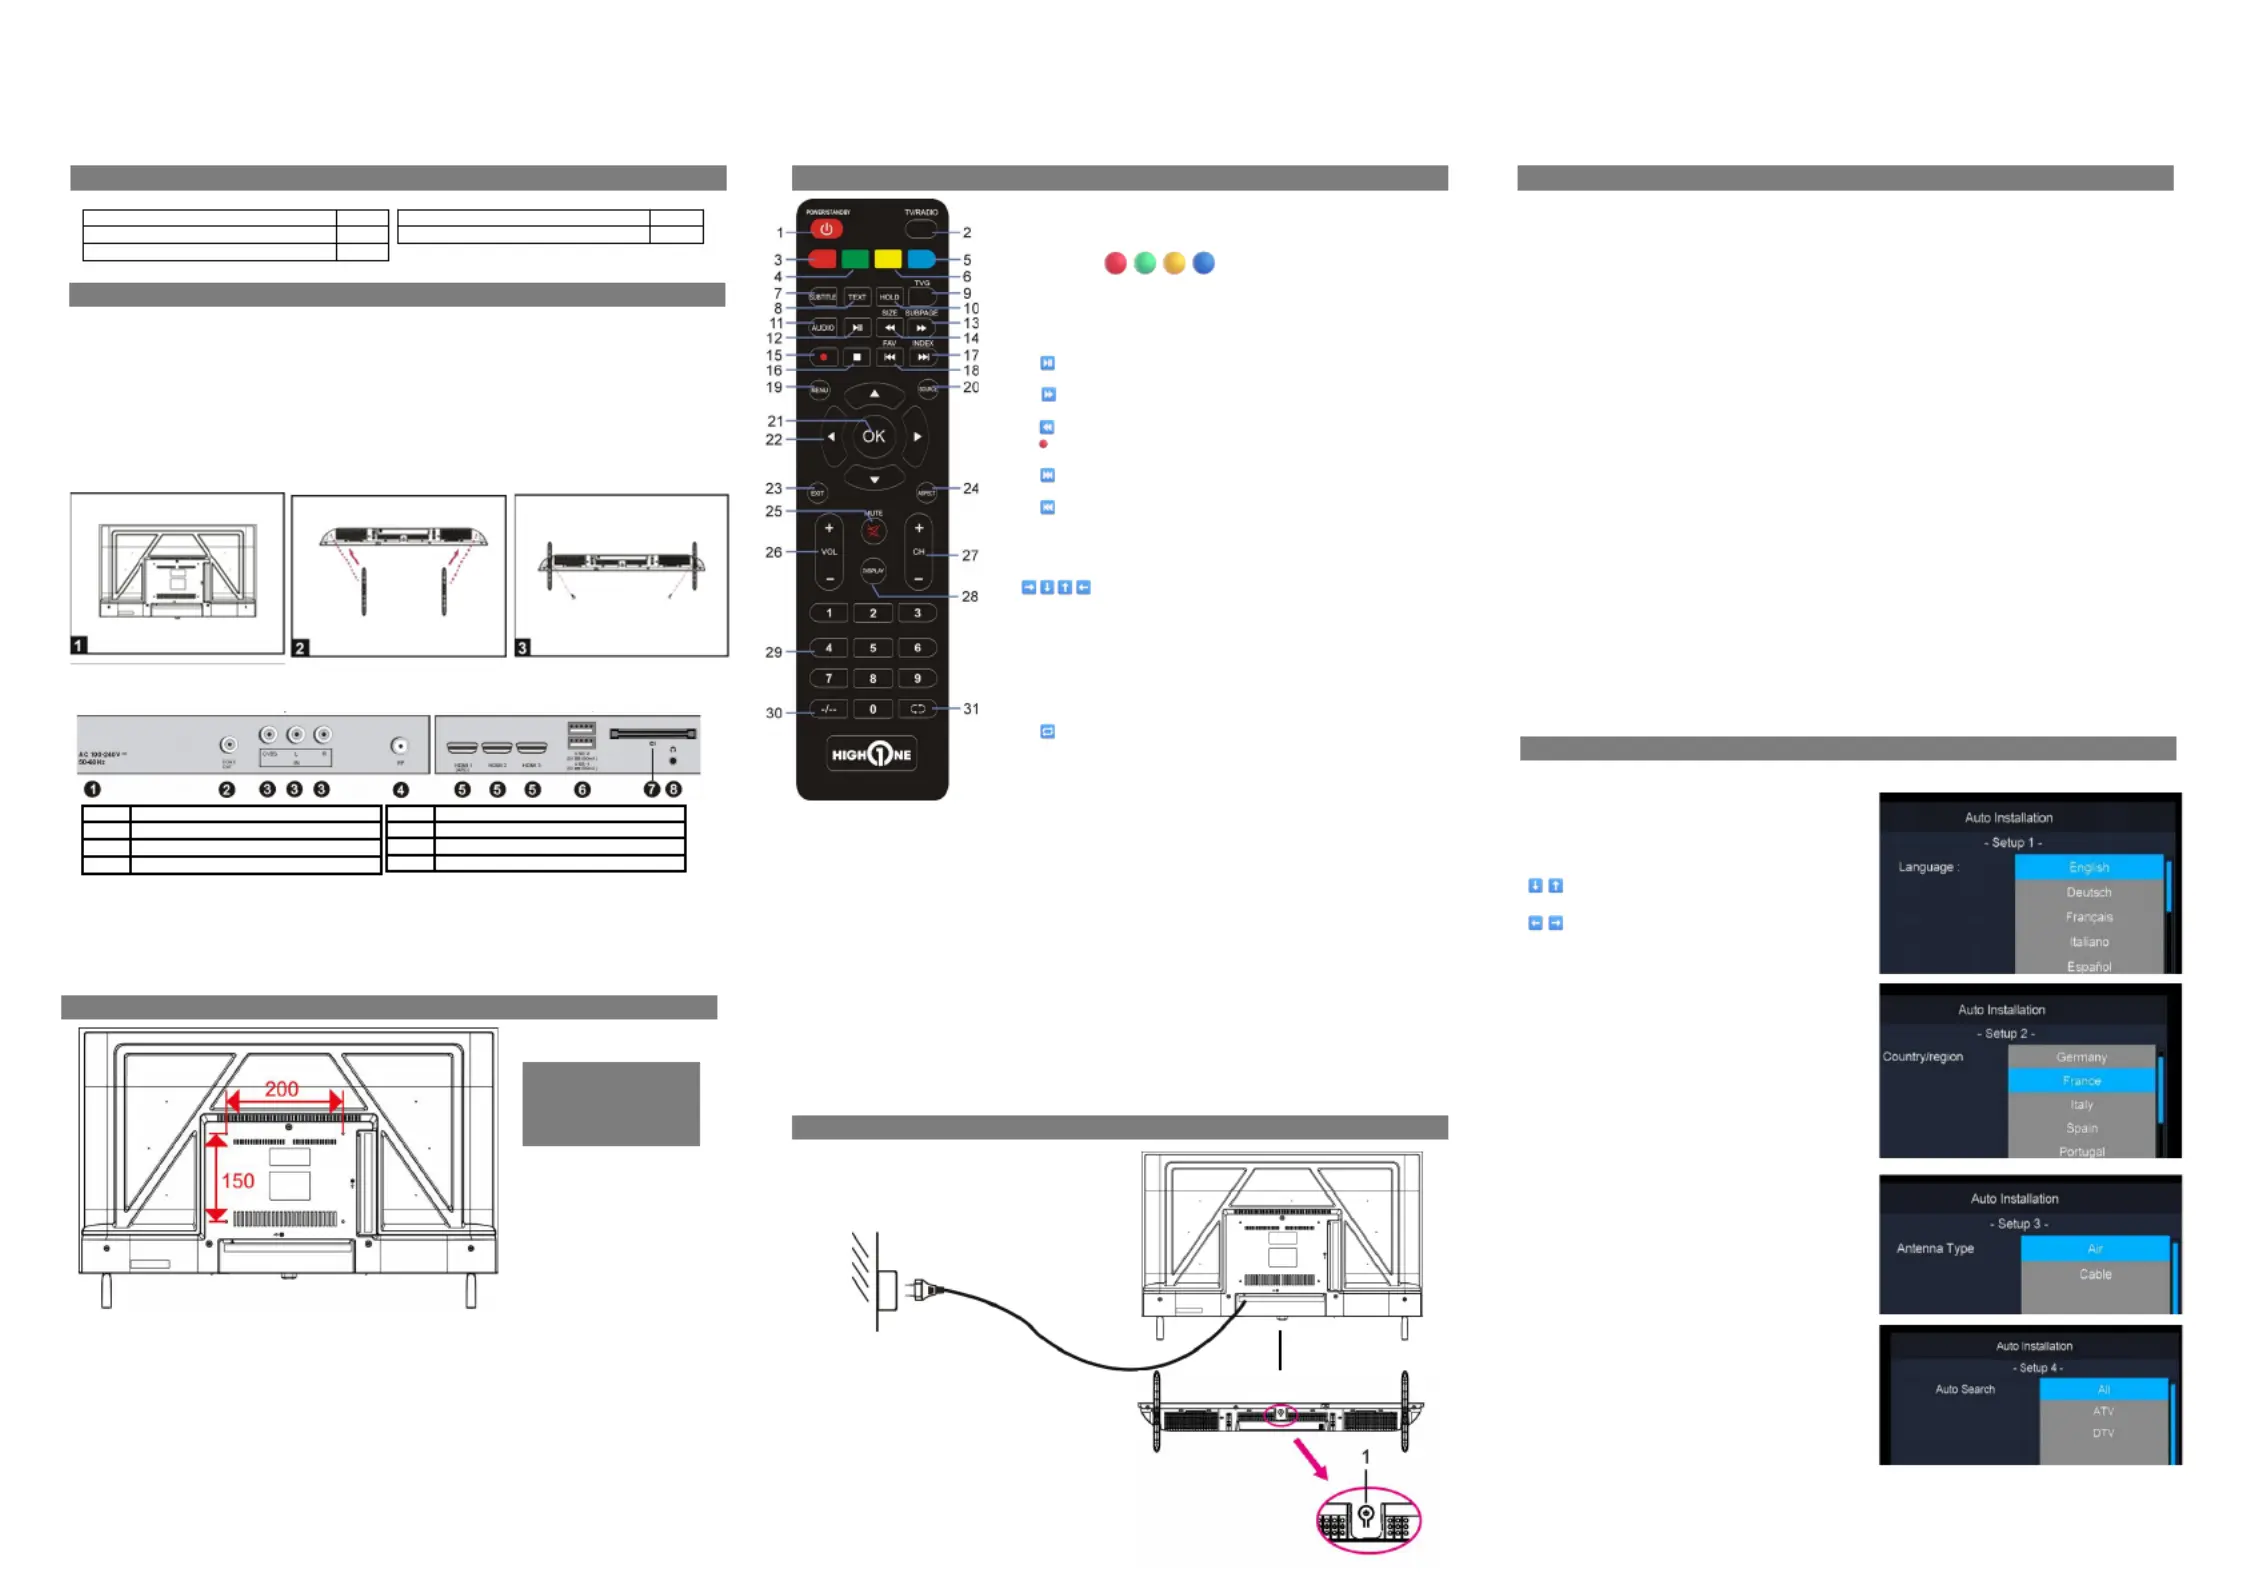
REMOTE CONTROL
The remote controlmustbe usedwithin theeffective receptionrangeofthe
television. remote TV's make Pointthecontrolattheinfraredreceiverandsure
therenoobstacles are in . betweenItsnormaloperatingdistancewillbereduced
bysunlightor direct lamplight. Be . carefulwhenusingtheremotecontrolDonot
drop it,step onit,orexpose itto .liquids
NoteTheandpositionthe: symbols of remote controlcontrolsmayvaryby
model.
Preparingtheremotecontrol
Insertbatteriesthecontrolaccordingthepolarity AAA two into remote to -) (+/
symbolsindicated . (Batteries notincluded)
Differenttypesbatteriesornew of andusedbatteriesshouldbemixed not .
Batteriesbeinstalledinpolaritymannerbatteriesshould must a . Used be
removedfromofsafelythem . theproductBatteriesmustbedisposed . Place in
thecollection binsprovided (check withyourretailer)to protecttheenvironment .
Warningbethatfrom: Batteriesshouldnot exposedtoexcessiveheatsuchas
thesun,fire, or similar origin.
CONNECTION TO THE POWER SOURCE
1.STANDBY: Allows you to put the device in
standby mode, a second press turns it on.
2. Remote Control Sensor/Power Indicator: In
standby mode, the indicator light is red; When
illuminated, the light is blue
MAKE SURE THAT ALL EQUIPMENT AND THE POWER PLUG ARE PROPERLY PLUGGED IN AND
THAT THE DEVICE IS SET TO THE CORRECT MODE BEFORE ANY TYPE OF MANIPULATION.
Press the SLEEP button on the device or remote control to turn on the device (the light turns blue); Press this
key again to turn off (sleep mode) the device (the light turns red).
SELECT THE DESIRED PROGRAM
Press the CH+ key to play the next channel.
Press the CH- key to play the previous channel.
Press the number keys on the remote control directly to select the desired program.
VOLUME CONTROL
Press the VOL+ or VOL button - to adjust the current volume level. Available Adjustment Range: 0-100.
MUTE CONTROL
Press the MUTE key to mute the sound, press it again to turn the sound back on.
SOURCE SETTINGS
Press the SOURCE button on the remote control to display the list of sources.
Press the UP and DOWN navigation key to select the desired input source, and then press OK to confirm the
selection.
MULTIAUDIO TUNING
Press the MENU button on the remote control and use the navigation keys to select the desired audio
language.
NOTE: To enable this feature, make sure the channel you're watching supports multi audio languages.
INFORMATION DISPLAY
Press the INFO button on the remote control to display the current program information.
MEDIA PLAYBACK
Insert a USB storage device into the USB port before performing the following steps.
Press the SOURCE button on the remote control to switch the unit to USB mode.
Press the UP/DOWN/LEFT/RIGHT navigation keys to move the cursor.
Press the BACK button to return to the previous page of the menu.
BASIC USE
MAKE SURE THAT ALL EQUIPMENT AND THE POWER PLUG ARE PROPERLY PLUGGED IN AND THAT THE DEVICE IS SET TO THE CORRECT MODE BEFORE ANY TYPE OF
MANIPULATION.
2
FIRST INSTALLATION
1
STANDBY
Put the TV on standby or on.
2 TV/RADIO
Switch between TV and radio mode.
3 / 4 / 5 / 6
7 SUBTITLE
Enable/
disablesubtitles.
8 TEXT
View
availableteletext.
9 EPG
View
the e-Program Guide.
10
HOLD
Hold the
teletext.
11
AUDIO
Change the available audio track.
12
Start/pause playback.
13
SUBPAGE
Enter a subpage of the teletext.
Move
quickly.
14
SIZE
Change the size of the teletext.
To
retreatquickly.
15
This feature is not available.
16
Stop playback.
17
.
Read the
followingChapter.
INDEX
Display the index of teletext.
18
.
Read the
previousChapter.
FAV
View a list of favorite channels.
19
MENU
Call up the main menu or go back to the previous menu.
20
SOURCE
Select the desired input source.
21 OK
Confirm
selection.
22
Navigation buttons.
23
EXIT
Exit the menu page.
24
ASPECT
Change the aspect ratio of the image on the screen.
25 MUTE
Mute the
sound.
26 VOL +/
-
Increase/decrease the volume level.
27 CH +/
-
Read the next/previous program.
28 DISPLAY
View
availableprogram information.
29 DIGITS (0
-9)
Enter string numbers or values
30
-/--
Change the number while watching TV programs.
31.
Go back to the previous channel.
5HDMI inputs1/2/3
6PortsUSB 1/2
7CI Port (Common Interface)
8HeadphoneAudio Output
1-AC power socket 100240V
2
Coaxial audio output
3
CVBS and Audio L/R input
4
Antennainput Air 75 Ω*
Connect the TV to a power source and turn it on by
pressing the STANDBY button on the remote, the following
setup page will be displayed on the screen.
Press the navigation button
to move the cursor.
Press the navigation button
to select an option.
Language: Select the language from the menu on the
screen.
Country: Select your country.
Energy Mode: Select Home mode for home use or Store
mode for commercial demo use.
Once the above selections are complete, press the OK key
to invoke the tuning configuration. 'Tuning Setup.
Tuning Setup
Select the tuning type and type
digitalusing navigation buttons
and press the OK key to start automatic tuning.
France standard type is by Air* DVB-T for DTT.
LCN in ON to arrange the program numbers in order.
Remark:
*
AIR= Hertzian
Elements following the digital type are adjustable only when the digital type is DVB-C and these elements vary depending on the digital type.
Produktspecifikationer
| Varumärke: | High One |
| Kategori: | Tv |
| Modell: | HI3227HD-GM |
Behöver du hjälp?
Om du behöver hjälp med High One HI3227HD-GM ställ en fråga nedan och andra användare kommer att svara dig
Tv High One Manualer

25 Januari 2026
13 Augusti 2025
13 Augusti 2025
13 Augusti 2025
20 September 2024
20 September 2024
20 September 2024
5 September 2024
Tv Manualer
Nyaste Tv Manualer
3 April 2026
3 April 2026
3 April 2026
2 April 2026
2 April 2026
31 Mars 2026
31 Mars 2026
31 Mars 2026
31 Mars 2026
26 Mars 2026