Ideal HeatSeeker Bruksanvisning
Läs gratis den bruksanvisning för Ideal HeatSeeker (8 sidor) i kategorin Diverse. Guiden har ansetts hjälpsam av 43 personer och har ett genomsnittsbetyg på 4.0 stjärnor baserat på 6 recensioner. Har du en fråga om Ideal HeatSeeker eller vill du ställa frågor till andra användare av produkten? Ställ en fråga
Sida 1/8
Getting started
1.Unpack the camera and remove the lens cap.
2.Press the Powerswitch and allow the camera to calibrate
itself. During this 15-second time period, the screen
may blank out before the thermal image appears.
3.Check the battery icon on the screen and charge unit
if necessary. The charging port is located inside the
camera flap. A full charge takes about 3.5 hours and
provides 6 hours of continuous use with the LED
flashlight on.
4.At this point, the camera should be ready for use with
the following defaults: Units of Measure: °F and Ft.;
Images are focused and aligned at 6’ from camera
lens; Image is blended at 50%; Auto tracking with
dual cursors is On; Voice/Text annotation is On;
Quick Start Guide
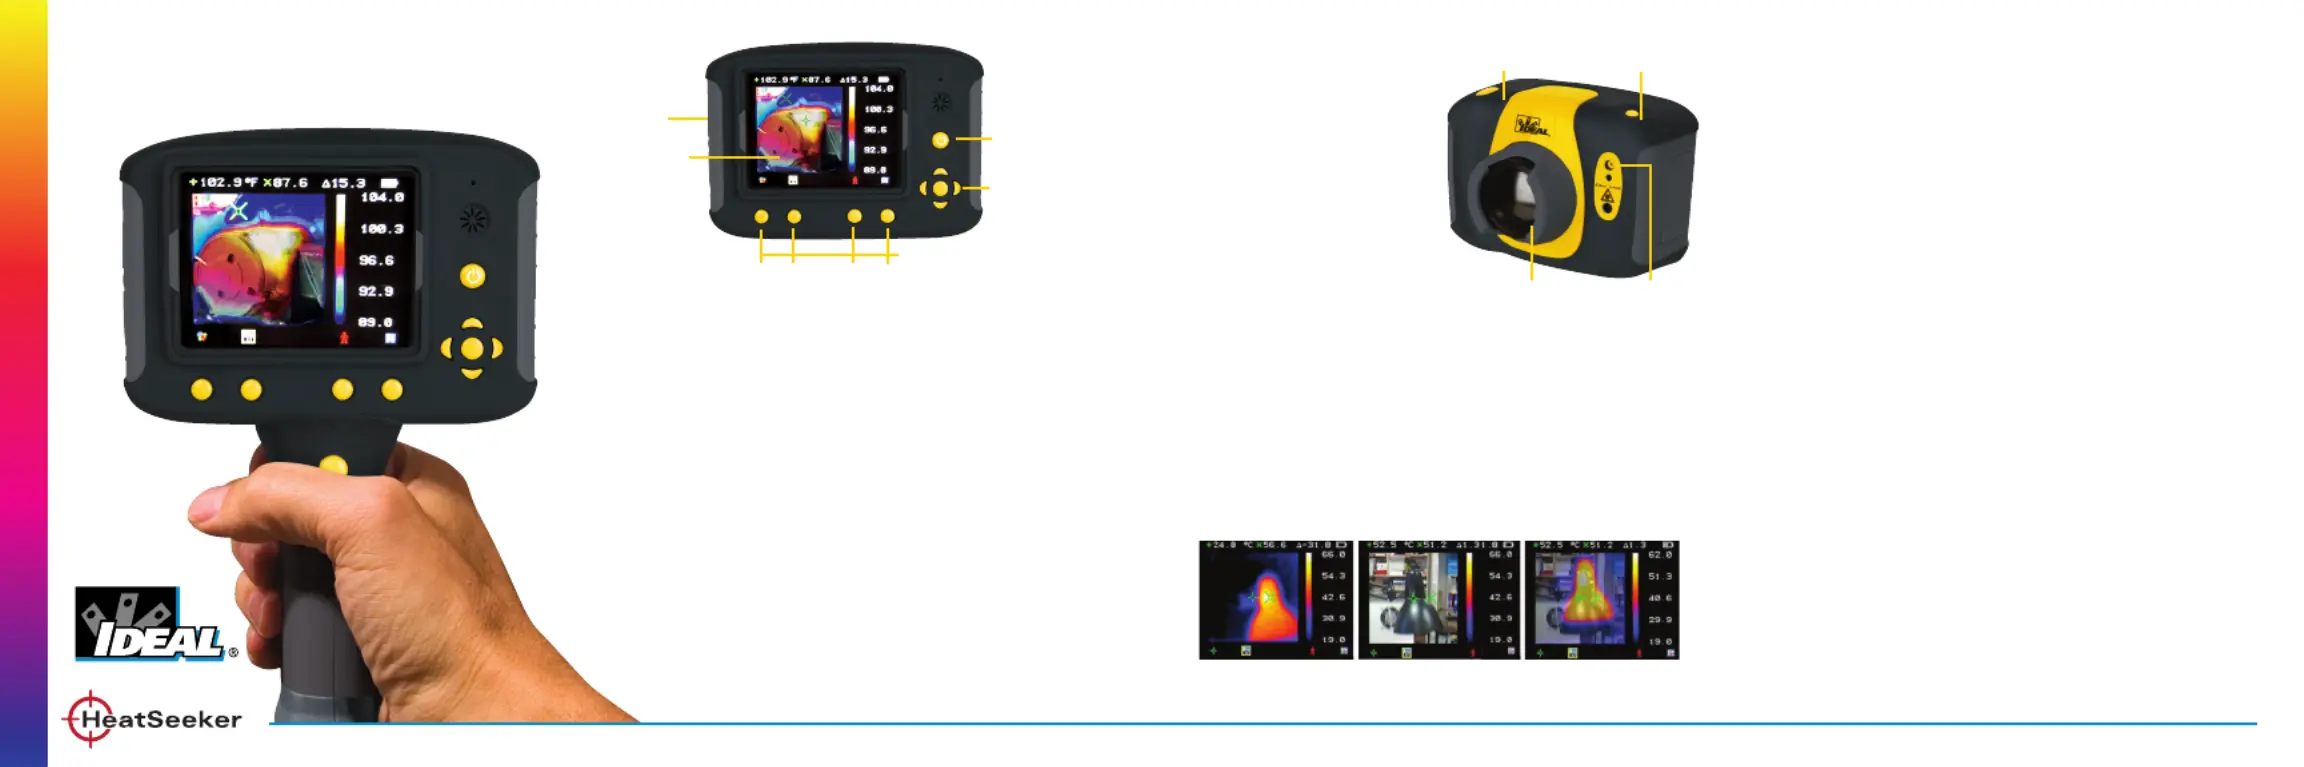
HeatSeeker™ Thermal Imager
Door
Screen
Power
Button
Navigation
Keys
F1 F2 F3 F4
™
then press the key, until appears. Then,F2Visible Off
use the to toggle the feature On. Then,center nav key
use the right/left keys to adjust the image blend.
9.To freeze the image, press thekey. If unsatisfiedF3
with the image, pressagain to release the imageF3
and enter the active measuring mode again. Press F3
to freeze another image.
10.For on-the-job troubleshooting, such as manually
moving the cursor to a specific location on the
camera’s screen to obtain a specific temperature
reading, refer to the full user’s manual saved on the CD.
11.To save the image to the Micro-SD card, press the
Capture buttonon the top of the camera. Then, record
a voice tag and/or text caption to identify the file when
retrieving it in the software. If these steps are skipped,
the image is still saved but with a generic file name.
12.The camera then returns to live imaging and is ready
to capture a new image.
13.The camera can be turned off by depressing the
power buttonuntil the camera shuts down. The
camera stores and uses the last settings upon the
next startup.
The key can be used to enter the menu to changeF4
settings and view saved images onscreen. Refer to the
operating manual to learn the camera’s full capabilities.
Ambient temperature is
set at 72°F; Emissivity is
set for 0.95; Auto Power
Off is set for 20min.
5.To customize the camera
from any of the defaults,
please see the Customizing
the Camera Setup section
further in this guide.
6.Point the camera at the
object of interest, noting that the camera is
focused/aligned at 6’. Ensure your fingers do not
obscure the small visual lens.
7.The dual cursors automatically locate the hottest and
coldest temperatures and displays these temperatures
at the top of the screen along with the temperature.Δ
8.To change the % image blend, hit the right/left
navigation keys. Note that the % refers to the amount
of visual image shown. If these keys are not working,
Capture Button
Thermal Lens
Visual Lens
Laser Button
Quick Start Guide: HeatSeeker™ Thermal Imagerwww.idealindustries.com
Soft Function Keys
a)100% Thermal
Only
b)100% Visible
Only
c)50% Thermal
& 50% visible
Produktspecifikationer
| Varumärke: | Ideal |
| Kategori: | Diverse |
| Modell: | HeatSeeker |
Behöver du hjälp?
Om du behöver hjälp med Ideal HeatSeeker ställ en fråga nedan och andra användare kommer att svara dig
Diverse Ideal Manualer

31 Augusti 2024
Diverse Manualer
Nyaste Diverse Manualer
11 Januari 2025
11 Januari 2025
10 Januari 2025
8 Januari 2025
8 Januari 2025
8 Januari 2025
27 Oktober 2024
27 Oktober 2024
22 Oktober 2024
21 Oktober 2024