IDIS DA-FM1500 Bruksanvisning
IDIS ej kategoriserat DA-FM1500
Läs gratis den bruksanvisning för IDIS DA-FM1500 (2 sidor) i kategorin ej kategoriserat. Guiden har ansetts hjälpsam av 18 personer och har ett genomsnittsbetyg på 4.8 stjärnor baserat på 6 recensioner. Har du en fråga om IDIS DA-FM1500 eller vill du ställa frågor till andra användare av produkten? Ställ en fråga
Sida 1/2
This manual is intended for the users of the DA-FM1500 ceiling mounting
bracket. It includes the instructions for mounting the DA-FM1500 ceiling
mounting bracket to the ceiling.
• This bracket is intended to be used with some models of dome
cameras. Ask your retailer for details on a specic model and do
not use it with other models of cameras.
• This installation should be performed by a qualied service
personnel in conformance to all local codes.
• You may need to reinforce the ceiling. If the ceiling is not strong
enough to support the camera, the camera may fall.
• Do not use this product for other purposes.
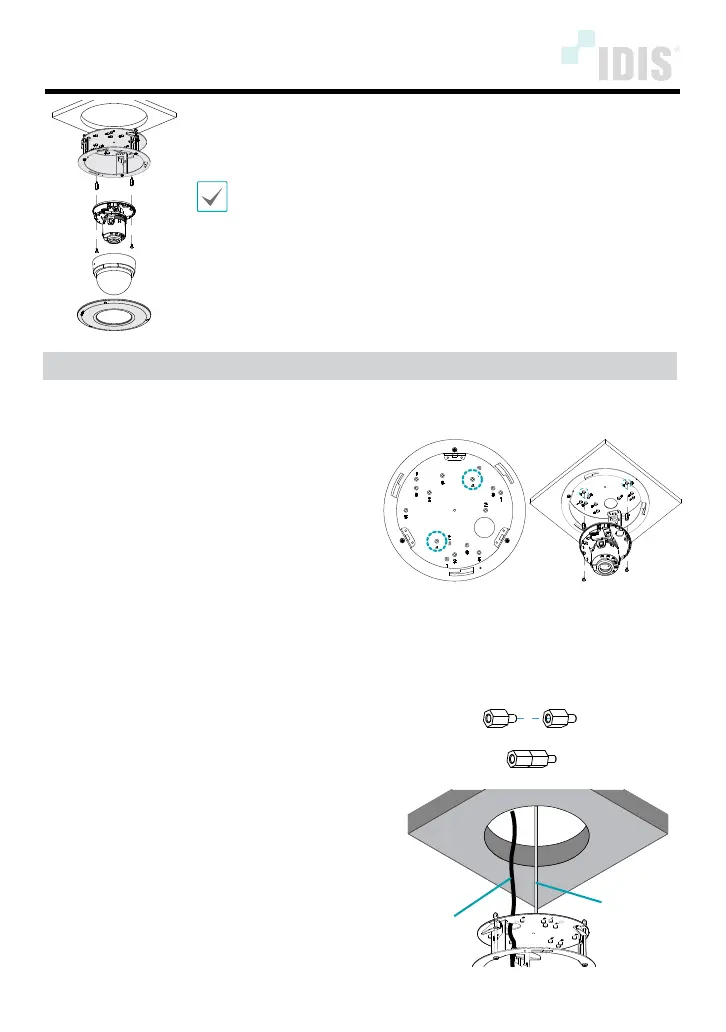
Mounting
1
Assemble the camera body to the bracket by
tightening the screws.
• DC-D3233WRX / DC-D3233RX / DC-D3233X Models:
Screw No. 5 (3-point), PCB Support 8.8mm
• DC-D4233WRX / DC-D4233HRX / DC-D4223WRX
DC-D4236WRX / DC-D4236HRX / DC-D4533HRX
DC-D4536HRX / DC-D4831HRX / TC-D5531WRX(P)(-A)
Models: Screw No. 5 (3-point), PCB Support 8.8mm 6ea
• DC-D4233RX / DC-D4223RX / DC-D4533RX /
DC-D4536RX / TC-D5531RX(P)(-A) Models: Screw No. 4
(2-point), PCB Support 8.8mm 4ea
• TC-D4222WRX / TC-D4221WRXP Model: Screw
No. 6 (2-point), No PCB support necessary
• TC-D4222RX / TC-D4221RXP Model: Screw
No. 6 (2-point), PCB Support 8.8mm
• DC-D4236(R)X Model: Screw No. 2 (3-point), PCB
Support 8.8mm 6ea
• Other Vandal Dome Models: Screw No. 1 (3-point), No
PCB support necessary
< Screw No. >
(DC-D4233RX Model)
*When using the screws of DC-D4233RX / DC-D4223RX
/ DC-D4236(R)X / DC-D4533RX /TC-D5531RX(P)(-A)/
DC-D4233WRX / DC-D4233HRX / DC-D4223WRX / DC-
D4236WRX / DC-D4236HRX /
DC-D4533HRX / DC-D4831HRX / TC-D5531WRX(P)(-A)
models, combine the two as shown below.
2
Connect the cable through the cable hole and
screw the safety wire to the bracket to prevent
the bracket from falling on to the oor.
Cable
Safety Wire
DA-FM1500 INSTALLATION MANUAL
Produktspecifikationer
| Varumärke: | IDIS |
| Kategori: | ej kategoriserat |
| Modell: | DA-FM1500 |
| Vikt: | 650 g |
| Bredd: | 210.2 mm |
| Djup: | 210.2 mm |
| Höjd: | 87 mm |
| Modell: | Montera |
| Produktens färg: | Vit |
| Brand kompatibilitet: | IDIS |
Behöver du hjälp?
Om du behöver hjälp med IDIS DA-FM1500 ställ en fråga nedan och andra användare kommer att svara dig
ej kategoriserat IDIS Manualer

8 Oktober 2025
8 Oktober 2025
31 Augusti 2025
31 Augusti 2025
ej kategoriserat Manualer
Nyaste ej kategoriserat Manualer
3 April 2026
3 April 2026
3 April 2026
3 April 2026
3 April 2026
3 April 2026
3 April 2026
3 April 2026
3 April 2026