Ignis ADL 448 Bruksanvisning
Ignis Diskmaskin ADL 448
Läs gratis den bruksanvisning för Ignis ADL 448 (16 sidor) i kategorin Diskmaskin. Guiden har ansetts hjälpsam av 16 personer och har ett genomsnittsbetyg på 4.1 stjärnor baserat på 3 recensioner. Har du en fråga om Ignis ADL 448 eller vill du ställa frågor till andra användare av produkten? Ställ en fråga
Sida 1/16
EN -1-
-1-
-1-
-1--1-
Chart
PROGRAM SELE
PROGRAM SELE
PROGRAM SELE
PROGRAM SELEPROGRAM SELECTION
CTION
CTION
CTION CTION
BUTTON
BUTTON
BUTTON
BUTTONBUTTON
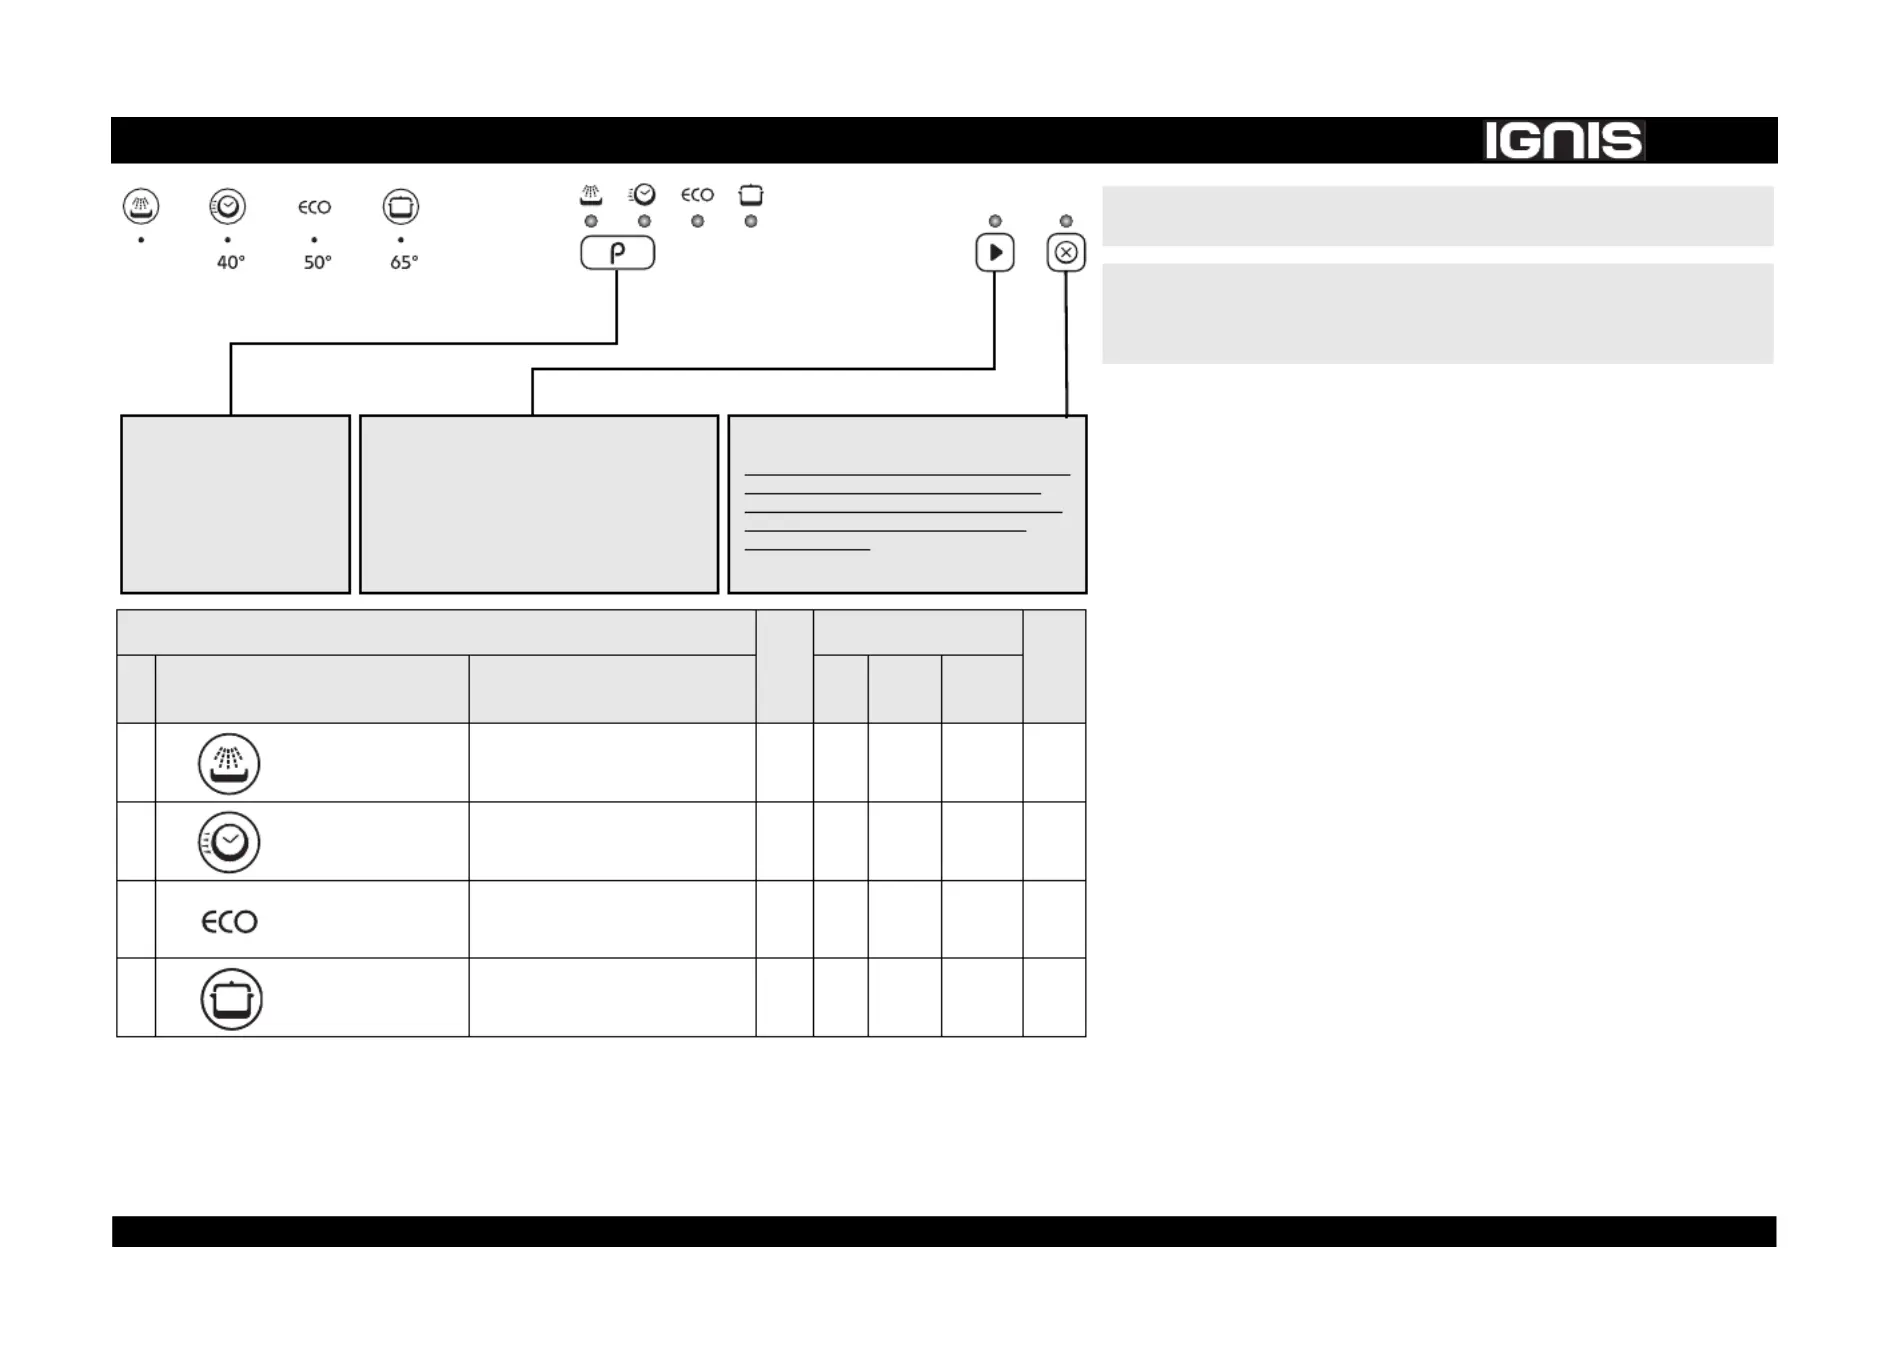
Push “Programs” button
(repeatedly) until the indicator
of the required program lights
up (see “Table of programs”
below).
CANCEL/OFF BU
CANCEL/OFF BU
CANCEL/OFF BU
CANCEL/OFF BUCANCEL/OFF BUTTON
TTON
TTON
TTONTTON
Push this button to switch off the control panel.
If pressed when a program is running it cancels the
program ongoing draining water for 1 minute.
If pressed when the dishwasher is switched off it
drains any possible liquids from dishwasher
(1 minute process).
If the indicator flashes repeatedly, see
page 6 - chapter ”What to do if ...”.
ST
ST
ST
STSTART/RESUME BUTTON
ART/RESUME BUTTON
ART/RESUME BUTTON
ART/RESUME BUTTONART/RESUME BUTTON
Push this button to start the selected program: the
indicator lights up and goes off at the end of the
program.
When the door is opened during a washing cycle,
the cycle is temporarily paused: the Start indicator
blinks. To resume the cycle push the Start button
and close the door within 3 seconds.
1)
1)
1)
1)1)Program data obtained in conformity with European
Program data obtained in conformity with European
Program data obtained in conformity with European
Program data obtained in conformity with EuropeanProgram data obtained in conformity with European standard EN
standard EN
standard EN
standard EN standard EN50242, obtained under normal conditions (without any opt
50242, obtained under normal conditions (without any opt
50242, obtained under normal conditions (without any opt
50242, obtained under normal conditions (without any opt 50242, obtained under normal conditions (without any options) a
ions) a
ions) a
ions) aions) and may vary depending
nd may vary depending
nd may vary depending
nd may vary dependingnd may vary depending on
on
on
on on
conditions
conditions
conditions
conditionsconditions. Differences of
. Differences of
. Differences of
. Differences of. Differences ofup to 20 min
up to 20 min
up to 20 min
up to 20 min up to 20 minutes are po
utes are po
utes are po
utes are poutes are possible with sens
ssible with sens
ssible with sens
ssible with sensssible with sensor program
or program
or program
or programor programs as a result o
s as a result o
s as a result o
s as a result os as a result of the appliance
f the appliance
f the appliance
f the appliancef the appliance’
’
’
’’s automa
s automa
s automa
s automas automatic calibrat
tic calibrat
tic calibrat
tic calibrattic calibration sy
ion sy
ion sy
ion syion system.
stem.
stem.
stem.stem.
2)
2)
2)
2)2)Reference program for energy label in compliance with EN 50242
Reference program for energy label in compliance with EN 50242
Reference program for energy label in compliance with EN 50242
Reference program for energy label in compliance with EN 50242 Reference program for energy label in compliance with EN 50242 regulations. - Note for T
regulations. - Note for T
regulations. - Note for T
regulations. - Note for Tregulations. - Note for T
esting Institutes: for detailed information on the
esting Institutes: for detailed information on the
esting Institutes: for detailed information on the
esting Institutes: for detailed information on the esting Institutes: for detailed information on the
EN/Standard
EN/Standard
EN/Standard
EN/StandardEN/Standard loading com
loading com
loading com
loading com loading comparison test and o
parison test and o
parison test and o
parison test and oparison test and other tests, con
ther tests, con
ther tests, con
ther tests, conther tests, contact the following
tact the following
tact the following
tact the followingtact the following address:
address:
address:
address: address: “
“
“
““con
con
con
concontact_ignis@ign
tact_ignis@ign
tact_ignis@ign
tact_ignis@igntact_ignis@ignis.com
is.com
is.com
is.comis.com”
”
”
””.
.
.
..
*Pow
*Pow
*Pow
*Pow*Power consumption in: Left-on mode: 0.70 W / Off mode: 0.40 W
er consumption in: Left-on mode: 0.70 W / Off mode: 0.40 W
er consumption in: Left-on mode: 0.70 W / Off mode: 0.40 W
er consumption in: Left-on mode: 0.70 W / Off mode: 0.40 Wer consumption in: Left-on mode: 0.70 W / Off mode: 0.40 W
T
T
T
TTable of programs
able of programs
able of programs
able of programsable of programs
Deter
Deter
Deter
DeterDeter-
-
-
--
gent
gent
gent
gentgent
Consumption
Consumption
Consumption
ConsumptionConsumption
Drying
Drying
Drying
DryingDrying
Phase
Phase
Phase
PhasePhase
P
P
P
PP
Pro
Pro
Pro
ProProgr
gr
gr
grgram
am
am
amams
s
s
ssLoading instructions
Loading instructions
Loading instructions
Loading instructionsLoading instructions
Litres
Litres
Litres
LitresLitreskWh
kWh
kWh
kWhkWh
Minutes
Minutes
Minutes
MinutesMinutes
1)
1)
1)
1)1)
1
1
1
11
Pre
Pre
Pre
PrePre-W
-W
-W
-W-Wash
ash
ash
ashashcold
cold
cold
coldcold
Crockery to be washed later.—5.00.0210NO
2
2
2
22
Rap
Rap
Rap
RapRapi
i
i
iid
d
d
dd40°C
40°C
40°C
40°C40°C
Lightly soiled crockery, with no dried-on
food.
X13.00.7030NO
3
3
3
33
Eco
Eco
Eco
EcoEco
2)
2)
2)
2)2)
50°C
50°C
50°C
50°C50°C
Normally soiled crockery.
“Standard program” the most efficient in
terms of its combined energy and water
consumption.
X15.01.02165Full
4
4
4
44
Intensive
Intensive
Intensive
IntensiveIntensive65°C
65°C
65°C
65°C65°C
Recommended program for heavily soiled
crockery, especially suitable for pans and
saucepans.
X15.01.50140Full
5019 550 00321
5019 550 00321
5019 550 00321
5019 550 003215019 550 00321
BEFORE USING THE APPLIANCE FOR THE
BEFORE USING THE APPLIANCE FOR THE
BEFORE USING THE APPLIANCE FOR THE
BEFORE USING THE APPLIANCE FOR THE BEFORE USING THE APPLIANCE FOR THE FIRST TIME CAREFULL
FIRST TIME CAREFULL
FIRST TIME CAREFULL
FIRST TIME CAREFULLFIRST TIME CAREFULLY READ THIS
Y READ THIS
Y READ THIS
Y READ THIS Y READ THIS
QUICK REFERENCE GUIDE AND THE ASSEMBL
QUICK REFERENCE GUIDE AND THE ASSEMBL
QUICK REFERENCE GUIDE AND THE ASSEMBL
QUICK REFERENCE GUIDE AND THE ASSEMBLQUICK REFERENCE GUIDE AND THE ASSEMBLY INSTRUCTIONS!
Y INSTRUCTIONS!
Y INSTRUCTIONS!
Y INSTRUCTIONS!Y INSTRUCTIONS!
THE CONTROL P
THE CONTROL P
THE CONTROL P
THE CONTROL PTHE CONTROL PANEL OF THIS DISHW
ANEL OF THIS DISHW
ANEL OF THIS DISHW
ANEL OF THIS DISHWANEL OF THIS DISHWASHER ACTIV
ASHER ACTIV
ASHER ACTIV
ASHER ACTIVASHER ACTIVA
A
A
AATES PUSHING ANY
TES PUSHING ANY
TES PUSHING ANY
TES PUSHING ANY TES PUSHING ANY
BUTTON EXC
BUTTON EXC
BUTTON EXC
BUTTON EXCBUTTON EXCEPT CANCEL/OFF BUTTON.
EPT CANCEL/OFF BUTTON.
EPT CANCEL/OFF BUTTON.
EPT CANCEL/OFF BUTTON.EPT CANCEL/OFF BUTTON.
FOR ENERGY SA
FOR ENERGY SA
FOR ENERGY SA
FOR ENERGY SAFOR ENERGY SAVING THE CONTROL P
VING THE CONTROL P
VING THE CONTROL P
VING THE CONTROL PVING THE CONTROL PANEL DEACTIV
ANEL DEACTIV
ANEL DEACTIV
ANEL DEACTIVANEL DEACTIVA
A
A
AATES
TES
TES
TES TES
AUTOMA
AUTOMA
AUTOMA
AUTOMAAUTOMATICALL
TICALL
TICALL
TICALLTICALLY AFTER 30 SECONDS IF NO CYCLE HAS ST
Y AFTER 30 SECONDS IF NO CYCLE HAS ST
Y AFTER 30 SECONDS IF NO CYCLE HAS ST
Y AFTER 30 SECONDS IF NO CYCLE HAS STY AFTER 30 SECONDS IF NO CYCLE HAS STARTED.
ARTED.
ARTED.
ARTED.ARTED.
Quick reference guide
Quick reference guide
Quick reference guide
Quick reference guideQuick reference guide
Ignis is a registered trademark
Ignis is a registered trademark
Ignis is a registered trademark
Ignis is a registered trademarkIgnis is a registered trademark
Produktspecifikationer
| Varumärke: | Ignis |
| Kategori: | Diskmaskin |
| Modell: | ADL 448 |
Behöver du hjälp?
Om du behöver hjälp med Ignis ADL 448 ställ en fråga nedan och andra användare kommer att svara dig
Diskmaskin Ignis Manualer

19 Juli 2025
17 Juli 2025
17 Juli 2025
5 Januari 2025
10 Oktober 2024
23 September 2024
17 September 2024
11 September 2024
11 September 2024
11 September 2024
Diskmaskin Manualer
Nyaste Diskmaskin Manualer
3 April 2026
2 April 2026
2 April 2026
2 April 2026
1 April 2026
1 April 2026
1 April 2026
1 April 2026
1 April 2026
1 April 2026