Insignia NS-SCR100FAB21 Bruksanvisning
Insignia projektions skärm NS-SCR100FAB21
Läs gratis den bruksanvisning för Insignia NS-SCR100FAB21 (2 sidor) i kategorin projektions skärm. Guiden har ansetts hjälpsam av 33 personer och har ett genomsnittsbetyg på 4.0 stjärnor baserat på 4 recensioner. Har du en fråga om Insignia NS-SCR100FAB21 eller vill du ställa frågor till andra användare av produkten? Ställ en fråga
Sida 1/2
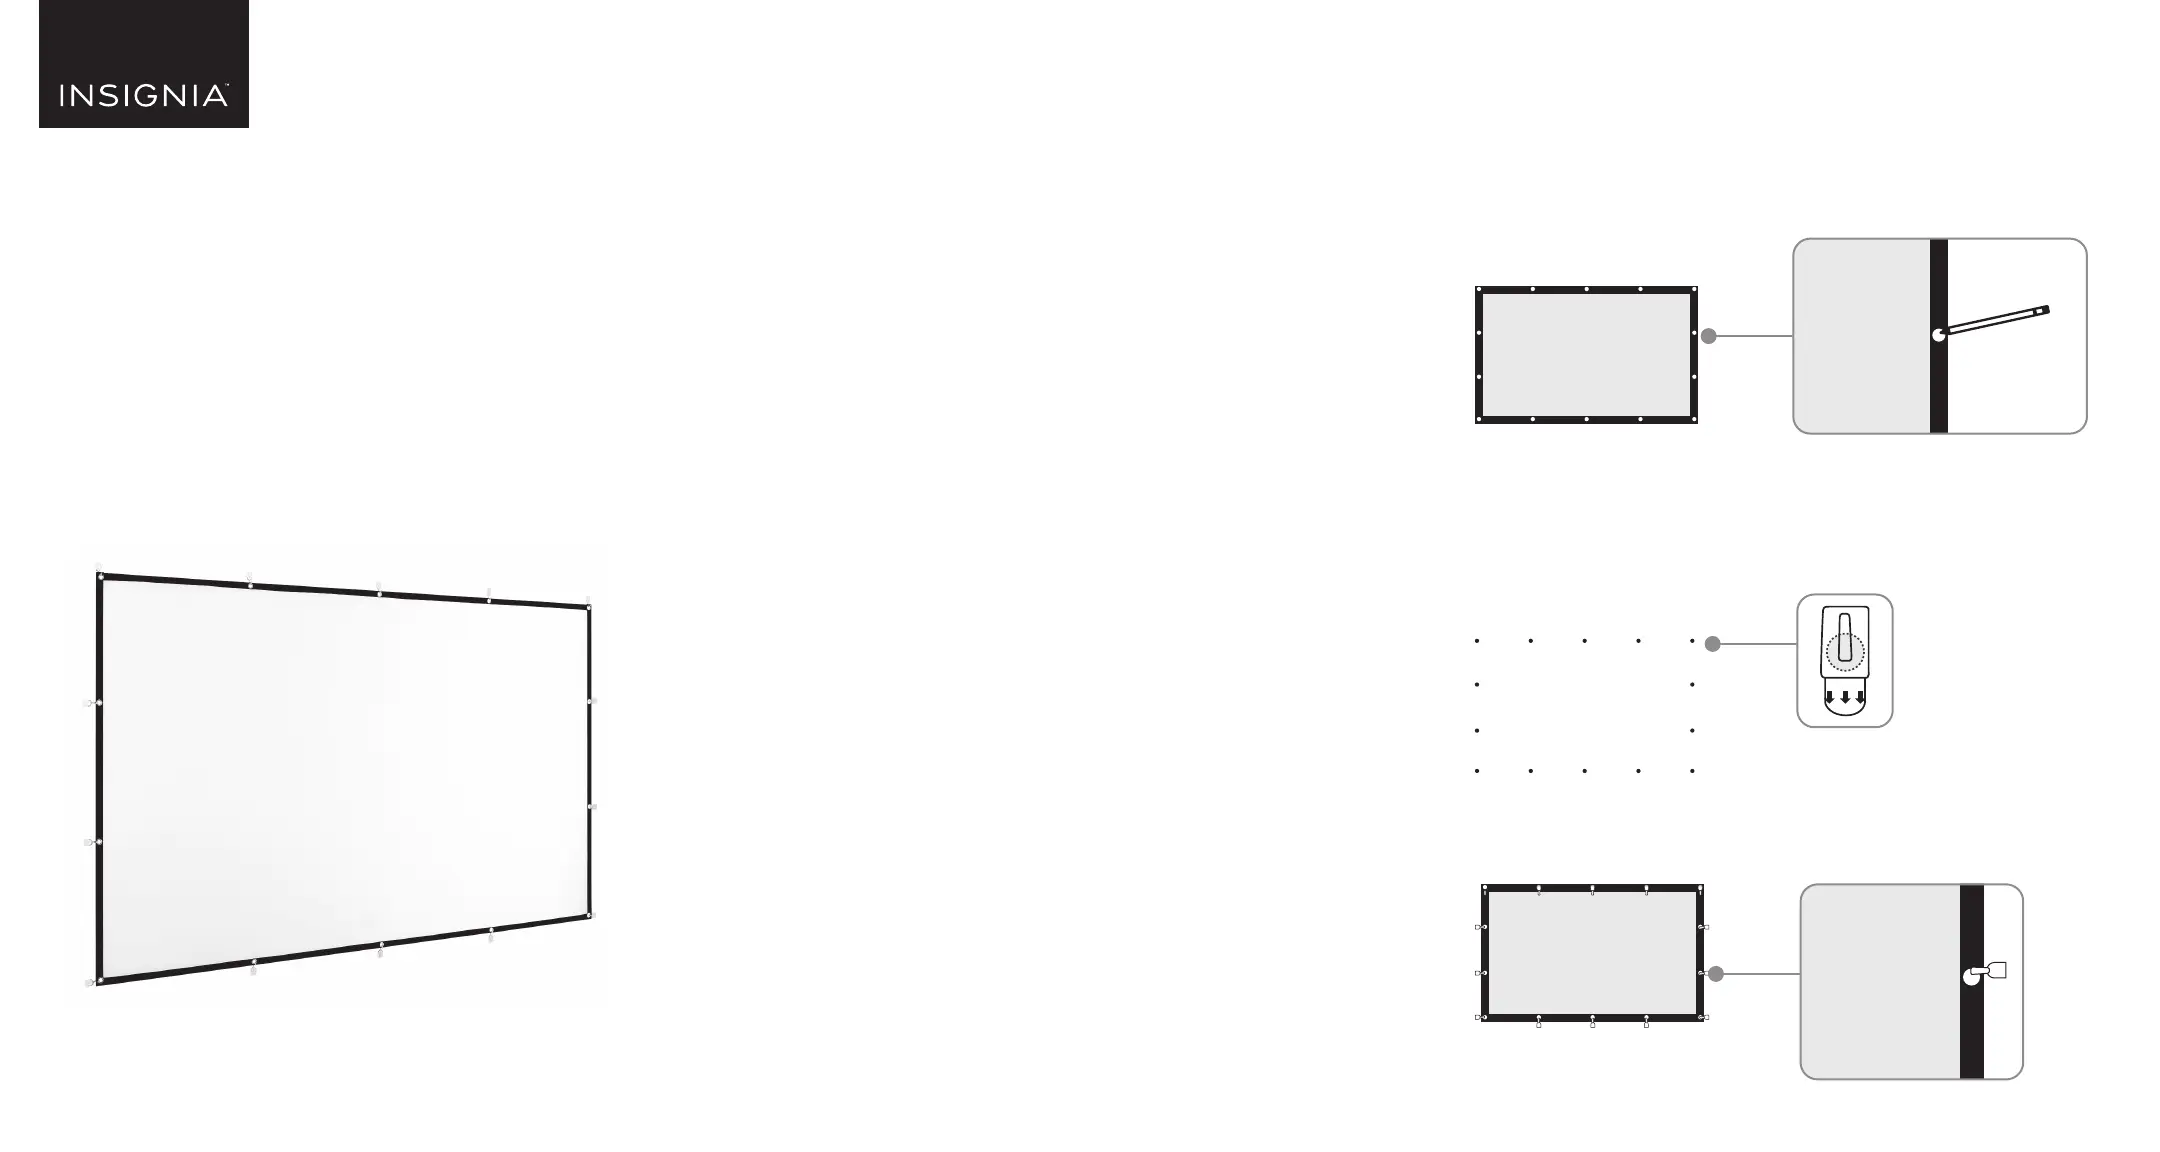
INSTALLING WITH HOOKS, NAILS, OR SCREWS
Note: You may need two people to mount your screen.
1Place your screen against the wall where you want to install it. Make
sure that the fabric is at and has as few wrinkles as possible.
2Mark the locations of each of the 14 eyelets on the wall. Don’t move or
slide the fabric while you’re marking.
3With the hooks pointing toward the center of the mounting surface,
stick a hook at each marked eyelet position.
Note: For surfaces or environments where the provided adhesive hooks will
not securely mount your projection screen, you may need to use screws or
nails (not provided) instead.
4Mount your screen by hanging the eyelets on the hooks (or
screws/nails).
USING YOUR PROJECTION SCREEN
Screen is intended for indoor use, but can be used outdoors in good
weather. (Avoid using in rain, wind, or extreme heat or cold.) The screen
should only be used outdoors when actively viewing content and is not
intended to be installed permanently.
Note: The projector can be pointed at either side of the screen.
STORING YOUR PROJECTION SCREEN
• Remove from mounting location, fold up, then store in the storage
bag.
• Never put the screen away if it is wet. Let it dry rst.
CLEANING AND MAINTAINING YOUR PROJECTION
SCREEN
• Wipe your screen with a dry or damp cloth. Use only water or a
neutral, inammable, nontoxic cleaning, and sanitizing solution.
• If your screen gets wet, move it to a dry location and let it air dry.
• Do not put in a washing machine.
SPECIFICATIONS
• Dimensions (H×W): 51 × 89 in. (129.5 × 226.1 cm)
• Border size: 1 in. (25 mm)
• Viewing area (diagonal): 100 in. (254 cm)
• Aspect ratio: 16:9
• Weight: 1 lb. (470 g)
SAFETY
WARNING: To avoid danger of suocation, keep the screen and all
accessories (ropes, hooks, bag, and screen) away from babies and
children. Do not use this bag in cribs, beds, strollers, or playpens. This
bag is not a toy.
WARNING: This is not a toy! This product contains small parts which
could cause choking if swallowed.
Before using your new product, please read these instructions to prevent any damage.
INSTALLING WITH ROPES
1Place your screen at on the ground, then thread one rope through
the eyelets on the top of the fabric and one through the eyelets on
the bottom of your screen.
2Pull the ropes tight to remove wrinkles, then make a knot at the edge
eyelets to secure the rope in place.
3Place your screen at at the mounting position, then tie your screen
to xed objects with the four rope ends.
PACKAGE CONTENTS
• Projection screen
• Reusable storage bag
• Ropes (2)
• Adhesive hooks (18)
• Quick Setup Guide
FEATURES
• 100 in. (254 cm) front-projection screen with a 16:9 aspect ratio gives
you a larger-than-life theatrical experience
• Convenient, foldable design can be easily installed and taken down
in minutes
• Tear-resistant eyelets provide numerous mounting opportunities
• Wrinkle-resistant, polyester material grants worry-free use when
unfolding and mounting
• Included adhesive hooks and two 16.4 ft. (5 m) ropes provide exible
placement options
• Lightweight, compact design with included storage bag allows for
easy portability
• Wide-range uses for the oce, home theater, outdoors, and more
ONEYEAR LIMITED WARRANTY
Visit www.insigniaproducts.com for details.
CONTACT INSIGNIA
For customer support, call 1-877-467-4289 (U.S. and Canada)
www.insigniaproducts.com
INSIGNIA is a trademark of Best Buy and its aliated companies.
Distributed by Best Buy Purchasing, LLC
7601 Penn Ave South, Richeld, MN 55423 U.S.A.
©2022 Best Buy. All rights reserved.
QUICK SETUP GUIDE
Portable Folding
Projection Screen
NS-SCR100FAB21
Produktspecifikationer
| Varumärke: | Insignia |
| Kategori: | projektions skärm |
| Modell: | NS-SCR100FAB21 |
Behöver du hjälp?
Om du behöver hjälp med Insignia NS-SCR100FAB21 ställ en fråga nedan och andra användare kommer att svara dig
projektions skärm Insignia Manualer

12 September 2025
12 September 2025
11 September 2025
11 September 2025
projektions skärm Manualer
Nyaste projektions skärm Manualer
31 Mars 2026
28 Mars 2026
26 Mars 2026
26 Mars 2026
11 Oktober 2025
10 Oktober 2025
9 September 2025
9 September 2025
9 September 2025
1 September 2025