Intermatic DT121K Bruksanvisning
Intermatic Växla DT121K
Läs gratis den bruksanvisning för Intermatic DT121K (2 sidor) i kategorin Växla. Guiden har ansetts hjälpsam av 34 personer och har ett genomsnittsbetyg på 4.0 stjärnor baserat på 2 recensioner. Har du en fråga om Intermatic DT121K eller vill du ställa frågor till andra användare av produkten? Ställ en fråga
Sida 1/2
Indoor 7 Day Digital Timer
Installation and User Instructions
MODEL DT121K/DT122K
• 125 VAC, 60 Hz, 15 A, 1875 W Resistive
• 15A General Use
• 8 A, 1000 W Tungsten, 500 VA Electronic Ballast
• 1/2 HP Motor Load
• 120 VAC, 60Hz, 8.3 A Magnetic Ballast
Ratings
Reset
P
r
o
g
r
a
m
+
-
T
i
m
e
e
s
R
u
m
e
M
o
d
e
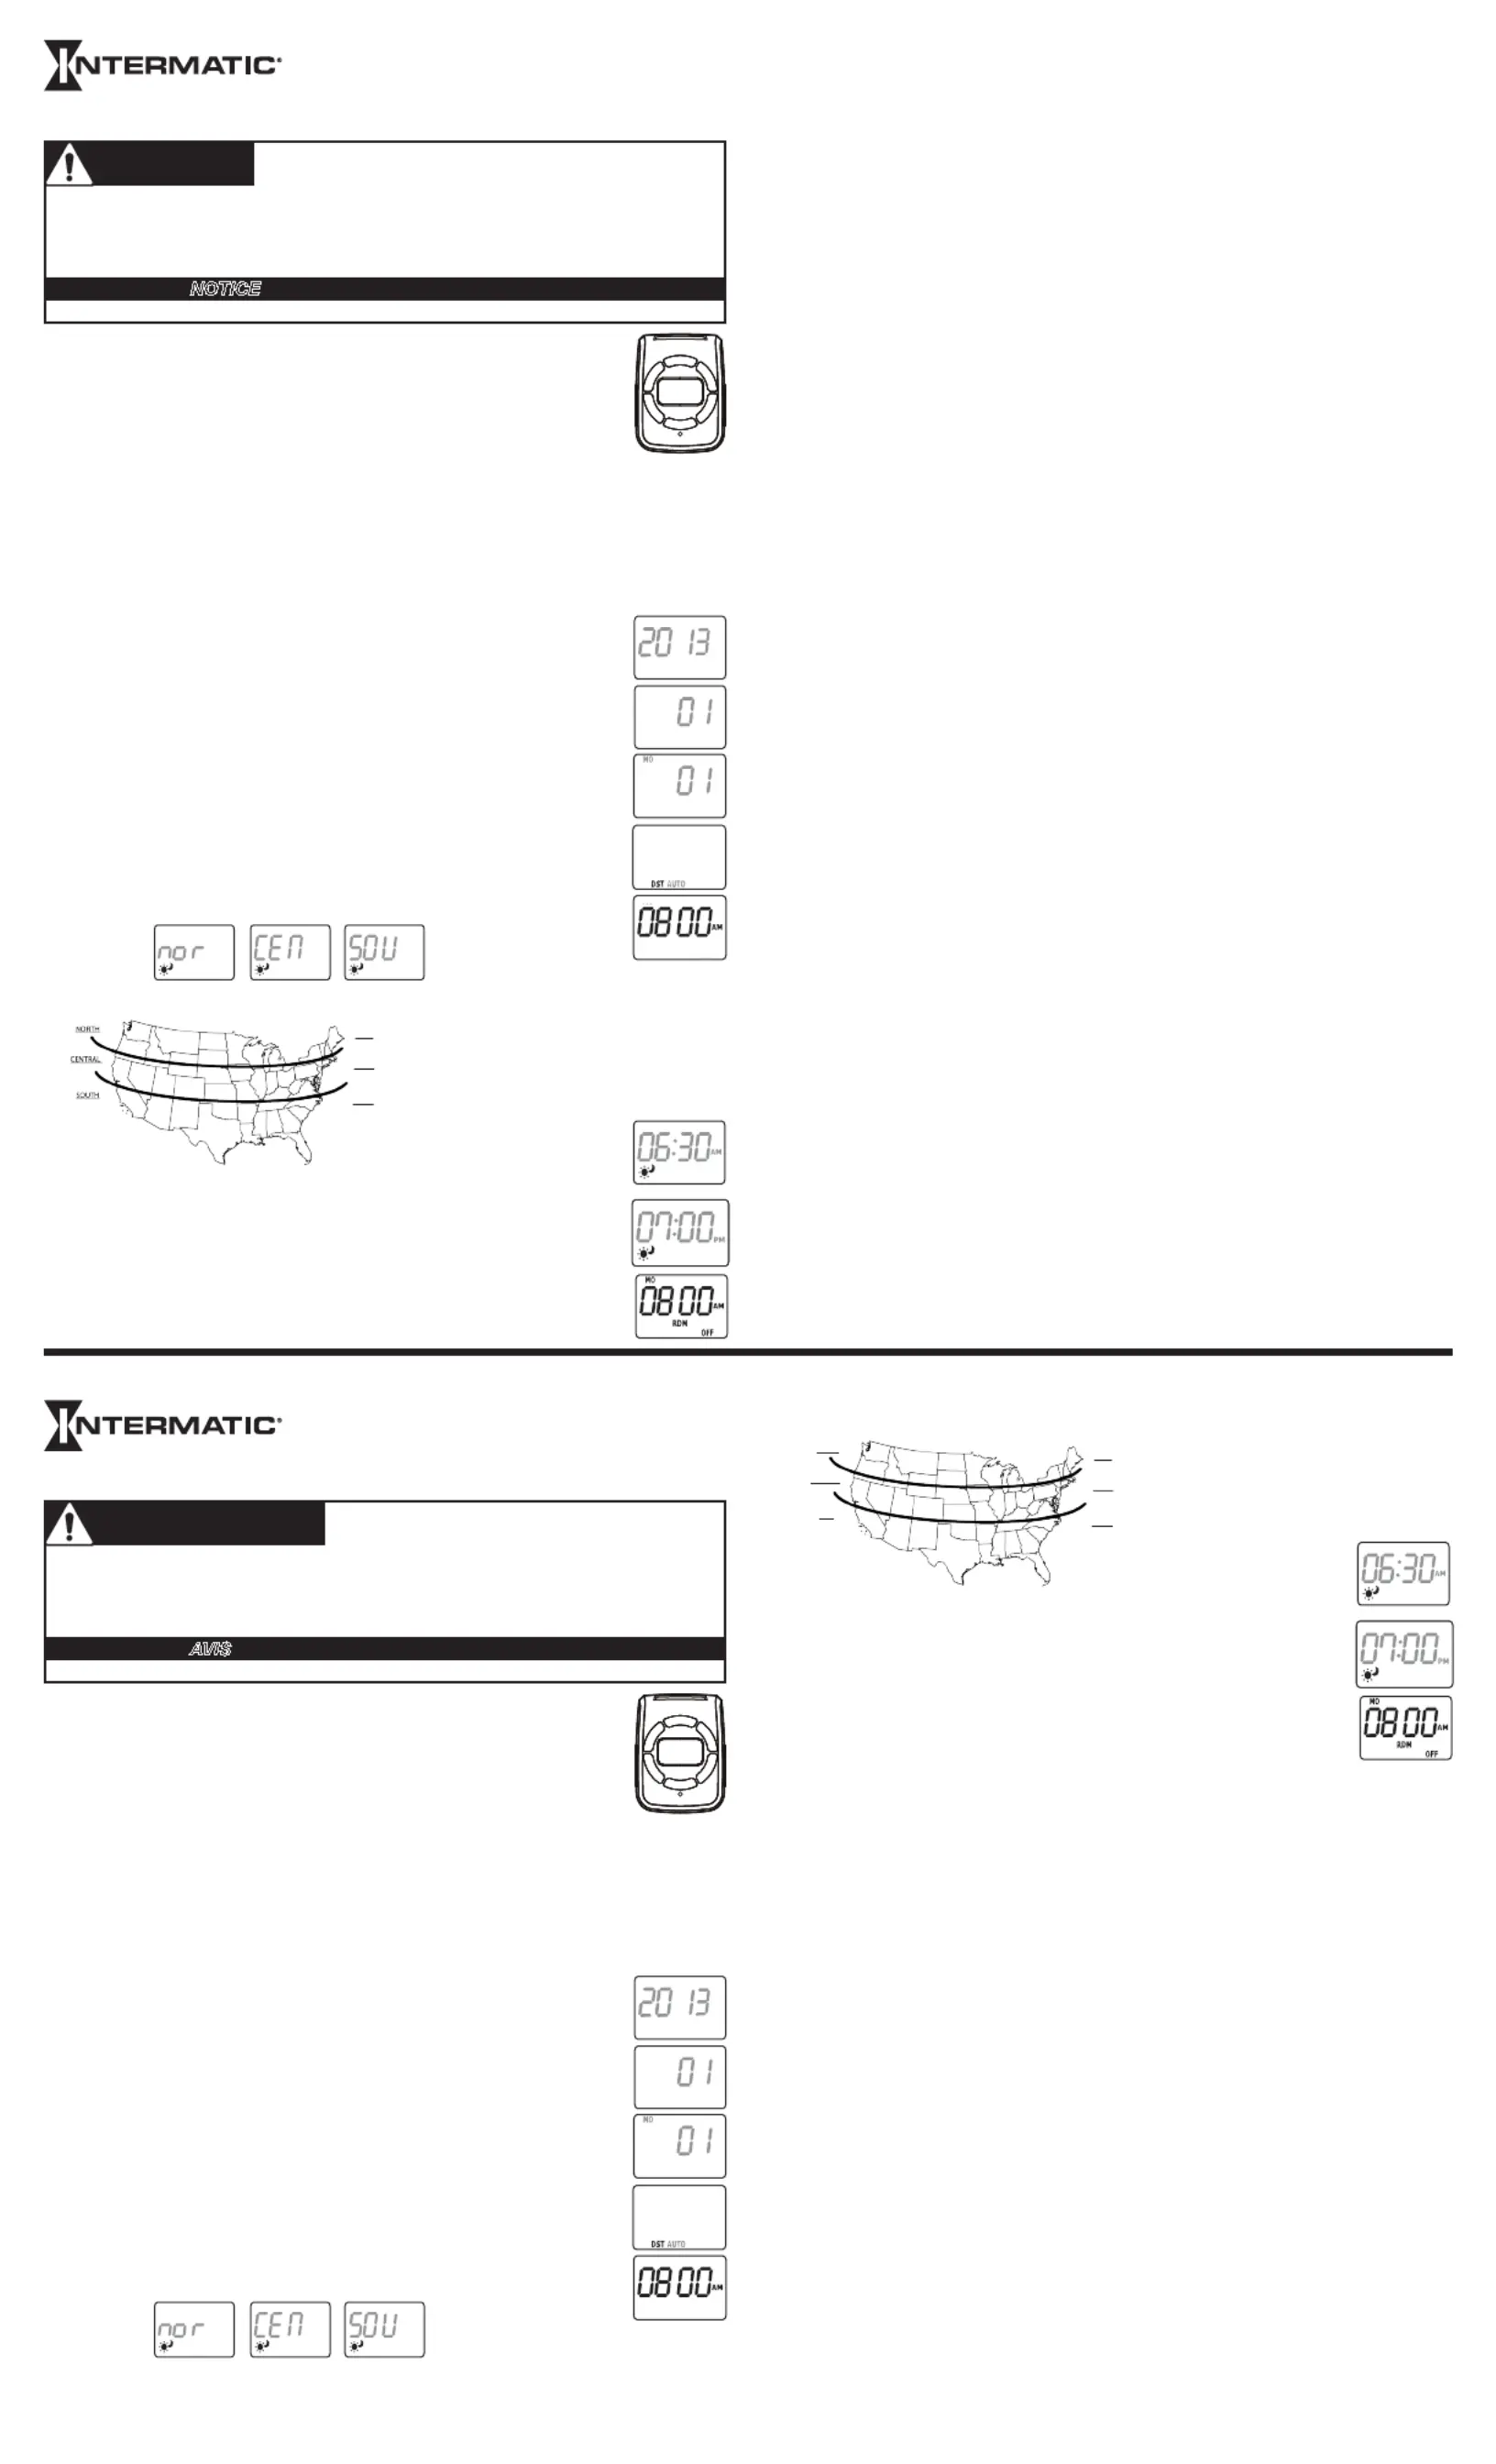
Setting Time, Date, Daylight Saving Time, and Region
NOTE: When setting the timer, if you pause for more than 30 seconds, the timer
will automatically return to normal time of day display.
1. Press TIME. A flashing 4-digit year appears.
2. Press
+- or to set the current year and then press .TIME
3. Press
+- or to set the month (01=Jan, 12=Dec) and then press .TIME
4. Press
+- or to set the day of the month.
5. Press TIME to set (DST) Daylight Saving Time function.
6. Press
+- or to select (AUTO DST adjust enabled) or (DST disabled).AUTOOFF
NOTE: DST enables the timer to automatically move ahead 1 hour on the second
Sunday in March at 02:00am and then automatically adjust back 1 hour on first
Sunday in November at 02:00am.
7. Press TIME. The hour digit flashes.
8. Press
+- or to set the current hour, then press . The minute digit TIME
flashes.
9. Press
+- or to set the minute, then press. TIME
10. Press
+- or to set your current region.
Plug the timer into an AC outlet for at least 30 minutes to charge the internal battery. If the display
is not visible, press to restart the timer and erase all settings and events. You may unplug the RESET
timer from AC outlet for easier setting.
IMPORTANT: Read Before Initial Use
1. NORTH:3. SOUTH:2. CENTRAL:
nor
CEN
SOU
The map below will determine what zone the timer is being used in.
Once the zone is
selected the timer
will automatically set
the sunrise and
sunset time.
Setting the Timer Operating Mode
1. Press to scroll to the desired operting mode. See below for a description of each mode. MODE
- Manual mode is selected. The device will stay ON.ONON
AUTO ONAUTOMATIC : mode is selected and the device is ON. The device will stay ON until the
next OFF event.
RDM ON:RANDOM mode is selected and the device is ON. The device will stay ON until the next
OFF event.
NOTE:RDM(RANDOM MODE)When is selected, the device will operate ±30 minutes from the
scheduled ON/OFF event settings to provide a lived-in look.
Manual mode is selected. The device will stay OFF.OFF:OFF
AUTO OFF:AUTOMATIC mode is selected and the device is OFF. The device will stay OFF until the
next ON event.
RDM OFF: RANDOM mode is selected and the device is OFF. The device will stay OFF until the next
ON event.
2. Plug desired device into timer.
3. Plug the timer into the electrical outlet.
Setting/Reviewing/Changing the ON/OFF Events
1. Press to access the ON/OFF Event Screens.PROGRAM
2. To set your timer the first time go to step 4. You will be setting ON event # 1.
3. To Review existing ON/OFF settings, repeatedly press to see up to 7 ON/OFF event PROGRAM
pairs. Dashes mean the displayed event is not set. To delete an unwanted event press . RESUME
To change an event, go to step 4. To exit the Event setting mode, press once or press MODE
PROGRAM repeatedly until the event number disappears or wait 30 seconds for timer to
automatically return to the main screen.
4. If dashes are displayed, press to change the dashes to an event with flashing day(s). Note TIME
that the events are numbered 1 thru 7, ON or OFF.
5. Press +- or to select the (flashing) day(s) on which the displayed event should run:
-One day only: Select “MO” or “” or “TUWE” … or “”, etc.SU
-Everyday: Select “MO TU WE TH FR SA SU”
-Weekdays only: Select “”MO TU WE TH FR
-Weekend only: Select “”SA SU
6. Press TIME to make the hour digits flash. To set this event to occur at a specific time of day, skip
to step 9. To set this event to happen at sunrise or sunset, proceed to step 7.
7. Press +- or to scroll to one of the 2 screens with moon and sun icons flashing and AM or PM
flashing. AM plus icons screen means this event will happen at Sunrise. PM plus icons means this
event will happen at Sunset.
8. Press PROGRAM to accept the Sunrise/Sunset setting and advance to the next event screen. To
add more events, go back to step 4. If all desired events have been set go to step 14.
9. Press or to scroll to the desired starting hour for the event. +-
10. Press to make the minute digits flash.TIME
11. Press or to scroll to the desired starting minute for the event.+-
12. Press to advance to the next event screen. PROGRAM
13. Repeat steps 4 thru 13 until all desired ON/OFF events have been set.
14. Repeat step 3 to check all your settings and exit the event setting mode.
11. Press TIME to access the AM sunrise time screen.
12. Press
+- or to adjust (±2 hours) the sunrise operating time to match your local
sunrise time.
NOTE:RESUME Press to return to the original sunrise time.
13. Press TIME to access the PM Sunset time screen.
14. Press
+- or to adjust (±2 hours) the sunset operating time to match your local
sunset time.
NOTE:RESUME Press to return to the original sunset time.
15. Press TIME to return to the time (main) screen.
LIMITED ONE-YEAR WARRANTY
If within the warranty period specied, this product fails due to a defect in material or workmanship,
Intermatic Incorporated will repair or replace it, at its sole option, free of charge. This warranty is
extended to the original household purchaser only and is not transferable. This warranty does not
apply to: (a) damage to units caused by accident, dropping or abuse in handling, acts of God or
any negligent use; (b) units which have been subject to unauthorized repair, opened, taken apart or
otherwise modied; (c) units not used in accordance with instructions; (d) damages exceeding the
cost of the product; (e) sealed lamps and/or lamp bulbs, LED’s and batteries; (f) the nish on any
portion of the product, such as surface and/or weathering, as this is considered normal wear and tear;
(g) transit damage, initial installation costs, removal costs, or reinstallation costs.
INTERMATIC INCORPORATED WILL NOT BE LIABLE FOR INCIDENTAL OR CONSEQUENTIAL DAMAGES.
SOME STATES DO NOT ALLOW THE EXCLUSION OR LIMITATION OF INCIDENTAL OR CONSEQUENTIAL
DAMAGES, SO THE ABOVE LIMITATION OR EXCLUSION MAY NOT APPLY TO YOU. THIS WARRANTY IS
IN LIEU OF ALL OTHER EXPRESS OR IMPLIED WARRANTIES. ALL IMPLIED WARRANTIES, INCLUDING THE
WARRANTY OF MERCHANTABILITY AND THE WARRANTY OF FITNESS FOR A PARTICULAR PURPOSE,
ARE HEREBY MODIFIED TO EXIST ONLY AS CONTAINED IN THIS LIMITED WARRANTY, AND SHALL BE
OF THE SAME DURATION AS THE WARRANTY PERIOD STATED ABOVE. SOME STATES DO NOT ALLOW
LIMITATIONS ON THE DURATION OF AN IMPLIED WARRANTY, SO THE ABOVE LIMITATION MAY NOT
APPLY TO YOU.
This warranty service is available by either (a) returning the product to the dealer from whom the
unit was purchased or (b) completing a warranty claim online at www.intermatic.com.
This warranty is made by: Intermatic Incorporated, Customer Service 7777 Winn Rd., Spring
Grove, Illinois 60081-9698. For warranty service go to: http://www.Intermatic.com or call 815-
675-7000.
NOTICE
WARNING
Risk of Fire or Electrical Shock
• Do not plug this timer into an extension cord.
• Always plug 3-prong plug directly into a properly grounded outlet. Never attempt to defeat this safety feature.
• Do not use timer to control devices that could have dangerous consequences due to inaccurate timing, such as
sun lamps, sauna, heaters, crock pots, etc.
• Follow all local electrical codes during use.
• No user serviceable parts inside.
Minuterie numérique
intérieure 7 jours
Instructions d’installation et mode d’emploi
MODÈLE DT121K/DT122K
• 125 V c.a., 60 Hz, 15 A, 1875 W résistif
• 15A usage général
• 8 A, 1000 W tungstène, 500 VA ballast électronique
• 1/2 HP moteur
• 120 V c.a., 60 Hz, 8,3 A ballast magnétique
Caractéristiques
Reset
P
r
o
g
r
a
m
+
-
T
i
m
e
e
s
R
u
m
e
M
o
d
e
Régler l’heure, la date, l’heure d’été et la région
REMARQUE: Durant le réglage de la minuterie, s’il s’écoule plus de 30 secondes
d’inactivité, la minuterie retourne automatiquement à l’affichage normal de l’heure de
la journée.
1. Appuyer sur . L’année à 4 chiffres s’affiche en clignotant.TIME
2. Appuyer sur ou pour sélectionner l’année en cours puis appuyer sur .+-TIME
3. Appuyer sur +- ou pour régler le mois (01=jan, 12=déc) puis appuyer sur .TIME
4. Appuyer sur ou pour régler le jour du mois.+-
5. Appuyer sur pour régler la fonction d’heure d’été (DST). TIME
6. Appuyer sur ou pour sélectionner (AUTO DST activé) ou (DST désactivé).+-AUTOOFF
REMARQUE: Lorsque la fonction DST est activée, la minuterie avance
automatiquement de 1 heure de deuxième dimanche de mars à 2h00 du matin et
revient de 1 heure en arrière le premier dimanche de novembre à 2h00.
7. Appuyer sur . Les chiffres du heures clignotent.TIME
8. Appuyer sur +-TIME ou pour sélectionner l’heure en cours puis appuyer sur . Les
chiffres du minutes clignotent.
9. Appuyer sur ou pour régler les minute puis appuyer sur . +-TIME
10. Appuyer sur ou pour sélectionner la région d’installation. +-
Brancher la minuterie dans une prise de courant secteur pendant au moins 30 minutes pour charger la batterie
interne. Si l’affichage n’est pas visible, appuyer sur pour redémarrer la minuterie et effacer tous les RESET
réglages et événements. La minuterie peut être débranchée de la prise de courant pour faciliter les réglages.
IMPORTANT : à lire avant la première utilisation
1. NORD:3. SUD:2. CENTRE:
Configurer/examiner/modifier les événements ON/OFF
1. Appuyer sur pour accéder aux écrans d’événements ON/OFF.PROGRAM
2. Pour régler la minuterie la première fois, aller à l’étape 4. Cela configurera l’événement ON n° 1.
3. Pour examiner les réglages ON/OFF, appuyer de façon répétée sur pour afficher jusqu’à 7 PROGRAM
paires d’événements ON/OFF. Les tirets signifient que l’événement n’est pas configuré. Pour supprimer un
événement, appuyer sur . Pour modifier un événement, aller à l’étape 4. Pour quitter le mode de RESUME
configuration des événements, appuyer une fois sur ou appuyer de façon répétée sur MODEPROGRAM
jusqu’à ce que le numéro d’événement disparaisse ou patienter 30 secondes que la minuterie revienne
automatiquement à l’écran principal.
4. Si des tirets s’affichent, appuyer sur pour change les tirets en événement avec le(s) jour(s) TIME
clignotant(s). On notera que les événements sont numérotés de 1 à 7, ON ou OFF.
5. Appuyer sur
+- ou pour sélectionner le(s) jour(s) (clignotants) où l’événement affiché doit s’exécuter:
- Un seul jour: Sélectionner «», «», «» … ou «»MOTUWESU
- Tous les jours: Sélectionner «»MO TU WE TH FR SA SU
- Jours de semaine seulement: Sélectionner «»MO TU WE TH FR
- Fins de semaine seulement: Sélectionner «»SA SU
6. Appuyer sur pour faire clignoter les chiffres des heures. Pour régler l’événement sur une heure TIME
spécifique de la journée, passer directement à l’étape 9. Pour régler l’événement sur le lever ou le
coucher du soleil, passer à l’étape 7.
7. Appuyer sur ou pour avancer jusqu’à l’un des 2 écrans avec les icônes de lune et de soleil +-
clignotantes et AM ou PM clignotant. L’écran avec AM et ces icônes signifie que l’événement se produira
au lever du soleil. L’écran avec PM et ces icônes signifie qu’il se produira au coucher du soleil.
8. Appuyer sur pour accepter le réglage de lever/coucher du soleil et passer à l’écran de PROGRAM
l’événement suivant. Pour ajouter d’autres événements, revenir à l’étape 4. Si tous les événements
souhaités sont configurés, aller à l’étape 14.
9. Appuyer sur ou pour avancer jusqu’à l’heure de début souhaitée pour l’évènement. +-
10. Appuyer sur pour faire clignoter les chiffres des minutes.TIME
11. Appuyer sur ou pour avancer jusqu’à la minute de début souhaitée pour l’évènement.+-
AVIS
AVERTISSEMENT
Risque d’incendie ou de choc électrique
•
Ne pas brancher cette minuterie sur un cordon de rallonge.
•
Toujours brancher la fiche à trois broches directement dans une prise correctement mise à la terre. Ne jamais tenter d’aller à
l’encontre de ce dispositif de sécurité.
•
Ne pas utiliser la minuterie pour contrôler des appareils qui pourraient avoir de dangereuses conséquences en raison d’un calcul
de temps inexact, tels que lampes solaires sauna, appareils de chauffage, mijoteuses, etc.
•
Respecter tous les codes d’électricité locaux pendant l’emploi.
•
Ne contient aucune pièce réparable par l’utilisateur.
nor
CEN
SOU
Une fois la zone
sélectionnée, la minuterie
définiti automatiquement
l’heure de lever et de
coucher du soleil.
11. Appuyer sur pour accéder à l’écran d’heure de lever du soleil. TIME
12. Appuyer sur +- ou pour adapter (de ± 2 heures) l’heure de lever du soleil de la
minuterie sur le lever du soleil local.
REMARQUE:RESUMEAppuyer sur pour retourner à l’heure originale de lever du soleil.
13. Appuyer sur pour accéder à l’écran d’heure de coucher du soleil.TIME
14. Appuyer sur +- ou pour adapter (de ± 2 heures) l’heure de coucher du soleil de la
minuterie sur le coucher du soleil local.
REMARQUE:RESUMEAppuyer sur pour retourner à l’heure originale de coucher du
soleil.
15. Appuyer sur pour retourner à l’écran (principal) de l’heure.TIME
La carte ci-dessous permet d’identifier la zone d’utilisation de la minuterie.
NORD
CENTRE
SUD
Produktspecifikationer
| Varumärke: | Intermatic |
| Kategori: | Växla |
| Modell: | DT121K |
Behöver du hjälp?
Om du behöver hjälp med Intermatic DT121K ställ en fråga nedan och andra användare kommer att svara dig
Växla Intermatic Manualer

20 Mars 2025
12 December 2024
12 December 2024
12 December 2024
12 December 2024
12 December 2024
12 December 2024
12 December 2024
12 December 2024
12 December 2024
Växla Manualer
Nyaste Växla Manualer
9 April 2025
9 April 2025
7 April 2025
5 April 2025
5 April 2025
5 April 2025
5 April 2025
3 April 2025
3 April 2025
2 April 2025