Intermatic EH10 Bruksanvisning
Intermatic Tidsbrytare EH10
Läs gratis den bruksanvisning för Intermatic EH10 (8 sidor) i kategorin Tidsbrytare. Guiden har ansetts hjälpsam av 18 personer och har ett genomsnittsbetyg på 4.9 stjärnor baserat på 5 recensioner. Har du en fråga om Intermatic EH10 eller vill du ställa frågor till andra användare av produkten? Ställ en fråga
Sida 1/8
®
ELECTRONIC 7-DAY
WATER HEATER TIME SWITCHES
MODELS EH10, 120 V AND EH40, 240 V
WITH BATTERY CARRYOVER
OWNER/INSTALLER INSTRUCTION MANUAL
RETAIN FOR FUTURE REFERENCE.
MANUAL (MAN) - AUTOMATIC (AUTO)
(See Fig. 1)
• MANUAL: Bypasses your program completely; timer
will not resume program until you return switch to
AUTO mode position.
• AUTOMATIC: For automatically switching at ON/OFF
times; accurate to-the-minute.
PROGRAM (PROG) - RUN - TIME SET
• PROGRAM:Use this position when programming.
• RUN: Use this position for normal operation. Be sure to
return to RUN after setting time and program.
• TIME SET: Use this position to set day and time of day.
ON/OFF - EVENT (the large push button) - Serves a
dual purpose
• EVENT: Used for programming (active only when switch
is set at PROG).
• ON/OFF: Override (active only when switch is set at
RUN); turns load ON if already off or OFF if already on.
Timer automatically resumes program cycle only when
slide switch is in AUTO. Note that this button is also
accessible without opening the enclosure.
SPECIFICATIONS:
Clock Voltage - Model EH40 - 240 VAC, 50/60 Hz
EH10 - 120 VAC, 50/60 Hz
Power Consumption - EH10-1.0 W Max., EH40 - 3.0
W Max.
Contact Configuration - EH10 (SPST) Single pole-single
throw model-EH40(DPST) Double pole-single throw model
MAN
AUTO
PROG
RUN
TIME
SET
ON
OFF
EVENT
DAY
HOUR
MIN
LOAD
RESET
BATTERY
®
Fig.1
Set Points (Events) - 12 total (6 ON/6 OFF) - Can be
assigned in any combination to weekdays, weekend days,
daily or weekly operation providing up to a maximum of 84
weekly operations (42 ON/42 OFF).
Battery Powered Clock Operation - 3 years minimum,
AA industrial grade alkaline supplied with time switch.
Minimum ON/OFF Time - 1 minute
Maximum ON/OFF Time - 6 days 23 hours 59 minutes
Shipping Weight - 2.37 lbs. (1.05 kg)
Case - Drawn steel, 7-3/4" (19.7 cm) high, 5" (12.7 cm)
wide, 3" (7.6 cm) deep; gray finish with lockable spring
hasp, clear see-through viewing window and external
override.
Knockouts - Combination of 1/2” - 3/4” (one on back and
each side, two on bottom)
Wire Size - AWG #10.
GENERAL SAFETY INFORMATION:
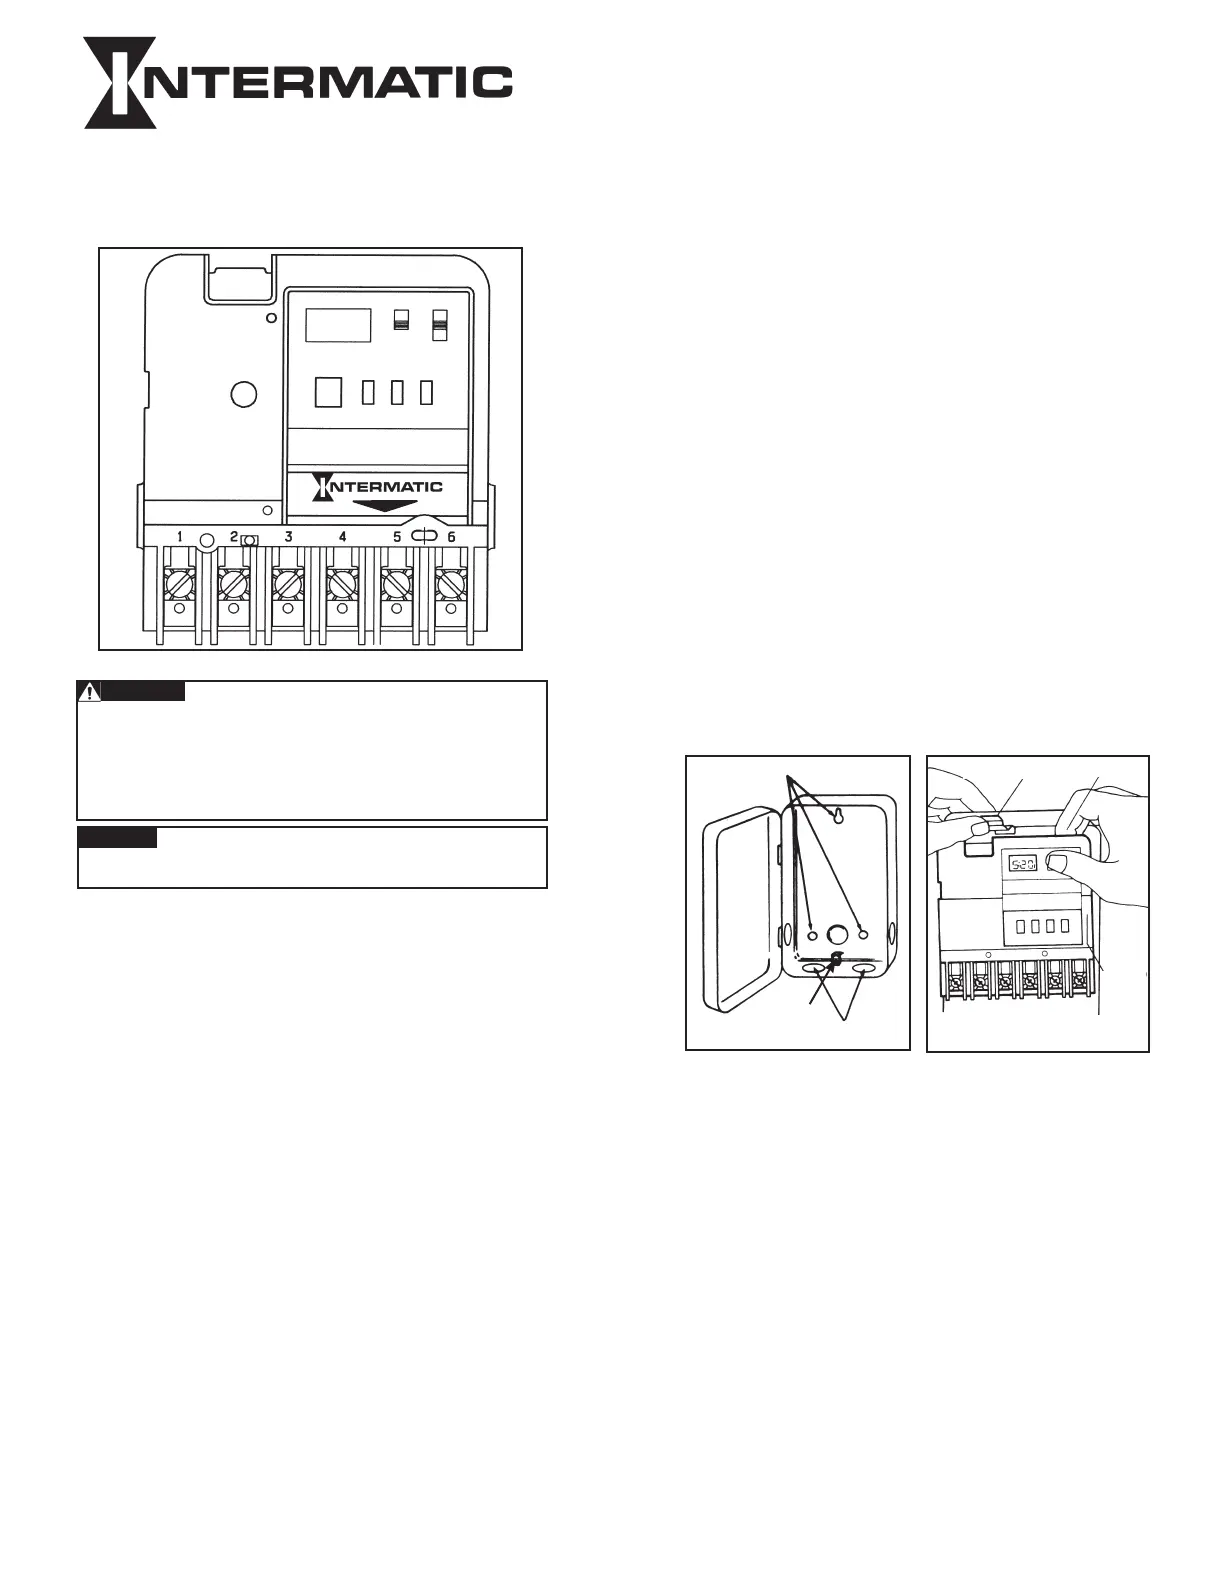
1. Mount the time switch in the desired location using the
three mounting holes which are provided. Mount the
time switch at eye level, if possible, providing sufficient
room to the left of the enclosure for the cover to swing
open fully. (See Fig. #2). The time switch mechanism
does not need to be removed from the enclosure to
mount the time switch since the top mounting hole is
a slotted type mounting hole. Secure a screw or other
fastener at eye level. The head of the screw of fastener
should be slightly larger than the narrow portion of the
slotted hole to ensure that the time switch is securely
held in place. The remaining two mounting holes
provide a means to secure the time switch.
2. If you do remove the mechanism, refer to Figure #3 and
remove the mechanism from the case by depressing
the catch at the top of the case and pulling out.
Fig. 3
Fig. 2
Mounting Holes
Knockouts
Ground
Terminal
Snap Out Catch
Tilt Top Forward
Lift Up
To
Remove
3. Replace the mechanism in the case if it has been
removed, making sure to engage ribs at sides of
mechanism between ears at sides of case before
snapping in place.
4. Lift the left side of the insulator off of the retaining
post and pivot it up and away to expose the terminal
screws.
5. Strip the supply and load wires by removing 1/2 inch
of insulation. DO NOT USE ALUMINUM WIRE.Insert
the wire ends under the proper terminal plates and
tighten the screws firmly. Use any size wire AWG #10.
Connect ground wire to grounding terminal at bottom
of case.
6. Replace the plastic insulator.
7. Follow instructions for battery installation. Be sure
that the battery is functioning properly. This can be
checked by seeing that the display is visible. If the
display has scrambled information, check to be sure
that the polarity orientation of the battery is as shown
on the cover label, then press the RESET switch and
hold for at least two seconds. Note that the battery
can easily be replaced without removing the time
switch mechanism or field wiring. Simply press in and
downward (in the direction of the arrow) on the battery
cover which is identified with the word “Battery”.
It is recommended that the battery be replaced with
a “AA” industrial grade alkaline cell at two to three
Switch Rating (Per Pole) -
• 30 A inductive/resistive - 120-240 VAC, 60 Hz
• 1 HP, 120 VAC, 60 Hz.
• 1-1/2 HP, 240 VAC, 60 Hz.
• 5 A tungsten, 120-240 VAC, 60 Hz.
Risk of Fire or Electric Shock
• Disconnect power at the circuit breaker(s) or disconnect switch(es) before installing
or servicing.
• More than one circuit breaker or disconnect switch may be required to de-energize
the equipment before servicing.
• Installation and/or wiring must be in accordance with National and Local Electrical
Code requirements.
• Use #10 AWG wires - COPPER conductors ONLY.
NOTICENOTICE
•Do nottouch circuit board components; contact can create a static discharge, which
can damage the microprocessor.
WARNING
Produktspecifikationer
| Varumärke: | Intermatic |
| Kategori: | Tidsbrytare |
| Modell: | EH10 |
Behöver du hjälp?
Om du behöver hjälp med Intermatic EH10 ställ en fråga nedan och andra användare kommer att svara dig
Tidsbrytare Intermatic Manualer

11 Januari 2025
10 Januari 2025
20 Oktober 2024
23 Juli 2024
23 Juli 2024
21 Juli 2024
Tidsbrytare Manualer
Nyaste Tidsbrytare Manualer
8 April 2025
8 April 2025
7 April 2025
7 April 2025
5 April 2025
4 April 2025
3 April 2025
3 April 2025
1 April 2025
1 April 2025