Intex Pull-Out Chair Bruksanvisning
Läs gratis den bruksanvisning för Intex Pull-Out Chair (1 sidor) i kategorin Stol. Guiden har ansetts hjälpsam av 47 personer och har ett genomsnittsbetyg på 5.0 stjärnor baserat på 4 recensioner. Har du en fråga om Intex Pull-Out Chair eller vill du ställa frågor till andra användare av produkten? Ställ en fråga
Sida 1/1
7
0
(
70) 2 IN 1 VALVE INSTRUCTION SHEET12 LANGUAGE 7.5”X 10.3”07/28/2010
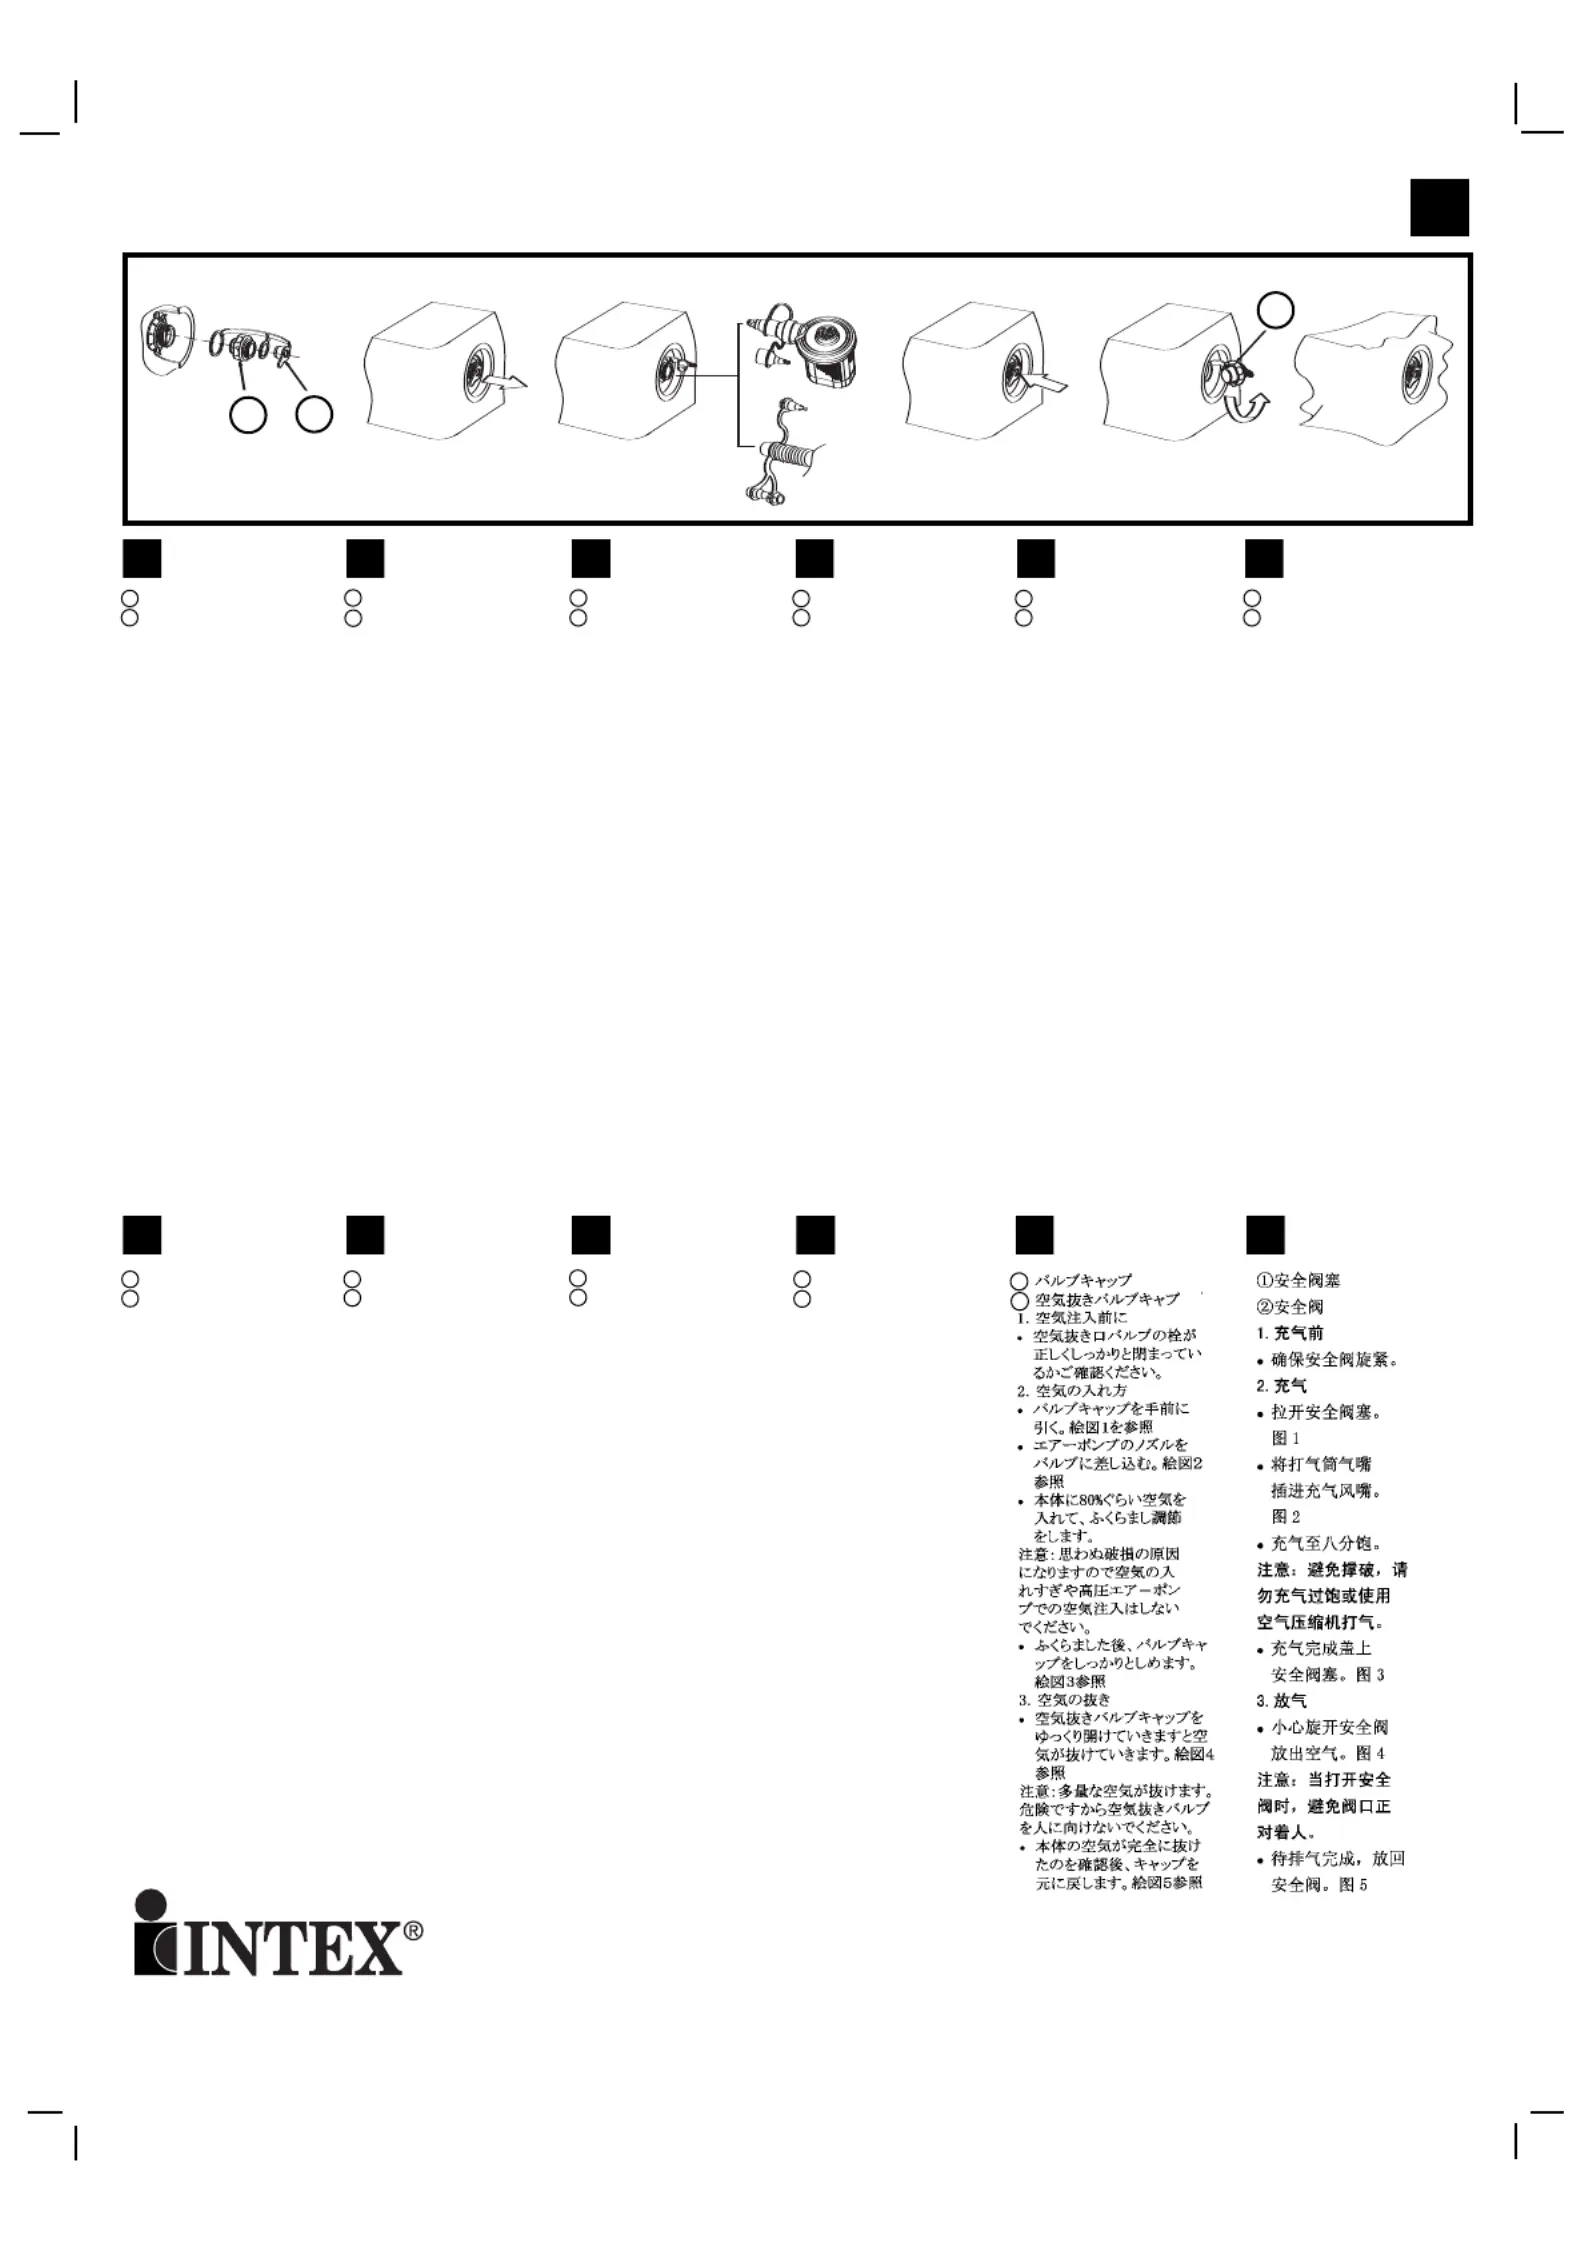
1Valve Cap
2Exhaust Valve Cap
1.BEFORE INFLATING
•Make sure that the
exhaust valve cap
is securely tightened.
2.TO INFLATE
•Pull valve cap to open.
See Fig 1.
•Insert the nozzle from
an air pump into the
Inflation Valve.See Fig 2.
•Inflate the product to
approximately 80% of
desired firmness.
CAUTION:To prevent
bursting,do not over inflate
or use high pressure air
compressor
.
•Close valve cap securely
after inflation.See Fig 3.
3.TDEFLATEO
•Carefully unscrewthe
exhaust valve cap to
release the air.See Fig 4.
CAU
TION:
When opening,
point the exhaust valve
away from any person
.
•Replace the exhaust valve
cap bacwhen the product k
is completely deflated.
See Fig 5.
1Bouchon de la valve
2Valve de dégonflage
1.AVANT GONFLAGE
•Assurez-vous que le
bouchon de la valve de
gonflage soit bien serré.
2.POUR GONFLER
•Retirez le bouchon de la
valve en le tirant (Fig.1).
•Insérez l'embout de votre
gonfleur dans la valve de
gonflage (Fig.2).
•Gonflez l'article jusqu'à environ
80% de la fermeté désirée.
ATTENTION :Pour éviter
tout éclatement,ne surgonflez
pas et n'utilisez pas de
compresseur.
•
Après gonflage, refermez la
valve à l'aide du bouchon
(Fig.3).
3.POUR DEGONFLER
•Dévissez la valvede
dégonflage pour que l'air
s'échappe (Fig.4).
AT
TENTION :
Ne dirigez pas
le souffle directement sur
le visage ou sur une partie
du corps.
•Replacez le bouchon de la
valve lorsque le produit est
complètement dégonflé (Fig.5).
1Tapón de la válvula
2Tapón de la válvula
de escape
1.ANTES DE SER INFLADO
•Asegúrese que el tapón de
la válvula de escape esté
firmemente apretado.
2.PARA INFLAR
•Tire del tapón de la válvula para
abrirlo (ver figura 1).
•Insertar la boquilla de la bomba
de aire en la válvula para hinchar
(ver figura 2).
•Hinche el producto hasta
aproximadamente un 80% de
su capacidad.
PRECAUCIÓN:Para evitar
reventones,no sobreinfle el
producto,ni utilice compresores
de alta presión.
•Cierre el tapón de la válvula
de forma segura después de
hincharlo (ver figura 3).
3.PARA DESINFLAR
•Desatornille cuidadosamente
el tapón de la válvula de
escape para
que salga el aire
(ver figura 4).
PRECAUCIÓN:Cuando la abra,
dirija la válvula de escape lejos
de las personas.
•Ponga de nuevo el tapón de la
válvula de escape cuando el
producto esté completamente
desinflado (ver figura
5).
1Ventilkappe
2Ablassventilkappe
1.VOR DEM AUBLASEN
•Vergewissern Sie sich das der
Verschluss der Ablassventils fest
angezogen ist.
2.AUFBLASEN
•Öffnen Sie die Ventilkappe.
Siehe Abb.1.
•Stecken Sie die Düse einer
Luftpumpe in das Aufblasventil.
Siehe Abb.2.
•Blasen Sie das Produkt zu
etwa 80 % der gewünschten
Festigkeit auf.
ACHTUNG:Um ein Zerplatzen zu
vermeiden,blasen Sie das Produkt
nicht zu stark auf und benutzten Sie
keinen Hoc
hdruckluftkompressor.
•Schließen Sie das Ventil nach
dem Aufblasen fest zu.Siehe
Abb.3.
3.LUFT ABLASSEN
•Schrauben Sie die
Ablassventilkappe sorgfältig auf
um die Luft abzulassen.S
iehe
Abb.4.
ACHTUNG:Sobald es offen ist,
richten Sie das Ablassventil nicht
auf irgendwelche Personen.
•Setzen Sie die Ablassventilkappe
wieder ein sobald das Produkt
komplett ausgelassen ist.Siehe
Abb.5.
1Tappo della valvola
2Tappo della valvola di svuotamento
1.PRIMA DEL GONFAGGIO
Prima di procedere col gonfiaggio
assicurarsi che il tappo di
sgonfiamento sia fermamente
avvitato.
2.PER GONFIARE
•Tirare per aprire il tappo della
valvola.Vedi figura 1.
•Inserire la bocchetta di una pompa
d'aria nella valvola di gonfiamento.
Vedi figura 2.
•Gonfiare il prodotto
approssimativamente fino all'80%
della compattezza desiderata.
ATTENZIONE:Per prevenire scoppi,
non gonfiare il prodotto oltre un
cer
to limite e non usare compressori
ad alta pressione.
•Close valve cap securely after
inflation.Vedi figura 3.
3.PER SGONFIARE
•Svitare con cura il tappo della
valvola di svuotamento per far
uscire l'ari
a.
Vedi figura4.
ATTENZIONE:Quando viene
aperta,non puntare la valvola
di svuotamento verso persone.
•Riposizionare all'interno il tappo
della valvola di svuotamento una
volta cheil prodotto sia completament
sgonfio.Vedi figura 5.
1Opblaasventiel met dop
2Leegloopventiel
1.ALVORENS OP TE
BLAZEN:
•Overtuig u ervan dat de
dop van het leegloopventiel
goed is aangedraaid.
2.OPBLAZEN:
•Verwijder de dop van het
opblaasventiel.(fig.1)
•Steek het mondstuk van
een luchtpomp in het
opblaasventiel.(fig.2)
•Opblazen tot ca.80% van
de gewenste hardheid
WAARSCHUWING:Gebruik
geen hogedrukpomp en
niet te hard opblazen,
daar ander
sproduct kan
openbarsten.
•Zet, na het opblazen, de
dop weer op het ventiel.
(fig.3)
3.LEEG LATEN LOPEN
•Draai voorzichtig het
gehele leegloopve
ntiel
los.(fig.4)
WAARSCHUWING:
Leegloopventiel NIET op
mens of dier richten!
•Als alle lucht eruit is, draai
leegloopventiel weer op
z'n plaats.(fig.5)
V
A-2
V
A-1
V
A-2
1.2.3.4.
5.
1Ventilhætte
2Luftudtø
mningsventilens hætte
1.INDEN OPPUMPNING
•Sørg for at luftudtømningsventilens
hætte er skruet godt fast.
2.
A
TPUSTE OP
•Træk i ventilhætten for at lukke op.
Se fig.1.
•Sæt spidsen af en luftpumpe ind i
oppumpningsventilen.Se fig.2.
•Pump produktet op til ca.80 % af
den ø
nsk
ede fasthed.
FORSIGTIG:For at sikre sig at
produktet ikke sprænger,må man
ikke pumpe det f
or meg
et op eller
bruge højtrykskompressor.
•Skru ventilhætten godt på efter
oppumpning.Se fig.3.
3.
FOR A
TTAGE LUFT UD
•Skru forsigtigt
luftudtø
mningsventilens hætte af
for at lukke luften ud.Se fig.4.
FORSIGTIG:Når man åbner
luftudtømningsventilen,
må man
ikke sigte på nogen med den.
•Skru hætten fast på
luftudtømningsventilen igen,
når al luften er lukk
et ud af
produktet.Se fig.5.
1Válvula
2Válvula de exaustão
1.ANTES DE INFLAR
•
Assegure-se que a
válvula esteja
seguramente fechada.
2.PARA INFLAR
•
Abr
aaválvula de
exaustão - veja figura 1.
•Insira o bico da bomba –
v
eja figur
a2.
•Infle o produto até obter
uma firmeza desejada.
CUIDADO:Não use
compressor de alta
pressão,inflar
demasiadamente pode
estourar o produto.
•
Após inflar f
eche a
válvula corretamente –
veja figura 3.
3.PARA DESINFLAR
•Abra cuidadosamente a
válvula de e
xaustão –
veja figura 4.
CUID
ADO:
Durante a
e
xaustão direcione o ar
para longe das pessoas.
•Após o produto estiver
completamente desinflado,
coloque a tampa da
válvula de exaustão –
v
eja figur
a5.
1èӷ͇
2Ç˚ıÓ‰ÌÓÈ Í·ԇÌ
1.è‰ ͇̇˜Ë‚‡ÌËÂÏ
•ì·Â‰ËÚÂÒ¸, ˜ÚÓ ‚˚ıÓ‰ÌÓÈ
ÍÎ‡Ô‡Ì ÔÎÓÚÌÓ Á‡Í˚Ú.
2.ç‡Í‡˜Ë‚‡ÌËÂ
•éÚÍÓÈÚÂ ÔÓ·ÍÛ
ëÏ. Ù. 1.
•ÇÒÚ‡‚¸Ú ÍÓ̈
̇҇‰ÍË ÓÚ Ì‡ÒÓÒ‡ ‚
ÍÎ‡Ô‡Ì ëÏ. Ù. 2.
•
ç‡Í‡˜‡ÈÚ ËÁ‰ÂÎË ‰Ó
80% ÓÚ Ï‡ÍÒËχθÌÓ„Ó
Ó·˙Âχ.
ÇÌËχÌËÂ: ÇÓ ËÁ·ÂʇÌËÂ
‡Á˚‚‡ ËÁ‰ÂÎËfl ÌÂ
ÔÂÂ͇˜Ë‚‡ÈÚÂ Ë ÌÂ
ËÒÔÓθÁÛÈÚ ÍÓÏÔÂÒÒÓ.
•
èÎÓÚÌÓ Á‡ÍÓÈÚ Í·ԇÌ
ÔÓ·ÍÓÈ. ëÏ. Ù. 3.
3. ë‰ÛÚËÂ
•éÒÚÓÓÊÌÓ ÓÚÍÓÈÚÂ
ÔÓ·ÍÛ Í·ԇ̇. ëÏ. Ù. 4.
ÇÌËχÌËÂ: èË ÓÚÍ˚ÚËË
ÔÓ·ÍË Ì ̇ԇ‚ÎflÈÚÂ
ÍÎ‡Ô‡Ì Ì‡ β‰ÂÈ.
•èÓÒΠÚÓ„Ó Í‡Í ‚ÓÁ‰Ûı
ÔÓÎÌÓÒÚ¸˛ ‚˚ȉÂÚ,
ÔÎÓÚÌÓ Á‡ÍÓÈÚ Í·ԇÌ
ÔÓ·ÍÓÈ. ëÏ. Ù. 5.
1NASADKAZAWORU
2NAKRĘTKA
WYPUSTOWAZAWORU
1. PRZED POMPOW
ANIEM
•Upewnij się, że zawór
wypustowy jest zakręcony.
2. POMPOWANIE
•Pociągnij nasadkę w celu
otwarcia. Patrz rys.1.
•Umieść końcówkę pompki w
zaworze. Patrz rys.2.
•Napompuj produkt do
uzyskania około 80% objętości.
UWAGA: Do pompowania nie
używaj urządzeń na sprężone
powietrze.
•Zamknij nasadkę po
napompowaniu. Patrz rys.3.
3. WYPUSZCZANIE
POWIETRZA
•Delikatnie odkręć zawór
wypustowy w celu
wypuszczenia powietrza.
Patrz rys.4.
UWAGA: Nie kieruj strumienia
wypuszczanego powietrza w
kierunku innych ludzi.
•Umieść nasadkę z powrotem
po całkowitym wypuszczeniu
powietrza. Patrz rys.5.
2
1
1
2
2
©
2010
Inte
xMarketing Ltd.
-Inte
xDe
velopment Co.
Ltd.- Intex Trading Ltd.- Intex Recreation Corp.
All rights reserved/Tous droits réservés/Todos los derechos reservados/Alle Rechte vorbehalten.
Printed in China/Imprimé en Chine/Impreso en China/Gedruc
kt in China.
®™
T
r
ademar
ks used in some countr
ies of the w
or
ld under license from/
®™
Marques utilisées dans certains pays sous licence de/Marcas registradas utilizadas en algunos países del mundo bajo
licencia de/Warenzeichen verwendet in einigen Ländern der Welt in Lizenz von/
Intex Marketing Ltd.to/à/a/an Intex Trading Ltd.,Intex Development Co.Ltd.,G.P.O Box 28829,Hong Kong & Intex
Recreation Corp.,
P.O.Box 1440,Long Beach,CA 90801
•Distr
ibuted in the European Union by/Distribué dans l’Union Européenne par/Distribuido en la unión Europea por/Vertrieb in der
Europäischen Union durch/
Intex Trading B.V.,P.O.Box nr.1075 – 4700 BB Roosendaal – The Netherlands
070**-R0-1107
Produktspecifikationer
| Varumärke: | Intex |
| Kategori: | Stol |
| Modell: | Pull-Out Chair |
| Bredd: | 1092 mm |
| Djup: | 2184.4 mm |
| Höjd: | 146.05 mm |
| Förpackningens bredd: | 330.2 mm |
| Låddjup: | 406.4 mm |
| Vikt inkl. förpackning: | 4653 g |
Behöver du hjälp?
Om du behöver hjälp med Intex Pull-Out Chair ställ en fråga nedan och andra användare kommer att svara dig
Stol Intex Manualer

3 Augusti 2024
Stol Manualer
Nyaste Stol Manualer
2 April 2026
29 Mars 2026
24 Mars 2026
24 Mars 2026
18 Mars 2026
11 Mars 2026
8 Mars 2026
26 Februari 2026
17 Februari 2026
16 Februari 2026