Kidde CV2208 Bruksanvisning
Kidde ej kategoriserat CV2208
Läs gratis den bruksanvisning för Kidde CV2208 (3 sidor) i kategorin ej kategoriserat. Guiden har ansetts hjälpsam av 33 personer och har ett genomsnittsbetyg på 4.9 stjärnor baserat på 3 recensioner. Har du en fråga om Kidde CV2208 eller vill du ställa frågor till andra användare av produkten? Ställ en fråga
Sida 1/3
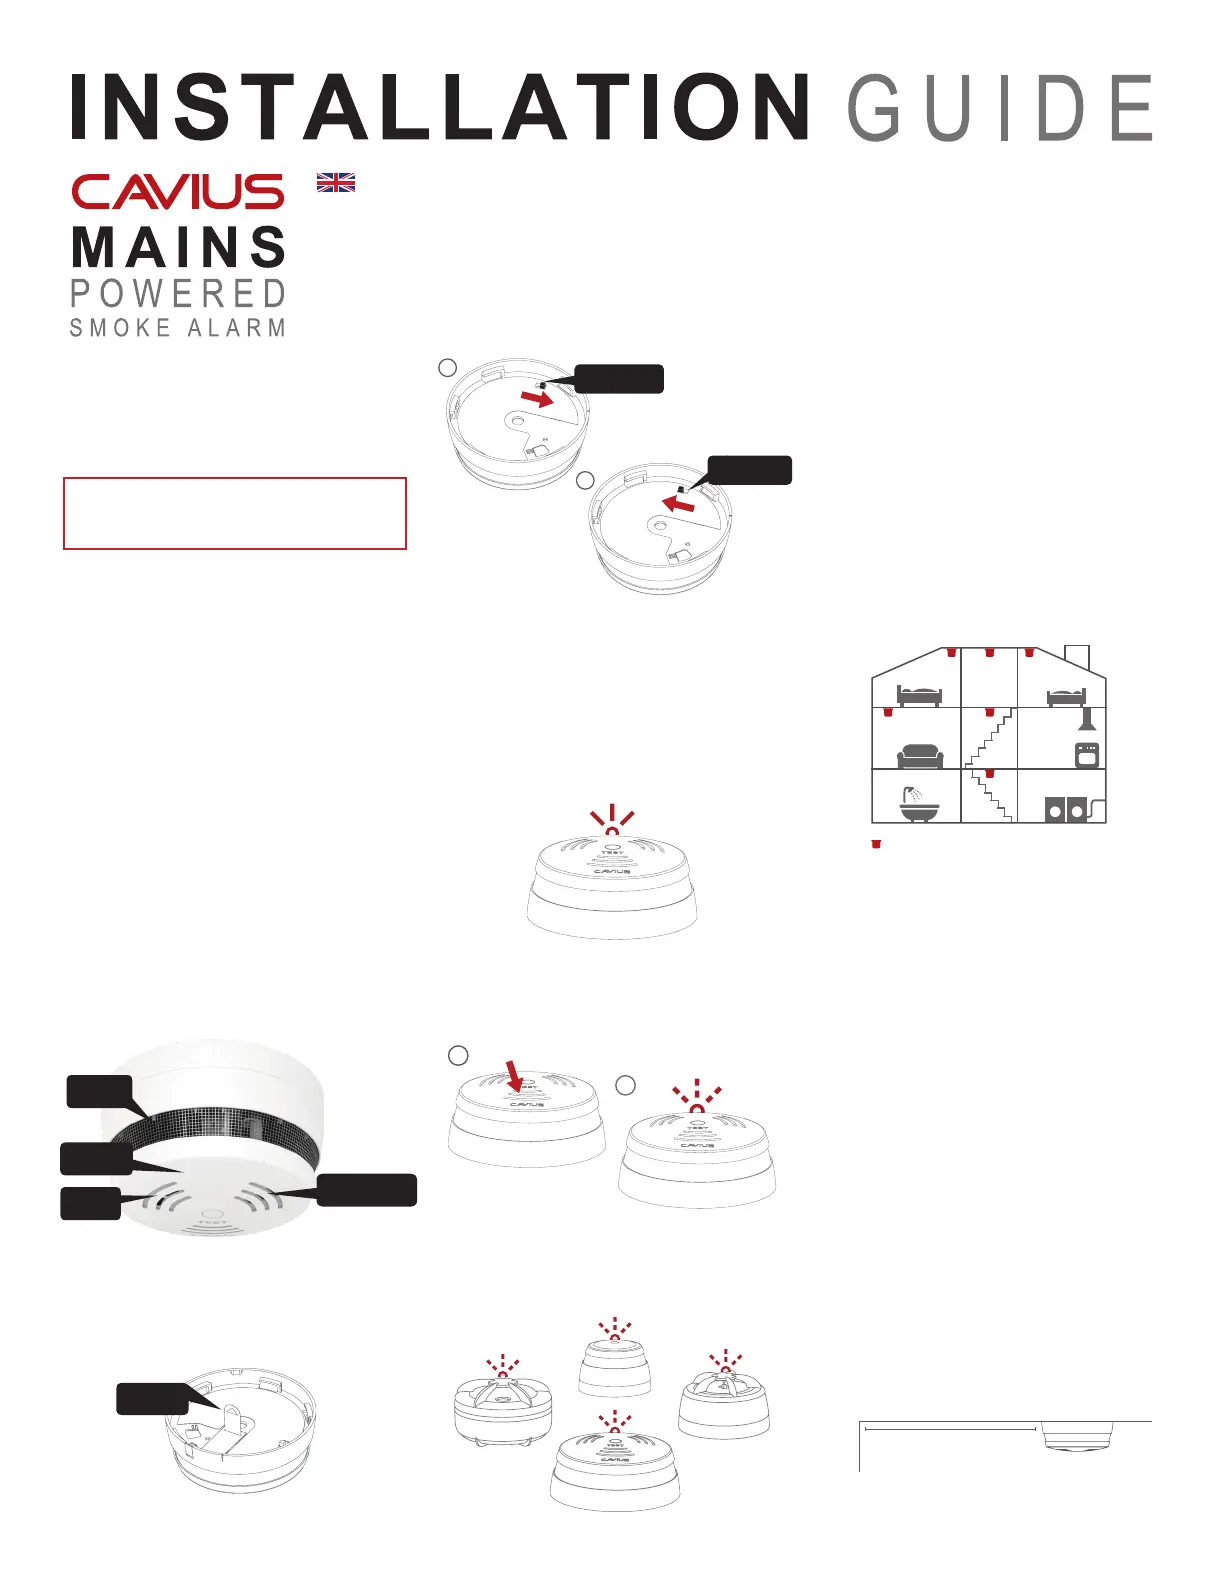
RF connection is done with the device powered
with battery only. You do not have to connect the
power supply. The product label must not be re-
moved as it contains important information re-
garding the product.
All alarms to be connected in the house should
be put into ‘Learn Mode’ by sliding the switch on
the back of the alarm to the ‘Learn Mode’ position.
Please note: The learn switch placed on the back
of the alarm can only be in learn position when
the alarm is disassembled from the power supply
unit. The learn switch will automatically switch to
normal position when the alarm head is tted to
the power supply.
The red LED will light up to indicate that ‘Learn
Mode’ has been selected.
Press and hold the test button at one alarm only,
until it beeps and the LED ashes. This alarm will
become the master and will start sending out a
specic house code to the other alarms.
As the other alarms receive the specic house
code, they will also ash the LED light.
When the red LED light flashes on all alarms,
they are connected and MUST BE SWITCHED
OUT OF ‘LEARN MODE’and installed.
Label the original “Learn” alarm in order to easily
add new CAVIUS Wireless Family alarms to the
system.
2. THE BEST AREAS TO INSTALL THE SMOKE
ALARM:
• Note the local country regulations regarding
installation.
• Note the local regulations about information
to your insurance company regarding installed
smoke alarms.
• Install an alarm between possible re sources
and bedrooms as a minimum.
• Install alarms on each oor of the house, in
hallways and landings.
• Alarms in each room such as bedrooms and
living rooms.
Additional alarms increase the security.
3. AREAS WHERE NOT TO INSTALL SMOKE
ALARMS:
• In dusty rooms
• At the top of a high pointed ceiling, in ceiling
corners, and within 50cm of a wall.
• In rooms where temperature goes outside the
range +4
o
to 38°Cor above 90% relative humidity
not condensing.
• In kitchens, garages, laundries, or too close to
replaces; areas where either dampness, gases
or smoke could occur.
Place the alarm where it is reachable in order to
test the alarm and for maintenance.
4. PLACEMENT:
The smoke alarm is designed to be installed on a
ceiling. With a minimum of one smoke alarm per
oor and a maximum distance between smoke
alarms of 10 meters.
For ceiling installation:
The smoke alarm should be a minimum of 30cm from
the wall.
Mains powered smoke alarm device
Model no.: 2208
The smoke alarm is designed for private homes.
PLEASE READ THE INSTALLATION GUIDE
CAREFULLY BEFORE INSTALLATION AND
RETAIN FOR FUTURE USE.
SAFETY INSTRUCTIONS:
The device comes with a 3V lithium battery. Bat-
teries are to be handled with care and battery pow-
ered devices should be kept out of reach of chil-
dren. Do not try to recharge or burn the batteries.
TECHNICAL INFORMATION:
Powered by a non-replaceable 3V CR123 Lith-ium
battery with 10-year life (included).
It can be RF interlinked with other CAVIUS
Wireless Family alarms.
The maximum number of alarms that can be
interlinked within a house group are 32. Please
note: These must be alarms from the CAVIUS Wire-
less Alarm Family.
The distance between interlinked alarms depends
on the house layout and they should always be
tested after installation. It is not advised to install
alarms with a separation of more than 10m.
Diameter: 97mm. Height: 41mm (without mount-
ing base) 52mm (with mounting base).
1. HOW TO SET UP AND CONNECT ALARMS:
Start by pulling out the battery isolation strip as
shown.
UK
1
Minimum 30cm
from wall
Wall
Ceiling
CHAMBER
FILTER
TEST BUTTON
SOUND
OUTPUT
RED & GREEN LED
Optical
Siting of Optical Smoke alarms
ISOLATION
STRIP
NORMAL MODE
2
LEARN MODE
1
2
1
Produktspecifikationer
| Varumärke: | Kidde |
| Kategori: | ej kategoriserat |
| Modell: | CV2208 |
Behöver du hjälp?
Om du behöver hjälp med Kidde CV2208 ställ en fråga nedan och andra användare kommer att svara dig
ej kategoriserat Kidde Manualer

5 September 2025
5 September 2025
5 September 2025
4 September 2025
4 September 2025
ej kategoriserat Manualer
Nyaste ej kategoriserat Manualer
3 April 2026
3 April 2026
3 April 2026
3 April 2026
3 April 2026
3 April 2026
3 April 2026
3 April 2026
3 April 2026