Kohler Antique K-7355 Bruksanvisning
Kohler Duschsystem Antique K-7355
Läs gratis den bruksanvisning för Kohler Antique K-7355 (2 sidor) i kategorin Duschsystem. Guiden har ansetts hjälpsam av 13 personer och har ett genomsnittsbetyg på 4.7 stjärnor baserat på 9 recensioner. Har du en fråga om Kohler Antique K-7355 eller vill du ställa frågor till andra användare av produkten? Ställ en fråga
Sida 1/2
1
37995-AA (C)
1998 Kohler Co.
NOTES:
OBSERVE ALL LOCAL PLUMBING CODES.
All information in these instructions is based upon the latest
product information available at the time of publication.
Kohler Co. reserves the right to make changes in product
characteristics, packaging, or availability at any time without
notice.
TOOLS AND MATERIALS REQUIRED:
Pliers
Adjustable wrench
Strap wrench
Thread sealant
Plumbers putty
Screwdrivers
BEFORE FINISH WALL IS COMPLETED:
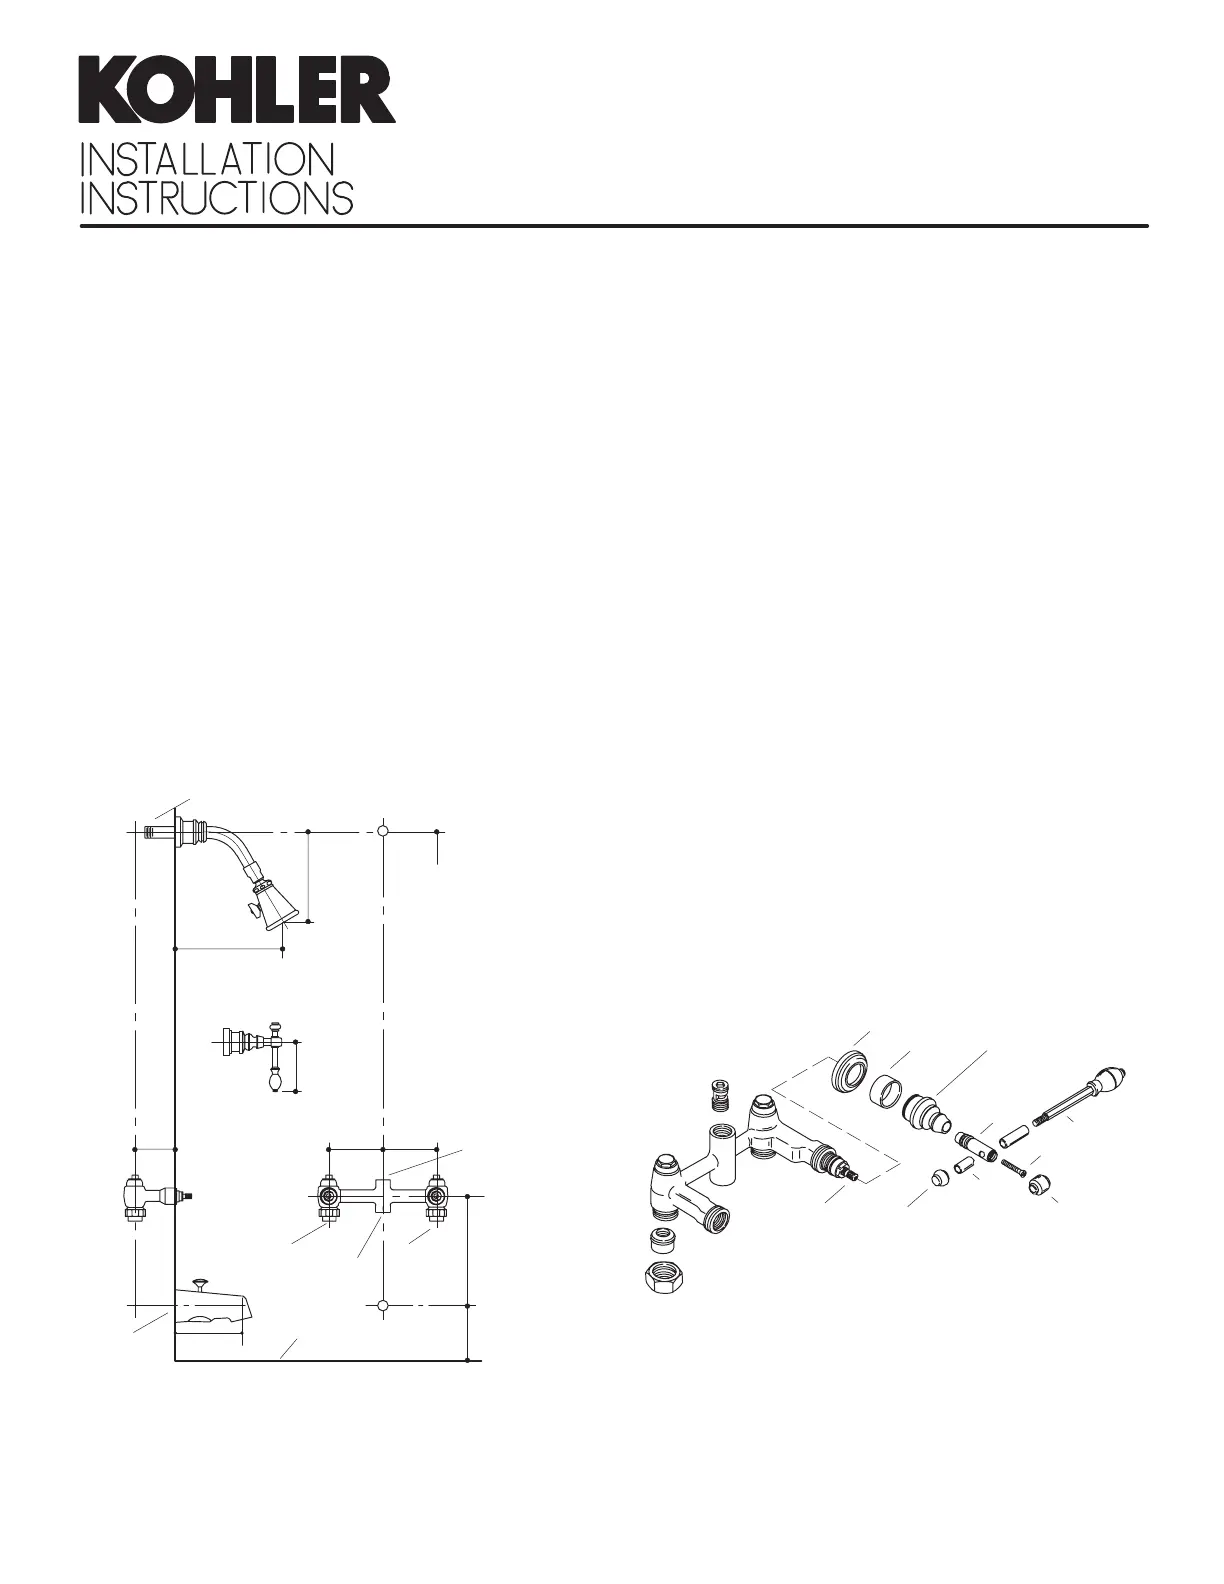
1.Rough-in 1/2” hot and cold supplies to valve as
illustrated in Fig. #1 . Apply trim (plated parts) only after
completion of finish wall. Make sure the valve is secured
to the framing, and that the center of the valve to the
finish wall dimension is 3”.
Fig. #1
1/2” N.P.T.
3”
1/2” HOT
1/2”
COLD
72”-78” TO
FLOOR
(TYPICAL)
TOP OF RIM
8”
4”
6-1/2”
7-5/8”
1/2” N.P.T. TAP
4”4”
4-7/8”
3-3/4”
LEVER
1/2” N.P.T.
TAP
1/2”
N.P.T.
TAP
NOTE: When used with shower only, install valve
approximately 48” above finished floor.
NOTE: Outlet marked “TUB” must always face down,
and must be connected to spout.
NOTE: For installation of bath filler only, plug shower
outlet with 1/2” plug. For installation of shower only, plug
bath outlet with 1/2” plug.
2.Connect the fittings with 1/2” piping and elbows in wall
for showerhead and spout according to Fig. #1 . Use
thread sealant.
3.Securely fasten the spout and shower piping to the
framing members. Temporarily install a length of 1/2”
pipe to shower and bath elbows to extend a minimum of
2” beyond the finish wall.
4.With valves in off position, turn on water supplies and
check all connections for leakage.
AFTER FINISH WALL IS COMPLETED:
5.After finish wall is completed, discard cardboard thread
protectors.
6.Refer to Fig. #2 . Ensure valves are in off position by
turning hot valve counterclockwise, and cold valve
clockwise. Apply a ring of plumbers putty or other
sealant around the back of escutcheons according to
the putty manufacturer’s instructions. Assemble
escutcheons, polished brass or black spacers, skirts,
and stem covers to stems. Use screws to attach
handles to stems.
NOTE: Make sure that the octagon-shaped holes on
stem covers are in the same position as shown in
Fig. #2 .
Fig. #2
Escutcheon
Spacer
Skirt
Stem
Cover
Stem
Screw
Skirt
Cap
Handle
Stem
End Cap
Short
Sleeve
7.Disassemble handles by unscrewing end cap and
removing short sleeves. Assemble skirt cap to stem
cover.
8.Insert handle stems through skirt caps, and reassemble
as shown in Fig. #2 using black or optional polished
brass sleeves. Remove temporary 1/2” pipe previously
installed into spout elbow.
Produktspecifikationer
| Varumärke: | Kohler |
| Kategori: | Duschsystem |
| Modell: | Antique K-7355 |
Behöver du hjälp?
Om du behöver hjälp med Kohler Antique K-7355 ställ en fråga nedan och andra användare kommer att svara dig
Duschsystem Kohler Manualer

5 Februari 2026
4 Februari 2026
3 Februari 2026
3 Februari 2026
2 Februari 2026
1 Februari 2026
1 Februari 2026
1 Februari 2026
1 Februari 2026
1 Februari 2026
Duschsystem Manualer
Nyaste Duschsystem Manualer
31 Mars 2026
29 Mars 2026
9 Mars 2026
9 Mars 2026
9 Mars 2026
8 Mars 2026
5 Mars 2026
26 Februari 2026
26 Februari 2026
26 Februari 2026