Kramer WP-211X Bruksanvisning
Läs gratis den bruksanvisning för Kramer WP-211X (3 sidor) i kategorin Växla. Guiden har ansetts hjälpsam av 14 personer och har ett genomsnittsbetyg på 4.6 stjärnor baserat på 7.5 recensioner. Har du en fråga om Kramer WP-211X eller vill du ställa frågor till andra användare av produkten? Ställ en fråga
Sida 1/3

WP-211X Quick Start
P/N:
2900- 301398QS
Rev:
1
Scan for full manual
WP-211X Quick Start Guide
This guide helps you install and use your WP-211X for the rst time.
Go to www.kramerav.com/downloads/WP-211X to download the latest user manual and check if rmware
upgrades are available.
Step 1: Check in the b what’s ox
WP-211X 4K HDR HDMI Auto Switcher Wall Plate
1 Quick start guide
Installation accessories
Frame (or frame set) and faceplate
1 Power adapter and cord
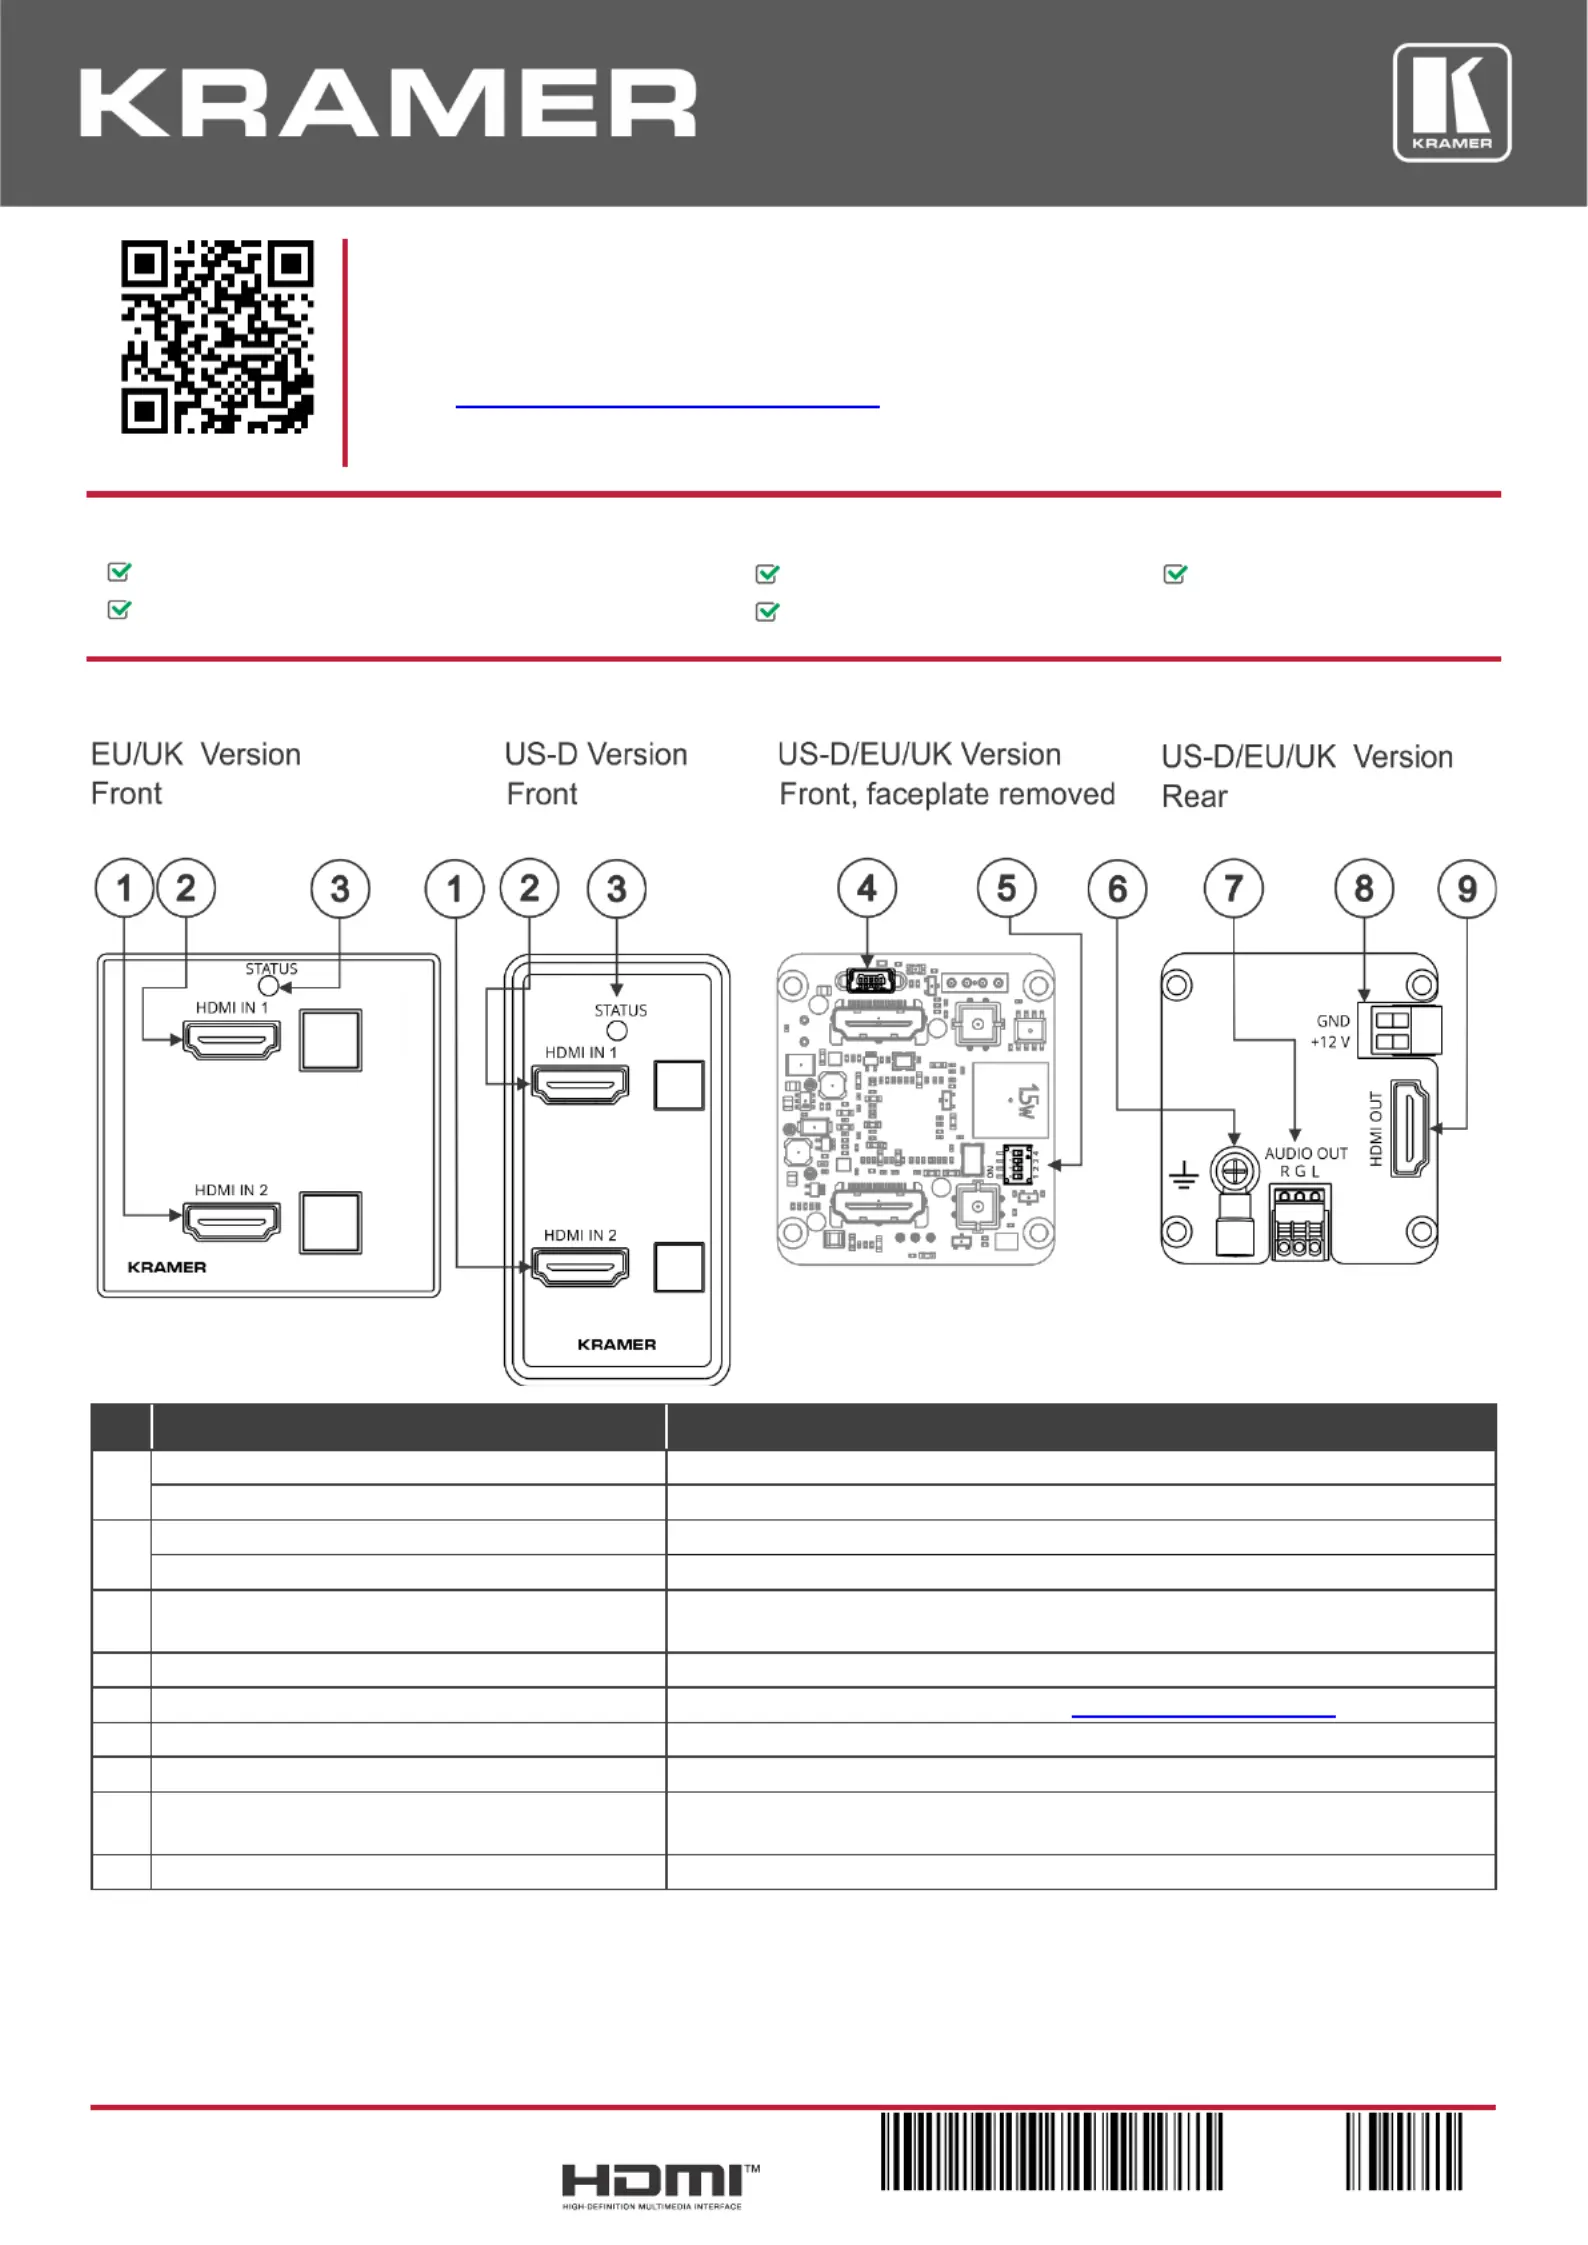
Step 2: Get to know your -211X WP
#
Feature
Function
1
HDMI IN 2 Connector
Connects to an HDMI source.
HDMI IN 2 Button
Press to select the HDMI 2 input (button lights orange).
2
HDMI IN 1 Connector
Connects to an HDMI source.
HDMI IN 1 Button
Press to select the HDMI 1 input (button lights orange).
3
STATUS LED
Lights green when the device is powered and blue when an HDMI output is
connected.
4
PROG Mi USB Connector ni
Connect to upgrade the firmware.
5
SETUP 4-way DIP-Switches
Set the operation DIP-switches (see Setting the DIP-Switches).
6
Ring Tongue Terminal Grounding Screw
Connect to grounding wire (optional).
7
AUDIO OUT 3-pin Terminal Block Connector
Connect to an unbalanced analog audio acceptor.
8
Power Supply 2-pin Terminal Block
Connector
Connect to the power supply. Connect GND to GND, + V to + 12 12V.
9
HDMI OUT Connector
Connect to an HDMI acceptor.
The terms HDMI, HDMI High-Denition Multimedia Interface, and the HDMI Logo are trademarks or registered trademarks of HDMI Licensing Administrator, Inc.

Step 3: Install the -211X WP
Insert the device into the in-wall box (note that rst you need to connect the HDBT cable and power) and connect the parts as
shown in the illustrations below:
US D - Version
EU/UK Version
DECORA® design or similar frames are included in US-D models. DECORA® is a registered
trademark of Leviton Manufacturing Co., Inc.
We recommend that you use any of the following standard 1 Gang in-wall junction boxes (or their equivalent):
• : 1 Gang US electrical junction boxes. US-D
• : 1 Gang in-wall junction box, with a cut-hole diameter of 68mm and depth that can fit in both the device and the EU
connected cables (DIN 49073).
• : 1 Gang in-wall junction box, 75x75mm (W, H) and depth that can t in both the device and the connected cables UK
(BS 4662 or BS EN 60670-1 used with supplied spacers and screws).
Step 4: Connect the inputs and outputs
Always switch OFF the power on each device before connecting it to your WP-211X. For best results, we recommend that you
always use Kramer high-performance cables to connect AV equipment to the WP-211X.

Setting the DIP-Switches
DIP-switches 1, 2 and 3 are set to ON by default and DIP-switch 4 is always set to OFF.
DIP-switch changes take eect immediately.
#
Feature
Dip-Switch Settings
1
Switching Mode
OFF Manual mode. –
ON Auto-switching mode. –
2
Auto-switching Mode
OFF Priority switching mode: the device– switches the source with the
highest priority to the output.
ON Last connected switching mode: the last detected active source is –
auto-switched to the output.
3
EDID lock
O EDID Locked. –
On EDID parameters are pass–ed-through.
4
Reserved for Factory Use
It is mandatory to keep set to OFF.
For optimum range and performance use the recommended Kramer cables available at www.kramerav.com/product/WP-211X
Grounding the (Optional) WP-211X
1. Connect the ring tongue terminal to the building grounding point wire (a green-yellow, AWG#18 (0.82mm2) wire,
crimped with a proper hand-tool is recommended).
2. Insert the M3x6 screw through the toothed lock washers and the tongue terminal in the order shown above.
3. Insert the M3x6 screw (with the two toothed lock washers and ring tongue terminal) into the grounding screw hole
and tighten the screw.
Step 5: Connect the power
Connect the V power adapter to the device and plug the power supply into the mains electricity. 12
Safety Instructions
Caution:
• For products with relay terminals and GPI\O ports, please refer to the permitted rating for an external connection, located next to the terminal or in the User Manual.
• There are no operator serviceable parts inside the unit.
Warning:
• Use only the power cord that is supplied with the unit.
• Disconnect the power and unplug the unit from the wall before installing.
• Do not open the unit. High voltages can cause electrical shock! Servicing by qualied personnel only.
• To ensure continuous risk protection, replace fuses only according to the rating specied on the product label which located on the bottom of the unit.
Produktspecifikationer
Varumärke: | Kramer |
Kategori: | Växla |
Modell: | WP-211X |
Behöver du hjälp?
Om du behöver hjälp med Kramer WP-211X ställ en fråga nedan och andra användare kommer att svara dig
Växla Kramer Manualer
2 Februari 2025
20 December 2024
20 December 2024
20 December 2024
20 December 2024
20 December 2024
19 December 2024
27 Oktober 2024
12 September 2024
8 September 2024
Växla Manualer
- Panasonic
- Mach Power
- Black Box
- Perel
- Cisco
- UPM
- ICasa
- Monoprice
- ORNO
- Fantini Cosmi
- Nexa
- Intermatic
- Airlive
- Apc
- ConnectPro
Nyaste Växla Manualer
9 April 2025
9 April 2025
7 April 2025
5 April 2025
5 April 2025
5 April 2025
5 April 2025
3 April 2025
3 April 2025
2 April 2025