Lastolite Cubelite LiteTable Bruksanvisning
Lastolite Andra kameratillbehör Cubelite LiteTable
Läs gratis den bruksanvisning för Lastolite Cubelite LiteTable (3 sidor) i kategorin Andra kameratillbehör. Guiden har ansetts hjälpsam av 45 personer och har ett genomsnittsbetyg på 4.0 stjärnor baserat på 7 recensioner. Har du en fråga om Lastolite Cubelite LiteTable eller vill du ställa frågor till andra användare av produkten? Ställ en fråga
Sida 1/3
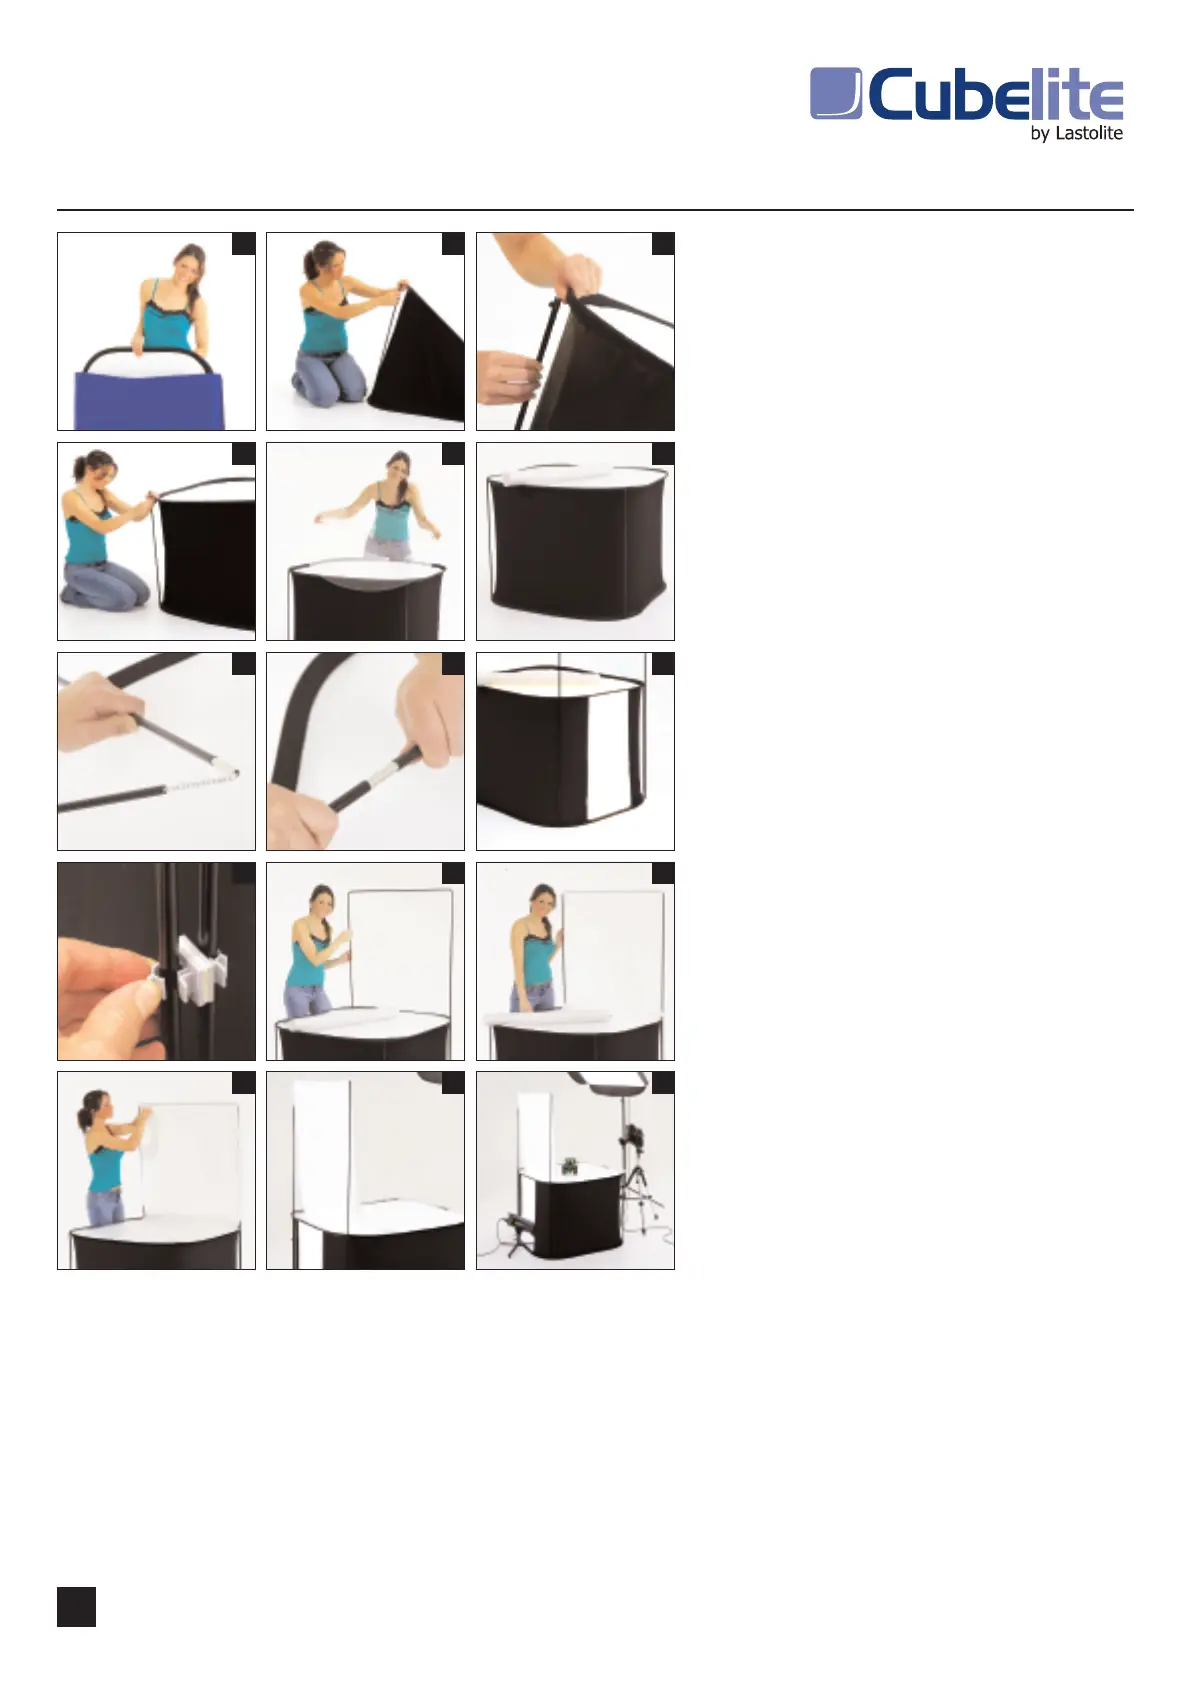
1.Remove items from the box. You should have:
-Bag containing the LiteTable (flat)
-4 x Black support rods
-4 x joining clips for the rods
-Back frame rod assembly
-Circular acrylic sheet
-Roll of translucent film
-Fabric back drop
Remove the LiteTable from the protective bag.
2.Lay the LiteTable on the floor and position the end of
one of the rods on the corner of the lower steel rim.
Ensure the steel rim locates into the jaws of the tip at
the end of the rod.
3.Pull the two steel rims away from each other and locate
the jaws of the tip at the other end of the rod into the
upper rim.
4.Repeat steps 2&3 for the remaining three corners.
When all four rods are in place, check they are all in a
vertical position.
5.Place the circular acrylic sheet on the top of the
LiteTable (Take care not to drop this as it will break).
6. The base unit is now complete.
7.Take hold of the back frame rod assembly and allow
the rods to ‘snap’into position. This will form one
complete ‘U’shaped structure.
8.Ensure that all the ‘Silver’joints are fully inserted into
the hollow black support rods.
9.Position the LiteTable so that the rear opening is in
front of you. Line the back frame assembly up with the
two rear support rods on the LiteTable base unit.
10.Use the four joining clips to attach the rods together.
Place one two inches from the bottom and one two
inches from the top of each of the rear support rods
on the LiteTable base unit. The clips simply snap shut
around the rod. Then attach the back frame assembly
in the same way.
11.The back frame assembly is now in place
12.Take the fabric back drop and with the smooth side
facing the front, wrap the top edge over the the
crossbar on the back frame structure and attach to the
velcro. This should leave a velcro strip facing forward
across the top of the back frame.
13. Unroll the translucent film. Then attach the velcro strip
at one end of the film to the velcro strip at the top of
the back frame. Allow the film to drop onto the top of
the base unit creating an infinity curve.
14.Take the bottom of the fabric back drop and ensure it
lays over the top of the black rim on the edge of the
LiteTable base unit (do not let it hang down the back of
the base unit). This ensures the black edge cannot be
seen through the translucent film.
15. Add your chosen lighting system. Refer to the label
near the rear opening of the LiteT
able for advice on
how to position the light source inside.
Breaking Down your LiteTable kit.
16.Remove the translucent film, roll up and return to tube.
17.Remove and roll up the fabric back drop. This can also
go in the tube with the film for protection.
18.Disconnect the back frame assembly from the support
rods. To dismantle the frame pull the rods apart and
fold them so they cannot ‘snap’back into position.
19. Remove the circular acrylic sheet from the top of the
base unit and return it to the protective bag.
20. Remove the supporting rods from the base unit and
allow the two steel rims of the LiteT
able to lie on top
of each other. Return them to the protective bag.
21. Return all the items to the storage box.
Setting up yourLiteTable
123
456
789
101112
131415
A
02.07
Produktspecifikationer
| Varumärke: | Lastolite |
| Kategori: | Andra kameratillbehör |
| Modell: | Cubelite LiteTable |
Behöver du hjälp?
Om du behöver hjälp med Lastolite Cubelite LiteTable ställ en fråga nedan och andra användare kommer att svara dig
Andra kameratillbehör Lastolite Manualer

22 September 2024
22 September 2024
22 September 2024
22 September 2024
Andra kameratillbehör Manualer
Nyaste Andra kameratillbehör Manualer
2 April 2025
25 Februari 2025
31 December 2025
27 December 2024
23 December 2024
23 December 2024
23 December 2024
23 December 2024
23 December 2024
23 December 2024