Leisure VHL1 Bruksanvisning
Läs gratis den bruksanvisning för Leisure VHL1 (4 sidor) i kategorin Sjunka. Guiden har ansetts hjälpsam av 44 personer och har ett genomsnittsbetyg på 4.3 stjärnor baserat på 7 recensioner. Har du en fråga om Leisure VHL1 eller vill du ställa frågor till andra användare av produkten? Ställ en fråga
Sida 1/4
1970-02
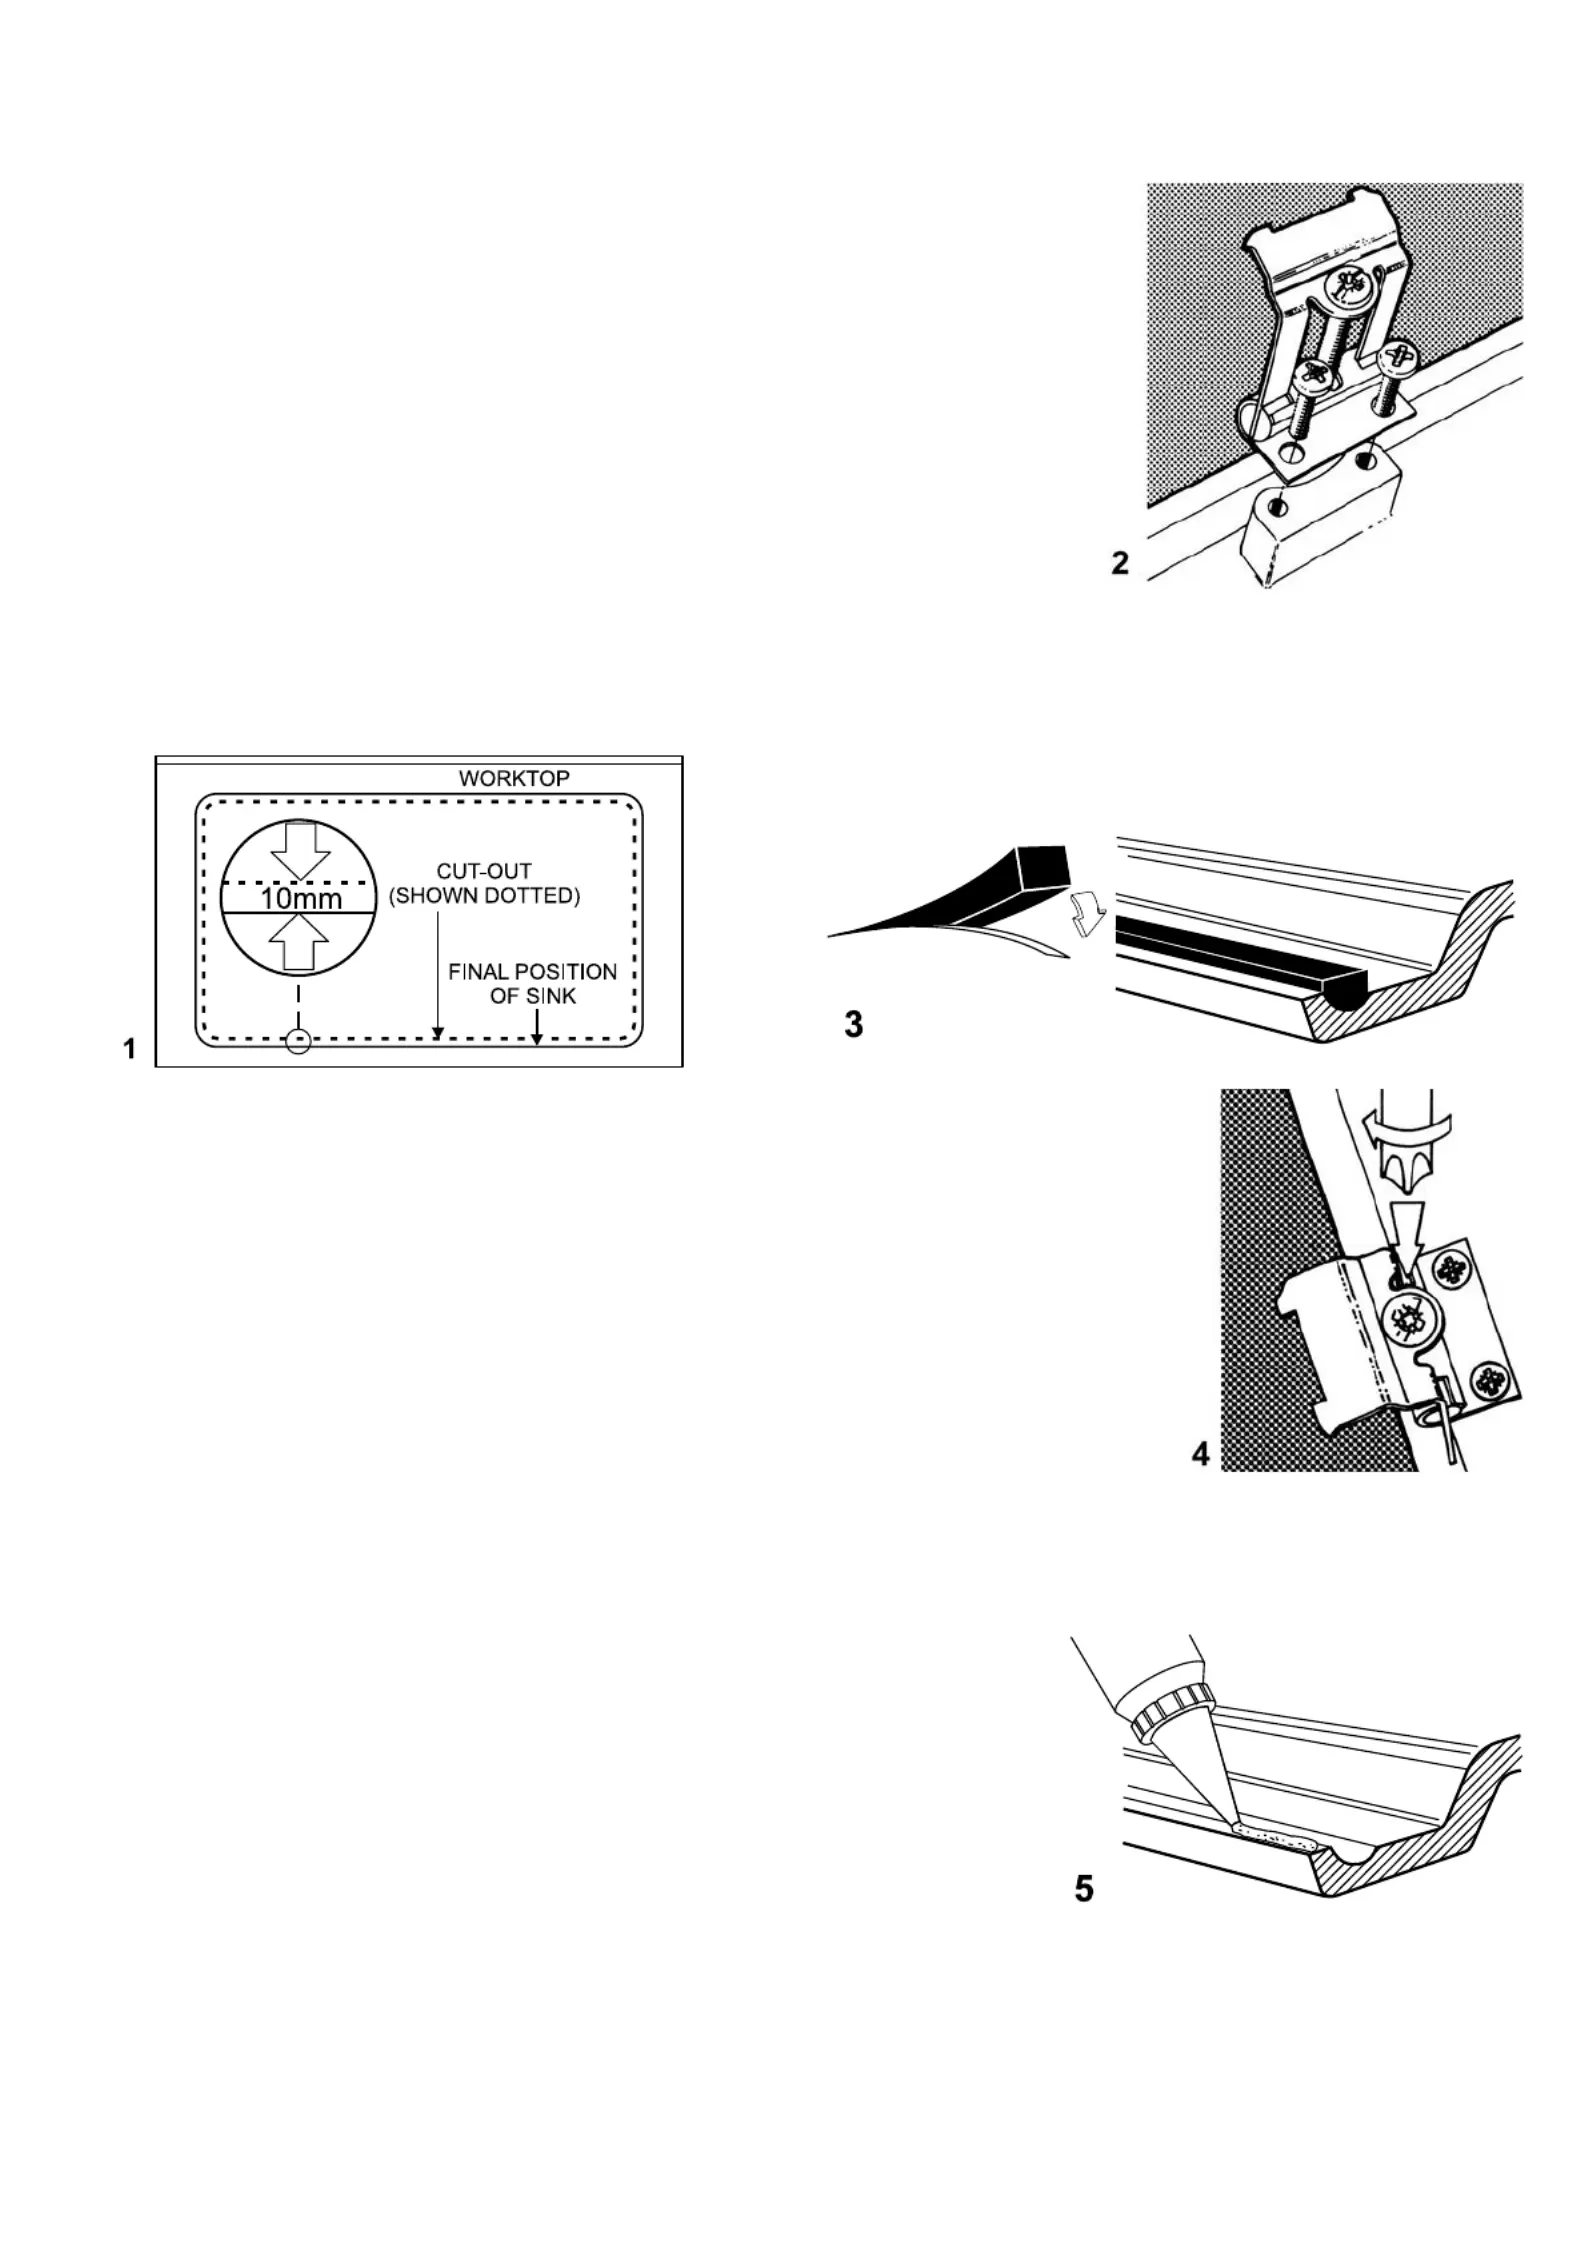
2.Fitthexingclipstothe
sinkusingthescrews
provided,asshownin
g.2andhingethem
backawayfromthe
sinkedge.
3.Atthispointtrythesink
inthecut-out,some
localisedenlargement
oftheholemaybe
necessaryaroundthe
clips.
4.Fitthetaptothe
sink.
5.Fitthewastestothesinkfollowingtheinstructions
packedwiththem.
6.Fitthefoamsealtotheedgeofthesink.Peeloffthepaper
backingstripandstickthesealtotherecessinthesink
asshowning.3.Ensurethataneatbuttjointisachieved
wheretheendsofthesealmeet.
FITTINGTHESINK
1.Positionthesinkinthecut
out.
2.Tensionthexingclipsas
showning.4.
Ensurethatthefoamseal
iscarefullycompressed
butdonotovertightenthe
clips.
3.Completetheplumbingof
thehotandcoldsupplyto
thetap.
ALTERNATIVEMETHODOFSEALING
1.Applysiliconesealant(notsupplied)totheundersideof
thesinkrim,asshowning.5.
2.Removesurplussealantfromaroundthesinkusingdampa
cloth.
NOTE:Duringinstallationcareshouldbetakentoensure
thesinkisprotectedfromscuffsandscratches.Strainingand
overtighteningofallplumbingxturesconnectedtothesink
shouldbeavoided.Installersshouldcarefullycheckthatthe
mouldingandtheedgesofthesinkaredeadlevelsothat
waterwillowthedrainer.off
PLEASEREADTHOROUGHLYBEFOREATTEMPTINGTO
INSTALLSINK.
PREPARINGTHEWORKTOP
1.Itisrecommendedthattheinsetsinkisttedtotheworktop
beforebeingpermanentlyxedtothecabinet.
2.Placethesinkupsidedownonworktop.Positionthesink
relativetotheworktopasrequired,ensuringthatthecabinet
frameworkwillbeclearofallpartsofthesink.
Withasharpsoftpencildrawroundsinkasaccuratelyas
possible.Seeg.1.
3.Removethesinkanddrawanotherline10mminside
theout-lineofthesinktop.Thisisthecuttinglineforthe
aperture.
4.Drillaslargeholeaaspossibleinsidethecuttingline.Using
apadsaw,jigsaworsimilar,cutouttheaperture.Atthis
pointwewouldrecommendthattheworktopapertureis
sealed.dothispaintoverwithap.v.a.adhesive,paint,To
varnishorsmearwithsiliconesealant.
PREPARINGTHESINK
1.Ifatapholeisrequired,buthasnotbeensuppliedinthe
sink,proceedasfollows.
Decidewhetherthebowlistobeontheleftorrighthand
whenthesinkistted.Cuttheappropriatetapholeinto
thesink.Todothisyouwillneedaholesawortankcutter
settocutouta35mmdiameterholeandapilotdrill.On
thereversesideofthesinkyouwillndalocationpoint
forthepilotdrillinthecentreofthetapcut-out.Drillout
thepilothole.TurnthesinkoverandcarefullydrilLcOt4he
tap-hole.
WARNING: Velstra&Neostoneproducincludeasilicaller.ts
Anymachiningoperationwillproduceneparticlesofdust.
Drillingorcuttingmustbecarriedoutinawell-ventilated
area.
INSTALLATIONDETAILSVELSTRA
®
&NEOSTONESINKS
Produktspecifikationer
| Varumärke: | Leisure |
| Kategori: | Sjunka |
| Modell: | VHL1 |
| Bredd: | 980 mm |
| Djup: | 508 mm |
| Produktens färg: | Svart |
| Typ av diskho: | Toppmonterat handfat |
| Diskhons form: | Rektangulär |
| Antal diskhoar: | 1 hoar |
| Första skål mått (BxL): | 400 x 433 mm |
| Första skål djup: | 180 mm |
| Hål för kran: | Ja |
| Antal hål för kranar: | 2 |
| Diskställ: | Ja |
| Tryck hålstorlek: | 35 mm |
Behöver du hjälp?
Om du behöver hjälp med Leisure VHL1 ställ en fråga nedan och andra användare kommer att svara dig
Sjunka Leisure Manualer

15 September 2024
15 September 2024
15 September 2024
15 September 2024
15 September 2024
15 September 2024
15 September 2024
15 September 2024
15 September 2024
15 September 2024
Sjunka Manualer
Nyaste Sjunka Manualer
9 April 2025
8 April 2025
8 April 2025
2 April 2025
31 Mars 2025
30 Mars 2025
26 Mars 2025
4 Mars 2025
3 Mars 2025
28 Januari 2025