Lexmark X945 Bruksanvisning
Läs gratis den bruksanvisning för Lexmark X945 (31 sidor) i kategorin Inte kategoriserad. Guiden har ansetts hjälpsam av 6 personer och har ett genomsnittsbetyg på 4.6 stjärnor baserat på 3.5 recensioner. Har du en fråga om Lexmark X945 eller vill du ställa frågor till andra användare av produkten? Ställ en fråga
Sida 1/31

Lexmark ™ X94x
Troubleshooting
Guide
Troubleshooting
Checking an unresponsive
printer
If your printer is not responding, make sure:
• The power cord is plugged into the printer and a properly
grounded electrical outlet.
• The electrical outlet is not turned off by any switch or breaker.
• The Ground Fault Circuit Interrupter (GFCI) has not tripped.
From the back of the printer, press the GFCI Reset button
located above the printer power cord.
• The printer is not plugged into any surge protectors,
uninterrupted power supplies, or extension cords.
• Other electrical equipment plugged into the outlet is working.
• The printer is turned on.
• The printer cable is securely attached to the printer and the
host computer, print server, option, or other network device.
Once you have checked each of these possibilities, turn the printer
off and then back on. This often fixes the problem.
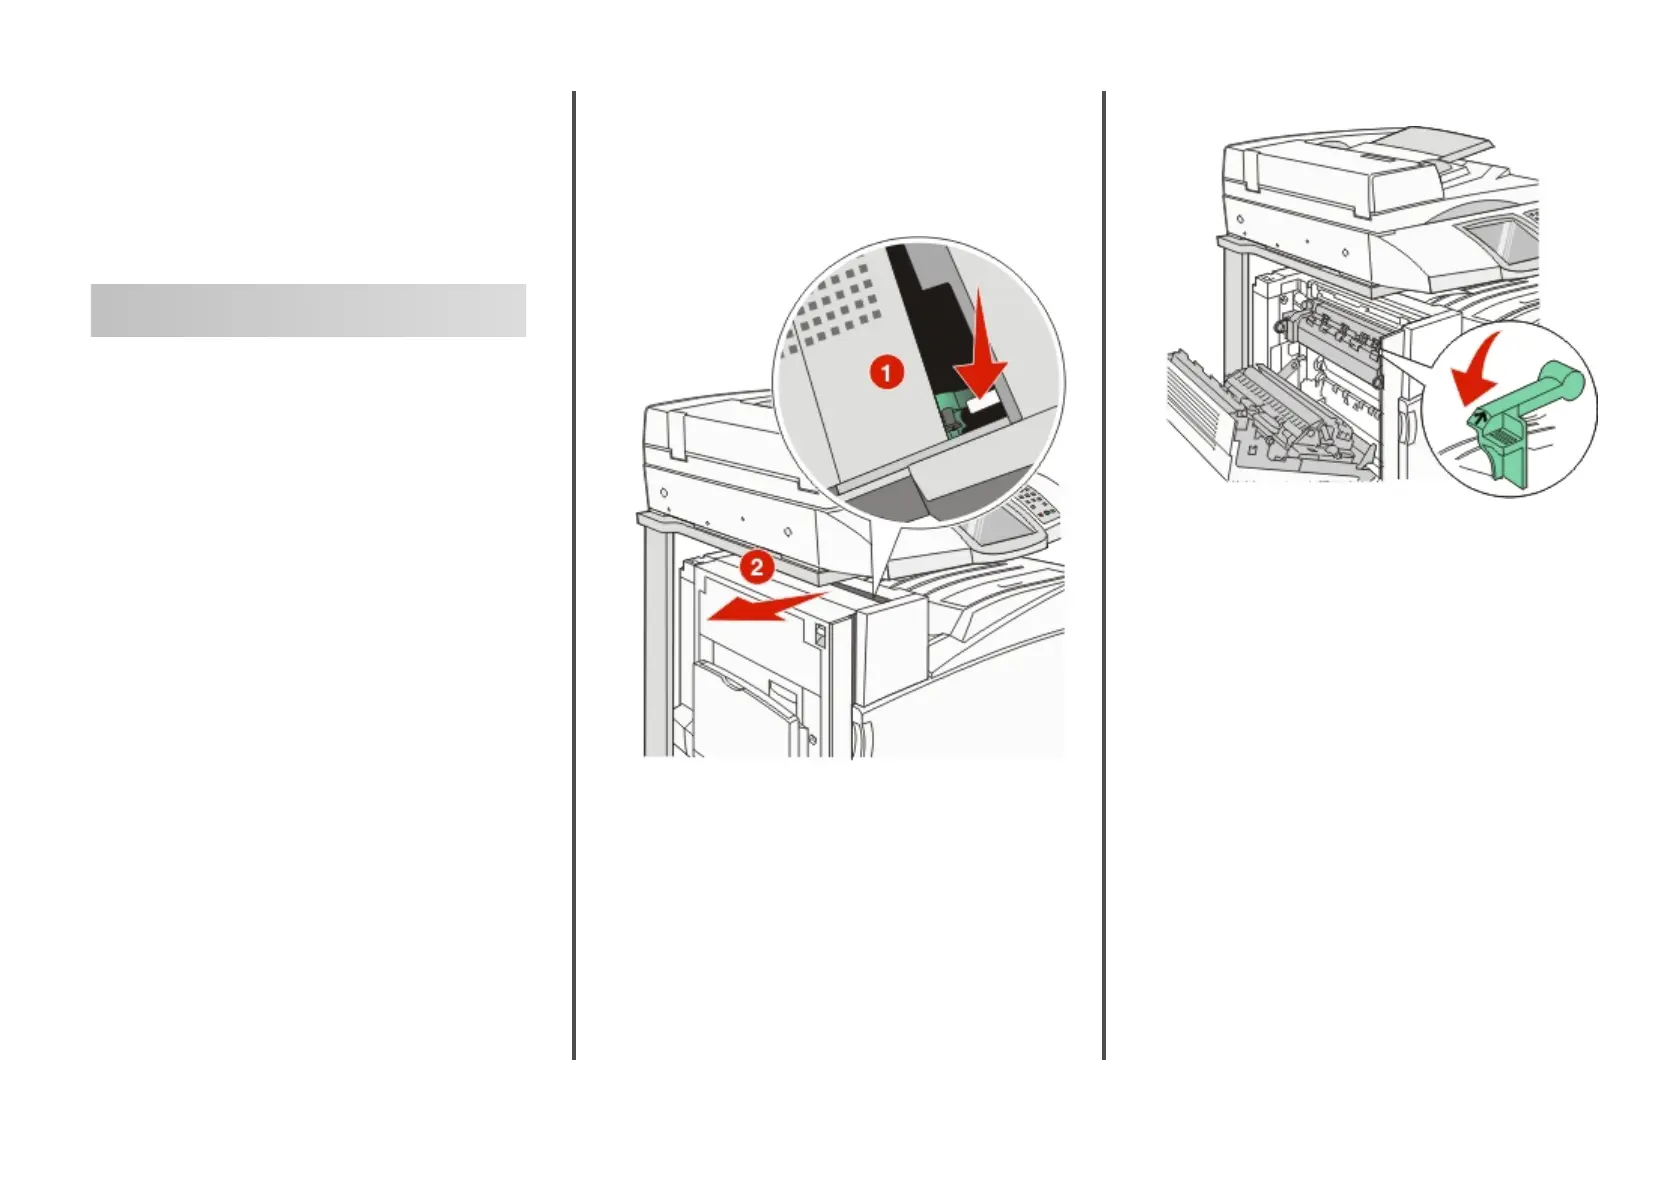
Door A will not shut properly
Make sure the green paper jam clearance lever behind Door A is
in place:
1 Press down on the white release lever beneath Door A at the
top of the printer, and then open the door.
2 Press the A1 green lever down to its normal position.
3 Close Door A.
Solving printing problems
Multiple-language PDFs do not print
The documents contain unavailable fonts.
1 Open the document you want to print in Adobe Acrobat.
2 Click the printer icon.
The Print dialog appears.
3 Select Print as image.
4 Click OK.
Control panel display is blank or
displays only diamonds
The printer self test failed. Turn the printer off, wait about 10
seconds, and then turn the printer back on.
If Performing Self Test and Ready do not appear, turn the
printer off and contact Customer Support.
1

Error message about reading USB
drive appears
Make sure the USB drive is supported. For information regarding
tested and approved USB flash memory devices, visit the Lexmark
Web site at www.lexmark.com.
Jobs do not print
These are possible solutions. Try one or more of the following:
MAKE SURE THE PRINTER IS READY TO PRINT
Make sure Ready or Power Saver appears on the display
before sending a job to print.
CHECK TO SEE IF THE STANDARD EXIT BIN IS FULL
Remove the stack of paper from the standard exit bin.
CHECK TO SEE IF THE PAPER TRAY IS EMPTY
Load paper in the tray.
MAKE SURE THE CORRECT PRINTER SOFTWARE IS
INSTALLED
• Verify that you are using the correct printer software.
• If you are using a USB port, make sure you are running
Windows Vista, Windows XP, Windows Server 2003, or
Windows 2000/Me/98 and using compatible printer
software.
MAKE SURE THE INTERNAL PRINT SERVER IS INSTALLED
PROPERLY AND WORKING
• Make sure the internal print server is properly installed and
that the printer is connected to the network.
• Print a network setup page and check that the status shows
Connected. If the status is Not Connected, check the
network cables, and then try printing the network setup
page again. Contact your system support person to make
sure the network is functioning correctly.
Copies of the printer software are also available on the Lexmark
Web site at www.lexmark.com.
MAKE SURE YOU ARE USING A RECOMMENDED
USB, SERIAL, OR ETHERNET CABLE
For more information, visit the Lexmark Web site at
www.lexmark.com.
MAKE SURE PRINTER CABLES ARE SECURELY
CONNECTED
Check the cable connections to the printer and print server to
make sure they are secure.
For more information, see the setup documentation that came
with the printer.
Confidential and other held jobs do
not print
These are possible solutions. Try one or more of the following:
HAS A FORMATTING ERROR OCCURRED?
If so, delete the job and try printing it again. Only part of the
job may print.
MAKE SURE THE PRINTER HAS SUFFICIENT MEMORY
Free up additional printer memory by scrolling through the list
of held jobs and deleting some of them.
CHECK TO SEE IF THE PRINTER HAS RECEIVED INVALID
DATA
Delete invalid jobs.
Job takes longer than expected to
print
These are possible solutions. Try one or more of the following:
REDUCE THE COMPLEXITY OF THE PRINT JOB
Eliminate the number and size of fonts, the number and
complexity of images, and the number of pages in the job.
CHANGE THE PAGE PROTECT SETTING TO OFF
1 Make sure the printer is on and Ready appears.
2 On the home screen, touch
.
3 Touch Settings.
4 Touch General Settings.
5 Touch
repeatedly until Print Recovery appears.
6 Touch until Off appears.
7 Touch Submit.
8 Touch
.
Job prints from the wrong tray or on
the wrong paper
CHECK THE PAPER TYPE SETTING
Make sure the Paper Type setting matches the paper loaded in
the tray.
Incorrect characters print
Cause Solution
Printer is in Hex Trace mode. If Ready Hex appears on the
display, you must exit Hex Trace
mode before you can print your job.
Turn the printer off and back on to
exit Hex Trace mode.
Tray linking does not work
ARE THE SAME SIZE AND TYPE OF PAPER LOADED IN
EACH TRAY?
• Load the same size and type of paper in each tray.
• Move the paper guides to the correct positions for the paper
size loaded in each tray.
2

ARE THE PAPER SIZE AND PAPER TYPE SETTINGS THE
SAME FOR EACH TRAY?
• Print a menu settings page and compare the settings for
each tray.
• If necessary, adjust the settings from the Paper Size/Type
menu.
Note: The multipurpose feeder does not automatically sense
the paper size. You must set the size from the Paper Size/Type
menu.
Large jobs do not collate
These are possible solutions. Try one or more of the following:
MAKE SURE COLLATE IS SET TO ON
From the Finishing menu or Print Properties, set Collate to On.
Note: Setting Collate to Off in the software overrides the
setting in the Finishing menu.
REDUCE THE COMPLEXITY OF THE PRINT JOB
Reduce the complexity of the print job by eliminating the
number and size of fonts, the number and complexity of
images, and the number of pages in the job.
MAKE SURE THE PRINTER HAS ENOUGH MEMORY
Add printer memory or an optional hard disk.
Unexpected page breaks occur
Increase the Print Timeout value:
1 Make sure the printer is on and Ready appears.
2 On the home screen, touch .
3 Touch Settings.
4 Touch General Settings.
5 Touch
repeatedly until Timeouts appears.
6 Touch Timeouts.
7 Touch the next to Print Timeout repeatedly until the
desired value appears.
8 Touch Submit.
9 Touch
.
Solving copy problems
Copier does not respond
These are possible solutions. Try one or more of the following:
ARE THERE ANY ERROR MESSAGES ON THE DISPLAY?
Clear any error messages.
CHECK THE POWER
Make sure the printer is plugged in, the power is on, and
Ready appears.
Scanner unit does not close
Make sure there are no obstructions:
1 Lift the scanner unit.
2 Remove any obstruction keeping the scanner unit open.
3 Lower the scanner unit.
Poor copy quality
These are some examples of poor copy quality:
• Blank pages
• Checkerboard pattern
• Distorted graphics or pictures
• Missing characters
• Faded print
• Dark print
• Skewed lines
• Smudges
• Streaks
• Unexpected characters
• White lines in print
These are possible solutions. Try one or more of the following:
ARE THERE ANY ERROR MESSAGES ON THE DISPLAY?
Clear any error messages.
IS THE TONER LOW?
When 88 <color> Toner Low appears or when the print
becomes faded, replace the toner cartridge(s).
IS THE SCANNER GLASS DIRTY?
Clean the scanner glass with a clean, lint-free cloth dampened
with water.
IS THE COPY TOO LIGHT OR TOO DARK?
Adjust the density of the copy.
CHECK THE QUALITY OF THE ORIGINAL DOCUMENT
Make sure the quality of the original document is satisfactory.
CHECK THE DOCUMENT PLACEMENT
Make sure the document or photo is loaded facedown on the
scanner glass in the upper left corner.
UNWANTED TONER IS IN THE BACKGROUND
• Increase the background removal setting.
• Adjust the darkness to a lighter setting.
PATTERNS (MOIRÉ) APPEAR IN THE OUTPUT
• On the copy screen, touch the Text/Photo or Printed Image
icon.
• Rotate the original document on the scanner glass.
• On the copy screen, adjust the scale setting.
BLACK TEXT IS LIGHT OR DISAPPEARING
• On the copy screen, touch the Text icon.
• Decrease the background removal setting.
• Increase the contrast setting.
• Decrease the shadow detail setting.
3
Produktspecifikationer
Varumärke: | Lexmark |
Kategori: | Inte kategoriserad |
Modell: | X945 |
Behöver du hjälp?
Om du behöver hjälp med Lexmark X945 ställ en fråga nedan och andra användare kommer att svara dig
Inte kategoriserad Lexmark Manualer
27 September 2024
24 September 2024
19 September 2024
5 September 2024
3 September 2024
2 September 2024
26 Augusti 2024
24 Augusti 2024
22 Augusti 2024
21 Augusti 2024
Inte kategoriserad Manualer
- Colt
- REDARC
- Nelson
- MPM
- Primus
- Pressalit
- ISpring
- Adder
- WHD
- Oster
- Altman
- Multibrackets
- Siemens
- Generac
- Foreo
Nyaste Inte kategoriserad Manualer
9 April 2025
9 April 2025
9 April 2025
9 April 2025
9 April 2025
9 April 2025
9 April 2025
9 April 2025
9 April 2025
9 April 2025