Lorex V261LCD Bruksanvisning
Läs gratis den bruksanvisning för Lorex V261LCD (2 sidor) i kategorin Kamera. Guiden har ansetts hjälpsam av 27 personer och har ett genomsnittsbetyg på 4.8 stjärnor baserat på 4 recensioner. Har du en fråga om Lorex V261LCD eller vill du ställa frågor till andra användare av produkten? Ställ en fråga
Sida 1/2
V261LC_QSG_EN_R1
HD Video Floodlight
To prepare for installation:
Before assembly, there are important preparations to make.
Levelled to the ground
• TURN OFF POWER TO YOUR
FLOODLIGHT CIRCUIT AT THE
FUSEBOX TO ENSURE NO
POWER IS BEING SENT. If you
are unsure of which breaker
controls the circuit, then turn
off the main power switch.
If you do not know where
your breaker is or how to turn
off power, consult a licensed
electrician.
• Verify that the supply voltage
is correct. Connect xture to a
100 VAC~240 VAC 50/60 Hz
power source.
• DO NOTconnect oodlight to a
dimmer switch or timer.
• If you are not replacing a light
xture, you will need to run
power cabling to the install
location, and purchase a
UL listed junction box for a
licensed electrician to install.
LED Indicator
Quick Start Guide
V261LC Series
lorex.com
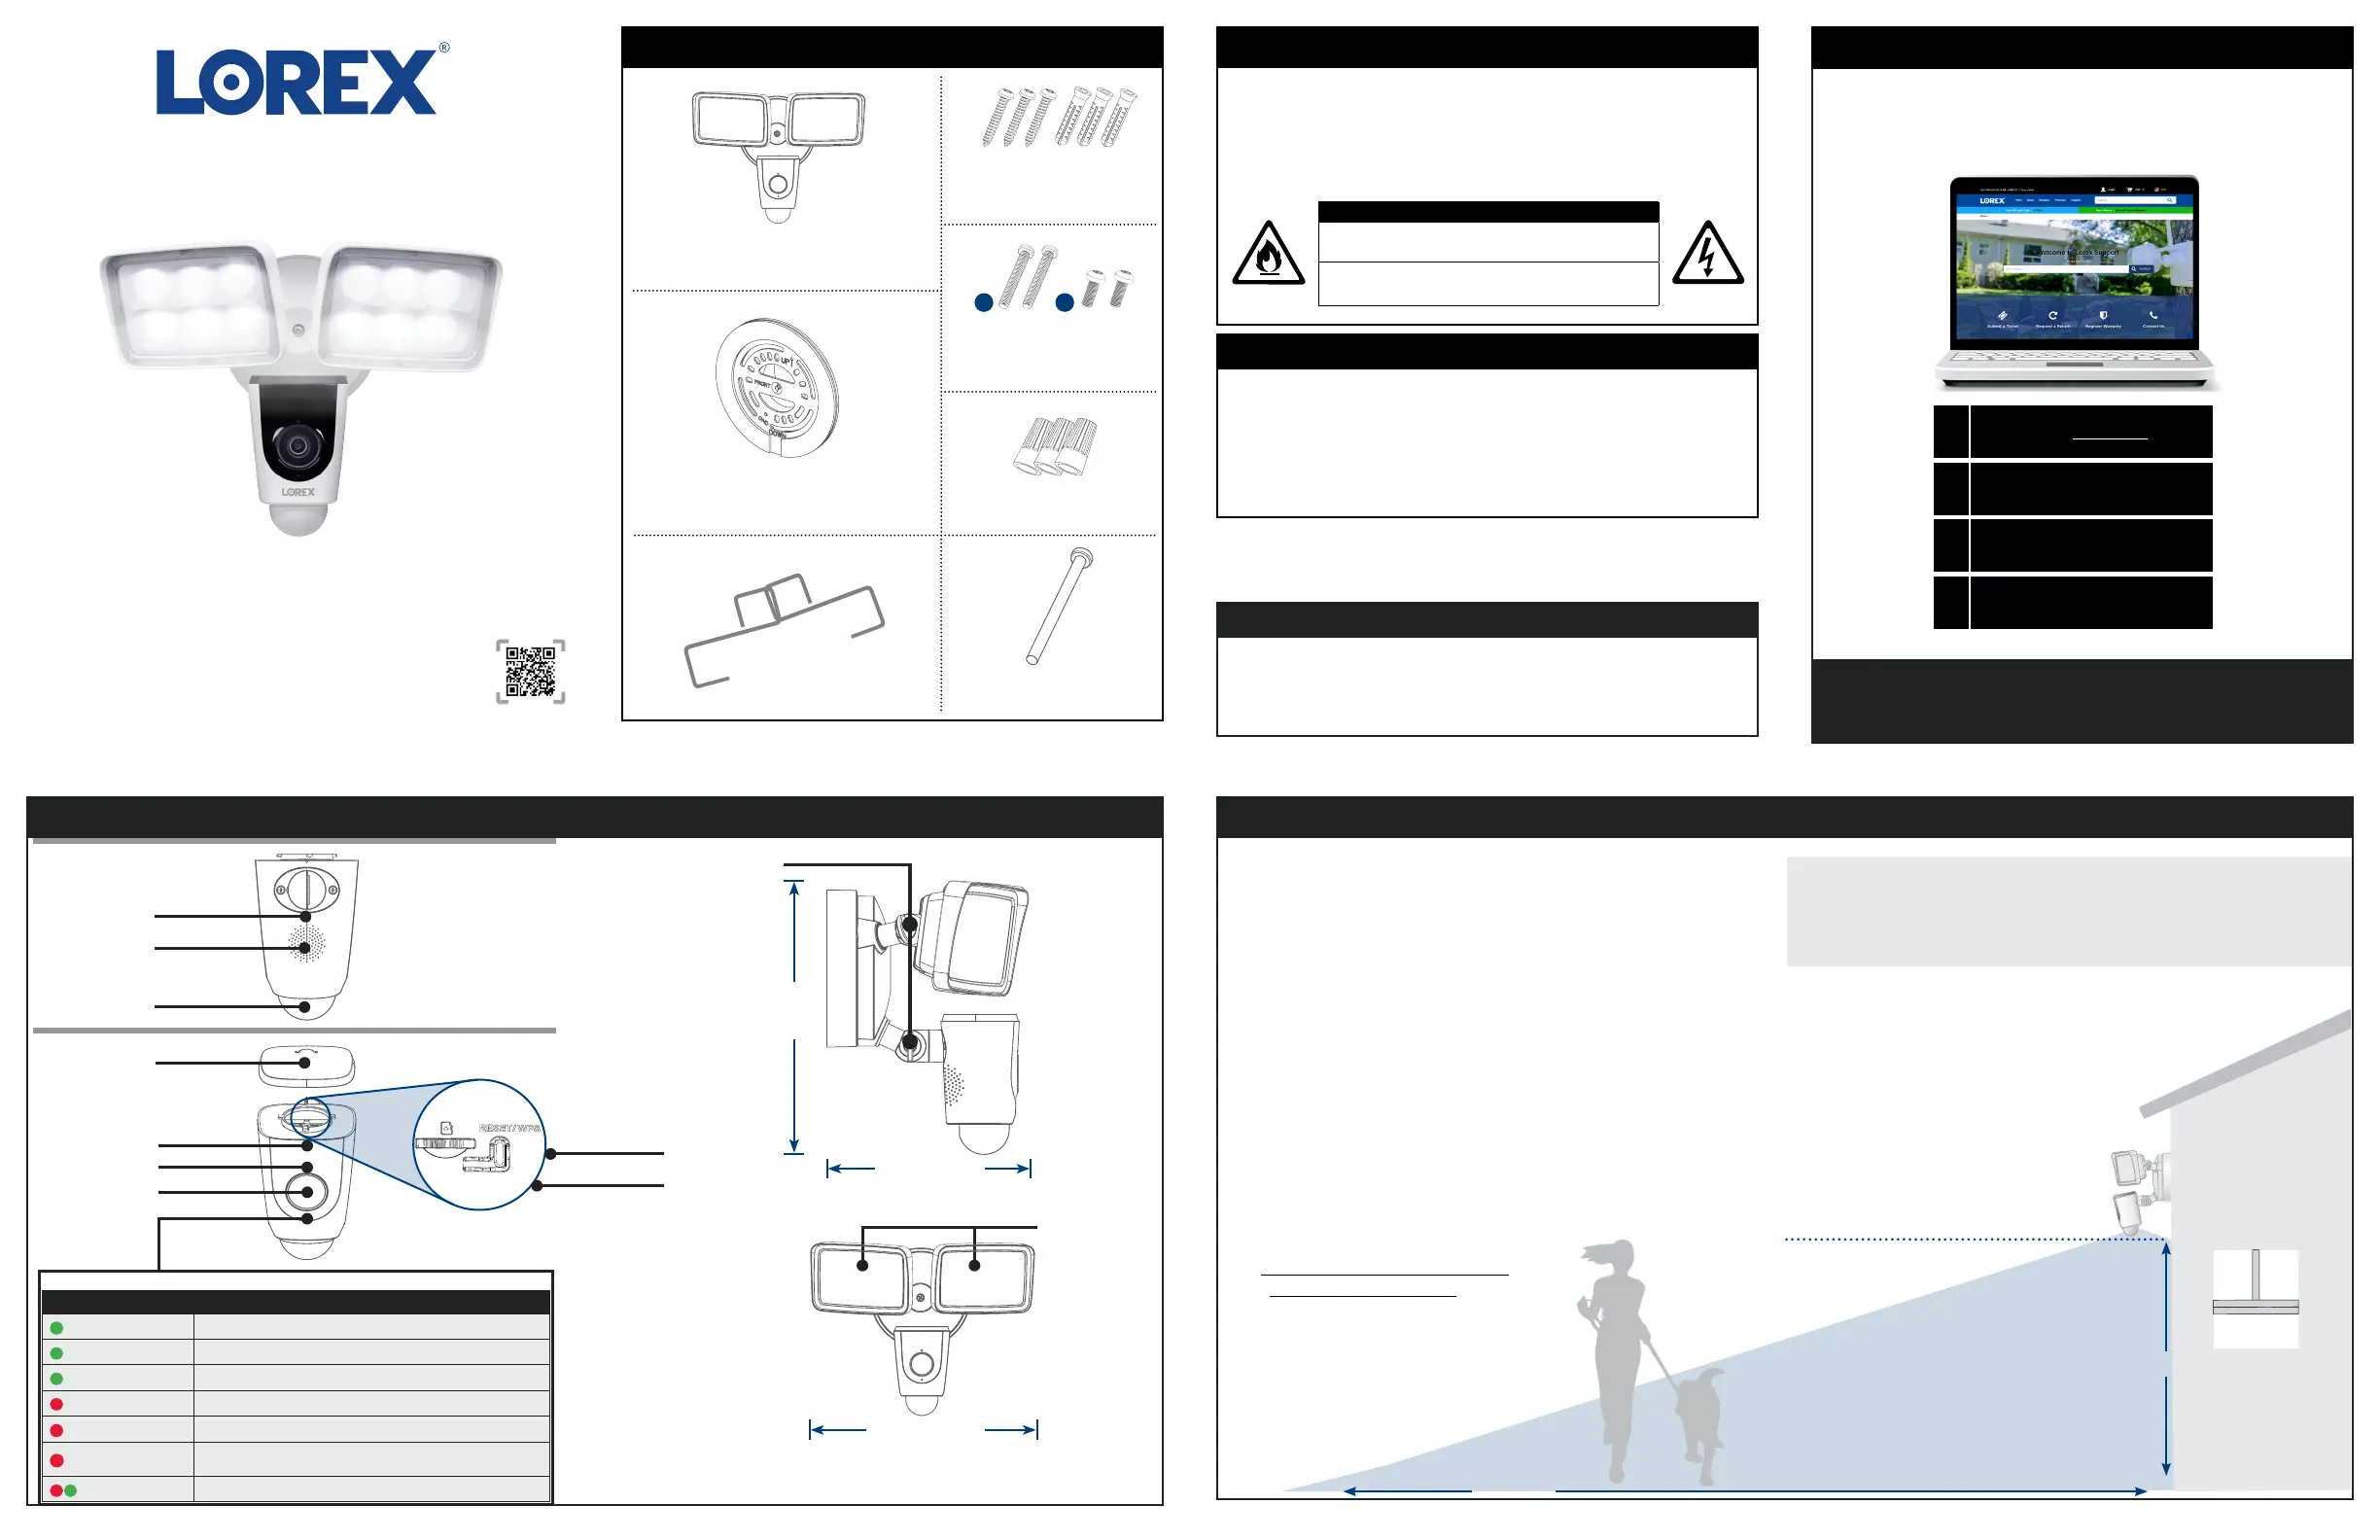
HD Video Floodlight
Package Contents
STEP 1: Preparation
Need Help?
Visit us online for up-to-date software
and complete instruction manuals
Click on the Downloads tab
4
Visit lorex.com
Search for the model
number of your product
Click on your product
in the search results
3
2
1
Copyright © 2020 Lorex Corporation
As our products are subject to continuous improvement, Lorex reserves the right to
modify product design, specications and prices, without notice and without incurring
any obligation. E&OE. All rights reserved.
Mounting Screws &
Anchors (×3)
• Read this guide carefully and keep it for future reference.
• Follow all instructions for safe use and handling of the product.
• Periodic cleaning may be required. Use a damp cloth only. Do not use any harsh,
chemical-based cleaners.
• Use the product within given temperature, humidity and voltage levels noted in the
product’s specications.
• Do not disassemble the oodlight.
Safety Precautions
• Always follow code standards when installing wired connections.
• This oodlight camera must be installed on a wall and a UL listed junction box.
• This oodlight includes an Auto Mechanical IR Cut Filter. When the camera
changes between Day/Night viewing modes, an audible clicking noise may be
heard from the oodlight. This clicking is normal, and indicates that the camera
lter is working.
• Audio recording without consent is illegal in certain jurisdictions. Lorex Corporation
assumes no liability for use of its products that does not conform with local laws.
Disclaimers
CAUTION
Risk of re.
Do not install camera near ammable or combustible surfaces.
Risk of electrical shock.
Disconnect the power at the fuse box before installation.
Hooks
Mounting Bracket
Scan for
Lorex Home APP
11.4”
290mm
THIS DEVICE COMPLIES WITH PART 15 OF THE FCC RULES. OPERATION IS SUBJECT TO THE
FOLLOWING TWO CONDITIONS:
(1) THIS DEVICE MAY NOT CAUSE HARMFUL INTERFERENCE, AND
(2) THIS DEVICE MUST ACCEPT ANY INTERFERENCE RECEIVED, INCLUDING INTERFERENCE THAT
MAY CAUSE UNDESIRED OPERATION.
FCC Notice
Product Overview
PIR motion sensor
Speaker
Microphone
Camera
IR LED
Top cover
Light sensor
Memory slot*
Reset button**
Floodlights
Adjusting knobs
Wire Caps (×3)
Bracket Screws
A and B (×2)
Phillips Machine Screw
A
B
10 Feet
32 Feet
12.8” / 325mm
7.3” / 185mm
Mount the oodlight camera 10 feet (3 meters) high with the
motion detector levelled to the ground for optimal detection of
human-sized objects as far as 32 feet (10 meters).
Recommendation:
Front Panel
Back Panel
BehaviorMeaning
(steady)
Operating correctly.
(ashing)
Ready for connection.
(ashing rapidly)
Mobile device is attempting to connect to the camera.
(steady)
Device malfunction. Try resetting the camera and repeating the setup.
(ashing)
Network connection failed. Try resetting the camera and repeating the setup.
(ashing rapidly)
Memory slot error. Try removing and re-inserting the included memory slot card,
or try a different card.
(alternating)
Firmware upgrade in progress.
* To access the memory slot and reset button, twist left to open the top cover.
** To reset the camera, hold down the reset button until the chime sounds and the LED Indicator turns red.
Produktspecifikationer
| Varumärke: | Lorex |
| Kategori: | Kamera |
| Modell: | V261LCD |
Behöver du hjälp?
Om du behöver hjälp med Lorex V261LCD ställ en fråga nedan och andra användare kommer att svara dig
Kamera Lorex Manualer

5 Oktober 2024
17 September 2024
17 September 2024
14 Augusti 2024
7 Augusti 2024
2 Augusti 2024
25 Juli 2024
Kamera Manualer
Nyaste Kamera Manualer
9 April 2025
9 April 2025
3 April 2025
3 April 2025
1 April 2025
29 Mars 2025
29 Mars 2025
27 Mars 2025
27 Mars 2025
27 Mars 2025