Metra 107-TO1HG Bruksanvisning
Metra Inte kategoriserad 107-TO1HG
Läs gratis den bruksanvisning för Metra 107-TO1HG (8 sidor) i kategorin Inte kategoriserad. Guiden har ansetts hjälpsam av 15 personer och har ett genomsnittsbetyg på 4.6 stjärnor baserat på 9 recensioner. Har du en fråga om Metra 107-TO1HG eller vill du ställa frågor till andra användare av produkten? Ställ en fråga
Sida 1/8
Metra. The World’s Best Kits.
®
MetraOnline.com © COPYRIGHT 2020 METRA ELECTRONICS CORPORATION REV. 8/18/20 INST107-TO1HG
INSTALLATION INSTRUCTIONS
107-TO1HG
Patent Pending
Attention!Let the vehicle sit with the key
out of the ignition for a few minutes before
removing the factory radio. When testing the
aftermarket equipment, ensure that all factory
equipment is connected before cycling the
key to ignition.
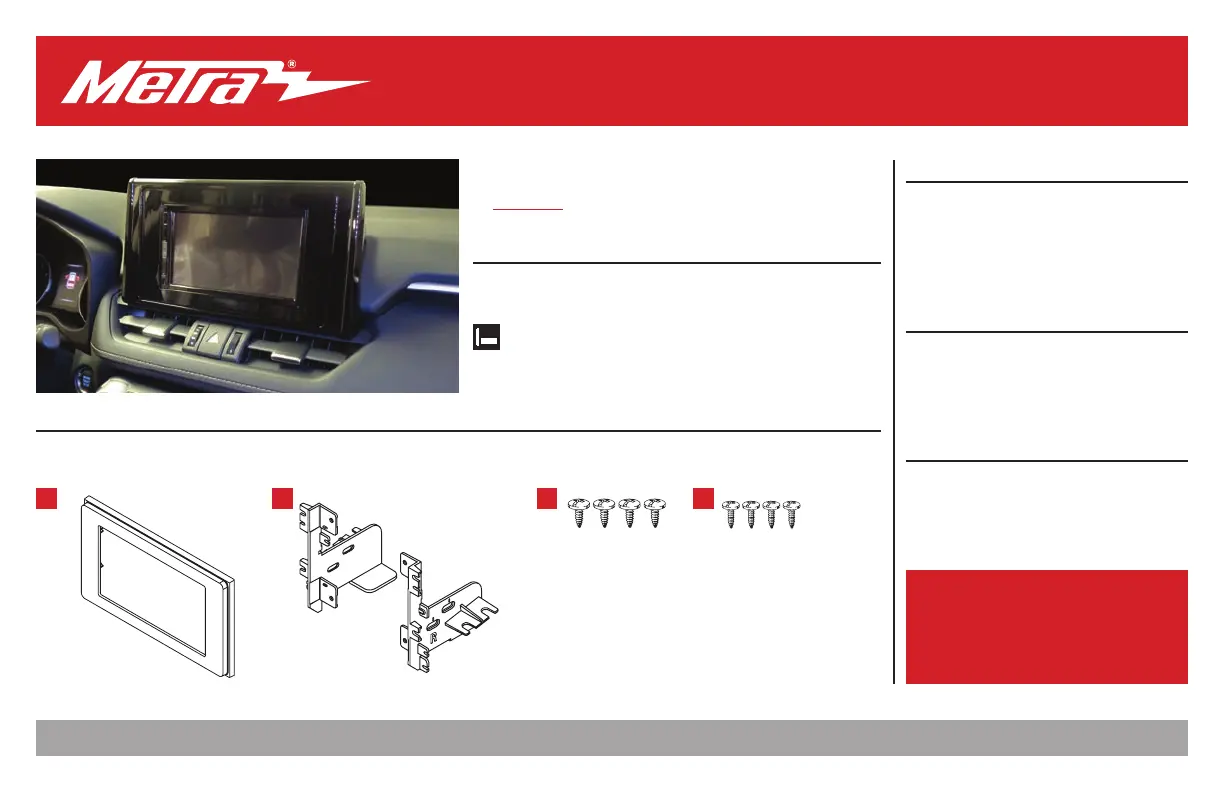
KIT FEATURES
• ISO DDIN radio provision*
• Painted gloss black
KIT COMPONENTS
• A) Radio trim panel • B) Radio brackets • C) #8 x 3/8” Phillips screws (4) • D) #4 x 3/8” Phillips screws (4)
TOOLS REQUIRED
• Panel removal tool • Phillips screwdriver
• 10mm Socket wrench • Cutting tool
TABLE OF CONTENTS
Dash Disassembly ..................................................2
Kit Assembly
–Shallow DDIN radio provision .............................3
–Pioneer modular DDIN radio provision .............4
WIRING & ANTENNA CONNECTIONS
(sold separately)
Visit axxessinterfaces.com or metraonline.com
for harness and interface options
Antenna Adapter: 40-LX11
ABCD
Toyota RAV42019-Up
Visit MetraOnline.com for more detailed information about the product and up-to-date vehicle
specific applications
* Designed for ISO DDIN radios which have an “L” shaped chassis design with the
radio chassis at the bottom of the screen. Compatible with Pioneer modular radios
† Refer to the radio manufacturer for current models
Produktspecifikationer
| Varumärke: | Metra |
| Kategori: | Inte kategoriserad |
| Modell: | 107-TO1HG |
Behöver du hjälp?
Om du behöver hjälp med Metra 107-TO1HG ställ en fråga nedan och andra användare kommer att svara dig
Inte kategoriserad Metra Manualer

3 April 2025
3 April 2025
3 April 2025
12 Mars 2025
24 Februari 2025
24 Februari 2025
14 Januari 2025
14 Januari 2025
2 Januari 2025
2 Januari 2025
Inte kategoriserad Manualer
Nyaste Inte kategoriserad Manualer
9 April 2025
9 April 2025
9 April 2025
9 April 2025
9 April 2025
9 April 2025
9 April 2025
9 April 2025
9 April 2025
9 April 2025