Metra 91-3300P Bruksanvisning
Metra
Inte kategoriserad
91-3300P
Läs gratis den bruksanvisning för Metra 91-3300P (3 sidor) i kategorin Inte kategoriserad. Guiden har ansetts hjälpsam av 8 personer och har ett genomsnittsbetyg på 4.3 stjärnor baserat på 4.5 recensioner. Har du en fråga om Metra 91-3300P eller vill du ställa frågor till andra användare av produkten? Ställ en fråga
Sida 1/3

IMPORTANT
Installation Kit
120 91-3300P
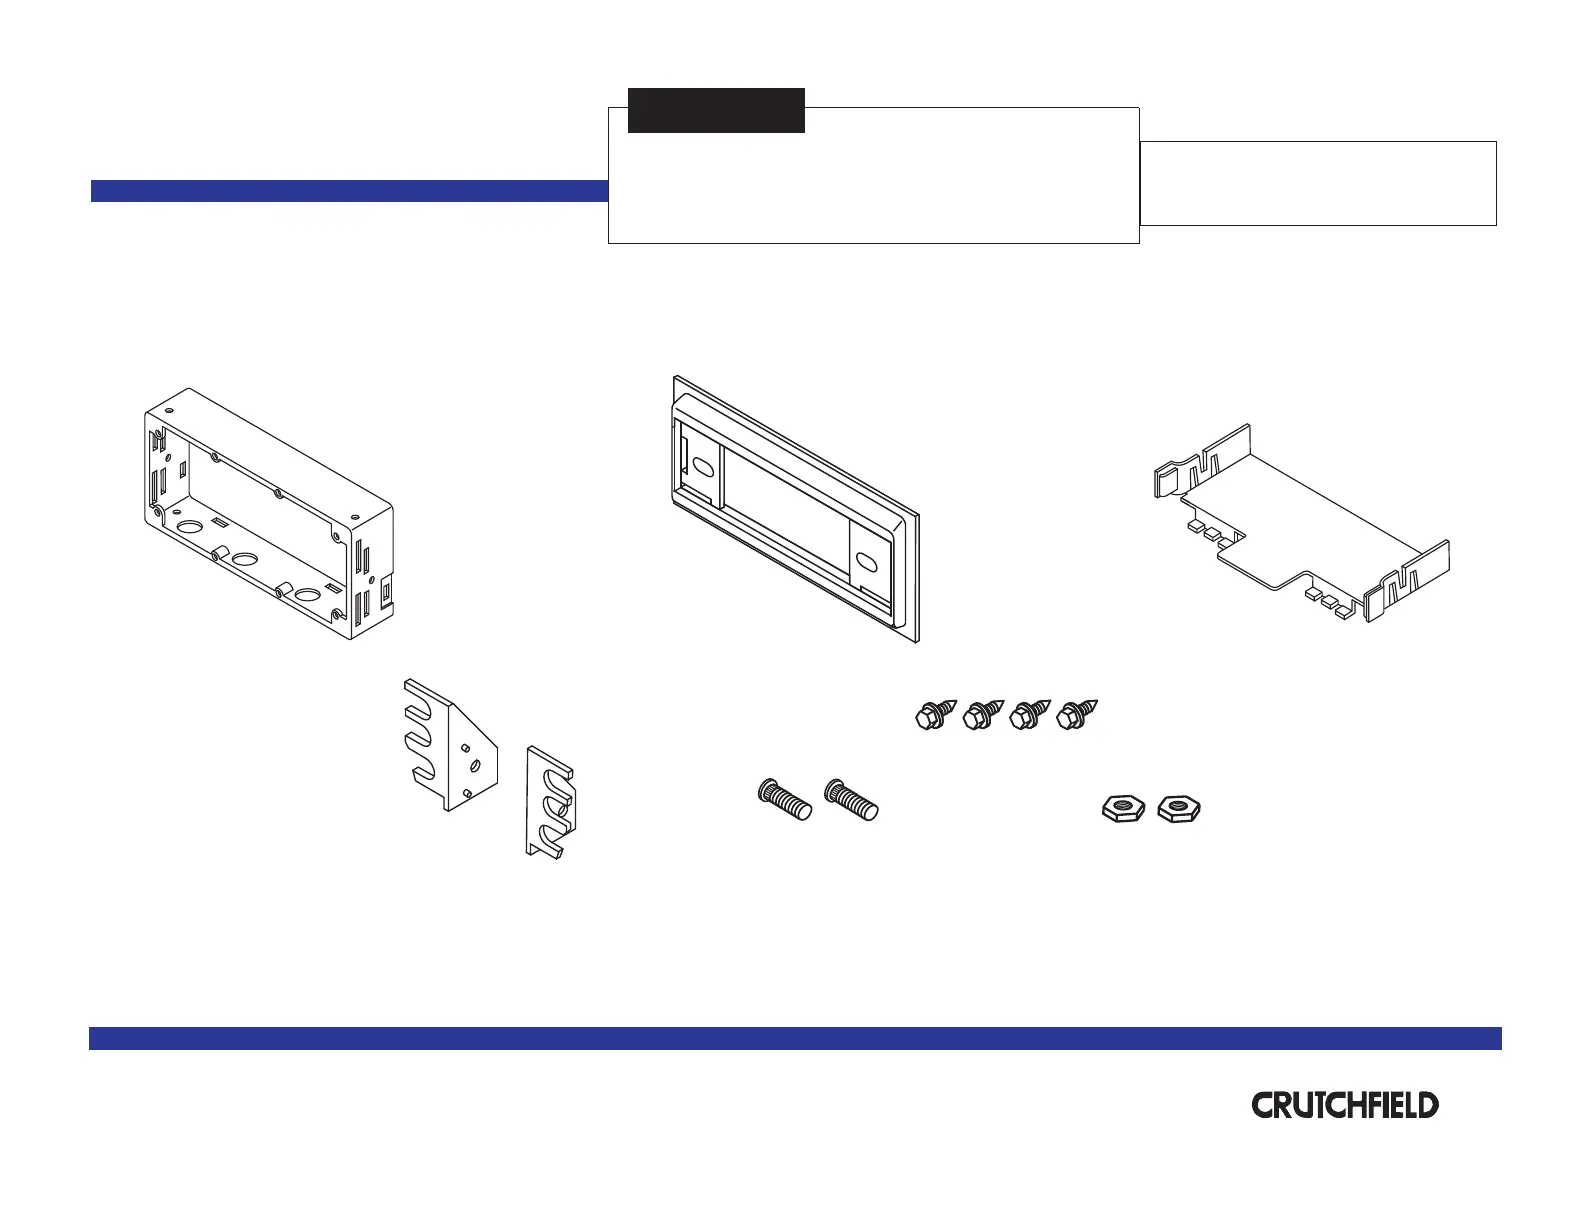
Before starting, compare items on your invoice with items
received. Carefully check through packaging material.
If an item is missing, please call:
Crutchfield
Parts Supplied:
Kit Frame
Support Tray
Chevrolet
Revision 10/29/03
Kit assembly instructions are on the following pages.
(2) Studs
Page 1 of 3
®
Copyright 2003 Crutchfield Corporation
*120913300P*
Trimplate
(2) 3/8” Nuts
Mounting Brackets
(4) 1/4” Hex Screws
at 1-888-955-6000

FIGURE 2
Shaft Supports
Installation Kit
Tools Required
120 91-3300P
Chevrolet
1. Press posts on trimplate into holes on kit frame to
snap parts together and secure with hex screws
(Figure 1).
2. Use a utility knife to cut out shaft supports in
trimplate to create a DIN opening (Figure 2).
3. Push clips on into slots on rear of kit support tray
frame to secure (Figure 1).
4. Secure side to kit frame with mounting brackets
studs nutsand supplied (Figure 1).
5. Remove DIN sleeve from receiver and slide into
opening in trimplate. Secure sleeve to trimplate by
bending the securing tabs (Figure 3).
6. Slide receiver into sleeve/kit assembly.
DIN Receiver Assembly
Utility
Knife
2
®
Copyright 2003 Crutchfield Corporation
FIGURE 3
Securing Tabs
DIN Sleeve
Bend tabs after sleeve
is inside assembly.
▲
Small Flat Blade
Screwdriver
FIGURE 1 Trimplate
Kit Frame
Support Tray
Mounting Bracket
Mounting Bracket
Stud Nut
1/4” & 3/8”
Sockets
Hex Screws

Installation Kit
120 91-3300P
Chevrolet
Spacers
(supplied with
your order)
1. Press posts on trimplate into holes on kit frame to
snap parts together and secure with hex screws
(Figure 1).
2. Push clips on into slots on rear of kit framesupport tray
to secure (Figure 1).
3. Secure side to kit assembly with mounting brackets
studs nutsand supplied (Figure 1).
4. Choose the proper spacers (supplied with your order) to
allow receiver nosepiece to extend 1/8” to 1/4” beyond
face of trimplate (Figure 2).
5. Insert receiver shafts (with spacers in place) through
openings in trimplate. Secure receiver and faceplate
with shaftnuts supplied with receiver.
6. Attach control knobs.
1/8” -1/4”
▲
▲
Spacer
Shaft Receiver Assembly
3
FIGURE 2
Shaftnuts
®
Copyright 2003 Crutchfield Corporation
FIGURE 1
Trimplate
Kit Frame
Support Tray
Mounting Bracket
Mounting Bracket
Faceplate
Control Knobs
Tools Required
▲
Deep Socket
(size depends upon receiver)
Stud
Nut
1/4” & 3/8”
Sockets
Hex Screws
Produktspecifikationer
Varumärke: | Metra |
Kategori: | Inte kategoriserad |
Modell: | 91-3300P |
Behöver du hjälp?
Om du behöver hjälp med Metra 91-3300P ställ en fråga nedan och andra användare kommer att svara dig
Inte kategoriserad Metra Manualer
3 April 2025
3 April 2025
3 April 2025
12 Mars 2025
24 Februari 2025
24 Februari 2025
14 Januari 2025
14 Januari 2025
2 Januari 2025
2 Januari 2025
Inte kategoriserad Manualer
- Nebula
- Walrus Audio
- Mebby
- Morris
- Sky-Watcher
- Kaiser Nienhaus
- Alto
- Mosconi
- Simplecom
- Ave Six
- KlikaanKlikuit
- TC Electronic
- ORNO
- BC Acoustique
- Fantec
Nyaste Inte kategoriserad Manualer
9 April 2025
9 April 2025
9 April 2025
9 April 2025
9 April 2025
9 April 2025
9 April 2025
9 April 2025
9 April 2025
9 April 2025