Metra 99-7612A Bruksanvisning
Metra ej kategoriserat 99-7612A
Läs gratis den bruksanvisning för Metra 99-7612A (16 sidor) i kategorin ej kategoriserat. Guiden har ansetts hjälpsam av 15 personer och har ett genomsnittsbetyg på 4.6 stjärnor baserat på 7 recensioner. Har du en fråga om Metra 99-7612A eller vill du ställa frågor till andra användare av produkten? Ställ en fråga
Sida 1/16
APPLICATIONS
METRA. The World’s best kits.
®
metraonline.com
© COPYRIGHT 2018 METRA ELECTRONICS CORPORATION
REV. 5/5/2018 INST99-7612
CAUTION: Metra recommends disconnecting the
negative battery terminal before beginning any
installation. All accessories, switches, and especially
air bag indicator lights must be plugged in before
reconnecting the battery or cycling the ignition.
NOTE: Refer to the instructions included with the
aftermarket radio.
INSTALLATION INSTRUCTIONS FOR PART 99-7612
®
U.S. PATENT # D719,560
• ISO DIN radio provision with pocket
• ISO DDIN radio provision
• 7612A-Coated with brushed aluminum look
• 7612B-Painted matte black
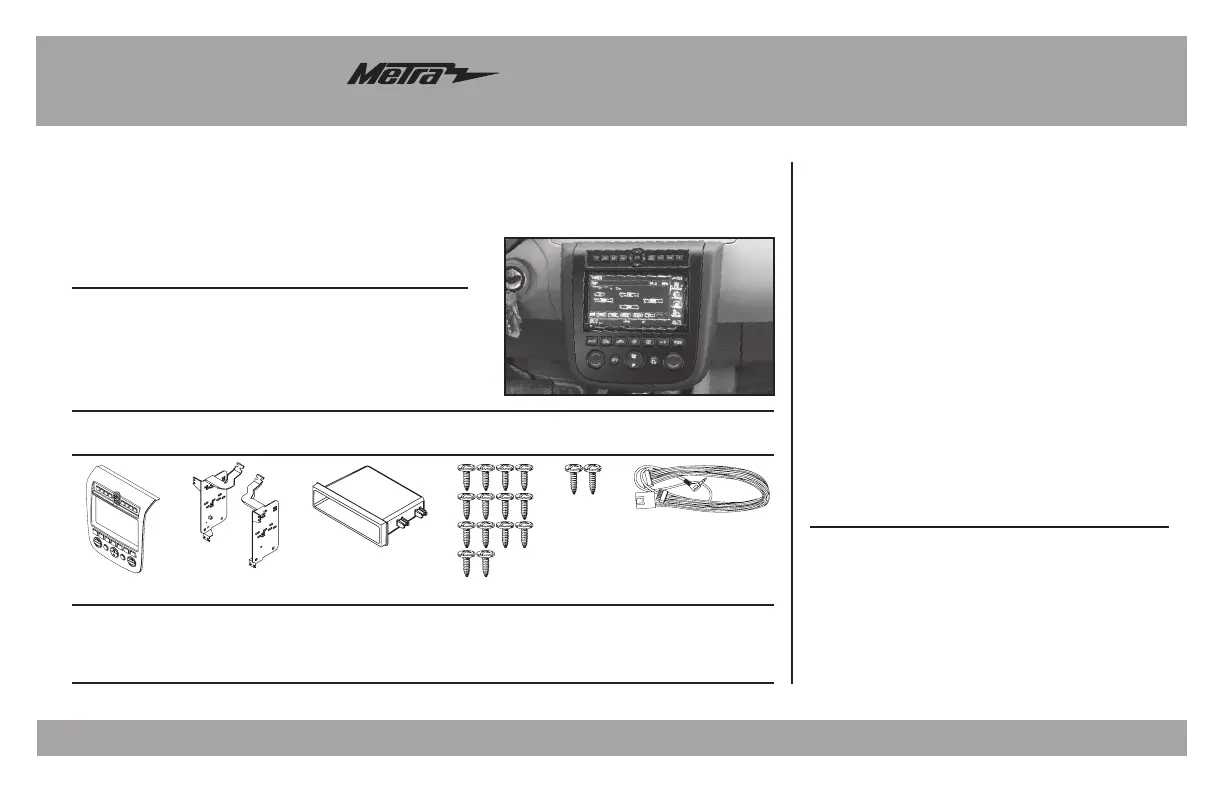
• A) Radio housing • B) Radio housing brackets • C) Pocket • D) (14) #8 x 3/8” Phillips screws
• E) (2) #8 x 1/2” Phillips screws • F) 7612 Wire harness
KIT FEATURES
KIT COMPONENTS
WIRING & ANTENNA CONNECTIONS (sold separately)
Wiring Harness: • 70-7550 - 1995-up Nissan • 70-7551 - 1995-up Nissan amp integration
Antenna Adapter: • 40-NI11 - Nissan
• Panel removal tool • Phillips screwdriver • Socket wrench
TOOLS REQUIRED
Nissan Murano 2003-2007
99-7612A, 99-7612B
A
BCDEF
Dash Disassembly
–Nissan Murano 2003-2007
(without OE NAV)* ......2-3
*Note: This kit will work in NAV models, but you will lose the
OE NAV controls, and voice prompts.
Kit Assembly
–ISODIN radio provision with pocket ...................3-4
–ISO DDIN radio provision ...................................4-5
Wiring Instructions ................................................5
Produktspecifikationer
| Varumärke: | Metra |
| Kategori: | ej kategoriserat |
| Modell: | 99-7612A |
| Kompatibla produkter: | Nissan Murano |
| Produktens färg: | Svart, silver |
Behöver du hjälp?
Om du behöver hjälp med Metra 99-7612A ställ en fråga nedan och andra användare kommer att svara dig
ej kategoriserat Metra Manualer

15 Oktober 2025
14 Oktober 2025
14 Oktober 2025
14 Oktober 2025
14 Oktober 2025
14 Oktober 2025
14 Oktober 2025
14 Oktober 2025
14 Oktober 2025
14 Oktober 2025
ej kategoriserat Manualer
Nyaste ej kategoriserat Manualer
3 April 2026
3 April 2026
3 April 2026
3 April 2026
3 April 2026
3 April 2026
3 April 2026
3 April 2026
3 April 2026