Muse M-168 Bruksanvisning
Läs gratis den bruksanvisning för Muse M-168 (4 sidor) i kategorin bilradio. Guiden har ansetts hjälpsam av 20 personer och har ett genomsnittsbetyg på 5.0 stjärnor baserat på 8 recensioner. Har du en fråga om Muse M-168 eller vill du ställa frågor till andra användare av produkten? Ställ en fråga
Sida 1/4
MODE/PAIR button
(release) button
//(hand LOUBND
up/loud/band) button
VOL / SEL (Audio knob)
button
(Power on/off) /
MUTE button
LCD display
4 SHF/(shufe) button
5 DIR-/ button
1/ (play/pause) button
2 SCN/ (Intro) button
3 RPT/ (repeat) button
AUX IN jack
6/ DIR+ button
USB port
9 PTY/ button
SCAN# /button
0 DSP /(Display) button
*+// AS/PSSCH/ (search) button
8TAEQ// button
7AF/ button
T-MENUTRANS/ button
button
(Dial/Answer) button
Reset button
SD/MMC card slot
Do not attempt to modify the unit, modifying the unit may cause an accident.
Installation or servicing of the unit by persons without training and experience in
electronic equipment and automotive accessories may be dangerous and could
expose you to the risk of electric shock or other hazards.
Stop the vehicle before carrying out any operation that could interfere with your
driving.
Keep the volume at a level which you could hear sounds from outside the vehicle.
Do not work in extremely high or low temperature. Be sure the temperature inside
the vehicle is between +60°C and -10°C before turning on your unit.
When replacing the fuse(s), the replacement must be of the same amperage as
shown on the fuse holder.
Do not block vents or radiator panels. Blocking them will cause heat to build up in-
side and may result in re.
Using this unit without running the engine can result in battery drainage
Use only in cars with a 12 volt negative ground.
After completing the installation and beginning to play the unit(including replacing
the battery), please remove the front panel at rst, and then press RESET button on
the base with pointed object (such as ball-point pen) to set the unit to initial status.
1.
2.
3.
4.
5.
6.
7.
8.
9.
10.
11.
12.
13.
14.
15.
16.
17.
18.
19.
20.
21.
22.
23.
24.
25.
26.
1.
2.
3.
4.
5.
6.
7.
8.
9.
10.
M-168 BT
GB - 1
User Manual
CAR RADIO WITH USB & SD
Please read the instruction carefully
before operating the unit.
PRECAUTIONS
English
GB - 2
GB - 3
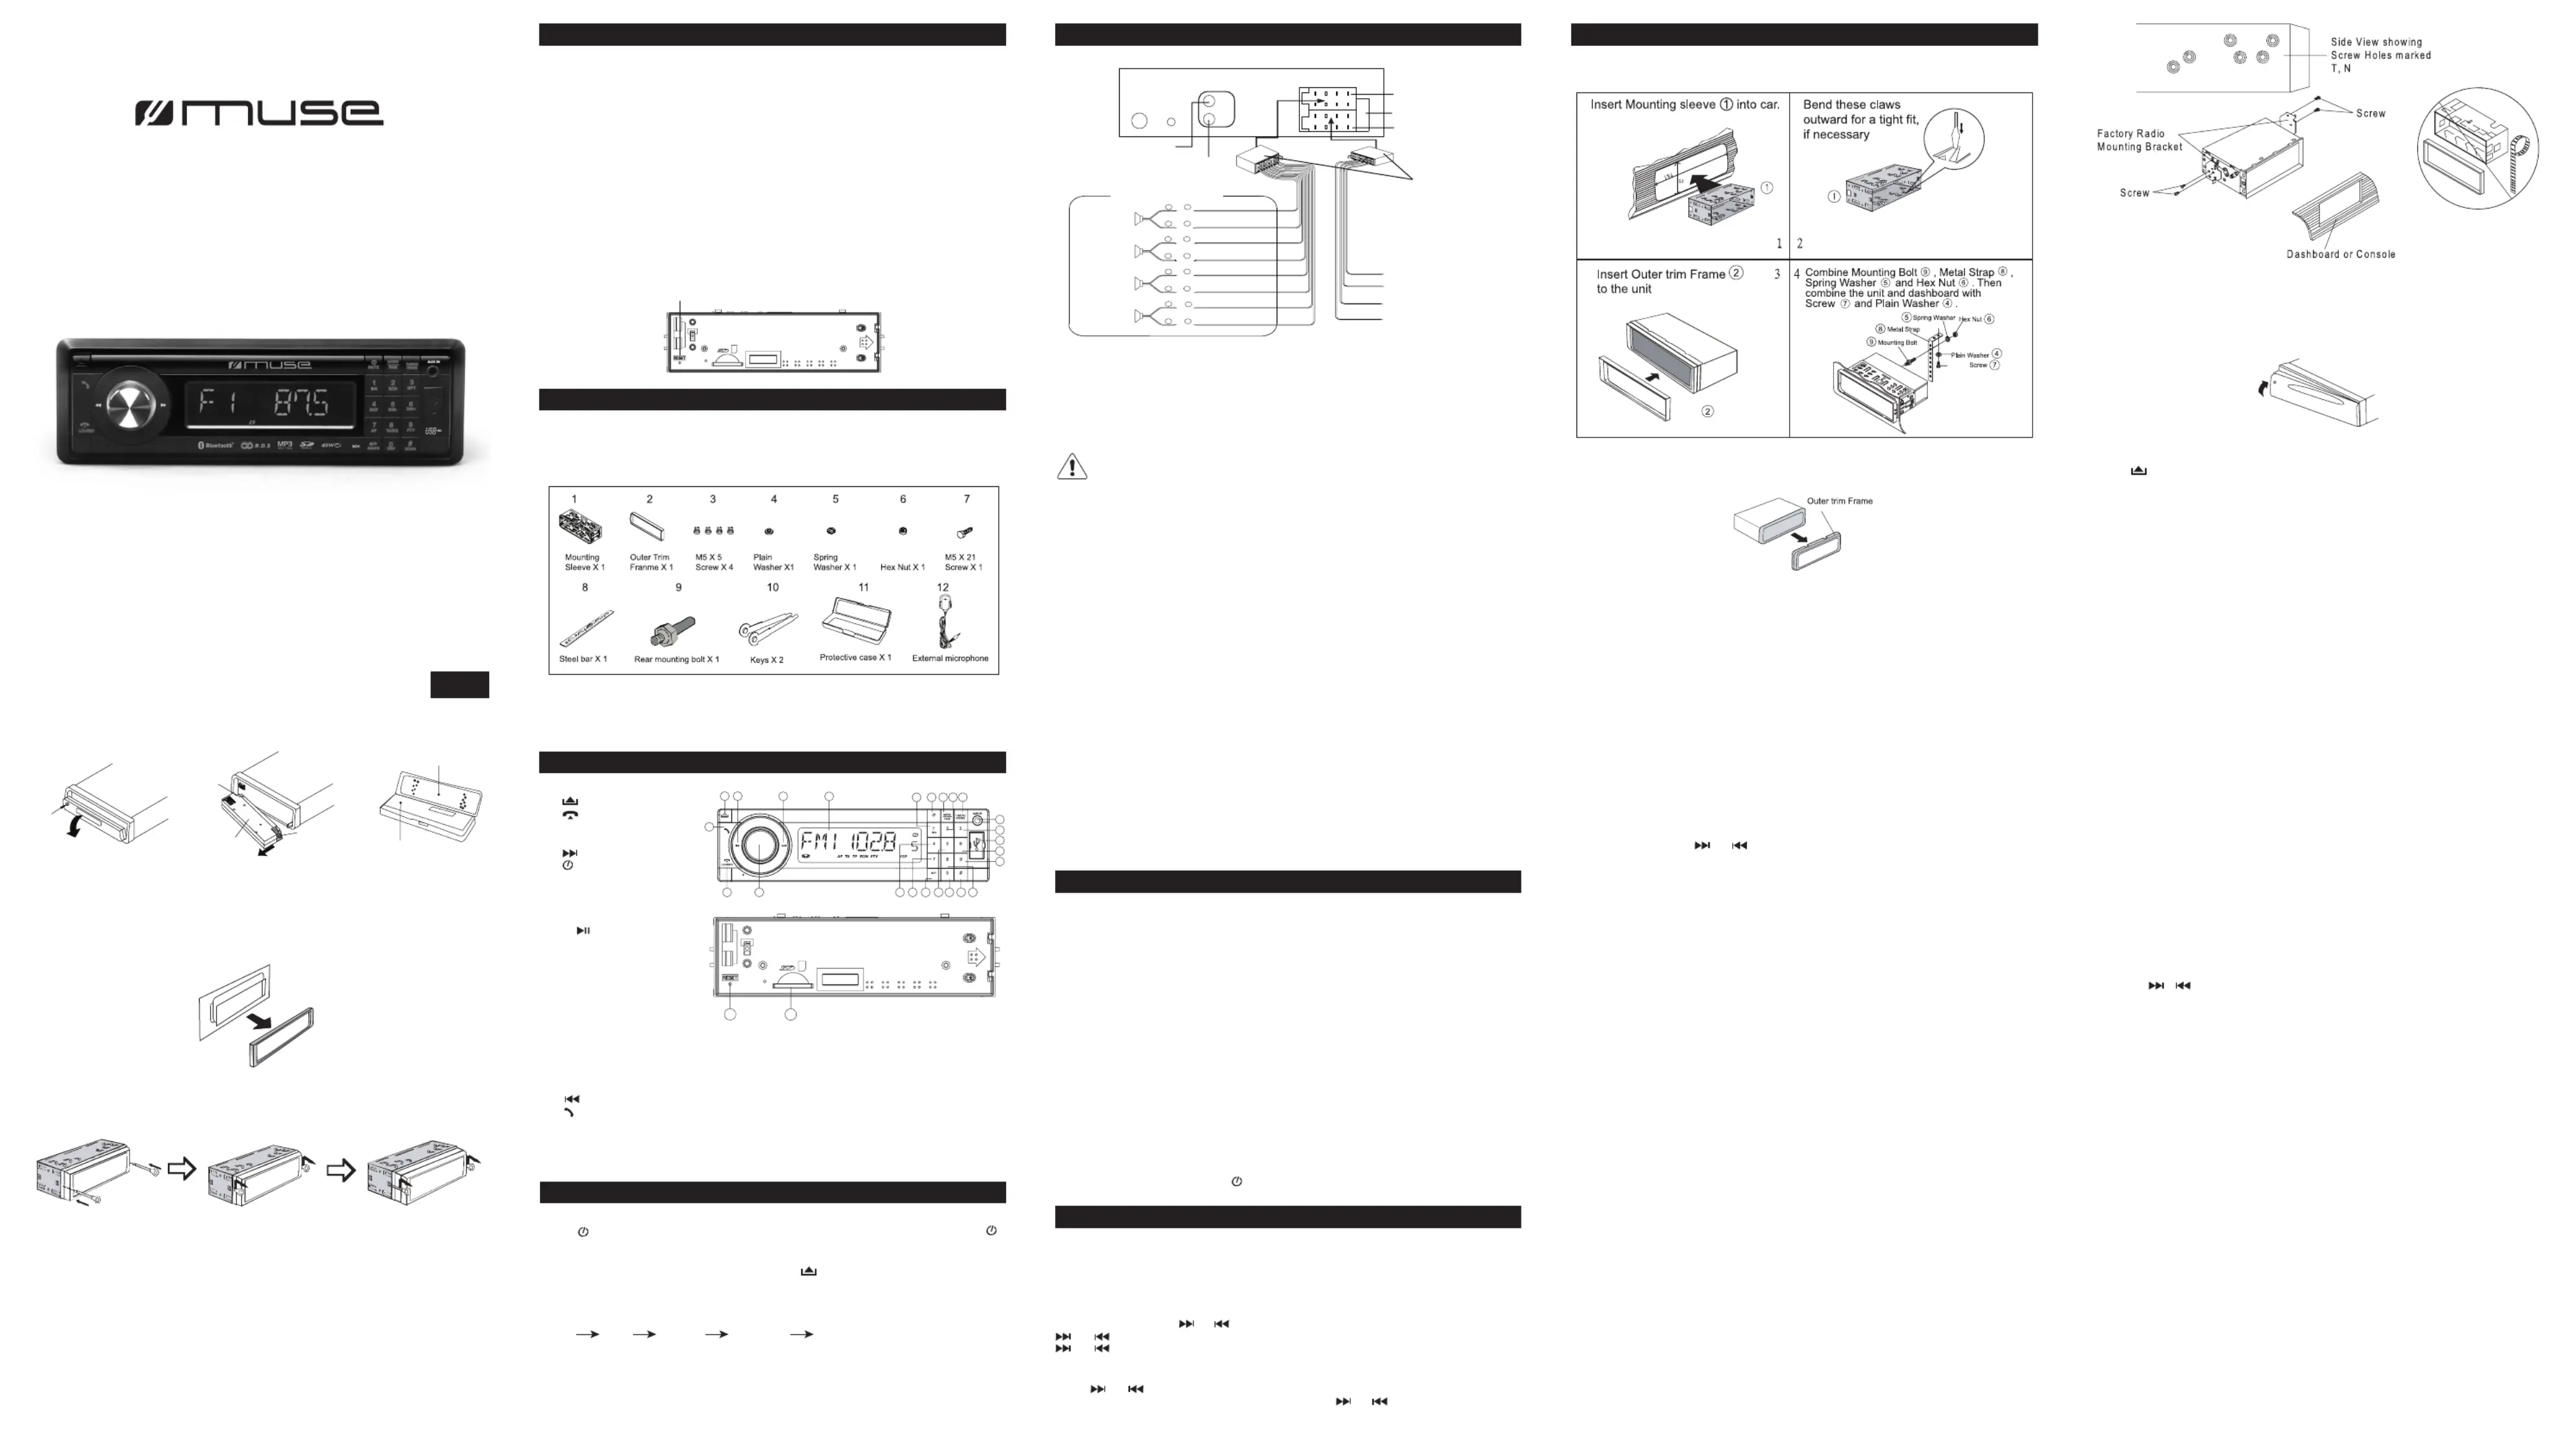
CONNECTION
Caution!
- Make sure to connect the color coded leads according to the diagram. Incorrect con-
nections may cause the unit to malfunction or damage the vehicle’s electrical system.
- Make sure to connect the speaker (-) leads to the speaker (-) terminal. Never connect
the left and right channel speaker cables each other or to the vehicle body.
- Make sure all the connections are completely correct before turning on your unit.
Do not connect the ignition wire (red) and the battery wire (yellow), it may cause
a short circuit, even result in re.
1. Remove the outer trim frame.
2. Select a position where the screw holes of the mounting bracket supplied with the
car and the screw holes of the main unit become aligned (are tted).
3. Tighten the screws. And then fasten them to the car.
GB - 5
3. Insert the keys supplied to the unit at the both sides of the unit (shown as illustrated)
until they click. Pulling the keys makes it possible to remove the unit from the dashboard.
GB - 6
LOCATION OF CONTROLS
GB - 7
Time display
Press / button to change display mode.0DSP
Reset the unit
Operating the unit for the rst time or after replacing the car battery, you must reset
the unit. To set the unit to initial status, press RESET button located on the base with a
pointed object. When some errors occur in display, you can also reset the unit, but it will
erase the clock setting and some memorized functions.
BASIC OPERATION
UNPACK YOUR UNIT
When you unpack your new car radio, make sure that you have removed all the acces-
sories and information papers:
Main unit
User manual
Accessories:
Install the unit
- Method 1: DIN Front-Mount
INSTALL AND REMOVE THE UNIT
SOUND FEATURES
NOTE:
This unit does not have built-in mic, make sure the external microphone (supplied)
is connected when the unit is installed to the car.
- Method 2 DIN Rear-mount (For Japanese car)
Volume adjusting:
To increase or decrease the sound level, rotate SEL/VOL knob clockwise or anti-clock-
wise.
Setting the Sound:
Repeatedly press to select the desired mode in the following order :“BAS” SEL/VOL
(Bass) -> “TRE” (Treble) -> “BAL” (Balance) -> “FAD“ (Fader) . After selecting the de-
sired mode, you can adjust the level by rotating the knob.SEL/ VOL
Preset equalizer
When you are listening to pop music, classic music or rock music, use the equalizer to
adjust the sound quality. Repeatedly press 8/TA/EQbutton to select different equalizer
mode in following order: FLAT-> CLASSICS -> POP->ROCK->DSP OFF(Display off).
Switching Loudness On/off
Press and hold button until “LOUD ON” shows on display to activate LOUD-LOU/BND
NESS function. By this function, you can increase the low frequency, which can im-
prove sound sensitivity. Press and hold this button again until “LOUD OFF” to cancel
LOUDNESS function.
Muting the sound
When the unit is ON, short press /MUTE to mute the sound. Press again to restore.
LISTENING TO THE RADIO
Selecting band
In tuner mode, repeatedly press button to select bands in following order: LOU/BND
FM1->FM2->FM3->MW.
Manual/automatic tuning
- Manual Tuning
Press and hold button or until “MANUAL” shows on display, then press button
or continuously to select a station upward or downward. Press and hold button
or o tune the station with a faster speed.
- Automatic Tuning
Press or once, the radio automatically searches a station upward or downward
respectively and plays when it nds a station. Press or once to stop scanning.
Remove the unit
1. Detach the front panel. (please refer to upper part)
2. Take out the outer trim frame.
Turning on/off the unit
Press / button to turn on the unit. When the unit is on, press and hold /MUTE
MUTE button to turn off the unit.
Note: When the unit is off, press any key except to turn on the unit.
Selecting the mode
After the unit is on, press MODE/PAIRbutton repeatedly to select different source
mode:
Radio USB SD/MM Bluetooth AUX .
Long press MODE/PAIR button to access or exit Bluetooth pairing mode.
Scanning/memorizing stations automatically
- By buttonAS/PS/SCH
In turner mode, press AS/PS/SCH until “SEARCH” appears on display. It will start scan-
ning and the 6 strongest stations are stored into the corresponding preset number but-
ton automatically.
- By number button 1-6
1. Tune to a station by or button.
2. Press and hold one of the Number buttons for 2 seconds until LCD shows the 1- 6
corresponding number, which indicates that station is stored in the corresponding num-
ber button.
Note: The unit can be stored up to 6 stations for each band.
Retrieving the preset stations
Press number button to listen to corresponding station.1-6
-- RDS (Radio Data System) Operations --
This unit has a built-in RDS decoder system that supports broadcast stations transmit-
ting RDS data. This system can display the name of the broadcast station being re-
ceived and can automatically switch to the broadcast station with the best reception as
you travel on long distances (AF switching). A trafc announcement broadcast from a
RDS station, no matter what mode you are. Additionally, if EON information is received,
enables automatic switching of other preset stations on the same network and interrup-
tion of the station being received with trafc information. This function is not available in
some areas.
Alternative frequency (AF)
The AFfunction switches to a different frequency on the same network in order to
maintain optimum reception. In FM mode, press button, certain program will be AF
automatically searched and received. If the reception of the current broadcast station
deteriorates, “AF” appears in the display and the radio searches for the same program
on another frequency. Press button again to cancel this function.AF
When reception is bad, the “” icon will blink.AF
Trafc alarm (TA)
In the TAstandby mode, when a trafc announcement broadcast starts, the trafc an-
nouncement broadcast is received as top priority regardless of the function mode so
you can listen to it. Trafc program (TP) automatic tuning is also possible.
Long pressTAbutton, when LCD shows “TA”, traffic program will be automatically
searched and saved, when LCD shows “TP”, this means that the RDS broadcast sta-
tion being received has trafc announcement programs.
If you press TAbutton while a trafc announcement broadcast is being received, the
trafc announcement broadcast reception is cancelled and the unit goes into the TA
standby mode.
If a TP station is not received, the unit continues searching.
Long press TA button again to stop searching. “TA” goes off.
ALARM
“ALARM”will be displayed when an emergency broadcasting is received; meanwhile
sound output level will be adjusted to the preset output level automatically when the
volume control is set at minimum.
Program type selection (PTY)
When PTYis selected, the radio starts to search corresponding PTY information, and
stops when the corresponding PTY information is detected.
If corresponding PTY information does not exist any more, PTY is automatically
stopped to normal mode.
Using button to Select ProgramPTY
1) Press PTYbutton once. When “PTY” appears on display, press number button 1-6
repeatedly to select below programs:
Button 1: NEWS/ AFFAIRS / INFO / SPORT / EDUCATE
Button 2: DRAMA / CULTURE / SCIENCE / VARIED / POP M
Button 3: ROCK M/EASY M/LIGHT M/CLASSICS / OTHER M
Button 4: WEATHER / FINANCE / CHILDREN / SOCIAL / RELIGION
Button 5: PHONE IN / TRAVEL / LEISURE / JAZZ M / COUNTRY
Button 6: NATION M / OLDIES / FOLK M / DOCUMENT / TEST / ALARM
(Press PTY button. Then rotating the volume knob. You also can select the programs above.)
Then press / or SEL/VOL buttons to start searching for the corresponding program.
2) Press and hold PTYPTYbutton will enter RDS MENU, in the menu, Shortly press
button will show below items:
TA ---PI ---RETURN ---MASK ---EONTA ---TAVOL---REG
After that, rotate knob to choose corresponding setting desired.SEL/VOL
TA: SEEK/ALARM
Install the front panel
Insert the panel into the housing and make sure the panel is properly installed.
Otherwise, abnormality occurs on the display or some keys will not function properly.
Detach the Front Panel
1.Press button in the upper left corner, and then the front panel will be folded down.
2. To remove the front panel, lift it up at a little angle from horizontal position, then rst
pull out the right side and then pull out the left side.
3. For safekeeping, store the front panel in the supplied protective case immediately
after being removed.
GB - 4
GB - 8GB - 9
a) TA SEEK mode:
When newly tuned station does not receive TP information for 5 seconds, the radio
retunes to next station which doesn’t have the same station (PI) as the last station, but
has the TP information.
When TP information gets lost at the current station for retune time which is set by
RETUNE SHORT or RETUNE LONG, the radio start to retune to next same PI station.
When PI station does not catch in one cyclic search, the radio retunes to next station
with TP information.
Note: In TA SEEK mode, the current station can be changed to the completely different
station because the unit searches TP station when the eld (signal) strength of the cur-
rent station is very weak, or the current station has no “TP” signal. (The higher priority
is TP rather than PI.)
b) TA ALARM mode
When this mode is selected, any automatic retune mode is not activated. Only double
beep sound (ALARM) is output. So, in this mode, the unit keeps the current station any-
how. (The PI priority is higher than TP.)
When newly tuned station doesn’t have TP information for 5 seconds, beeps come out.
When TP information gets lost at the current station for retune time, the beep sound is
output.
When newly tuned station doesn’t have RDS signal, “PI SEEK” is suppressed somewhat.
RESET
.
M5 X 21
M5 X 21
2
3489
23
2119
24
5
7
1
SCH
MUTE
AS/PS
DSPSCAN
PTYAF
TA/EQ
SHF
SCN
RPT
DIR+DIR-
181720
16
14
15
12
13
221110
6
26
25
OPEN
The left side
Front panel
The right side
Protective case
Front panel
Note: Never put any objects into the front panel.
WIRING DIAGRAM (IDENTIFYBY COLOR)
8
7
5
4
++
+
-
-
+
+
-
+
--
-
+
--
+
8
7
6
5
4
3
2
1
6428
5317
6428
5317
ANTENNA
SOCKET
MIC IN
LINE OUT
LCH (WHITE)
R CH (RED)
ISO CONNECTOR 1
FUSE HOLDER (15A)
ISO CONNECTOR 2
ISO CABLE
(NOT INCLUDED)
FUSE(15A)
4-SPEAKER SYSTEM
REAR LEFT
SPEAKER
FRONTLEFT
SPEAKER
FRONTRIGHT
SPEAKER
REAR RIGHT
SPEAKER
GREEN/BLACK
WHITE/BLACK
GRAY/BLACK
VIOLET/BLACK
VIOLET
GRAY
WHITE
GREEN
GROUND WIRE (BLACK)
+12V ACCESSORY/SWITCH(RED)
POWERANTENNA/
AMPLIFIER TURN ON (BLUE)
+12V CONSTANT
POWER SUPPLY(YELLOW)
Produktspecifikationer
| Varumärke: | Muse |
| Kategori: | bilradio |
| Modell: | M-168 |
Behöver du hjälp?
Om du behöver hjälp med Muse M-168 ställ en fråga nedan och andra användare kommer att svara dig
bilradio Muse Manualer

11 Augusti 2025
10 Augusti 2025
10 Augusti 2025
10 Augusti 2025
10 Augusti 2025
10 Augusti 2025
10 Juli 2025
10 Juli 2025
5 December 2024
4 Oktober 2024
bilradio Manualer
Nyaste bilradio Manualer
23 Mars 2026
22 Februari 2026
18 Februari 2026
18 Februari 2026
18 Februari 2026
17 Februari 2026
17 Februari 2026
17 Februari 2026
17 Februari 2026
16 Februari 2026