Musical Fidelity V90-HPA Bruksanvisning
Musical Fidelity Hörlursförstärkare V90-HPA
Läs gratis den bruksanvisning för Musical Fidelity V90-HPA (2 sidor) i kategorin Hörlursförstärkare. Guiden har ansetts hjälpsam av 43 personer och har ett genomsnittsbetyg på 4.1 stjärnor baserat på 9 recensioner. Har du en fråga om Musical Fidelity V90-HPA eller vill du ställa frågor till andra användare av produkten? Ställ en fråga
Sida 1/2
V90-HPA Headphone Amplifier and 24 bit/96 kHz
Asynchronous USB DAC
Instructions
Introduction
Thank you for purchasing the V90-HPA headphone
amplifier. We sincerely hope that it will bring you many
years of outstanding listening pleasure.
Installation Precautions
Your new V90-HPA is designed and built to provide
trouble-free performance, but as with all electronic devices,
it is necessary to observe a few precautions:
Do not use the V90-HPA near water. The unit must not be
exposed to dripping or splashing and no objects filled with
liquids, such as vases, must be placed on the unit.
Keep the V90-HPA away from heat such as radiators. No
naked flame sources, such as lighted candles, should be
placed on the unit.
Power Supply Note:
Only use
approved
Musical Fidelity DC power supply. The
use of other adaptors or supplies could seriously damage
the V90-HPA.
This Hi-fi product has been tested to ensure that its
operation is not adversely affected by normal background
levels of Radio Frequency Interference (R.F.I.), and that it
does not itself generate excessive amounts of interference.
However, if a problem persists, please contact your Musical
Fidelity agent.
Never open the case of the V90-HPA yourself, as this will
invalidate the guarantee.
Place all connecting cables where they are not likely to be
walked on or trapped by items placed on them.
The V90-HPA will operate in accordance with its
specifications within the following environmental range:
Temperature 5 to 45 degrees Celsius
Humidity 10 to 90% non condensing
There are no user adjustments inside. Please refer all
service work to an authorised Musical Fidelity agent.
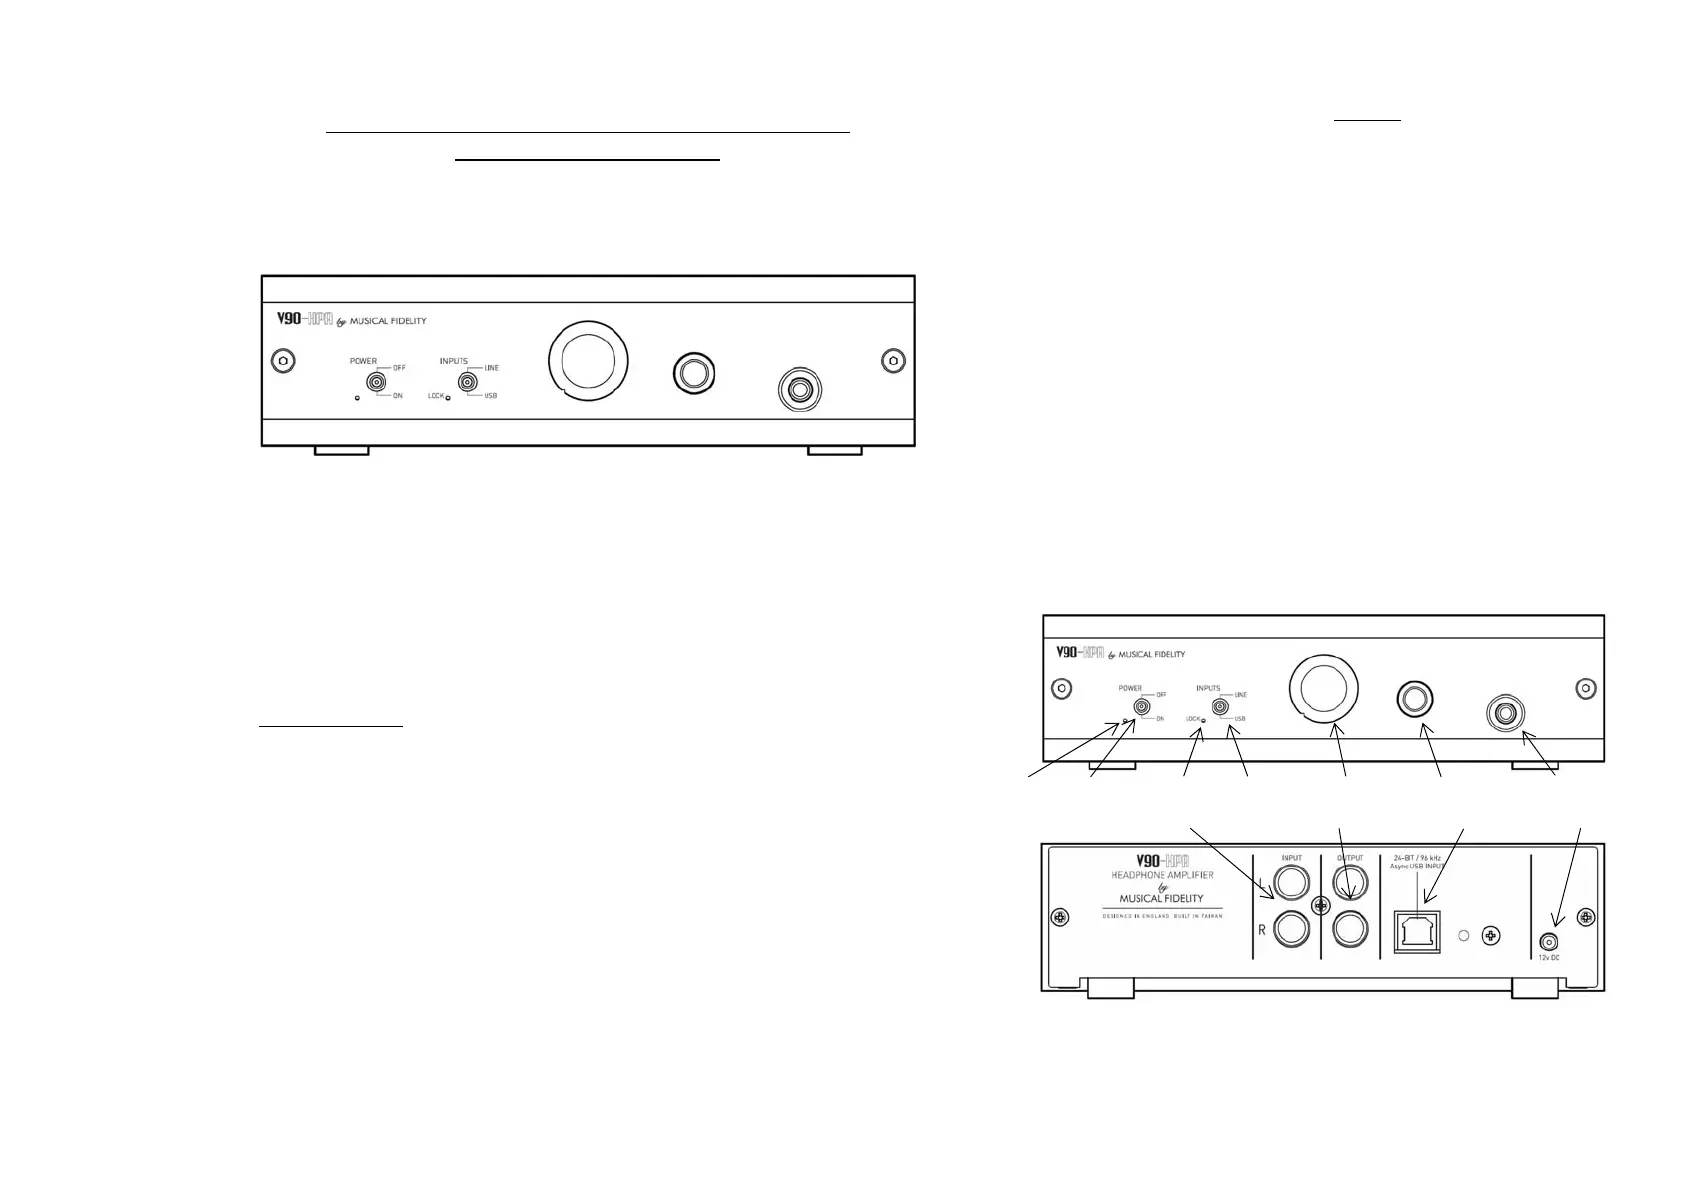
Connections
All connections must be made before the mains adaptor is
plugged in, and before any amplifier connected is switched
on. Always switch off the equipment attached to the V90-
HPA before connecting or disconnecting power, changing
leads or inputs.
Inputs
Using good quality RCA leads (not supplied), connect the
left and right outputs from a CD player or other audio source
to the V90-HPA INPUT sockets.
Outputs
Two headphone sockets are available to allow a greater
range of headphones to be used without need of adaptors.
Connect headphones into the correct output socket of the
V90-HPA.
Note: If connecting into an
existing
system, the V90-HPA
can conveniently be connected to the TAPE REC outputs of
any pre- or integrated amplifier. If the TAPE REC outputs
are still required by e.g. tape or CD recorder, then the
OUTPUT sockets (back panel) of the V90-HPA reproduce
the input source currently selected by the setting of the
INPUTS switch i.e. LINE or USB.
The back panel OUTPUT sockets are unaffected by the
volume control and are therefore suitable for recording
either from LINE or USB inputs.
Power
Plug the DC connector lead from the power supply unit into
the V90-HPA power inlet socket, and plug the adaptor itself
into a convenient wall mains outlet. The blue LED will light
to confirm the unit is ready for use.
Power LED Power switch USB Lock LED Input selector Volume control Phone jack 6.35mm Phone jack 3.5mm
RCA inputs Left & Right RCA outputs Left & Right Async. USB input DC power input socket
USB input
A good quality USB A to B cable is required to connect the
unit to the computer.
Plug the B (square) end into the socket in the back of the
V90-HPA
Plug the A (rectangle) end into a free USB socket on your
computer.
Additional USB information
On the host computer, a new device will be available,
whenever the V90-HPA is plugged in. Use this device to
listen to music stored or played from this host computer.
CD, MP3, WAV files played on any software should now
play through the internal USB DAC.
This device works with the normal USB audio drivers as
supplied with Windows XP, Windows VISTA, Windows 7, 8
and Apple OS-X and later. Musical Fidelity does not supply
or support any third party or update drivers for this device.
The computer drivers for the USB input of the V90-HPA
should install automatically. If they do not, please consult
computer system administrator/technical support. To check
correct installation follow these steps:
PC /Windows users
Check the computer has picked up the device and is
currently using it by clicking: (most Windows versions)
-Start
-Settings
-Control panel
-Sounds and Multimedia
-Audio
Check “V90-HPA 24/96” appears under PREFERRED
AUDIO DEVICE tab.
Mac users
Check the computer has picked up the device and is
currently using it by clicking: (MAC OS X)
-System preferences
-Hardware
-Sound
Check that “V90-HPA 24/96” is selected under the
OUTPUT tab. If the computer’s warning sounds/chimes are
to played through the internal DAC, make sure it is selected
under the SOUND EFFECTS tab too.
This device is a high speed serial data processor, and by
its nature, requires a very high volume of USB bandwidth. It
will benefit greatly from being the only device connected on
its USB ‘port’. Sharing the same port with other devices may
cause unwanted artefacts such as dropouts or temporary
loss of signal. This especially includes the use of the unit on
a USB hub/splitter alongside other USB components.
With the USB cable plugged in, the internal USB DAC is
automatically recognised no matter what input is currently
selected. When INPUTS selector switch is set to USB, the
green LOCK LED will light to show that the USB DAC is
correctly setup. The green LOCK LED goes out when the
INPUTS switch is set to LINE position but the internal USB
DAC is still connected and ready to use whenever required.
Use
With volume turned down, switch unit on and plug in
headphones. Select USB or LINE INPUT as required using
the input switch. Adjust the volume control for a comfortable
listening level, sit back and enjoy the music.
These products have been designed so that it may be left
on indefinitely, but please note that the mains adapter may
become warm to the touch - this is normal.
Produktspecifikationer
| Varumärke: | Musical Fidelity |
| Kategori: | Hörlursförstärkare |
| Modell: | V90-HPA |
Behöver du hjälp?
Om du behöver hjälp med Musical Fidelity V90-HPA ställ en fråga nedan och andra användare kommer att svara dig
Hörlursförstärkare Musical Fidelity Manualer

19 September 2024
Hörlursförstärkare Manualer
Nyaste Hörlursförstärkare Manualer
7 Januari 2025
6 Januari 2025
6 Januari 2025
6 Januari 2025
6 Januari 2025
31 December 2025
31 December 2025
30 December 2025
16 December 2024
14 December 2024