Navman Big Rig Duo Bruksanvisning
Läs gratis den bruksanvisning för Navman Big Rig Duo (2 sidor) i kategorin Navigator. Guiden har ansetts hjälpsam av 60 personer och har ett genomsnittsbetyg på 4.6 stjärnor baserat på 7 recensioner. Har du en fråga om Navman Big Rig Duo eller vill du ställa frågor till andra användare av produkten? Ställ en fråga
Sida 1/2
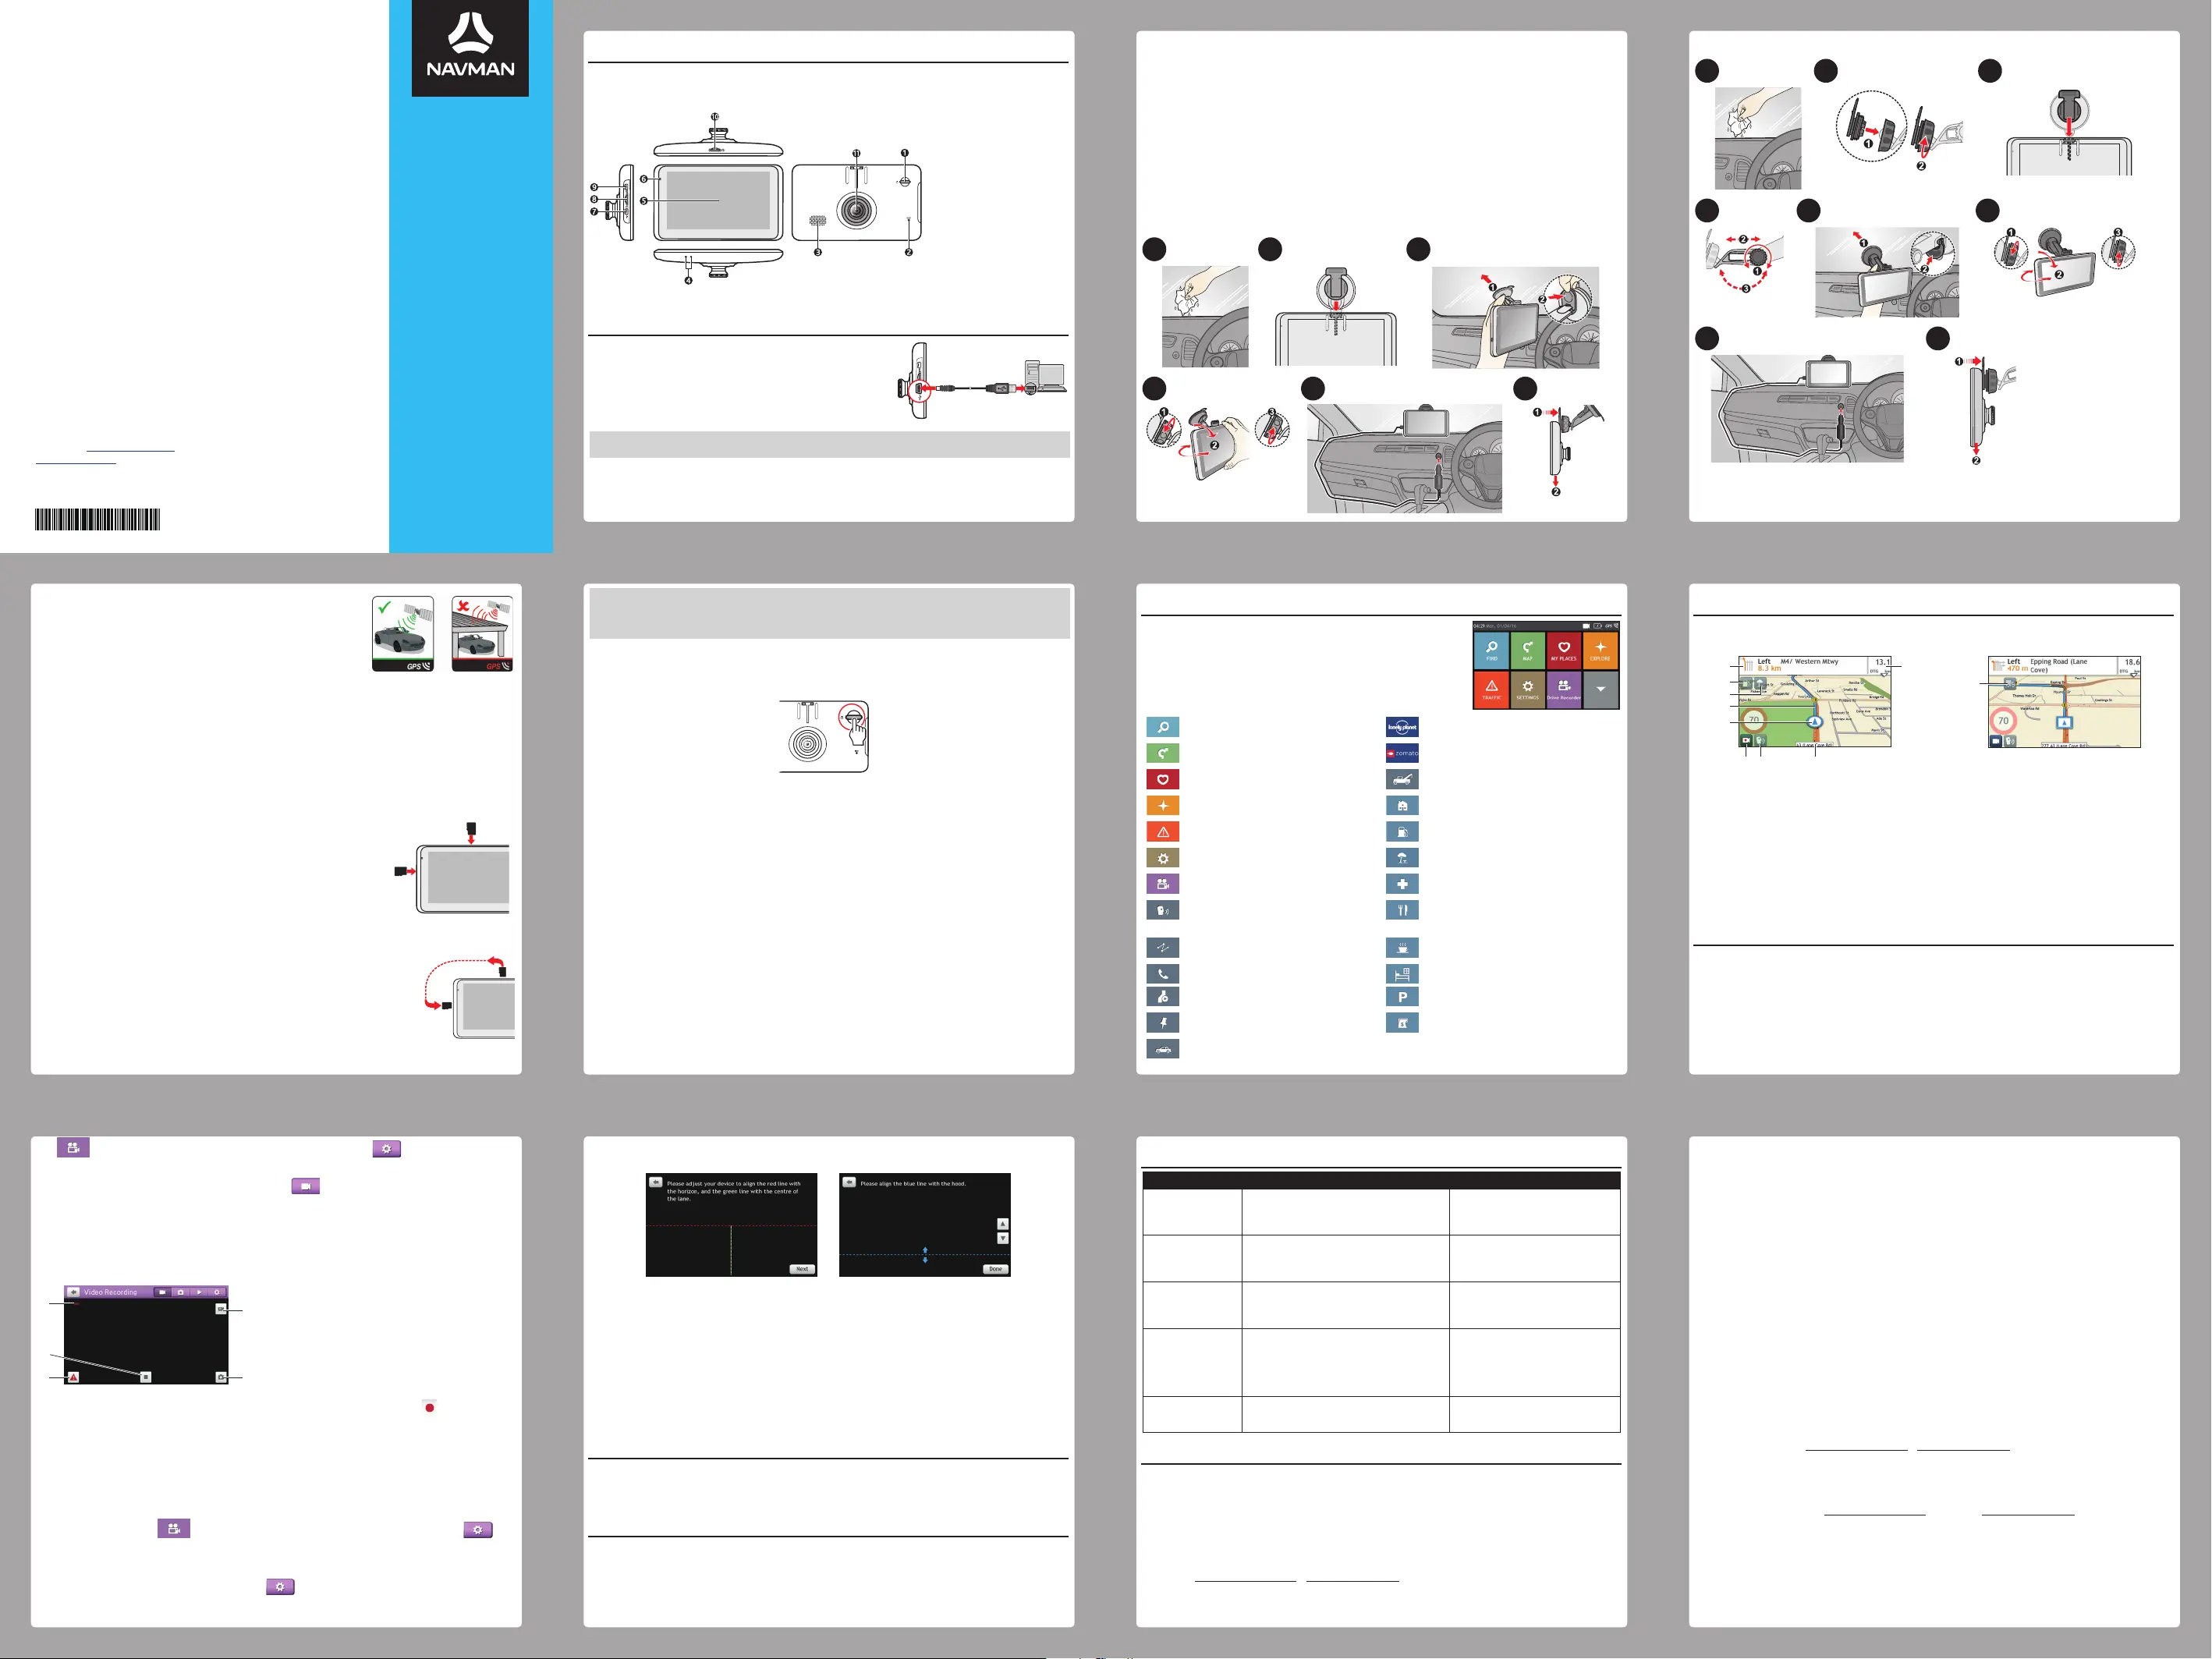
Getting to know your Navman
Note: Depending on the specific model purchased, the colour and look of your device and accessories may
not exactly match the graphics shown in this document.
❶
Power button
❷
Reset button
❸
Speaker
❹
Microphone
❺
Touch screen
❻
Power indicator
❼
Mini-USB connector
❽
Data card slot
❾
Rear dash cam connector
❿
Recorder card slot
⓫
Camera lens
How do I get started?
Before using your Navman for the very first time,
you should connect your Navman to a power source
for at least 8 hours with your Navman turned off.
Connect your Navman to your computer via the
supplied USB cable.
CAUTION: Do not connect the USB cable into the rear dash cam connector as your computer will not recognise
the device.
Mounting your Navman in a vehicle
• Never mount your Navman where the driver’s field of vision is blocked.
BIG RIG DUO
Quick Start Guide
Important!
Please install the NavDesk™ software found on the supplied DVD to your Windows
PC or Mac. This will allow your device access to regular software updates and the
Navman’s free map feature when connected to your computer.
Please DO NOT DISPOSE of the supplied DVD as it contains essential information
that may be required for international maps and complementary products.
Please go to www.navman.com.au (Australian residents) or
www.navman.co.nz (New Zealand residents) for more information.
• If the windscreen is tinted with a reflective coating, it may be athermic and impact the GPS
reception. In this instance, please mount your Navman where there is a “clear area” - usually
just beneath the rear-view mirror.
• When disconnecting from the external power source, the device will enter a suspended
state within 10 seconds automatically. To continue using the device, tap Yes.
• It is highly recommended for the GPS device to stay connected with the vehicle power
adapter to ensure optimal performance and to enable the Traffic feature for eligible devices.
• The battery is designed as a backup power source for short-term use only in the event when
the vehicle's power system is not available. It is not to be used as a sole source of power for
prolonged periods.
Your Navman may come with different types of the device mounts. See the following illustrations
for proper installation.
Short mount
123
456
Long mount
123
456
78
GPS fix
Your Navman receives GPS signals via the internal GPS
antenna. To guarantee the optimum GPS signal strength,
ensure your Navman is outdoors, or in a vehicle outdoors,
and has an unobstructed view of the sky.
TMC (Traffic Message Channel)
You can receive current traffic information on your Navman using the TMC services. Make sure
that the vehicle power adapter is connected for the TMC services.
Note: Traffic information is available in selected models and countries only.
Note: Please note that you will not be able to receive the traffic information while using the third-party
accessory (such as your own vehicle power adapter).
Using a memory card
Hold the card (MicroSD) by the edges and gently insert it
into the slot as shown in the illustration.
To remove a card, gently push the top edge of the card
inwards to release it, and pull it out of the slot.
Note: A second memory card in the data slot is only required if installing
additional maps and subscriptions that can no longer fit on the internal
memory. The device can operate normally without one.
Recording
Accessing
data
If you want to access the recording files on your computer:
1. Turn off the device by pressing and holding the power button
for 3 seconds.
2. Move the MicroSD card from the recorder card slot (on the
top of the device) to the data card slot (on the left side of the
device).
3. Connect the device to your computer by using the USB
cable.
CAUTION:
• Do not apply pressure to the centre of the memory card.
• Inserting the card in the reverse direction may cause damage.
• Do not insert or remove the memory card when the device is turned on or in the suspend mode.
How do I turn on my Navman?
• For the initial start-up, briefly press the power button to turn on your Navman.
When you turn on your device for the first time, follow the prompts to customise your
device.
Note: The first time you use your Navman, it may take several minutes to establish a GPS connection. When
you have a GPS fix, you can start to use your Navman to plan your trip.
• To put your Navman in a suspended state, briefly press the power button.
When you next turn it on, your Navman will return to the last screen that you used.
• To resume using the device, do one of the following:
• Press the power button briefly.
• Connect the device to an external power source.
• To turn off your Navman, press and hold the power button for 3 seconds.
Main Menu
Main Menu screen options and the order of the options
may differ from the above, depending on your region,
maps installed or Navman model.
Search for places, areas and streets to help
plan your route.
Search for information and POIs using
Lonely Planet Scenic Tours or Travel Guides.
Display the Map screen.Search for information and POIs for the city
you are visiting.
Access your saved locations.Get help with just a phone call when your
car breaks down on the road.
Explore the area around your current
position or destination.
Set or navigate to your home address.
Receive live traffic information on your
route and set traffic preferences.
Search for the nearest petrol stations.
Configure your Navman to enhance your
navigation experience.
Search for the nearest rest stops.
Display the recording screen.Search for the nearest emergency services,
including hospitals and police stations.
Control your Navman by voice, allowing
you to search for an address/place/POI
easily.
Search for the nearest restaurants, cafes,
fast-food premises and other dining
establishments.
Add or begin a planned trip with multiple
waypoints.
Search for the nearest cafes.
Use your Navman as a hands-free car kit.Search for the nearest hotels/motels.
Display the calculated route in simulation
mode.
Search for the nearest parking places.
Record GPS co-ordinates of a location or a
journey.
Search for the nearest banks and ATMs.
Select your navigation mode: Car, Large
Vehicle or Professional Truck.
Viewing your route
Car mode
Large Vehicle mode
Professional Truck mode
❶
Direction and distance of next turn
❼
Voice command
❷
Petrol stations
❽
Address bar
❸
Rest stops
❾
Distance and time information
Tap to display more information.
❹
Current route
❺
Current position
❿
Truck stops
❻
Driving Recorder
Tap to change recording modes.
Note: Tap anywhere on the Map screen to bring up the Map options screen, which allows you to change the
route-related configuration.
Recording your driving
To make sure of the correct date and time for your recordings, please make sure that the device
has already gotten a GPS fix before you begin recording.
Make sure that the recording-specific MicroSD card (recommended Class 10 memory card with
a 16 GB – 64 GB capacity) has been inserted into the memory card slot for recording on the top
of the device.
When you use a new MicroSD card for recording for the first time, format the card on the device
to make it recording-specific.
Tap on the Main Menu. Tap anywhere on the screen and tap . Tap System >
Format > Yes.
Recordings are made in the video recording mode (). A recording can be triggered
automatically when:
• an AC power source is connected to the device that has been turned on.
• an event happens (such as sudden impact, high-speed driving, an overdone turn or an
accidental crash) during recording for the G sensor to prompt the device to start an event
recording automatically.
❶
Recording in progress
❷
Tap to stop recording.
❸
Tap to switch between emergency/event
recording and normal continuous recording.
❹
Tap to take a photo with the current GPS
coordinates during recording.
❺
Tap to switch between the device’s camera
and the rear camera (sold separately).
To restart the continuous recording, tap anywhere on the screen and then tap .
Note: The rear camera feature is not available on all models.
Note: The rear camera (sold separately) does not function when the device is using battery power.
Driving Assistance
Your Navman comes with driving assistance features, such as Lane Departure Warning System
(LDWS) and Forward Collision Warning System (FCWS). The features are enabled by default. To
change the settings, tap on the Main Menu > tap anywhere on the screen > tap >
tap LDWS or FCWS.
You are advised to calibrate the system constantly in order to be alerted correctly.
1. Tap anywhere on the screen and then tap > Driving Assistance > Calibration.
2. Drive the vehicle in the middle of the lane.
3. Ask a passenger to select this option and then follow the on-screen instructions to complete
calibration.
Note: LDWS: Certain conditions may prevent the lane departure warnings from operating correctly. It
requires correct calibration to capture road markings and is recommended to be used on main roads with
good visible road markings. Objects that are obstructing the camera view, glare, harsh reflections, low light
conditions, rain, fog, dirt, snow on windscreen and on road markings can impact how this feature functions.
Lane departure warnings will work best on straight roads like motorways and highways, and performance may
be limited on bends and windy roads. Changing lanes may also trigger the alerts.
Note: FCWS: Certain conditions may prevent the forward collision warnings from operating correctly.
Objects that are obstructing the camera view, glare, harsh reflections, low light conditions, rain, fog, dirt, snow
on windscreen and on the road can impact how this feature functions.
Forward collision will only operate in normal daylight conditions not lower than the light conditions on a cloudy
day.
NavDesk
NavDesk™ is a suite of tools to access greater functionalities, product information and map
updates via your computer.
MiVue Manager
You can use MiVue Manager™ to view the videos recorded on your Navman.
Troubleshooting
ProblemSteps to take and things to checkWhat next?
The unit is not turning
on.
Try to power the unit through a USB cable connected
to a computer. If the unit powers up then the issue is
with the vehicle power adapter. If the unit still fails to
power up, then the fault is with the unit.
Contact technical support and an RMA
will be created to fix the unit or replace the
vehicle power adapter.
I cannot get a GPS
signal.
Make sure you are stationary and have a clear line of
site to the sky. If this fails to resolve the issue, please
reset the GPS chip through the Settings menu of
your unit.
If the fault is still not resolved, please visit
our self help site (see the information from
"Navman customer support" section), or
contact our technical support team.
My unit is always
showing that the speed
limit is 110 kph even
when it is not.
The units are set at a manual speed limit defaulted at
110 kph. This can be changed through the "Safety"
section of your Settings menu.
If the fault is still not resolved, please visit
our self help site (see the information from
"Navman customer support" section), or
contact our technical support team.
Where is my product
key? I want to activate
my unit.
There is no need to activate your unit in any way.
This Activation tab within the NavDesk software is
for subscriptions, travel books, international maps
and map upgrades only. Your unit will work straight
out of the box and there is no need to activate it in
any way.
If the fault is still not resolved, please visit
our self help site (see the information
below), or contact our technical support
team.
My unit keeps
displaying battery low.
Power your unit through a USB cable connected to a
computer for 8 hours. Ensure the device is turned on
and is displaying the USB connection screen.
If it is still displaying battery low after
following this process, contact our
technical support team.
For more information
Navman’s free map feature
Navman's "Free Monthly Map Updates" entitles you to receive up to 12 map data updates annually,
when and as such updates are made available from the Navman website. It is only applicable for this
specific Navman product, until that product's useful life expires or Navman no longer receives map
data from its third party supplier, whichever is shorter. Updates are not transferable to other Navman
products or alternative products. The updates you receive will be updates to the same geographic map
data originally included with your Navman product when originally purchased. Full terms and conditions
available at www.navman.com.au / www.navman.co.nz or by contacting Customer Support.
Map downloads require sufficient memory on your device – you may need to use an appropriate
MicroSD card (not included) to store and access the downloads if your device’s internal memory is not
sufficient. Updates are not transferable to other Navman devices or alternative product. PC (running
Microsoft Windows 7 or higher, Mac OSX 10.6 and above) and Internet connection required. You must
install the NavDesk™ PC software supplied with your device. Only the preloaded map sold with your
device can be updated under this offer.
About the battery
Your Navman uses a Lithium-ion battery. It is important to follow the guidelines set out regarding this
type of Battery.
Electronic devices using a lithium – ion battery such as Mobile phones, GPSs and cameras are designed
to operate at a temperature range of approximately 0°C to 50°C. Beyond these temperature limits,
there may be a risk of battery failure, when these electronic goods are exposed to extreme heat
conditions for long periods.
It is recommended that you do not use your Navman in a humid, wet and/or corrosive environment.
Do not put, store or leave your product in or near a heat source, in a high temperature location, in
strong direct sunlight and do not expose it to temperatures over 60°C (140°F). Failure to follow
these guidelines may cause the Lithium-ion battery to leak acid, become hot, explode or ignite and
cause injury and/or damage. Do not pierce, open or disassemble the battery. If the battery leaks and
you come into contact with the leaked fluids, rinse thoroughly with water and seek medical attention
immediately. For safety reasons, and to prolong the lifetime of the battery, your Navman unit should not
be connected at low (below 0°C/32°F) or high (over 45°C/113°F) temperatures.
THE LITHIUM-ION BATTERY CONTAINED IN THE PRODUCT MUST BE RECYCLED OR DISPOSED
OF PROPERLY.
It is highly recommended you use your Navman only WITH AC ADAPTER (HOME CHARGER) OR THE
SUPPLIED DC VEHICLE POWER ADAPTER.
For more information on how to recycle your old electronic devices, please contact your local council
office. You can also visit www.navman.com.au / www.navman.co.nz to view our latest trade-in offers.
Navman Customer Support
To report a faulty product or speak to a member of our Technical Support team, contact:
Australia: 1300 NAVMAN (1300 628 626), New Zealand: 0800 GO NAVM (0800 466 286); or visit our
Technical Support Website: www.navman.com.au (Australia), www.navman.co.nz (New Zealand).
Important Notice
In addition to the user manual, this document contains the following terms that apply to your use of
your Navman product:
1. Software Licence;
2. Privacy Notice;
3. Terms and Conditions for the Use of Navigation Data; and
4. 2-Year Limited Warranty.
5615N5380021 R01
Produktspecifikationer
| Varumärke: | Navman |
| Kategori: | Navigator |
| Modell: | Big Rig Duo |
Behöver du hjälp?
Om du behöver hjälp med Navman Big Rig Duo ställ en fråga nedan och andra användare kommer att svara dig
Navigator Navman Manualer

22 September 2025
22 September 2025
22 September 2025
22 September 2025
22 September 2025
21 September 2025
21 September 2025
21 September 2025
21 September 2025
21 September 2025
Navigator Manualer
Nyaste Navigator Manualer
20 Mars 2026
5 Februari 2026
14 Oktober 2025
14 Oktober 2025
13 Oktober 2025
13 Oktober 2025
13 Oktober 2025
12 Oktober 2025
11 Oktober 2025
9 Oktober 2025