Noctua NH-U9B SE2 Bruksanvisning
Noctua
Hårdvarakylning
NH-U9B SE2
Läs gratis den bruksanvisning för Noctua NH-U9B SE2 (4 sidor) i kategorin Hårdvarakylning. Guiden har ansetts hjälpsam av 35 personer och har ett genomsnittsbetyg på 4.8 stjärnor baserat på 18 recensioner. Har du en fråga om Noctua NH-U9B SE2 eller vill du ställa frågor till andra användare av produkten? Ställ en fråga
Sida 1/4

NH-U9B SE2
|
Installation Manual INTEL
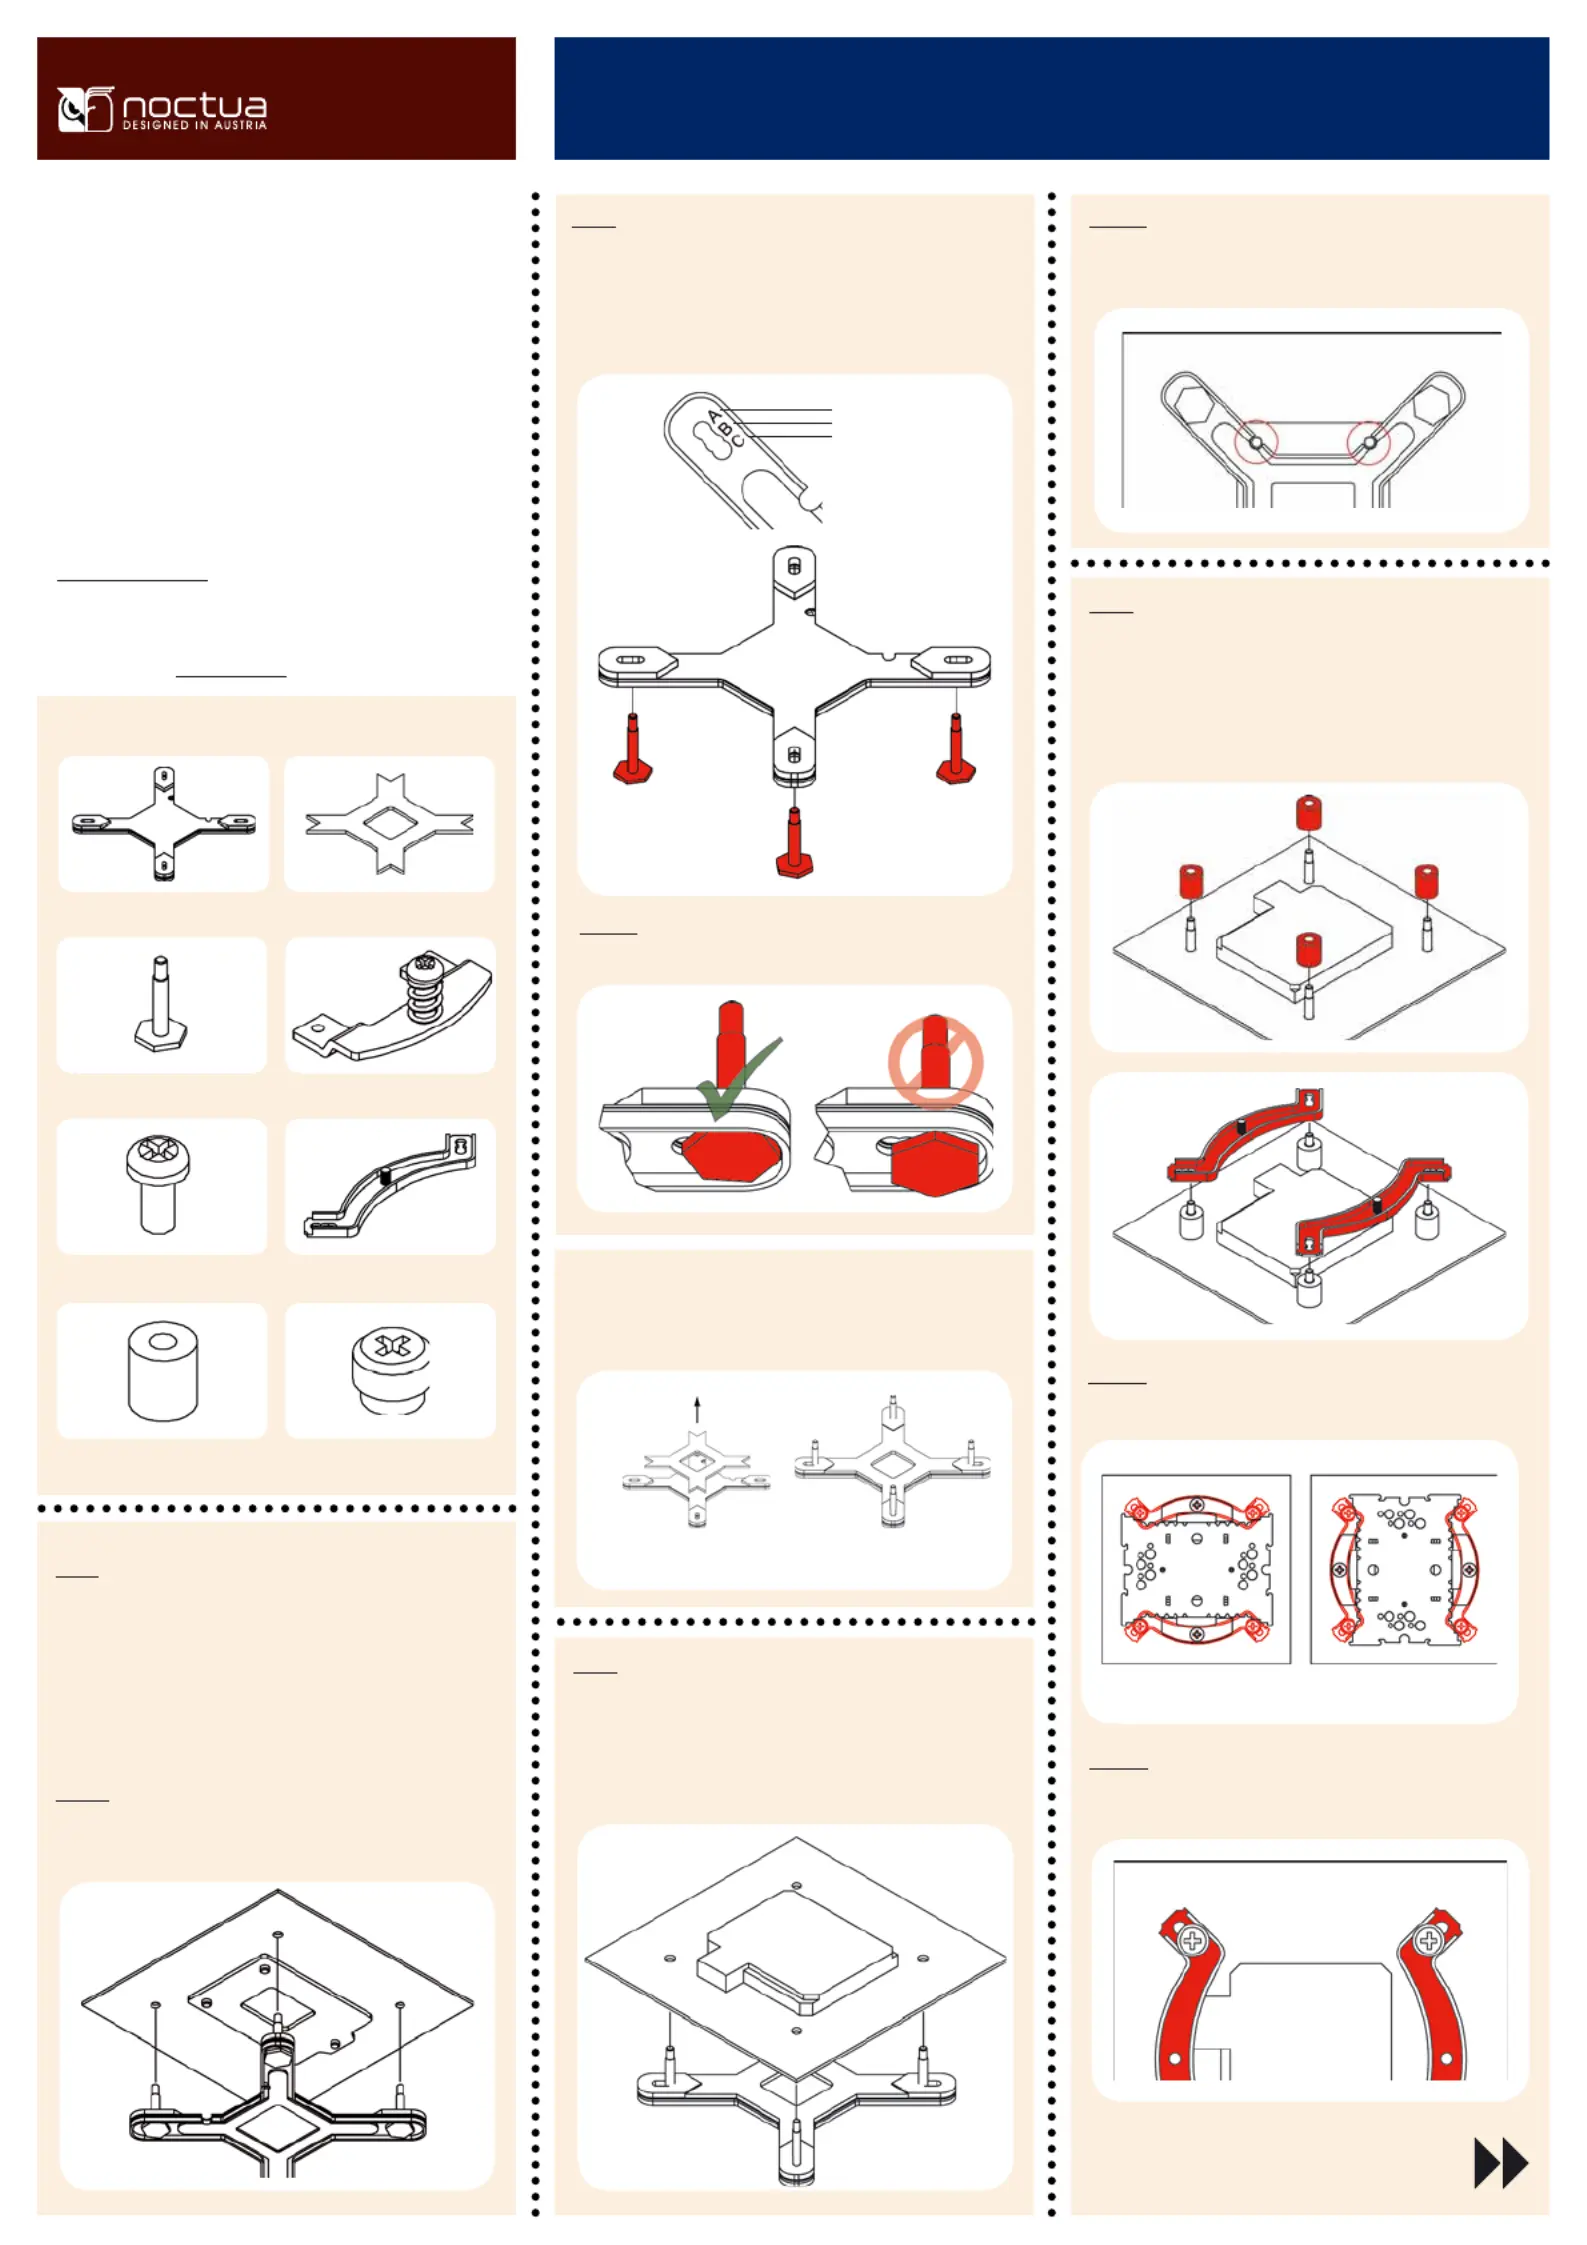
Removing the mainboard
Step 1:
In case you want to use the cooler on an assembled system,
you first have to remove the mainboard from the case in order
to be able to install the supplied backplate.
Caution: On LGA1366 and LGA1156/1155, the supplied back-
plate will install over the mainboard’s stock backplate, so the
mainboard’s stock backplate must not be taken off.
Required mounting parts:
First put the four bolts into the holes appropriate for your
mainboard’s CPU socket.
Setting up the backplate
Step 2:
Thank you very much for choosing a Noctua cooler.
This manual will guide you through the installation process
of the SecuFirm
tm
2 mounting system step by step.
Prior to installing the cooler, please consult the
compatibility list on our website and verify that the cooler
is fully compatible with your motherboard. Should you
encounter any difficulties, please check the FAQs on our
website and don’t hesitate to contact our support team at
support@noctua.at. Noctua cannot be held responsible for
any damage or losses caused by compatibility issues.
Multilingual versions of this manual are available
on our website: www.noctua.at
Caution: Please verify that all four bolts are put into the ap-
propriate holes fully pushed in.
Step 4:
Installing the mounting bars
First put the plastic spacers onto the bolts, then add the mount-
ing bars.
Noctua NH-U9B SE2
Installation Manual
4x plastic spacers 4x thumbscrews
1x 3-in-1 Intel backplate
4x bolts for backplate 2x fastening brackets
4x short screws
2x mounting bars
LGA1366 (80mm)
LGA1156/1155 (75mm)
LGA775 (72mm)
For use on LGA1366 and LGA1156/1155 mainboards, please
remove the rubber inlay. Make sure that the rubber inlay is
in place for LGA775.
LGA1366 & LGA1156/1155 LGA775
Caution: On LGA1156/1155, please make sure that the two
cuts in the supplied backplate align with the screws of the main-
board’s stock backplate.
Caution: Choose the alignment of the mounting bars according
to the desired final orientation of the cooler:
Orientation A
Step 3:
Attaching the backplate
Place the backplate on the rear side of the mainboard so that
the bolts stick through the mounting holes.
Caution: Make sure that the curved sides of the mounting bars
are pointing outwards.
Orientation B
LGA775 rubber inlay

NH-U9B SE2
|
Installation Manual INTEL
For all enquiries concerning your Noctua cooler, both your
retailer and the international Noctua support team at
support@noctua.at are at your service.
Please also consult the FAQ section on our website
www.noctua.at.
Support & FAQs
Caution: Tighten the screws until they stop.
Caution: Make sure to use the correct holes on the mounting bars.
Fix the mounting bars using the 4 thumb screws.
Step 5:
Attaching the fastening brackets to the heatsink
Tightly screw the fastening brackets to the base of the heatsink
using the 4 short screws.
Caution: Make sure to install the fastening brackets in the cor-
rect position:
Connect the fan(s) to the mainboard, power supply or fan con-
troller. Use the supplied y-split cable to connect both fans to
one fan header. Depending on your CPU and the temperature
inside the case, you may interconnect the supplied Low-Noise
Adapter (L.N.A.) or Ultra-Low-Noise Adapter (U.L.N.A.) in or-
der to further reduce the fan’s operating noise.
Caution: Please use one adaptor per fan when running two
fans with adaptors. Never use one adaptor for two fans by
putting it before the y-split cable.
Caution: When using the (U.)L.N.A., check the temperature
of your CPU using appropriate software (e.g. the respective
applications of your mainboard manufacturer), in order to
evade automatic throttling of the CPU due to the increased
temperature. If the cooling performance is insufficient, please
increase case ventilation or remove the (U.)L.N.A.
Attaching the fan
Step 8:
First stick the 2 anti-vibration strips onto the cooling fins in
order to dampen minor vibrations emitted by the fan.
Then attach the fan to the heatsink using the 2 steel clips,
placing it so that it blows onto the heatsink.
Add the second NF-B9 fan sucking air off the rear side of the
heatsink for extra performance (average gains 1-3°C). Please
make sure that both fans are aligned in the same direction.
Step 6:
Applying thermal paste
If there are residual traces of thermal paste or thermal pads
on your CPU, please clean them off first. Then press a small
drop (4-5mm diameter) of NT-H1 onto the centre of the heat-
spreader.
Caution: Applying too much thermal paste will lower the heat
conductivity and cooling performance!
Step 7:
Fastening the heatsink to the CPU
Caution: Please take off the protection cover at the bottom side
of the heatsink first!
Put the heatsink onto the CPU and screw it to the screw threads
of the mounting bars.
Caution: Tighten the screws until they stop.
Low-Noise Adapter (L.N.A.)
1300 RPM, 13.1 dB(A)
Ultra-Low-Noise Adapter (U.L.N.A.)
1000 RPM, 7.9 dB(A)
Black Blue

NH-U9B SE2
|
Installation Manual AMD
Required mounting parts:
First put the plastic spacers onto the screw threads, then fix
the mounting bars using the 4 long screws.
Attaching the mounting bars
Step 2:
Thank you very much for choosing a Noctua cooler. This
manual will guide you through the installation process of
the SecuFirm
tm
2 mounting system step by step.
Prior to installing the cooler, please consult the compat-
ibility list on our website and verify that the cooler is fully
compatible with your motherboard.
Should you encounter any difficulties, please check the
FAQs on our website and don’t hesitate to contact our sup-
port team at support@noctua.at. Noctua cannot be held
responsible for any damage or losses caused by compat-
ibility issues.
Multilingual versions of this manual are available on our
website: www.noctua.at
Caution: Make sure that the curved sides of the mounting
bars are pointing inwards.
Noctua NH-U9B SE2
Installation Manual
Caution: Tighten the screws until they stop.
2x mounting bars
4x long screws
4x plastic spacers
Caution: The SecuFirm
tm
2 mounting system requires a back-
plate, which is preinstalled on most AM2/AM2+/AM3 main-
boards.
If your mainboard doesn’t have a backplate, please contact our
support team at support@noctua.at.
Step 4:
Applying thermal paste
If there are residual traces of thermal paste or thermal pads on
your CPU, please clean them off first.
Then press a small drop (4-5mm diameter) of NT-H1 onto the
centre of the heat-spreader.
Caution: Applying too much thermal paste will lower the heat
conductivity and cooling performance!
Removing the retention module
Step 1:
If your mainboard uses a retention module for CPU cooler in-
stallation, please remove it first. The
SecuFirm
tm
2 mounting
system will install directly to your mainboard’s stock backplate
on the rear side of the socket.
4x short screws
2x fastening brackets
Step 3:
Attaching the fastening brackets to the heatsink
Tightly screw the fastening brackets to the base of the heatsink
using the 4 short screws.
Caution: Make sure to install the fastening brackets in the cor-
rect position:
AMD stock backplate
Produktspecifikationer
Varumärke: | Noctua |
Kategori: | Hårdvarakylning |
Modell: | NH-U9B SE2 |
Vikt: | 640 g |
Bredd: | 95 mm |
Djup: | 120 mm |
Höjd: | 125 mm |
Material: | Aluminium, Copper |
Modell: | Kylare |
Luftflöde: | 64.3 m³/h |
Rotationshastighet (max): | 1600 RPM |
Rotationshastighet (min): | 1000 RPM |
Spänning: | 12 V |
Antal fläktblad: | 7 |
Lagertyp: | Self-Stabilising Oil-pressure Bearing (SSO) |
Förpackningstyp: | Låda |
Fläktdiameter: | 92 mm |
Rotationshastighet med LNA (max): | 1300 RPM |
Luftflöde med LNA (max): | 52.6 m³/h |
Antal fläktar: | 2 fläkt/-ar |
Ljudnivå (hög hastighet): | 17.6 dB |
Lämplig placering: | Processor |
Stödd processor uttag: | LGA 1150 (Socket H3), LGA 1155 (Socket H2), LGA 1156 (Socket H), LGA 1366 (Socket B), LGA 2011 (Socket R), LGA 775 (Socket T), Socket AM2, Socket AM2+, Socket AM3, Socket AM3+, Socket FM1, Socket FM2, Socket FM2+ |
Mått, fläkt (B x D x H): | 92 x 92 x 25 mm |
Fläktbladens material: | Gjuten aluminium |
Fläktvikt: | 90 g |
Medeltid mellan fel (MTTF): | 150000 h |
Lågljudsadapter (LNA): | Ja |
Behöver du hjälp?
Om du behöver hjälp med Noctua NH-U9B SE2 ställ en fråga nedan och andra användare kommer att svara dig
Hårdvarakylning Noctua Manualer
9 April 2025
27 December 2024
22 Oktober 2024
22 Oktober 2024
26 September 2024
26 September 2024
26 September 2024
26 September 2024
26 September 2024
23 September 2024
Hårdvarakylning Manualer
- StarTech.com
- Dynatron
- Alphacool
- Arctic Cooling
- ALSEYE
- Savio
- Apc
- Akasa
- Daikin
- Bitspower
- In Win
- Scythe
- Raijintek
- Lian Li
- Mars Gaming
Nyaste Hårdvarakylning Manualer
9 April 2025
9 April 2025
8 April 2025
8 April 2025
8 April 2025
8 April 2025
8 April 2025
8 April 2025
8 April 2025