NZXT Kraken 120 Bruksanvisning

NZXT kylskåp Kraken 120

Läs gratis den bruksanvisning för NZXT Kraken 120 (2 sidor) i kategorin kylskåp. Guiden har ansetts hjälpsam av 9 personer och har ett genomsnittsbetyg på 4.7 stjärnor baserat på 5 recensioner. Har du en fråga om NZXT Kraken 120 eller vill du ställa frågor till andra användare av produkten? Ställ en fråga

Sida 1/2
KRAKEN 120
120MM LIQUID COOLER WITH RGB
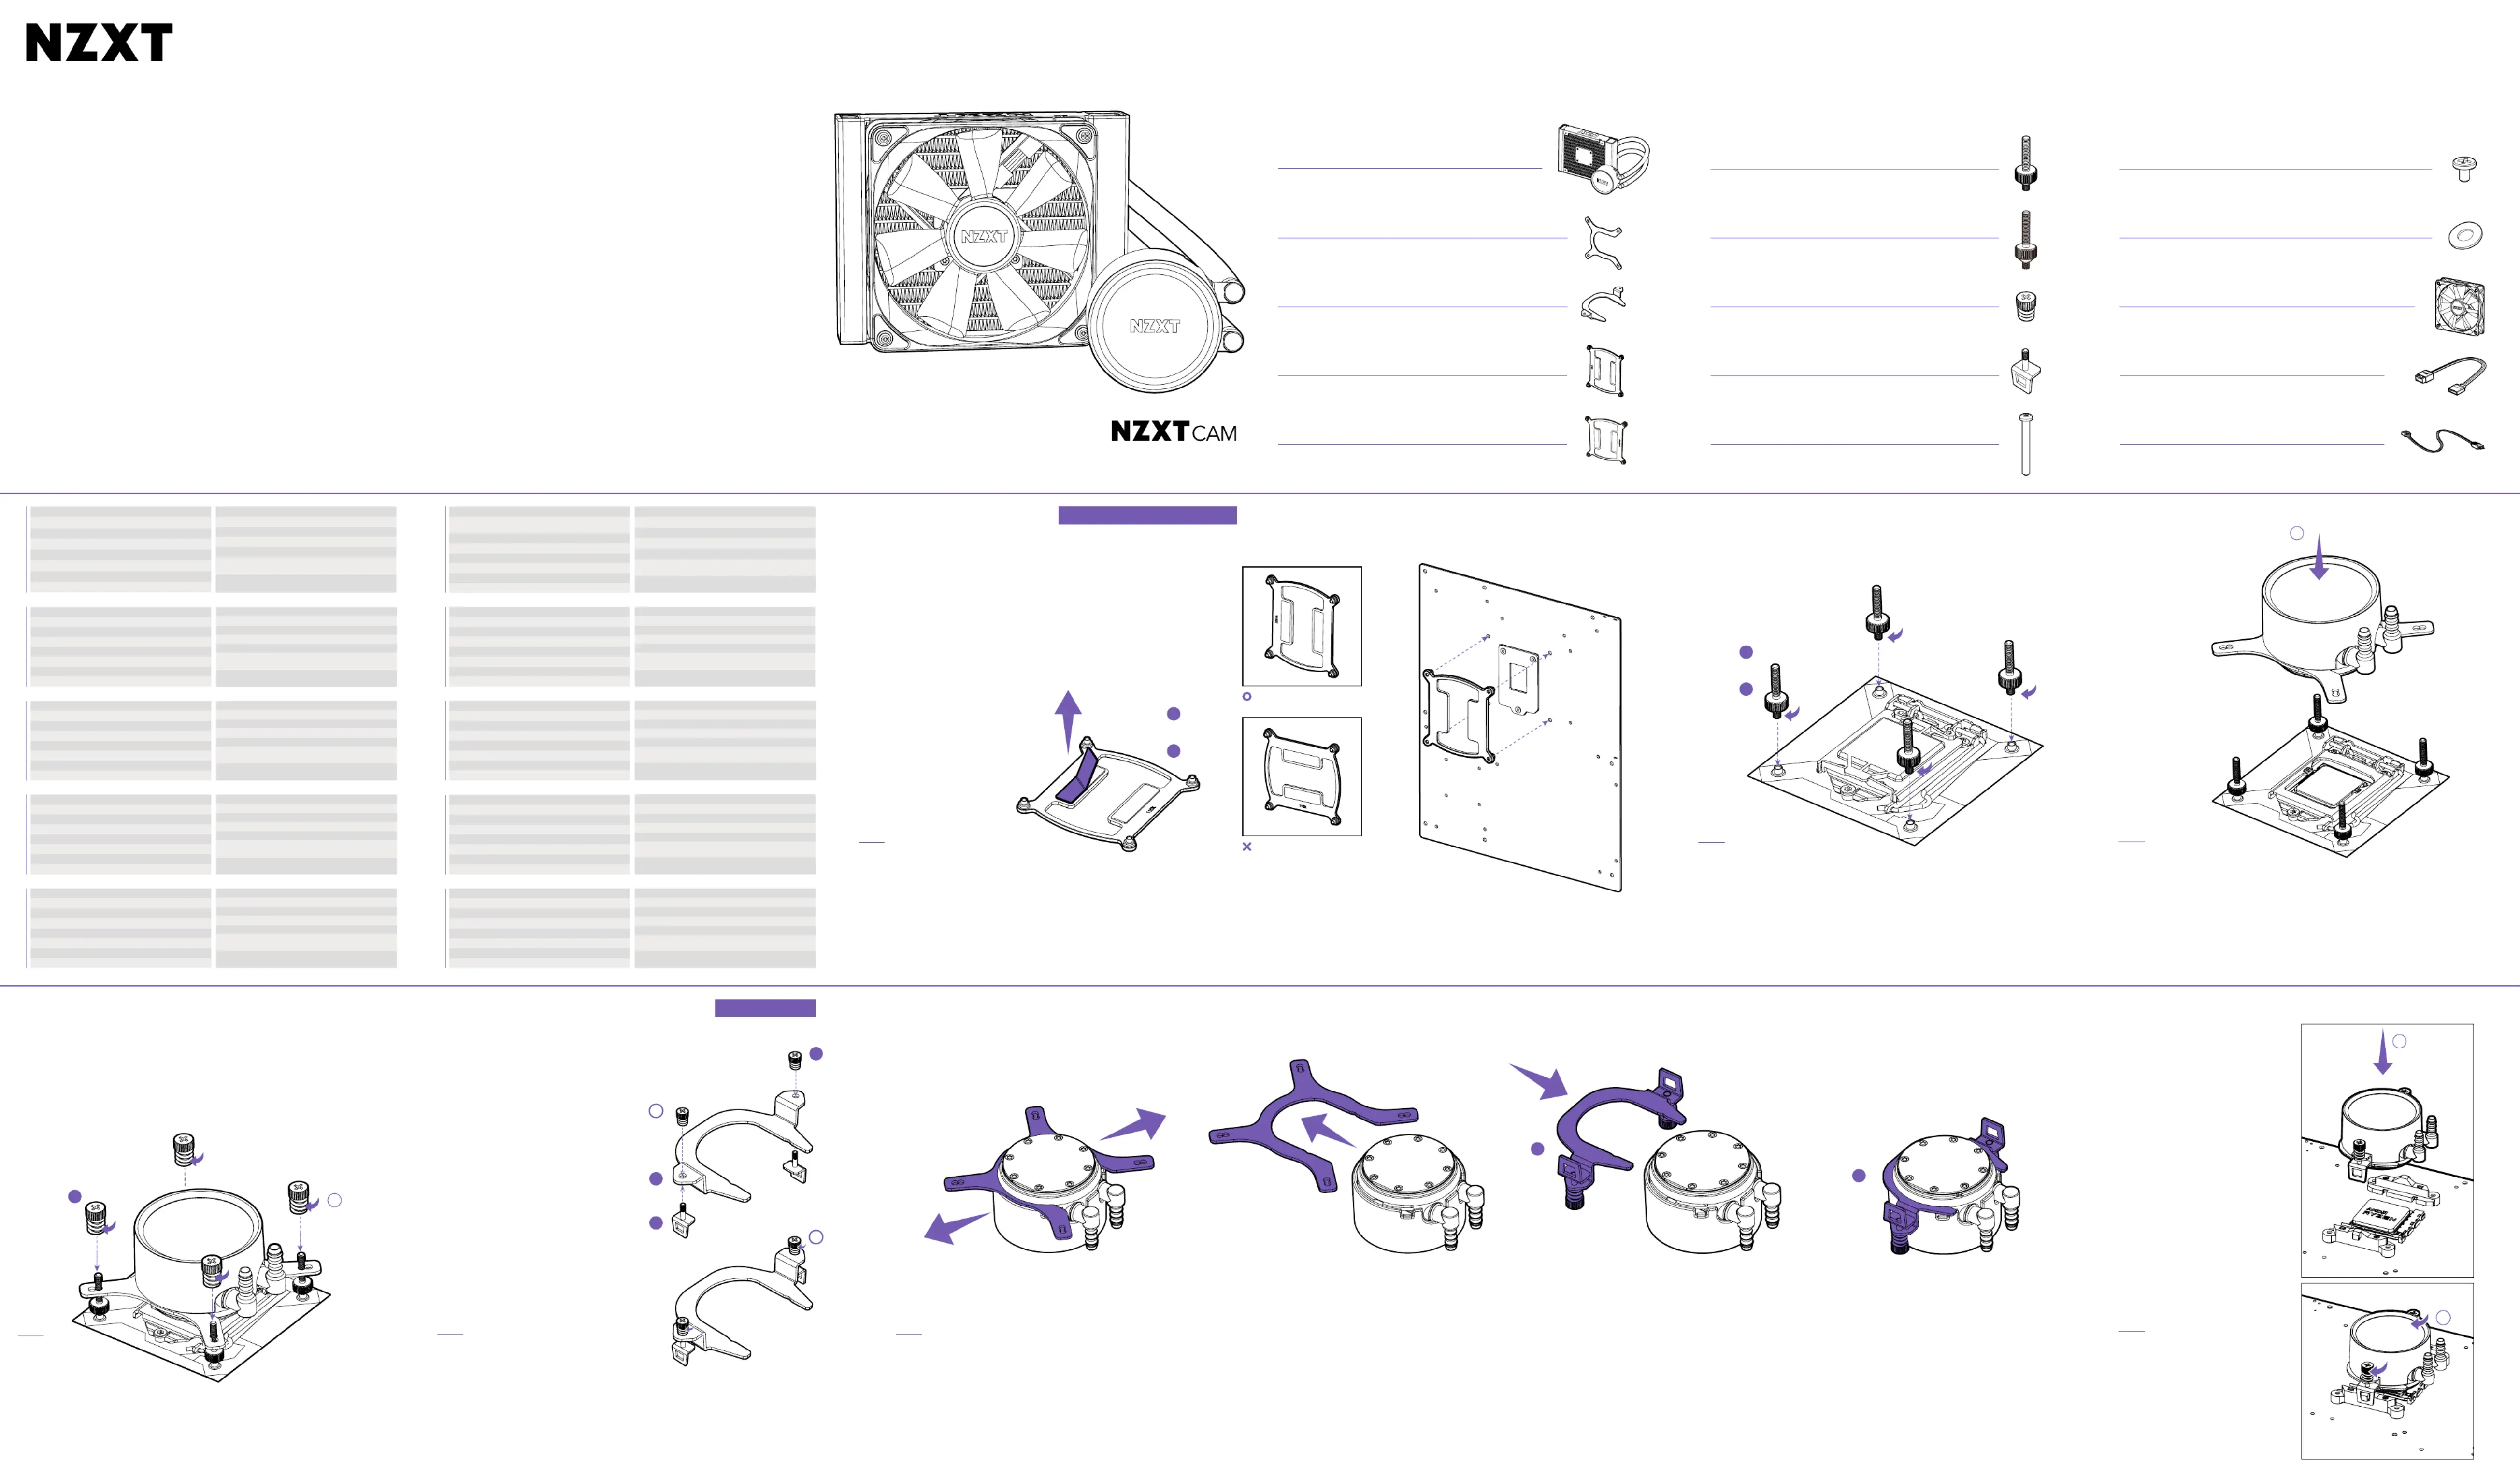
S T E P 4
2
H
LISTA DE COMPONENTES
LISTE DES COMPOSANTS
KOMPONENTENLISTE
LISTA DE COMPONENTES
СПИСОК КОМПЛЕКТУЮЩИХ
구성품 목록
部品
零件表
零件表
AKraken 120
x1
D
Intel 1200/115X Backplate
x1
E
Intel 1700 Backplate
x1
C
AMD Retention Bracket
x1
BIntel Retention Bracket (Pre-installed)
x1
H
Thumbnut with Spring
x4
I
Hook Screw for AMD Retention
x2
J30mm UNC 6-32 Fan Screw
x8
N200mm 5V ARGB (Female) to NZXT RGB (Male) Adapter
x1
O200mm NZXT RGB (Female) to 5V ARGB (Male) Adapter
x1
GIntel Socket 1700 Standoff Screw
C O M P O N E N T L I S T
F
Intel Socket 1200/115X Standoff Screw
x4
K5mm UNC 6-32 Radiator Screw
x4
x4
MAer P 120 Fan
x1
LMetal Washer
x8
A .
Kraken 120
B .
Soporte de retención intel (preinstalado)
C .
Soporte de retenQción AMD
D .
Placa trasera intel 1200/115x
E .
Placa trasera Intel 1700
F .
Separadores socket intel 1200/115x
G .
Separadores socket Intel 1700
H .
Tuercas de mariposa con arandela elástica
I .
Tornillos de gancho para retención AMD
J .
Tornillos de ventilador unc 6-32 de 30 mm
K .
Tornillos de radiador unc 6-32 de 5 mm
L .
Arandelas metálicas
M .
Ventilador Aer P120
N .
ARGB de 200 mm, 5 v y 3 pines (hembra) a conector
NZXT RGB (macho)
O .
Conector ARGBNZXT RGB de 200 mm (hembra) a
5 V de 3 pines (macho)
A .
Kraken 120
B .
Base de support intel (préinstallée)
C .
Base de support AMD
D .
Platine arrière intel 1200/115x
E .
Platine arrière Intel 1700
F .
Vis d’espacement pour logement intel 1200/115x
G .
Vis d’espacement pour logement Intel 1700
H .
Écrous moletés avec ressorts
I .
Vis à crochet pour support AMD
J .
Vis pour ventilateur 30 mm unc 6-32
K .
Vis pour radiateur 5 mm unc 6-32
L .
Rondelles en métal
M .
Ventilateur Aer P120
N .
Connecteur 200 mm RVBA 5 V 3 broches (femelle)
vers NZXT RVB (mâle)
O .
Connecteur 200 mm NZXT RVB (femelle) vers RVBA
5 V 3 broches (mâle)
A .
Kraken 120
B .
Intel-Halterung (vormontiert)
C .
AMD-Halterung
D .
Intel 1200/115X Backplate
E .
Intel 1700 Backplate
F .
Abstandsschraube für Intel-Sockel 1200/115X
G .
Abstandsschraube für Intel-Sockel 1700
H .
Flügelmutter mit Feder
I .
Schraubhaken für AMD
J .
30 mm UNC 6-32 Lüfterschraube
K .
5 mm UNC 6-32 Radiatorschraube
L .
Metallunterlegscheibe
M .
Aer P120 Lüfter
N .
200 mm 5V 3-Pin ARGB (Buchse) auf NZXT RGB
O .
200 mm NZXT RGB Steckverbindung (Buchse) auf
5V 3-Pin ARGB (Stecker)
A .
Kraken 120
B .
Staffa di tenuta intel (preinstallata)
C .
Staffa di tenuta AMD
D .
Backplate intel 1200/115x
E .
Backplate Intel 1700
F .
Distanziatori per socket intel 1200/115x
G .
Distanziatori per socket Intel 1700
H .
Dadi con molla
I .
Viti a gancio per la staffa AMD
J .
Viti per ventola unc 6-32 da 30 mm
K .
Viti per radiatore unc 6-32 da 5 mm
L .
Rondelle metalliche
M .
Ventola Aer P120
N .
Connettore ARGB da 200 mm 5V a 3 pin (femmina) -
connettore RGB NZXT (maschio)
O .
Connettore RGB NZXT da 200 mm (femmina) -
connettore ARGB 5V a 3 pin (maschio)
A .
Kraken 120
B .
Braçadeira de retenção Intel (pré-instalada)
C .
Braçadeira de retenção AMD
D .
Placa traseira Intel 1200/115X
E .
Placa traseira Intel 1700
F .
Parafuso afastador para tomada Intel 1200/115X
G .
Parafuso afastador para tomada Intel 1700
H .
Porca de ajuste manual com mola
I .
Parafuso com gancho para retenção AMD
J .
Parafuso 30mm UNC 6-32 para ventoinha
K .
Parafuso 5mm UNC 6-32 para radiador
L .
Anilha metálica
M .
Ventoinha Aer P120
N .
Conector ARGB 5V de 3 pinos de 200mm (fêmea)
para conector NZXT RGB (macho)
O .
Conector NZXT RGB de 200mm (macho) para
ARGB 5V de 3 pinos (macho)
A .
Kraken 120
B .
Удерживающий кронштейн Intel
( )предварительно установлен
C .
Удерживающий кронштейн AMD
D .
Задняя панель Intel 1200 / 115x
E .
Задняя панель Intel 1700
F .
Переходных винта гнезда для intel 1200 / 115x
G .
Переходных винта гнезда для Intel 1700
H .
Гайки пружиной с
I .
Болта для удержания AMD
J .
Винтов вентилятора мм 30 unc 6-32
K .
Винта радиатора мм 5 unc 6-32
L .
Металлических шайб
M .
Вентилятор Aer P120
N .
3-контактный разъем 200 мм, 5 В ARGB (гнездо) -
разъем штекер NZXT RGB ( )
O .
3-контактный разъем NZXT RGB (гнездо) -
3-контактный разъем 5 ARGB (В штекер)
A .
Kraken 120
B .
Intelンシラケ (ール済み)
C .
AMDリテラケ
D .
Intel 1200/115X バップレー
E .
Intel 1700 レー
F .
Intelソケ 1200 / 115X ドオネジ
G .
Intelソケ 1700 ネジ
H .
グ付きサムナ
I .
AMDテン
J .
30mm UNC 6-32 ン用ネジ
K .
5mm UNC 6-32 ラジエーター用ネジ
L .
金属ワ
M .
Aer P120
N .
200MM 5V 3 ARGB ( NZXT RGB ) から
コネ ()
O .
200mm NZXT RGB () 5V 3
ARGB (
)
A .
Kraken 120
B .
Intel 扣具(预装)
C .
AMD
D .
Intel 1200/115X 背板
E .
Intel 1700
F .
Intel Socket 1200/115X 位螺丝
G .
Intel Socket 1700 定位螺丝
H .
带弹簧的蝶形螺母
I .
AMD 具带钩螺
J .
30mm UNC 6-32 风扇螺丝
K .
5mm UNC 6-32 散热器螺丝
L .
金属垫圈
M .
Aer P120 风扇
N .
200MM 5V 3 ARGB RGB (插座)至恩杰
连接器(插头)
O .
200mm RGB 连接器(插座)至 5V 3
ARGB(插头)
A .
Kraken 120
B .
Intel 固定支 (預先安裝)
C .
AMD 定托架
D .
Intel 1200/115X 背板
E .
Intel 1700
F .
Intel 1200/115X 插座支座螺釘
G .
Intel 1700 座支座螺
H .
帶彈簧的翼形螺母
I .
用於 固定托架的鉤形螺釘 AMD
J .
30mm UNC 6-32 風扇螺釘
K .
5mm UNC 6-32 散熱器螺絲
L .
金屬墊圈
M .
Aer P120 風扇
N .
200MM 5V 3 ARGB NZXT RGB (母頭)
連接器(公頭)
O .
200mm NZXT RGB 5V 3 連接器(母頭)至
ARGB(公頭)
A .
Kraken 120
B .
Intel 리텐션 ( )브라켓 사전 설치
C .
AMD 리텐션 브라켓
D .
Intel 1200/115X 백플레이트
E .
Intel 1700 플레이트 1
F .
Intel 소켓 1200/115X 탠드오프 스크류
G .
Intel 소켓 1700 스탠드오프 스크류 4
H .
스프링이 너트
I .
AMD 텐션용 후크 스크류
J .
30mm UNC 6-32 스크류
K .
5mm UNC 6-32 라디에이터 스크류
L .
메탈 워셔
M .
Aer P120
N .
200MM 5V 3 ARGB( ) TO NZXT RGB
커넥터( )
O .
200mm NZXT RGB ) to 5V 3커넥터(
ARGB(
)
A M D
I N S TA LL AT I O N
INSTALACIÓN
INSTALLATION
MONTAGE
INSTALLAZIONE
INSTALAÇÃO
УСТАНОВКА
설치
取付
安装
安裝
S T E P 2
1. 2 . 3 . 4 .
C
C
Changing the retention bracket
Cambio del soporte de sujeción
Changement du support de rétention
Austauschen der Halterung
Modifica del supporto di fissaggio
Troca do suporte de retenção
Замена кронштейна для крепления
리텐션 브라켓 변경
テントの変更
更换固定支架
更換固定支架
Preparing the retention bracket
Preparación del soporte de sujeción
Préparation du support de rétention
Vorbereiten der Halterung
Preparazione del supporto di fissaggio
Preparação do suporte de retenção
Подготовка кронштейна для крепления
리텐션 브라켓 준비
テントの準備
准备固定支架
準備固定支架
S T E P 1
C
1
2
I
H
1
I N T E L 1 7 0 0 & 1 2 0 0 /11 5 X
I N S TA LL AT I O N
INSTALACIÓN
INSTALLATION
MONTAGE
INSTALLAZIONE
INSTALAÇÃO
УСТАНОВКА
설치
取付
安装
安裝
Preparing the backplate
Preparar la placa posterior
Préparer la plaque arrière
Rückplatte vorbereiten
Preparazione della piastra
Preparar a placa de suporte
Подготовка задней пластины
후면판 준비
バッレーの準備
准备背板
準備背板
Installing the standoffs
Instalar los separadores
Installer les entretoises
Abstandhalter installieren
Installazione dei distanziatori
Instalar os espaçadores
Установка стоек
스탠드오프 설치
ドオフの付け
安装支架
安裝銅柱
S T E P 2S T E P 1
CORRECT
INCORRECT
G
E
D
or
F
or
Installing the water block
Instalar la bomba
Installer la pompe
Pumpe installieren
Installazione della pompa
Instalar a bomba
Установка насоса
펌프 설치
ポンプの取付け
安装泵
安裝幫浦
S T E P 3
2
1
Installing the water block
Instalar la bomba
Installer la pompe
Pumpe installieren
Installazione della pompa
Instalar a bomba
Установка насоса
펌프 설치
ポンプの取付け
安装泵
安裝幫浦
S T E P 3
V05
/
本标识内数字表示产品在正常使用状态下的环保使用年 年。10
某些件也可能有环保使用期标识其环保使用年以标识内的数字为准。
说明适配单板 模块上电子元器件的瓷或玻璃中含/ /
- : RL-KR120-B1 KRAKEN 120
有害物
件名称 六价(Pb) (Cd) (Hg) (Cr
+6
)联苯 (PBB) (PBDE)
线
PCBA
格依 编制SJ/T 11364
:
该有件所有均材料中的含 限量下。 GB/T 26572
:
该有至少在该的某材料中的含 仍符命令 GB/T 26572 ,
2011/65/EU
单板 模块上电子元器件的玻璃/
- : RL-KR120-B1 KRAKEN 120
及其
單元 六價(Pb) (Cd) (Hg) (Cr
+6
)聯苯 (PBB) (PBDE)
PCBA
1. 0.1wt% 0.01wt%”及” 之百分比含出百分比含基準
係指用物之百分比含出百分比含2.
3.
係指該用物
電路
電路模組上子元器件的或玻/
Scan the QR code or visit manuals.nzxt.com/kraken120
to view or download the full manual.
NZXT, Inc./ 15736 E . Valley Blvd, City of Industry, CA 91744, USA
NZXT Europe GmbH/ Industriering Ost 66 | 47906 Kempen | Germany
+1 (800) 228-9395 / / service@nzxt.com nzxt.com
> Visit nzxt.com/warranty and support.nzxt.com for information on warranty coverage and service.
> Visite el sitio Web y nzxt.com/warranty support.nzxt.com para obtener información sobre la cobertura y el servicio de la garantía.
> Visitez nzxt.com/warranty support.nzxt.com pour les informations de la couverture de la garantie et du service. et
> Informationen zu Geltungsbereich und Service der Garantie finden Sie unter support.nzxt.com und nzxt.com/warranty.
> Visitare il sito nzxt.com/warranty e support.nzxt.com per informazioni sulla copertura e sul servizio della garanzia.
> Visite nzxt.com/warranty e support.nzxt.com para obter informações sobre a cobertura da garantia e assistência.
> - nzxt.com/warranty support.nzxt.com.Подробную информацию об условиях гарантийного обслуживания см. на веб сайте и
> 제품
nzxt.com/warranty support.nzxt.com .보증 범위와 서비스 정보를 확인하시려면 또는 방문해 주시기 바랍니다
> 保証範囲およびサービスに関する情報については、support.nzxt.com nzxt.com/warranty にアさい。
> nzxt.com/warranty support.nzxt.com 访 了解保修范围和服务的信息。
> nzxt.com/warranty support.nzxt.com 請訪問 了解產品保固範圍和更多服務訊息。
NZXT SUPPORT
NZXT GLOBAL WARRANTY POLICY
This NZXT Global Warranty Policy governs the sale of products by NZXT to you.
II. WHO IS PROT ECTED
The Warranty covers only NZXT products purchased by the original consumer.
Any replacement product will be covered under warranty for the remainder of the warranty period or thirty days,
whichever is longer. Proof of purchase is required for warranty service.
I. WARRA NTY LEN GTH
New NZXT Product
Warranty Length for Parts
Computer Cases
2 Years
Temperature Meters
2 Years
Fans
2 Years
Lighting
2 Years
Accessories
2 Years
Kraken M/120
3 Years
Headset/Headphone
2 Years
Headset/Headphone Storage
2 Years
Mixer
2 Years
Motherboards
3 Years
Gold Power Supply
10 Years
Kraken X/Z Coolers
6 Years
Mini ITX Case with PSU, AIO, and Riser Card
3-year warranty on case, riser card, and AIO.
10-year warranty on PSU.
Refurbished NZXT Product
Warranty Length for Parts
All NZXT Certified Refurbished Products
1 Years
III. WHAT IS AND IS NOT COVERED
Please note that our warranty is not an unconditional guarantee. If the product, in NZXT's reasonable opinion,
malfunctions within the warranty period, NZXT will provide you at its sole discretion with a repaired or
replacement product, either new or refurbished, with a similar function that is equal or greater in value depending
on supply. Our warranty does not cover the following:
any product or serial number/warranty sticker modification applied without permission from NZXT;
any damage that is not a manufacturing defect;
damage, deterioration or malfunction resulting from: accident, abuse, misuse, neglect, fire, water, lightning, or other acts of
nature, unauthorized product modification or failure to follow instructions included with the product;
improper installation, unauthorized alterations or modifications, or repair or attempted repair by anyone not authorized by NZXT;
shipping or transport damage (claims must be made with the carrier);
normal wear and tear.
NZXT does not warrant that this product will meet your requirements. It is your responsibility to determine the
suitability of this product for your purpose. For NZXT Store orders, we cover two way return shipping for all
exchanges and returns. For all other authorized dealers, NZXT Support does not cover return shipping and only
covers one way shipping from NZXT back to the end user for exchanges. Two way expedited shipping is provided for
all PSUs covered under the Less Than Three program, indiscriminate of purchase location, provided the location is
an approved NZXT reseller.
IV. EXCLUSION OF DAMAGES (DISCLAIMER)
NZXT's sole obligation and liability under this warranty is limited to the repair or replacement of a defective
product with either a new or refurbished product with a similar function that is equal or greater in value at our
option. NZXT shall not, in any event, be liable for any incidental or consequential damage, including but not limited
to damages resulting from interruption of service and loss of data, business, or for liability in tort relating to this
product or resulting from its use or possession.
Note: Always use washers to prevent damage.
Nota: Utiliza siempre arandelas para evitar daños.
Remarque: Utilisez toujours des rondelles pour éviter d'endommager le matériel.
Hinweis: Verwenden Sie stets Unterlegscheiben, um Schäden zu vermeiden.
Nota: utilizzare sempre le rondelle per evitare danni.
Nota: Sempre use as arruelas para evitar danos.
Примечание Всегда используйте шайбы чтобы повреждения. , предотвратить .
참고
: 항시 와셔를 사용해 손상을 방지하시기 바랍니다 .
損傷を防ぐために、必ずャーを使ださい
始终使用垫圈以损坏。
備註請務必使用墊圈以止損壞。
For mounting in which the radiator fits directly onto the case, please install the fan(s) first using the 30mm fan screws.
Use the 5mm case screws and washers to mount the radiator.
Para un montaje en el que el radiador se coloca directamente en la caja, instala los ventiladores en primer lugar
utilizando los tornillos de ventilador de 30mm. Utiliza los tornillos de 5mm y las arandelas para montar el radiador.
Dans le cas où le radiateur se fixe directement sur le boîtier, utilisez d'abord les vis de 30mm destinées à fixer le(s)
ventilateur(s). Utilisez ensuite les vis 5mm du boîtier et les rondelles pour monter le radiateur.
Falls Sie den Kühler direkt am Gehäuse montieren möchten, befestigen Sie bitte zunächst den/die Lüfter mithilfe der
30-mm-Lüfterschrauben. Montieren Sie dann den Kühler mithilfe der 5-mm-Gehäuseschrauben.
Per il montaggio che prevede l'inserimento diretto del radiatore nel case, installare le ventole per prime utilizzando le viti
della ventola da 30 mm. Utilizzare le viti da 5 mm del case e le rondelle per montare il radiatore.
Para montagens nas quais o radiador se encaixa diretamente no gabinete, instale as ventoinhas primeiro, utilizando parafusos de
ventoinha de 30 mm. Use os parafusos de gabinete de 5mm e as arruelas para montar o radiador.
Для установки, при которой радиатор крепится непосредственно на корпус, сначала установите вентилятор(-ы), используя
30- миллиметровые винты для вентилятора. Используйте миллиметровые винты и шайбы корпуса чтобы установить радиатор 5- от , .
라디에이터를
케이스에 바로 장착하려는 경우 30mm 나사를 사용하여 팬을 먼저 설치하시기 바랍니다. 5mm 케이스 나사와 와셔를
사용하여 라디에이터를 설치합니다 .
ジエータをケースに直接取付ける場合は、30mm ネジを使用にフエータに付けま次に 5mm ケー
ーを使用て、ジエータをケースに取付けま
将散热器直接安装到机箱中请先使用 扇螺丝安装扇。使用 机箱螺丝和垫圈安装散热器。 30mm 5mm
若散熱排可直接安裝在機殼上請先使用 扇螺絲來安裝扇。使用 的機殼螺絲和墊圈安裝散熱排。 30 mm 5 mm
DIRECT M O U N T I N G
For mounting in which the fan(s) fit between the radiator and chassis, please use the 30mm fan screws and washers
for mounting.
Para un montaje en el que los ventiladores se colocan entre el radiador y el chasis, utiliza los tornillos de ventilador de
30mm y las arandelas para el montaje.
Dans le cas où le(s) ventilateur(s) se fixe(nt) entre le radiateur et le châssis, utilisez les vis de 30 mm ainsi que les
rondelles pour le montage.
Falls Sie den/die Lüfter zwischen Kühler und Gehäuse montieren möchten, verwenden Sie bitte die 30-mm-
Lüfterschrauben und Unterlegscheiben.
Per il montaggio con le ventole inserite tra il radiatore e il case, utilizzare le viti della ventola da 30 mm e le rondelle.
Para montagens nas quais os ventiladores se ajustam entre o radiador e o chassi, use os parafusos de ventoinha de 30 mm e as
anilhas para montagem.
Для ) установки, при которой вентилятор(-ы располагается между радиатором и корпусом , используйте миллиметровые винты 30- для
вентилятора и шайбы .
라디에이터와
30mm 섀시 사이에 팬을 장착하려는 경우 나사와 와셔를 사용하여 팬을 장착하시기 바랍니다.
ファンをラジエータとシャーシの間に取り付ける場合は、30mm ファンネジとワッシャーを使用してラジエータとファンをケースに
取り付けてください。
扇安装在散热器和机箱之间,请使用 扇螺丝和垫圈行安装。 30mm
扇可安裝在散熱排與機殼之間,請使用 扇螺絲和墊圈行安裝。 30 mm
INDIRECT M O U N T I N G
K
L
A
L
J
M
J
L
M
A
M O U N T I N G T H E R A D I ATO R A N D F A N
MONTAR EL RADIADOR Y LOS VENTILADORES
MONTER LE RADIATEUR ET LES VENTILATEURS
KÜHLKÖRPER UND LÜFTER MONTIEREN
MONTAGGIO DEL RADIATORE E DELLE VENTOLE
MONTAR O RADIADOR E AS VENTOINHAS
МОНТАЖ РАДИАТОРА ВЕНТИЛЯТОРОВ И
라디에이터 고정
エターおよびフの取付け
安装水排和
安裝水冷排及
Connect the 3-pin pump power cable of the pump embedded in the radiator to the 4-pin CPU_OPT, PUMP or AIO_PUMP
connectors on the motherboard. We suggest to set it to full speed in the BIOS.
Conecta el cable de alimentación de 3 patillas de la bomba incorporada en el radiador a los conectores de 4 patillas
CPU_OPT, PUMP o AIO_PUMP de la placa base. Sugerimos establecerlo a máxima velocidad en la BIOS.
Raccordez le ble d'alimentation à 3broches de la pompe intégrée au radiateur aux connecteurs PUMP, AIO_PUMP ou
CPU_OPT à 4broches de la carte mère. Nous vous suggérons de le faire fonctionner à pleine vitesse dans le BIOS.
Schließen Sie das 3-polige Stromkabel der Pumpe, das in den Kühler integriert ist, an die 4-poligen CPU_OPT-, PUMP-
oder AIO_PUMP-Anschlüsse am Mainboard an. Wir empfehlen, die BIOS-Einstellung auf die volle Geschwindigkeit zu
setzen.
Collegare il cavo di alimentazione a 3 pin della pompa integrata nel radiatore ai connettori a 4-pin CPU_OPT, PUMP o
AIO_PUMP sulla scheda madre. Si consiglia di utilizzare l'impostazione Full Speed nel BIOS.
Conecte o cabo de alimentação da bomba de 3 pinos incorporado no radiador aos conectores CPU_OPT de 4 pinos, BOMBA ou
AIO_PUMP na placa-mãe. Sugerimos defini-lo com velocidade total na BIOS.
Подключите
3- 4- CPU_OPT, PUMP контактный кабель питания насоса, встроенного в радиатор, к контактному разъему или
AIO_PUMP
на материнской плате Мы рекомендуем установить для него максимальную скорость в . BIOS.
라디에이터에 내장된 펌프의 펌프 전원 케이블을 마더보드에 있는 3 4 CPU_OPT, PUMP AIO_PUMP 또는 커넥터에 연결합니다.
BIOS
에서 속도를 최대로 설정하는 것을 추천합니다 .
ジエータに組み込まてい 3 ンのポンプ電源ケーブルを、マザボードの 4 CPU_OPTPUMP AIO_PUMP タに
ますBIOS で回転数を最高に設定すをお勧めます
将散热器内置泵的 泵电源线接到主板上的 接器。我们建议在 中将其设置为全 3 4 CPU_OPT PUMP AIO_PUMP BIOS
將散熱排內嵌泵浦的 腳泵浦源線接至主機板上的 。建議在 中設定為全 3 4 CPU_OPT PUMP AIO_PUMP BIOS
Connect the 4-pin power cable of the fan to the 4-pin CPU_FAN connector on the motherboard.
Conecta el cable de alimentación de 4 patillas del ventilador al conector de 4 patillas CPU_FAN de la placa base.
Raccordez le câble d'alimentation à 4broches du ventilateur au connecteur CPU_FAN à 4broches de la carte mère.
Schließen Sie das 4-polige Stromkabel des Lüfters an den 4-poligen CPU_FAN-Anschluss am Mainboard an.
Collegare il cavo di alimentazione a 4 pin della ventola al connettore a 4 pin CPU_FAN della scheda madre.
Conecte o cabo de alimentação de 4 pinos da ventoinha ao conector CPU_FAN de 4 pinos na placa-mãe.
Подключите
4- 4- CPU_FAN .контактный кабель питания вентилятора к контактному разъему на материнской плате
팬의 전원 케이블을 마더보드에 있는 커넥터에 연결합니다 4 4 CPU_FAN .
ンの 4 ン電源ケーブルをマザーボードの 4 CPU_FAN ネク接続
扇的 电源线接到主板上的 接器。 4 4 CPU_FAN
扇的 源線接至主機板上的 4 4 CPU_FAN
P O W E R I N G T H E P U M P A N D FA N
PROPORCIONAR ENERGÍA A LOS VENTILADORES
ALIMENTER LES VENTILATEURS
LÜFTER VORBEREITEN
ALIMENTARE LE VENTOLE
ALIMENTAR AS VENTOINHAS
ПОДКЛЮЧИТЕ ПИТАНИЕ ВЕНТИЛЯТОРАМ К
전원 공급
ンへの電源供給
扇供电
扇供
FAN POWER CA B L E
PUMP POWER CABLE
C O N N E C T I N G A D D I T I O N A L L E D S
CÓMO CONECTAR LUCES LED ADICIONALES (ARGB 5 V)
BRANCHEMENT DES LED SUPPLÉMENTAIRES (RVBA 5 V)
WEITERE LEDS ANSCHLIESSEN (5 V ARGB)
COLLEGAMENTO DI LED AGGIUNTIVI (ARGB 5V)
LIGAR LEDS ADICIONAIS (ARGB 5V)
ПОДКЛЮЧЕНИЕ ДОПОЛНИТЕЛЬНЫХ СВЕТОДИОДОВ (5 В А RGB)
추가 연결하기 LED (5V ARGB)
追加された の接続LED (5V ARGB)
接其他 LED (5V ARGB)
接其他 LED 5V ARGB
Use the included "NZXT RGB (Female) to 5V ARGB (Male) adapter" and connect the NZXT RGB (Female) end to the NZXT
RGB Connector from the water block.
Usa el adaptador de NZXT RGB (hembra) a ARGB 5 V (macho) incluido para conectar el extremo del NZXT RGB (hembra) al
conector NZXT RGB desde el bloque de agua.
Utilisez l’« adaptateur NZXT RVB (femelle) vers RVBA 5 V (mâle) » fourni et branchez l’extrémiNZXT RVB (femelle) au
connecteur NZXT RVB de léchangeur à eau.
Schließ das Ende des NZXT RGB-Kabels (Buchse) mithilfe des mitgelieferten NZXT RGB (Buchse) auf 5V ARGB (Stecker)
Adapters an das NZXT RGB-Kabel vom Kühlblock an.
Usa “ladattatore RGB NZXT (femmina) - ARGB 5V (maschio)" incluso e collega il terminale RGB NZXT (femmina) al
connettore RGB NZXT dal blocco dellacqua.
Utilize o “adaptador NZXT RGB (fêmea) para ARGB 5V (macho)” incluído e ligue a extremidade do NZXT RGB (fêmea) ao conector
NZXT RGB do bloco de água.
Используйте
) прилагаемый «Адаптер 5 В ARGB (гнездо) - NZXT RGB (штекер и подключите конец NZXT RGB (гнездо к
разъему от водоблока NZXT RGB .
포함된 "NZXT RGB( ) to 5V ARGB( ) " NZXT RGB( ) NZXT RGB . 어댑터 사용하여 단부를 워터 블록에서 커넥터에 연결합니다
付属のNZXT RGB ( ) - 5V ARGB ( ) プターを使用し、ターブロNZXT RGB () の端をNZXT RGBコネ
ーに接続しま
使用随附的“恩杰 插座插头)适配器”并将恩杰 插座接至水冷头上的恩杰 插头)连接器。 RGB 5V ARGB RGB RGB
使用隨附的「 頭)頭)適配器」從水箱將NZXT RGB 5V ARGB NZXT RGB NZXT RGB 頭)接至 接器。
STEP 1
Connect the 5V ARGB (Female) end to an available 5V 3-pin ARGB header on your motherboard.
Conecta el extremo del ARGB 5 V (hembra) a un cabezal ARGB 5 V de 3 pines que tengas disponible en la placa base.
Raccordez lextrémiRVBA 5 V (femelle) à une embase RVBA 5 V 3 broches disponible sur votre carte mère.
Schließ das 5V ARGB-Kabel (Buchse) an einen freien 5V 3-Pin ARGB-Anschluss auf deinem Motherboard an.
Collega il terminale ARGB 5V a un connettore 5V a 3 pin disponibile sulla scheda madre.
Ligue a extremidade ARGB 5V (fêmea) a um conector disponível ARGB 5V de 3 pinos na sua motherboard.
Подключите
5 ARGB ( ) 3- 5 ARGB .конец В гнездо к имеющемуся контактному разъему В на материнской плате
5V ARGB(
단부를 마더보드에 있는 사용 가능한 헤더에 연결합니다) 5V 3 ARGB .
5V ARGB () 端子をマザーボード上の使用可能な5V 3 ARGBヘッダーに接続ます
插座接至您主板上未使用的 接头。 5V ARGB 5V 3 ARGB
頭)接到主機板上的可用 5V ARGB 5V 3 ARGB
P O W E R I N G T H E L E D S
CÓMO ALIMENTAR LAS LUCES LED (ARGB 5 V)
ALIMENTATION DES LED (RVBA 5 V)
LEDS ANSCHLIESSEN (5V ARGB)
ALIMENTAZIONE LED (5V ARGB)
ALIMENTAÇÃO DOS LEDS (ARGB 5V)
ПОДКЛЮЧЕНИЕ СВЕТОДИОДОВ (5 В А RGB)
LED 켜기(5V ARGB)
LEDへの電力供給 (5V ARGB)
供电 LED (5V ARGB)
LED (5V ARGB)
Use the included "5V ARGB (Female) to NZXT RGB (Male) adapter" and connect the NZXT RGB (Male) end to the NZXT RGB
(Female) Connector from the water block.
Usa el adaptador de ARGB 5 V (hembra) a NZXT RGB (macho) incluido para conectar el extremo del NZXT RGB (macho) al
conector NZXT RGB (hembra) desde el bloque de agua.
Utilisez l« adaptateur RVBA 5 V (femelle) vers NZXT RVB (mâle) » fourni et branchez lextmité NZXT RVB (mâle) au
connecteur NZXT RVB (femelle) de léchangeur à eau.
Verbinde das Ende des NZXT RGB-Kabels (Stecker) mithilfe des mitgelieferten „5V ARGB (Buchse) auf NZXT RGB
(Stecker) Adapters“ mit dem NZXT RGB-Kabel (Buchse) vom Kühlblock.
Usa ladattatore ARGB 5V (femmina) - RGB NZXT (maschio)" incluso e collega il terminale RGB NZXT (maschio) al
connettore RGB NZXT (femmina) dal blocco dellacqua.
Utilize o “adaptador ARGB 5V (fêmea) para NZXR RGB (macho)” incluído e ligue a extremidade do NZXT RGB (macho) ao conector
NZXT RGB (fêmea) do bloco de água.
Используйте
прилагаемый «Адаптер 5 В ARGB (гнездо) - NZXT RGB (штекер и подключите конец NZXT RGB (штекер) к
разъему гнездо от водоблока NZXT RGB ( ) .
포함된 어댑터 "5V ARGB( ) to NZXT RGB( ) " 사용하여 단부를 워터 블록에서 커넥터에 연결합니다 NZXT RGB( ) NZXT RGB( ) .
付属の5V ARGB () - NZXT RGB () ダプター」使用ターブロNZXT RGB () の端子をNZXT RGB ()
コネターに接続ます
使用随附的“ 插座至恩杰 插头)适配器”并将恩杰 插头接至水冷头上的恩杰 插座)连接器。5V ARGB RGB RGB RGB
使用隨附的「 頭)頭)適配器」從水箱將5V ARGB NZXT RGB NZXT RGB NZXT RGB頭)接至 頭)連接器。
STEP 1
STEP 2
V. LIMITATIONS OF IMPLIED WARRA NTIES
There are no other warranties, expressed or implied, including but not limited to those of merchantability or
fitness for a particular purpose. The duration of implied warranties is limited to the warranty length specified in
Paragraph I.
VI. TO OBTAIN TECHNIC AL SU PPORT
If you have already referenced your product owner's manual and still need help, you may contact us by phone at +1
(800) 228-9395, by email at , or visit the NZXT Support site at service@nzxt.com nzxt.com/customer-support.
VII. HOW TO OBTAIN A WARRANTY SERVICE FROM NZXT
To receive a warranty service for your product when purchased directly from NZXT, you must submit a request via
the NZXT Support site outlining the problem. If a technician deems the product defective or requiring testing, you
will be required to provide a copy of your proof of purchase, which will enable you to submit a Return Merchandise
Authorization RMA” request.
Once approved, you`ll receive an RMA number, upon which you will be asked to ship the defective item back to NZXT
with the RMA number clearly marked or labelled on the package. NZXT recommends that appropriate measures are
taken to safeguard the product from damage during shipping.
VIII. APPLICABLE L AW AND ADDITIO NAL LEG AL RIGH TS FOR CONSUME RS
This warranty gives you specific legal rights. These conditions are governed and construed in accordance with
the laws of California (with exception of its conflict of law provisions), and the application of the United Nations
Convention of Contracts for the International Sale of Goods is expressly excluded. The non-exclusive jurisdiction
of the courts of California is agreed, which means that you may bring a claim to enforce your consumer protection
rights in connection with this Global Warranty in the country which you have your habitual residence where you
may have additional rights. These rights may vary.
For original consumers who are covered by consumer protection laws or regulations in their country, state, or
province of purchase or, if different, their country, state, or province of residence, the benefits conferred by this
warranty are in addition to all rights and remedies conveyed by such consumer protection laws and regulations. To
the extent that liability under such consumer laws can be limited, NZXT’s liability is limited, and its sole option, to
repair or replacement, either new or refurbished, with a similar function that is equal or greater in value depending
on supply.
In the United Kingdom:
For NZXT products sold to customers in the UK, during the expected lifespan of your product your legal rights entitle you to
the following:
> Up to 30 days: if your goods are faulty, then you can get an immediate refund.
> Up to six months: if your goods can't be repaired or replaced, then you're entitled to a full refund, in most cases.
> Up to six years: if your goods do not last a reasonable length of time you may be entitled to some money back.
If the person seeking to rely on the guarantee is not the original consumer, the NZXT Warranty will cover the product in relation
to that person provided that they are able to provide proof of the transfer of the benefit of the guarantee from the original
consumer.
The implied warranties under the Consumer Rights Act 2015 says that your goods must be as described, fit for all purposes for
which such goods are usually supplied, and of satisfactory quality.
In the EU:
If you are a consumer and have your habitual residence in the EU, you additionally enjoy the protection afforded to you by
provisions that cannot be derogated from by agreement by virtue of the law where you have your habitual residence.
IX. WARRANT Y SERVI CE FROM RESELLERS
In the event that a warranty service is sought, you must provide proof of purchase (store receipt or invoice) in order
to receive the service and if deemed necessary, repair or replacement product.
In North America:
Within the first 60 days after purchase, please return your product (or for power supplies installed within our
enclosures, just the failed power supply) to your dealer or reseller for a replacement. If the product is still within
warranty and you can no longer return it to your dealer, please contact NZXT Customer Support (see above) for
assistance and instructions. NZXT will not accept returns without prior approval and an RMA number.
In Europe:
Within the first year after purchase, please return your product (or for power supplies installed within our
enclosures, just the failed power supply) to your dealer or reseller for a replacement. If the product is still within
warranty and you can no longer return it to your dealer, please contact NZXT Customer Support (see above) for
assistance and instructions. NZXT will not accept returns without prior approval.
In Australasia:
Within the first two years after purchase, please return your product (or for power supplies installed within our
enclosures, just the failed power supply) to your dealer or reseller for a replacement. If the product is still within
warranty and you can no longer return it to your dealer, please contact NZXT Customer Support (see above) for
assistance and instructions. NZXT will not accept returns without prior approval.
The cost of shipping will be borne at the first instance by you; however, if the purchased item is defective, NZXT
will reimburse reasonable postage or transportation of costs.
Outside North America, Europe, and Australasia:
If your product needs to be returned within the warranty period, please contact the retailer or distributor from
whom you purchased the product.
X. NZXT.CO M STORE RETURNS/EXCHANGE POLICY
Eligible products under this NZXT Warranty qualify for a full refund or exchange only with an authorized RMA
number and if the item is returned to the NZXT.com store inventory within 30 days of purchase. Returns are
not allowed beyond 30 days of the purchase date. The NZXT.com Store reserves the right to deny any return or
exchange. Refunds will be credited to the original method of payment. To initiate a return, simply submit a request
via NZXT support site.
D O W N LO A D I N G N Z X T C A M
DESCARGA DE CAM DE NZXT
TÉLÉCHARGEMENT DE NZXT CAM
HERUNTERLADEN VON NZXT CAM
DOWNLOAD DI NZXT CAM
DOWNLOAD DO NZXT CAM
ЗАГРУЗКА ПРОГРАММЫ NZXT CAM
NZXT CAM 다운로드
NZXT CAMのダウンロー
NZXT CAM
NZXT CAM
After setting up the Kraken, turn on your PC and proceed to download and install NZXT CAM software to enable Kraken
controls: nzxt.com/camapp/
Tras configurar el Kraken, enciende tu ordenador y descarga e instala el software NZXT CAM para activar los controles
de Kraken: nzxt.com/camapp/
Après l’installation du Kraken, allumez votre PC et téléchargez puis installez le logiciel NZXT CAM pour activer le
monitoring et le contrôle du kit de refroidissement : nzxt.com/camapp/
Nach Einbau des Kraken den PC hochfahren und NZXT CAM-Software herunterladen und installieren, um die Kraken-
Steuerung zu aktivieren: nzxt.com/camapp/
Dopo il montaggio del sistema Kraken, accendere il PC, scaricare il software NZXT CAM da nzxt.com/camapp/ e
installarlo per utilizzare le funzioni Kraken
Depois de configurar o Kraken, ligue o PC e faça o download e instalação do software NZXT CAM para ativar os
controles do Kraken: nzxt.com/camapp/
После установки СВО Kraken, вк лючите ПК, загрузите и установите программное обеспечение
NZXT CAM
, чтобы получить
доступ управлению системой к Kraken:
nzxt.com/camapp/
Kraken PC Kraken NZXT CAM 소프 nzxt.com/camapp/ 운로
Krakenの設定後、PCの電源をオンにし、NZXT CAMェアのダインールを実行しKrakenロールを有効
ます: nzxt.com/camapp/
以启用 Kraken PC NZXT CAM Kraken nzxt.com/camapp/
並下和安裝 Kraken PC CAM Kraken 控制nzxt.com/camapp/
P O W E R I N G T H E L E D S
CÓMO ALIMENTAR LAS LUCES LED (NZXT RGB)
ALIMENTATION DES LED (NZXT RVB)
LEDS ANSCHLIESSEN (NZXT RGB)
ALIMENTAZIONE LED (NZXT RGB)
ALIMENTAÇÃO DOS LEDS (NZXT RGB)
ПОДКЛЮЧЕНИЕ СВЕТОДИОДОВ (NZXT RGB)
LED 켜기(NZXT RGB)
LEDへの電力供給 (NZXT RGB)
供电 恩杰 LED ( RGB)
LED (NZXT RGB)
Connect the NZXT RGB Connector from the water block to a NZXT RGB controller header.
Conecta el conector NZXT RGB del bloque de agua a un cabezal de controlador NZXT RGB.
Branchez le connecteur NZXT RVB de léchangeur à eau sur une embase de contrôleur NZXT RVB.
Schließ das NZXT RGB-Anschlusskabel vom Kühlblock an den Anschluss eines NZXT RGB-Controllers an.
Collega il connettore RGB NZXT dal blocco dellacqua a un connettore controller RGB NZXT.
Ligue o conector NZXT RGB do bloco de água a um conector do controlador NZXT RGB.
Подключите
NZXT RGB NZXT RGB.разъем от водоблока к разъему контроллера
워터 블록에서 커넥터를 NZXT RGB NZXT RGB .컨트롤러 헤더에 연결합니다
NZXT RGB
ータNZXT RGBローラーヘダーに接続しま
将水冷头上的恩杰 接器接至恩杰 控制器接头。 RGB RGB
從水箱將 接器接至 NZXT RGB NZXT RGB 控制器接
C O N N E C T I N G A D D I T I O N A L L E D S
CÓMO CONECTAR LUCES LED ADICIONALES (NZXT RGB)
BRANCHEMENT DES LED SUPPLÉMENTAIRES (NZXT RVB)
WEITERE LEDS ANSCHLIESSEN (NZXT RGB)
COLLEGAMENTO DI LED AGGIUNTIVI (RGB NZXT)
LIGAR LEDS ADICIONAIS (NZXT RGB)
ПОДКЛЮЧЕНИЕ ДОПОЛНИТЕЛЬНЫХ СВЕТОДИОДОВ (NZXT RGB)
추가 연결하기 LED (NZXT RGB)
追加された の接続LED (NZXT RGB)
接其他 恩杰 LED ( RGB)
接其他 LED (NZXT RGB)
Connect additional NZXT RGB lighting accessories to the NZXT RGB Connector (Male) from the water block.
Conecta accesorios de iluminación NZXT RGB adicionales al conector NZXT RGB (macho) desde el bloque de agua.
Branchez les accessoires lumineux NZXT RVB supplémentaires sur le connecteur NZXT RVB (mâle) de léchangeur à eau.
Schließ zusätzliches NZXT RGB-Beleuchtungszubehör an den NZXT RGB-Anschluss vom Kühlblock an.
Collega gli accessori di illuminazione aggiuntivi RGB NZXT dal blocco dellacqua al connettore RGB NZXT (maschio).
Ligue acessórios de luz NZXT RGB adicionais ao Conector NZXT RGB (macho) a partir do bloco de água.
Подключите
NZXT RGB NZXT RGB ( ) .дополнительные аксессуары для освещения к разъему штекер от водоблока
워터 블록에서 커넥터 추가 NZXT RGB ( ) NZXT RGB .라이트닝 부속품을 연결합니다
追加のNZXT RGB照明セサターNZXT RGB () 接続ます
将其他恩杰 照明接至水冷头上的恩杰 接器插头 RGB RGB
從水箱將其他 照明接至 NZXT RGB NZXT RGB 接器頭)
Note: The Kraken 120 must be the first lighting accessory in the chain. Please use the NZXT RGB Connection Cable from
your lighting accessories' box to connect to the Kraken 120.
Nota: El Kraken 120 tiene que ser el primer accesorio de iluminación de la cadena. Usa el cable de conexión NZXT RGB de
tu caja de accesorios de iluminación para conectarlos al Kraken 120.
Remarque : Le Kraken 120 doit être le premier accessoire lumineux de la chaîne. Veuillez utiliser le câble de raccordement
NZXT RVB de la boîte de vos accessoires lumineux pour procéder au branchement sur le Kraken 120.
Anmerkung: Die Kraken 120 muss die erste Beleuchtung in der Reihe sein. Schließ die Kraken 120 mit dem NZXT RGB-
Anschlusskabel aus der Verpackung deines Beleuchtungszubehörs an.
Nota: Il Kraken 120 deve essere il primo accessorio di illuminazione della catena. Usa il Cavo di collegamento RGB NZXT
per collegare la scatola degli accessori di illuminazione al Kraken 120.
Nota: O Kraken 120 deve ser o primeiro acessório de luz na cadeia. Utilize o Cabo Conector NZXT RGB da sua caixa de acessórios
de luz para ligar ao Kraken 120.
Примечание
. Kraken 120 Kraken 120, должен быть первым осветительным устройством в цепи. Для подключения к
используйте соединительный кабель из коробки с осветительными приборами NZXT RGB .
참고 크라켄 체인에서 번째 라이트닝 부속품이어야 합니다 크라켄 연결하려면 라이트닝 부속품 박스의 : 120 . 120 NZXT RGB
케이블을 사용하십시오 .
注記 は、ーンの最初の照明セサとする必要が照明アセサーのボスに付属の:Kraken 120 NZXT RGB接続ケー
ブルを使用し、Kraken 120に接続してださい。
是串联的所有设备中的第一个照明件。请使用照明件盒中的恩杰 接线 Kraken 120 RGB Kraken 120
注意是菊花中的第一個照明件。請使用照明件盒中的 接至Kraken 120 NZXT RGB Kraken 120
Note: Please refer to the motherboard or lighting manufacturer's documentation for directions.
Nota: Consulta la documentación del fabricante de la placa base o la iluminación para obtener instrucciones.
Remarque : Consultez la documentation du fabricant de la carte mère ou de léclairage pour plus dinstructions.
Anmerkung: Eine Anleitung dazu findest du in der Dokumentation des Motherboard- oder Beleuchtungsherstellers.
Nota: Consulta la documentazione del produttore della scheda madre o degli accessori di illuminazione per le istruzioni.
Nota: Consulte a documentação do fabricante da motherboard ou da iluminação para obter instruções.
Примечание
. . См документацию производителя материнской платы или освещения для получения инструкций .
참고 자세한 내용은 마더보드 또는 라이트닝 제조업체의 설명서를 참조하십시오: .
注記 手順については、マザーボーまたは照明のメーカーの資料を参照ださい。:
有关方向请参主板或照明设备制商的文档。
注意請參主機板或照明製商的文檔以了解說明。
Connect the 5V 3-pin ARGB Connector to additional 5V 3-pin ARGB lighting accessories.
Conecta el conector ARGB 5 V de 3 pines a los accesorios de iluminación adicionales ARGB 5 V de 3 pines.
Raccordez le connecteur RVBA 5 V 3 broches aux accessoires lumineux RVBA 5 V 3 broches supplémentaires.
Schließ den 5V 3-Pin ARGB-Steckverbinder an weiteres 5V 3-Pin ARGB-Beleuchtungszubehör an.
Collega il connettore ARGB 5V a 3 pin agli accessori di illuminazione aggiuntivi ARGB 5V a 3 pin.
Ligue o conector ARGB 5V de 3 pinos a acessórios de luz ARGB 5V de 3 pinos adicionais.
Подключите
3- 5 ARGB контактный разъем В к дополнительным осветительным приборам с контактным разъемом В 3- 5 ARGB.
추가 라이트닝 부속품에 커넥터를 연결합니다 5V 3 ARGB 5V 3 ARGB .
5V 3 ARGBコネを追加の5V 3 ARGB照明アセサに接続ます
接器接至其他 照明件。 5V 3 ARGB 5V 3 ARGB
STEP 2
C O N N E C T I N G A D D I T I O N A L L E D S
CÓMO CONECTAR LUCES LED ADICIONALES (ARGB 5 V)
BRANCHEMENT DES LED SUPPLÉMENTAIRES (RVBA 5 V)
WEITERE LEDS ANSCHLIESSEN (5 V ARGB)
COLLEGAMENTO DI LED AGGIUNTIVI (ARGB 5V)
LIGAR LEDS ADICIONAIS (ARGB 5V)
ПОДКЛЮЧЕНИЕ ДОПОЛНИТЕЛЬНЫХ СВЕТОДИОДОВ (5 В А RGB)
추가 연결하기 LED (5V ARGB)
追加された の接続LED (5V ARGB)
接其他 LED (5V ARGB)
接其他 LED 5V ARGB
N Z X T R G B
A
A
5 V A R G B
A
A
N
N
O
A
M


Produktspecifikationer

Varumärke: NZXT
Kategori: kylskåp
Modell: Kraken 120
Ursprungsland: Taiwan
Modell: Allt-i-ett vätskekylare
Minsta luftflöde: 18.28 cfm
Maximalt luftflöde: 73.11 cfm
Rörlängd: 400 mm
Maximalt lufttryck: 2.93 mmH2O
Fläkthastighet (max): 2000 RPM
Fläkthastighet (min): 500 RPM
Pumpström: 340 mA
Vattenblockets djup: 66 mm
Minsta lufttryck: 0.18 mmH2O
Produktens färg: Svart
Rörmaterial: Gummi
Pumpspänning: 12 V
Fläktdiameter: 120 mm
Belysningsfärg: Multi
Harmonized System (HS)-kod: 84733080
Antal fläktar: 1 fläkt/-ar
LED-belysning: Ja
Lämplig placering: Processor
Stöd för pulsbreddsmodulering (PWM): Ja
Mått, fläkt (B x D x H): 120 x 120 x 26 mm
Fan kontakt: 4-stift
Kylarbredd: 120 mm
Kylardjup: 152 mm
Kylarhöjd: 32 mm
Vattenblockets bredd: 66 mm
Vattenblockets höjd: 43 mm
Kylarmaterial: Gjuten aluminium
Vattenblocksmaterial: Koppar/plast
Pump motorvarvtalet: 4200 RPM
Fläktbrusnivå (min): 21 dB
Fläktbrusnivå (max): 36 dB
Fan spänning: 12 V
Fläktens lagerteknik: Vätskedynamiskt lager (FDB)
Fläktström: 0.32 A
Fläktens medeltid till fel (MTTF): 60000 h
Fläktens strömförbrukning: 3.84 W

Behöver du hjälp?

Om du behöver hjälp med NZXT Kraken 120 ställ en fråga nedan och andra användare kommer att svara dig