Odys Connect 8+ Bruksanvisning
Läs gratis den bruksanvisning för Odys Connect 8+ (1 sidor) i kategorin Tablett. Guiden har ansetts hjälpsam av 37 personer och har ett genomsnittsbetyg på 4.6 stjärnor baserat på 7 recensioner. Har du en fråga om Odys Connect 8+ eller vill du ställa frågor till andra användare av produkten? Ställ en fråga
Sida 1/1
ODYSCONNECT8+QUICKSTARTGUIDE
Introduction
ODYS
CONNECT8+isaMIDwithfullcolorscreen.
Althoughthisproductissafe,pleaseobservetheinformationandwarningsfromtheusermanual.
Theusermanualisinstalledatthedevicesinternalmemoryandcanbeaccessedoverthe
mainmenu.Pleaserefertotheusermanualfordetailedinstructions,conformityand
supportinformation.
‐Toopentheuser’s
manualpleasetaponthemanualiconyoucanseeatthehomescreen
toopenthefolderwherethemanualsarestoredin.
TurningOn/Off
Toturnonthedevice,pressandholdthePowerbuttonontheunituntilyou‐seethebootupscreen
thenmayrelease.Ittakeafewminutestothestartupsystem,pleasewaitbeforeyouproceed.
Toturnoffthedevice,pressandholdthePowerbuttonuntil
youseetheoption“PowerOff”,tapon
“PowerOff”andtapthenon“OK”.
Tip:Thisdevicewillsleepwiththescreenoffifitstaysinactiveforafewseconds.Youcanbrieflypress
thethePowerbuttontoturnonscreenandwakeitup.
PowerOnandOfftheDisplay
‐Shortlypressthe[Power]buttontoturnoffthedisplay.
‐Pressthe[Power]buttonagainshortlyturnthedisplayonagain.
LanguageSetting
‐ConfirmthetworequestsatthetapingatbeginningbyOK.
‐Tapon[Settings]andselect[Language&Input]
‐
Tapon[Language]andselectyourdesiredlanguageontherightside.
GettingStarted
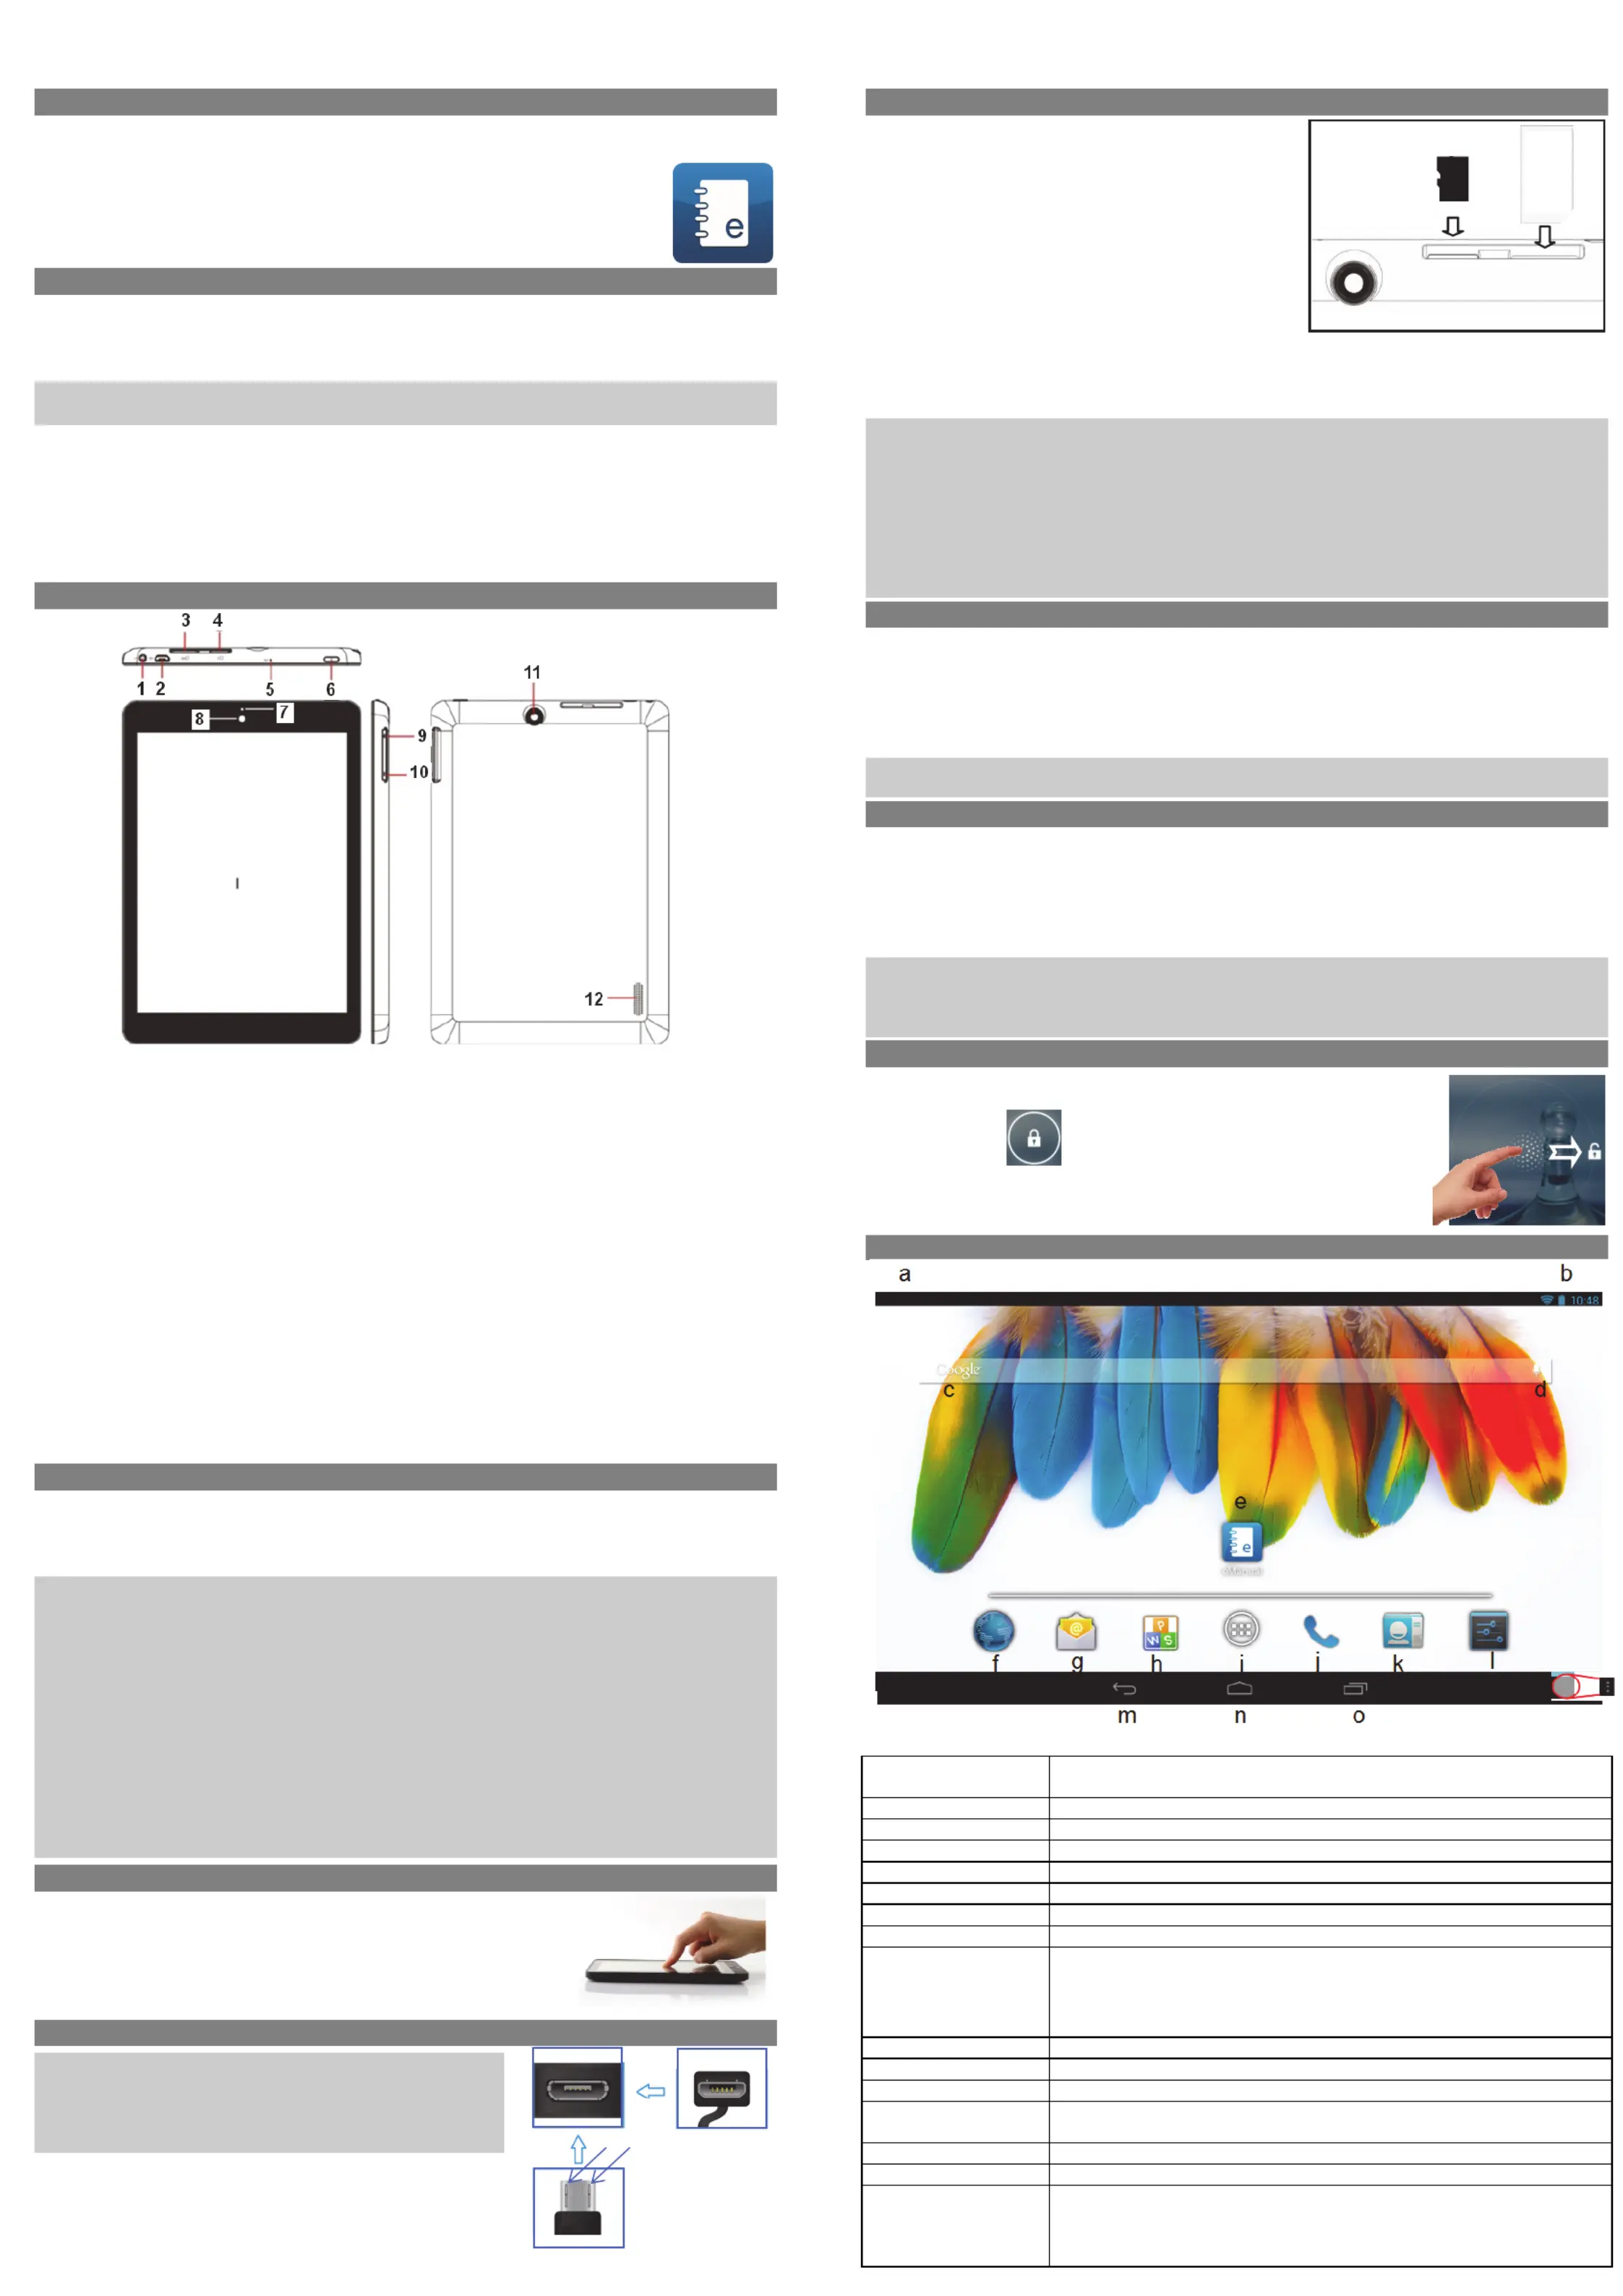
1.HeadphonejackAudiooutputconnectionforhead‐phones
Note:Speakeroutputisautomaticallydisabledwhenheadphonesare
connectedtotheplayer.
2.2.0MicroUSBHi‐
speed
Connecttodataacomputertotransfer(e.g.,music,videos,photos,files).
SupportUSBstick,Surfstick,KeyBoardandMouse.
Note:
A
OTGsupportingadaptorcableisrequired(optional)
3.SimCardSlotAccommodatesanySimCard.
4.MicroSDCardSlotAccommodatesanystandardSD/SDHCmemorycard.
5.Microphone
6.PowerButtonPressandtoturntheholdthepowerswitchonoffordevice;
Brieflypresstheswitchtoturnthescreenonoroff.
Pressandtoholdfor10Secondsresetandrestartthedeviseifitfreezes
orotherwisebehavesabnormal.
7.ChargeIndicator
8.FrontCameraFront‐facingcamerafortakingavatarpictures
9.Volumekey+Shortlypresstoincreasevolumelevel.
10.Volumekey‐Shortlypresstodecreasevolumelevel.
11.RearCameraRear‐facingcamerafortakingpictures
12.Speaker
ChargingBattery
Thedevicehas‐abuiltinrechargeablebattery.Noextrabatteryinstallationisrequired.Justcharge
thebattery.devicewhenitindicateslow
Tochargethethebattery,connectthetodeviceanystandardwalloutletviaUSBportusingthe
poweradaptor.aboutIttakes5hourstofullycharge
thebattery.
Note:
a.adviceWetouseonlythedeliveredpoweradapterwiththistablet.
b.Youcanoperatethedeviceevenwhenitisbeingcharged.Butforextendedbatterylife,itis
suggestedNOTtousethedevicewhenitischarging.
c.Itisrecommendedtothechargethebatterybeforeyouusethedeviceforfirsttime.
d.beusedFormaximumperformance,lithiumion‐batteriesneedtooften.Ifyoudon’tusethe
deviceoften,besuretorechargethebatteryatleastoncepermonth.
e.Shouldtherechargeablebatteryofthedevicedischargecompletely,connectthedevice(usingthe
adapter)tothemainpowersourceforapproximately‐510minutesbeforeattemptingnormal
operation.
f.someIncases,deviceswhichhavebeenchargedforlongerperiodsoftimemaynotbeabletobe
switchedbackandon.ShouldthisoccuryouhavetomakeaReset.Pressholdfor10Secondsto
resetandrestartthedevice.
Touchscreen
Thetouchscreenisacapacitivedisplayanddesignedforprecisionand
respondsbestwhentouchedwiththesmallestpointpossible.Usethe
flatpadofyourfingertotouchthescreen.
ConnectviaUSB
Pleasenote:Onlyuseconnectingcablewithamaximumlengthof
80cm.PleasemakesurewhenconnectingtheUSBadapteror
connectorcablesattentiontothecorrectalignmentoftheconnector
beforeinsertingitintotheUSBsocketinsertionontheunit.Incorrect
maycausedamagetoplugandsocket.
Onthesideofoftheplugthereareusuallysmallsizeshooks
thatsecurethefixation.
Payspecialattentiononofthepositionthehooks,theyshow
upwardswhenconnectingcableswhilethescreenisabove.
InstallingMemoryCard
Thisdevicecanreadfilesdirectlyfrommemorycardand
USBmemory.
Tousememoryacard,cardfindtheslotatthesideof
thedeviceandtheninsertthememorycardintotheslot
inthecorrectorientationorConnectUSBMemoryusing
theprovidedUSBadaptorcable.To
accessthefiles
storedinthethememorycard,enterExplorermodeby
tappingtheExplorericonandselectthe“SDCard”
directory.
‐CheckthattheMicroSDcardisinthecorrectposition
withthecontactpinfacingdownwardsasillustrated.You
maydamagethecardandthereader
ifMicroSDcardisnotinsertedincorrectposition.
‐PushtheMicroSDcardintothecardslotuntilitclicks.
‐ToremoveMicroSDcard,pushthecardonceagainuntilitclicks.
Note:WerecommendusingonlyMicroSDorSDHCcardsupto32GBcapacity.
‐WhenaMicroSDcardisinsertedfrominorejectedthedevice,itmaytakethefewsecondsfor
devicetoupdatethecontent.
‐PleaseavoidinsertingorejectingMicroSDcardwhenotheroperationisrunningasthismaycause
thesystemhang.
‐DoNotremovethecardifthecontentcardinsidetheisbeingplayed.Thiswillhaltthe
operationofthedeviceandmightcauseasystemhang.
‐OnlyusetheprovidedUSBadaptorcabletoattachUSBmemorydevices.
‐Pleaseuseyourfingernailstoproperlyinsertorremovethecard.
InstallingSIMcard
TouseaSIMSIMcard,findthetheandcardslotatbacksideofthedevicetheninsertthecardinto
thetheslotincorrectorientation
‐CheckthattheSIMcardisinthecorrectpositionwiththecontactpinfacingdownwardsas
illustrated.Youmaydamagethe
cardandtheposition.readerifisSIMcardnotinsertedincorrect
‐PushtheSIMcardintothecardslotuntilitclicks.
‐ToremoveSIMcard,pushtheSIMcardonceagainuntilitclicks.
Note:TheSIMCardcanonlyberecognizedifthedevicewasturnedoffwhileinserting.
MicroSIMCardsarenotsupported.
TransferringFiles
Beforereadingorplayingfiles,youneedtototransfermediafilesfromacomputerthedevice.
(1)suppliedConnectthedevicetotheacomputerwithUSBcable.
(2)Onceconnected,oneremovablediskItdrivewillshowonyourcomputer.representstheinternal
memoryofthethedeviceand
memorycardinsertedintothedevice.Nowyoucancopyfilesfromor
toasthesediskdrivejustyouwouldonyourharddrive.
3)Disconnectthethedevicefromcomputer.
Note:‐ThepreinstalledapplicationsandAndroidOSoccupyaconsiderablepartofcapacity–nearlymorethan
1GB,itisnormalhugethatyouseedifferencebetweenavailablememoryspaceandtotalcapacity.
Caution!ThedevicesupportsAdobeDRMcontents.AdobeDigitalEditions(ADE)isrequired.Pleaserefertothe
user’smanualforcloserinformation’sonhowtouseDRMprotectedfiles.
Screenlock
Thescreenautomaticallyturnsoffandafterlocksitselfasetperiodoftime.
Whenthescreenturnedoff,pressthethePowerbuttontolightupscreen.
Pushthelockicon
anddragittotheopenlockattherightsideto
unlock.
Home Screen
a.SystemHintsInformstheuserifattachedmemoryorupdatesareandavailableothersystem
statusinformation’s
b.Systemsettings
c.GoogleSearchBar
d.GoogleVoiceSearch
e.ebookeManualManualinformat
f.BrowserTaptotolaunchtheBrowservisityourfavoritewebsites.
g.E‐MailToopenthemailclient
h.KingsoftOffice
i.ApplicationsiconTaponthisicontorevealallapplicationsinstalledonyourTablet
- YoucancopytheapplicationsontotheHomescreenbypressing
andholdingontheiricons.
- YoucandeletetheapplicationfromtheHomeScreenbydragging
theiriconstotheCrossthatappearsatthetopofthescreen.
j.Telephone
k.Contacts
l.SystemSettings
m.BacksoftkeyTaptotothethethereturnpreviousscreen.Ifkeyboardisonscreen,taptoclose
thekeyboard.
n.HomesoftkeyTaptotothereturnhomescreen.
o.RunningappsShowappswhicharecurrentlyrunninginbackground.
p.MenusoftKeyTaptoviewtheoptionmenu
Note:WhenyouTaptheMenukeyfromwithinanapplication,youwillseethe
optionsforthatapplication.Butyouwillnotseethemonstartscreen.
Caution!Someappsmayshowthisiconatthetoprightcorner.
v1.0
Top
Bottom
Hooks
Screen
p
Backside
SimSlotCardMicroSDSlot
Camera
Provicer
523503423048WD
MC
UM
TS/GSM
SIM
Produktspecifikationer
| Varumärke: | Odys |
| Kategori: | Tablett |
| Modell: | Connect 8+ |
Behöver du hjälp?
Om du behöver hjälp med Odys Connect 8+ ställ en fråga nedan och andra användare kommer att svara dig
Tablett Odys Manualer

21 September 2024
21 September 2024
21 September 2024
21 September 2024
20 September 2024
Tablett Manualer
Nyaste Tablett Manualer
27 Mars 2026
27 Mars 2026
17 Mars 2026
16 Mars 2026
14 Mars 2026
12 Mars 2026
6 Mars 2026
24 Februari 2026
23 Februari 2026
22 Februari 2026