Onkyo PCA1120 Bruksanvisning
Läs gratis den bruksanvisning för Onkyo PCA1120 (2 sidor) i kategorin mottagare. Guiden har ansetts hjälpsam av 30 personer och har ett genomsnittsbetyg på 4.3 stjärnor baserat på 4 recensioner. Har du en fråga om Onkyo PCA1120 eller vill du ställa frågor till andra användare av produkten? Ställ en fråga
Sida 1/2
●1x120Wat4ohms,forcommercialandindustrialuse
●Lo-Z(8/4/2ohms)/Hi-Z(70/100V)Compatible
●Bluetooth
Ⓡ
/Front-panelinputforportableplayer
●4inputs(2Line,2Mic)and1output
●PriorityDuckerandFeedbackSuppressorforMic.
●PrioritymutingwithPTTswitch
●DynamicLoudnessandLevelerforcomfortableBGM
●PresetEQandHPFforLoudspeakers
●Setupdonelocallyfromrearpanel
●ExpandablewithoptionalpoweramplifierPCA1120
●1URackmountable(withoptionalIRK-44-3)
・InstructionManual(ThisDocument)
・SafetyInformation
・WarrantyCard
・MainUnit
・ACPowerCord
・5-pinEuroblocks(3)
InstructionManual
MONO-MIXINGAMPLIFIER
Features
PackageContents
■Step1-B:[SOUNDMODE]SoundPreferencesSwitches
AdvancedconfigurationtoolsforPaging,EQandDSP.
TIP:Thesesettingchangesareinstant.Nopowercycleisnecessary.
#6,7[BGMMode]
SelectaSoundModebasedontheintendedmoodofthelisteningenvironment.
#8-10[PresetEQforLoudspeaker]
SelecttheEQpresetforyourspeakertype(seelistbelow).
#3-5[HPF(HighPassFilter)]
UsethisfiltertolimitbassfrequenciestotheSPEAKEROUTterminals.TheDIPswitchesset
thecutofffrequency.
NOTE:Donotsetto[Off]whenusingHi-Zspeakerortheamplifiermaygointo
protectionmode.
50Hz
40Hz
60Hz
70Hz
90Hz
453
150Hz
200Hz
Off(Nofilterorusing[PresetEQforLoudspeaker])
Lively:AnUpbeatsound.GreatforaGym,orClub
Off:FlatFrequencyresponse
Natural:ABalancedSoundformostspaces
Calm:ARelaxed,Laid-Backsound.GreatforaCafe,etc.
67
Type1:ReservedforOnkyo
Type2:ReservedforOnkyo
Type3:ReservedforOnkyo
Off
8910
Type5:B16
Type4:ReservedforOnkyo
Type6:B40
Type7:J24CT
#2[AutoLeveler]
Automaticallyadjuststhelevelofeachinputsignalforconsistentvolumeacrosssources.
Off
On
2
#1[MicDucker]
WhentheduckersensesaudiofromMIC1and/orMIC2(notLINE3),thevolumeofallotherinput
sourceswillbeattenuatedby24dB.Thisisusefulforpagingoverbackgroundmusic.
Ifyouset#6[MIC2/LINE3]ofSETUPDIPswitchto[MIC2],youcanusethisfunctionwith
twomicrophones.
Off
On
1
■Step1-A:[SETUP]InitialSetupSwitches
IMPORTANT:Incorrectsettingscandamageyourequipment.
Setupcarefullytoensuresafeoperation.
IMPORTANT:DIPSwitchsettingchangeswillnotapplyuntiltheunitispower
cycledbyremovingtheACpowercordforawhile,andreinserting.
#6[MIC2/LINE3]
ChoosebetweenMIC(Mono)orLINE(Stereo)inputsetting.
#10NOTUSED
#9[SpeakerLo-Z]
IfSwitch#8issettoLo-Z,youmustadjustthisswitchaccordingtoyourspeakerspecifications.
#8[SPEAKEROUT]
SelectHi-ZorLo-Zdependingonyourspeakerspecifications.
NOTE:ItisimportanttoreadStep2:ConnectingSpeakersbeforesettingthisswitch.
IMPROPERSETUPCANRESULTINMALFUNCTIONORFIRE.
(⇒seeStep2fordetails)
NOTE:ItisimportanttoreadStep2:ConnectingSpeakersbeforesettingthisswitch.
IMPROPERSETUPCANRESULTINMALFUNCTIONORFIRE.
(⇒seeStep2fordetails)
#7[MIC2AMP]
Ifswitch#6issettoMIC2,selectbetweenOn(MicLevel)orOff(LineLevel).
Off(LineLevel)
On(MicLevel)
7
Hi-Z(70V/100V)
Lo-Z(2Ω/4Ω)
8
Lo-Z:4Ωminimum
9
Lo-Z:2Ωminimum
MIC2
LINE3
6
#5[VolumeControl]
Selectwhichtypeofoptionalexternalvolumecontroller:VolumeControl(10kΩ、B-curvetype),
orInfraredRemoteSystem.
NOTE:AutoStandbydoesnotworkwhenBluetoothisconnected.
#2[AutoStandby]
TheMCA1120automaticallygoesintothestandbystateaftertwohourswhenthereis
noaudiosignalandnooperation.
#3,4[AutoPowerOn]
WhenanaudiosignalisdetectedontheselectedinputduringStandby,thepoweristurnedon
automatically.
#1[Keylock]
LocksthefrontpanelcontrolswiththeexceptionofthePowerbuttonandMasterVolume.
Off
On
2
1
Lock
Unlock
Bluetooth/LINE1
LINE3
Off
LINE2
34
UsingaVolumeControl(10kΩ)orUnusinganExternalControl
IRcontrol
5
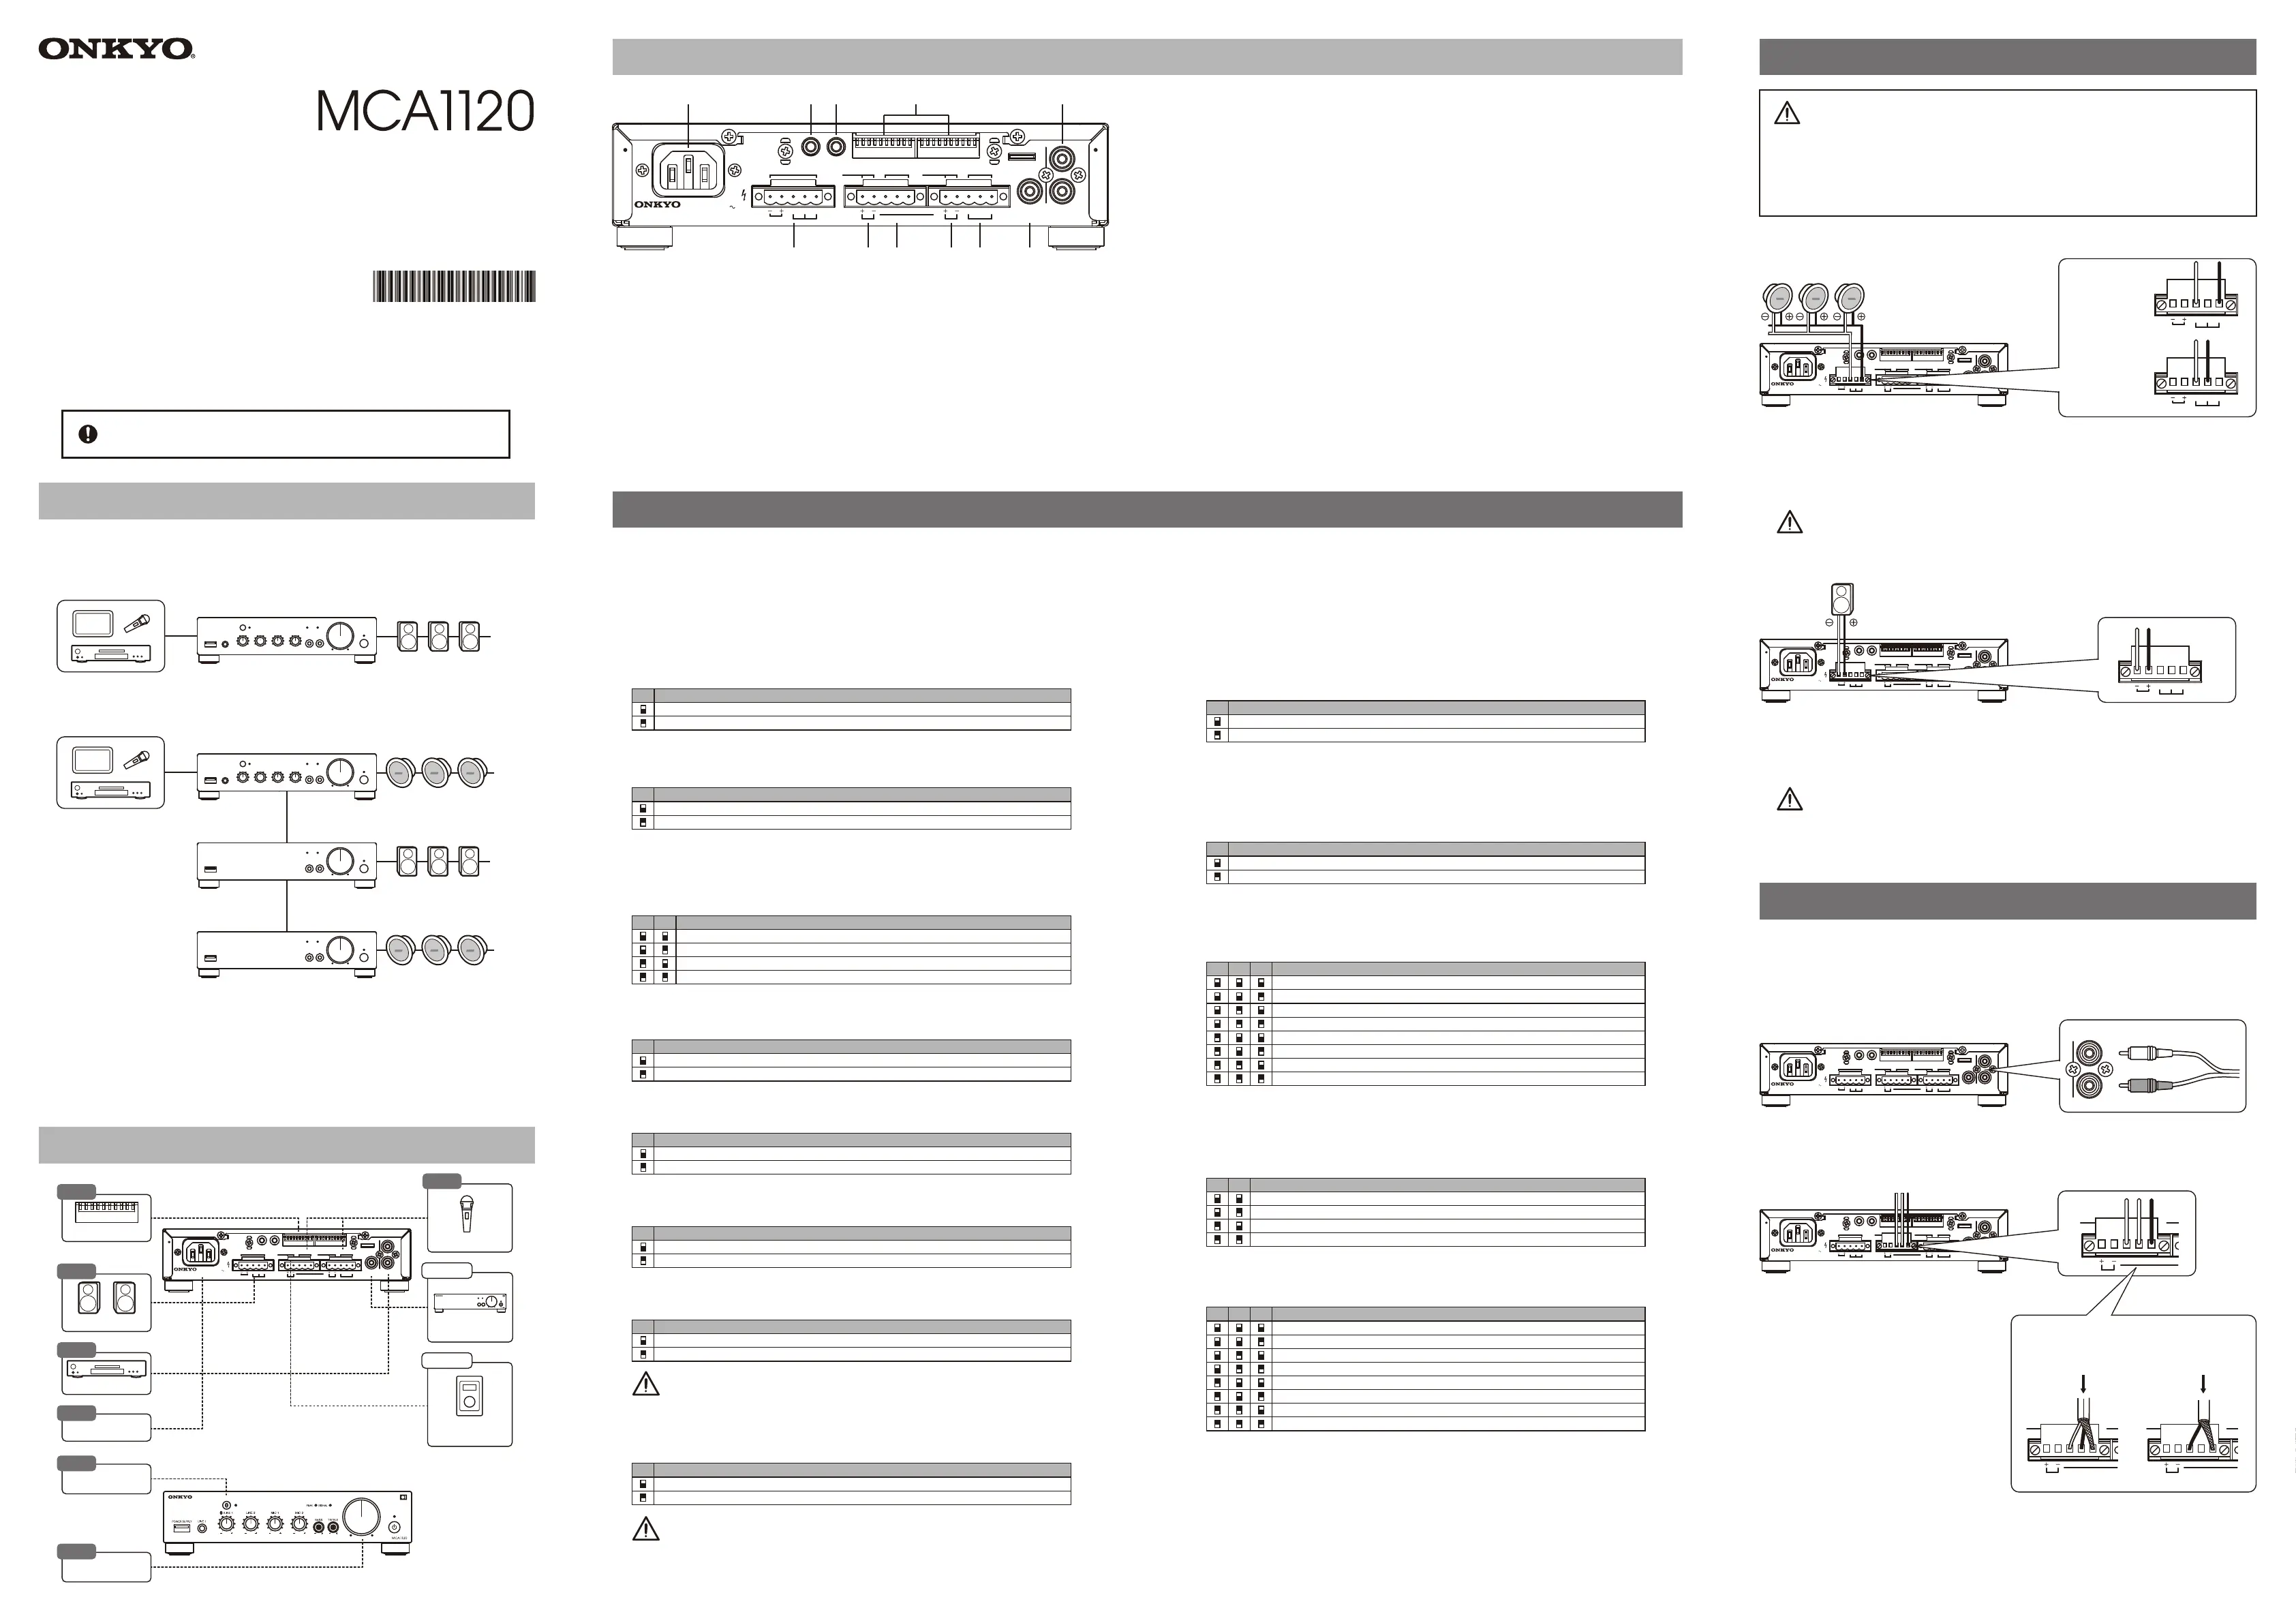
MCA1120RearPanel
①ACInlet(IECC13,100V-240V50/60Hz)(⇒seeStep5)
②SPEAKEROUTTerminals(Euroblock)
NOTE
ItisimportanttoreadStep2:ConnectingSpeakersbeforeattemptingtousethisterminal.
IMPROPERSETUPCANRESULTINMALFUNCTIONORFIRE.(⇒seeStep2)
③RemoteVolumeControllerTerminal(Euroblock)
Useforconnectingacommerciallyavailablevolumecontrol.(⇒seeOption2)
④MIC2/LINE3InputTerminals(Euroblock)
UseforconnectingeitheraMicLevelorLineLeveldevice.(⇒seeStep4)
①
②③④⑤⑥⑦
⑧⑨⑩⑪
1234567891012345678910
SPEAKER OUT
Class2
Wiring
IR INRS232
AC
INLET
REMOTE VOL
MIC 2
MANUAL MUTE
MIC 1
SET UPSOUND MODE
L
R
COM70 V
2 Ω - 8 Ω
100 V
H
RG
(
LLINE 3
)
ECMIC 2ECH
(
MONO
)
MODEL NO. MCA1120
100 -240 V
50 / 60 Hz
Input :
LINE 2PRE OUT
⑤ManualMuteTerminalforMIC1Input(Euroblock)
UseforconnectingaPush-to-TalkswitchforPriorityMutePaging.(⇒seeStep4)
⑥MIC1InputTerminals(Euroblock)
Useforconnectingawiredmicrophone.(⇒seeStep4)
Forwirelessmicrophonesystems,useMIC2/LINE3terminal.
⑦PREOUTTerminal(RCAMono)
ThisisavariablelineoutputlinkedtotheMasterVolume.
UsethisoutputtolinktoexpansionamplifierPCA1120likeinExampleB.
(⇒seeOption1forSetup)
⑧LINE2InputTerminals(RCAStereo)
UsetoconnectanexternalplayersuchasCD,MusicStreamer,etc.(⇒seeStep3)
⑨IRIN(3.5mmMini,Mono/2-pole)
Forusewithanexternalinfraredcontroller.
⑩RS232(3.5mmMini,Stereo/3-Pole)
Forusewithanexternalcontroller,orforCustomEQprogramming.
IMPORTANT:Topreventdamage,unplugthepowercordwheninserting/removing
theRS232cable.
⑪DIPSwitches
SeeStep1forinstructionsonhowtosettheDIPswitches.
Step2:ConnectingSpeakers
1.Set#8[SETUP]DIPswitch[SPEAKEROUT]to[Hi-Z].
2.Connectthe[100V]or[70V]terminalofSPEAKEROUTto
the+terminalonyourspeakers.Next,connectthe[COM]to
the‒terminalonyourspeakers.
■Hi-Z(HighImpedance)Connections
1.Set#8[SETUP]DIPSwitch[SPEAKEROUT]to[Lo-Z].
2.
Connectthe+terminalofSPEAKEROUTtothe+terminalonyourspeakers.
Next,connectthe-tothe‒terminalonyourspeakers.
■Lo-Z(LowImpedance)Connections
1234567891012345678910
SPEAKER OUT
Class2
Wiring
IR INRS232
AC
INLET
REMOTE VOL
MIC 2
MANUAL MUTE
MIC 1
SET UPSOUND MODE
L
R
COM70 V
2 Ω - 8 Ω
100 V
H
RG
(
LLINE 3
)
ECMIC 2ECH
(
MONO
)
MODEL NO. MCA1120
100 -240 V
50 / 60 Hz
Input :
LINE 2PRE OUT
1234567891012345678910
SPEAKER OUT
Class2
Wiring
IR INRS232
AC
INLET
REMOTE VOL
MIC 2
MANUAL MUTE
MIC 1
SET UPSOUND MODE
L
R
COM70 V
2 Ω - 8 Ω
100 V
H
RG
(
LLINE 3
)
ECMIC 2ECH
(
MONO
)
MODEL NO. MCA1120
100 -240 V
50 / 60 Hz
Input :
LINE 2PRE OUT
SPEAKER OUT
COM70 V
2 Ω - 8 Ω
100 V
〜〜
〜〜
■Whenconnecting
100Vline
speakers
■Whenconnecting
70Vline
speakers
SPEAKER OUT
COM70 V
2 Ω - 8 Ω
100 V
SPEAKER OUT
COM70 V
2 Ω - 8 Ω
100 V
・Seethe"frontpanel"sectionontheback.
・ConnecttheexternalplayertotheLINE2terminalswiththeRCAcable.
YoucanuseeitherLorRterminalfortheoutputofmonauralplayer.
■LINE3Connection
■LINE1Connection
1.Set#6[SETUP]DIPSwitch[MIC2/LINE3]
to[LINE3].
Ifthissettingismissing,thein-phasesignal
(melody,bassline,etc.)willnotcomeout.
2.Connecttheoutputoftheexternal
playertotheLINE3terminalwith
Euroblock.
YoucanuseeitherLorRterminalfor
theoutputofmonauralplayer.
Stereosignalsareinternallymixedintomono.
■LINE2Connection
Step3:ConnectingExternalPlayers
1234567891012345678910
SPEAKER OUT
Class2
Wiring
IR INRS232
AC
INLET
REMOTE VOL
MIC 2
MANUAL MUTE
MIC 1
SET UPSOUND MODE
L
R
COM70 V
2 Ω - 8 Ω
100 V
H
RG
(
LLINE 3
)
ECMIC 2ECH
(
MONO
)
MODEL NO. MCA1120
100 -240 V
50 / 60 Hz
Input :
LINE 2PRE OUT
RCA
L
R
LINE 2
MCA1120
Inthemainspace
MCA1120
IntheVIParea
PCA1120
Intheterracearea
PCA1120
■ExampleA
Standaloneuse
oftheMCA1120asaBackgroundMusic(BGM)andPagingsystem.
SystemConfigurationExamples
■ExampleB
ExpandingthesystemusingthePCA1120(x2shown)andadditionalspeakers.
1234567891012345678910
SPEAKER OUT
Class2
Wiring
IR INRS232
AC
INLET
REMOTE VOL
MIC 2
MANUAL MUTE
MIC 1
SETUPSOUND MODE
L
R
COM70 V
2 Ω - 8 Ω
100 V
H
RG
(
LLINE 3
)
ECMIC 2ECH
(
MONO
)
MODEL NO. MCA1120
100 -240 V
50 / 60 Hz
Input :
LINE 2PRE OUT
REMOTE VOL
MIC 2
MANUAL MUTE
MIC 1
H
RG
(
LLINE 3
)
ECMIC 2ECH
Step1:DIPSwitchSettings
■ExampleC(IMAGENOTSHOWN)
DrivingapassivesubwooferwiththePCA1120.
Lo-Zspeakers
Compositeimpedance2Ωormore
・ ・ ・
Hi-Zspeakers
Ratedtotal120Worless
Drip-proofspeaker
Hi-Z120Worless/
Lo-Z2Ωormore
♪
・DonotconnecttheLo-ZspeakerstotheHi-Zterminals.
・Whenconnectingmultiplespeakers,makesurethatthetotalimpedanceismorethan
thevalueofsetting#9[SpeakerLo-Z]ofSETUPDIPswitch.
・Donotusethehighimpedance70Vlineand100Vlineterminalsatthesametime.
・Makesurethatthetotalratedinputpoweroftheconnectedspeakersis120Worless.
■Caseof
StereoSource
From
ExternalPlayer
From
ExternalPlayer
■Caseof
MonauralSource
REMOTE VOL
MIC 2
MANUAL MUTE
MIC 1
H
RG
(
LLINE 3
)
ECMIC 2ECH
REMOTE VOL
MIC 2
MANUAL MUTE
MIC 1
H
RG
(
LLINE 3
)
ECMIC 2
E
CH
〜〜
〜〜
SN29403546A
2*9403546A
Seewebsitefordetailedconnections.
BluetoothPlayback
Step6
SetupandOperationSteps
DIPSwitches
12345678910
Step1
Speakers
Step2
ACPower
Step5
ExternalPlayer
Step3
1234567891012345678910
SPEAKER OUT
Class2
Wiring
IR INRS232
AC
INLET
REMOTE VOL
MIC 2
MANUAL MUTE
MIC 1
SET UPSOUND MODE
L
R
COM70 V
2 Ω - 8 Ω
100 V
H
RG
(
LLINE 3
)
ECMIC 2ECH
(
MONO
)
MODEL NO. MCA1120
100 -240 V
50 / 60 Hz
Input :
LINE 2PRE OUT
Option1
SpeakerExpansion
Option2
Remote
VolumeController
Microphones
Step4
AdjustingVolume
Step7
PCA1120
・ ・ ・
・ ・ ・
♪
Lo-Zspeakers
Compositeimpedance2Ωormore
・ ・ ・
ThePCA1120hasbuilt-incrossoversettingsforthisapplication.
・ConnectACpowercordinfinalstep.DonotconnectACpowercordbeforethisstep.
Itmaycauseelectricshock.
・ChecktheconnectionpinsofEuroblockandLo-Z/Hi-ZsettingsofDIPswitches
accordingtospeakerspecifications.
Ifthesearenotmatched,itmaycausemalfunctionorfire.
Paycloseattentiontospeakersetting/
connection!
Itmaycausemalfunctionorfire.
Thisproductisintendedforcommercial/professionaluse.
Itshouldbeinstalledonlybyaspecially-trainedtechnician.
Inthisconfigurationwithmultipleroomsandspeakertypes,
theMCA1120controlstheoverallvolumeofthesystem,whileeach
PCA1120volumelevelcanbeadjustedforitsroom.
*
Produktspecifikationer
| Varumärke: | Onkyo |
| Kategori: | mottagare |
| Modell: | PCA1120 |
Behöver du hjälp?
Om du behöver hjälp med Onkyo PCA1120 ställ en fråga nedan och andra användare kommer att svara dig
mottagare Onkyo Manualer

15 Mars 2026
1 Februari 2026
28 Januari 2026
24 Januari 2026
8 Oktober 2025
8 Oktober 2025
8 Oktober 2025
7 Oktober 2025
7 Oktober 2025
6 Oktober 2025
mottagare Manualer
Nyaste mottagare Manualer
2 April 2026
2 April 2026
1 April 2026
1 April 2026
31 Mars 2026
31 Mars 2026
29 Mars 2026
29 Mars 2026
28 Mars 2026
28 Mars 2026