OSD Audio NERO-WRSKII Bruksanvisning
OSD Audio Nätverkskort/adapter NERO-WRSKII
Läs gratis den bruksanvisning för OSD Audio NERO-WRSKII (2 sidor) i kategorin Nätverkskort/adapter. Guiden har ansetts hjälpsam av 22 personer och har ett genomsnittsbetyg på 4.4 stjärnor baserat på 3 recensioner. Har du en fråga om OSD Audio NERO-WRSKII eller vill du ställa frågor till andra användare av produkten? Ställ en fråga
Sida 1/2
WIRELESS REAR SPEAKER KIT
1111
)SID
• OPTIMAL
~~
..
,...
----•
SPEAKER
~UDIOoESIGN
Please read this user's guide before using your
new speaker kit.
User's Guide
Package
Contents
■
Transmitter
■
Receiver
■
9V AC Adapter
■
15V AC Adapter
■
Stands (2)
■
6-foot speaker wire (2)
■
User's Guide
Features
■
5.8GHz digital wireless link provides crystal-clear
audio signals.
■
Auto
channel selection.
■
Up to 100 feet (30.5m) operation distance
between transmitter and receiver (line
of
sight).
Install
the
Transmitter
1.
Make sure your amplifier is
off.
Connect the
transmitter to your amplifier's speaker output
terminals with the provided 6-foot speaker wire,
matching polarities. Or connect your transmitter to
the amplifier's RCA output ports with RCA
cables (not included).
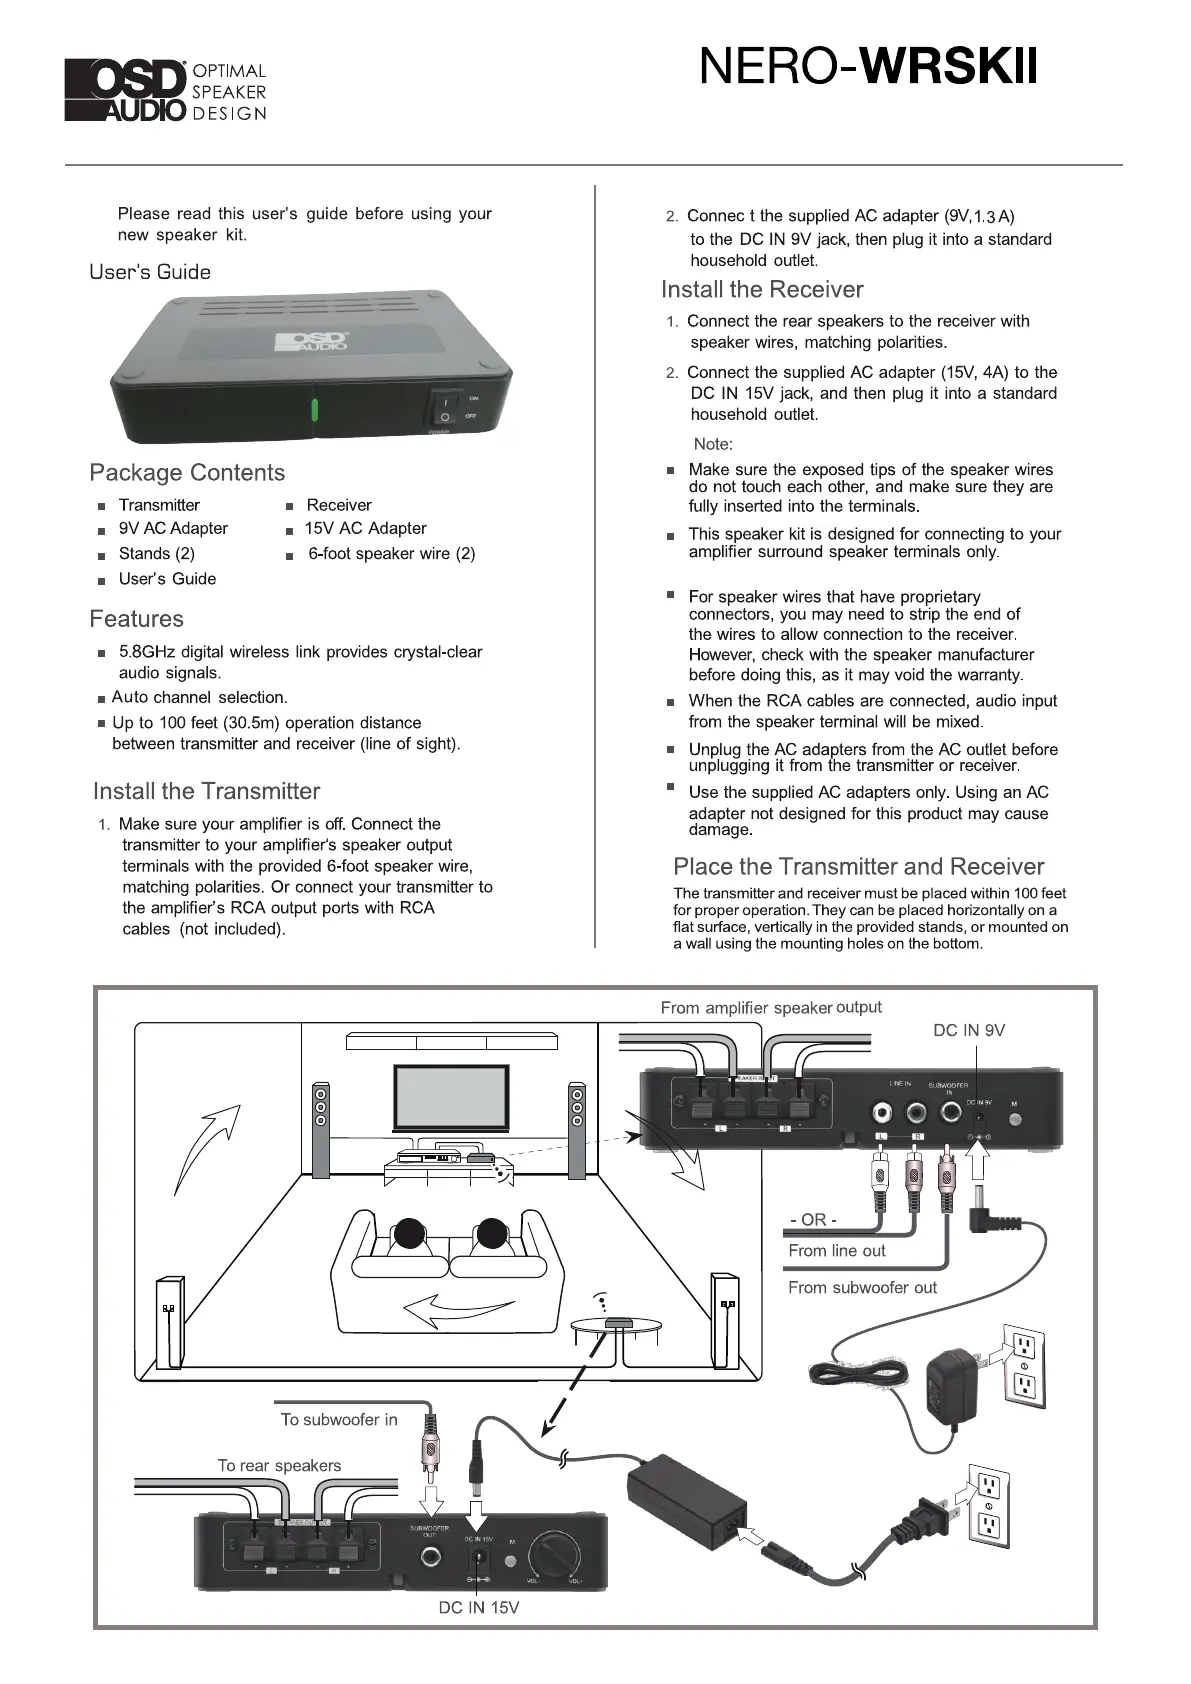
To
subwoofer in
DC
IN
15V
NERO-WRSKII
2.
Connect
the supplied AC adapter
(9V,
1.3A)
to the DC
IN
9V jack, then plug it into a standard
household outlet.
Install
the
Receiver
1.
Connect the rear speakers to the receiver with
speaker wires, matching polarities.
2.
Connect the supplied AC adapter
(15V,
4A) to the
DC
IN
15V jack, and then plug it into a standard
household outlet.
Note:
■
Make sure the exposed tips
of
the speaker wires
do not touch each other, and make sure they are
fully inserted into the terminals.
■
This speaker kit is designed for connecting to your
amplifier surround speaker terminals only.
■
For speaker wires that have proprietary
connectors, you may need to strip the end
of
the wires to allow connection to the receiver.
However, check with the speaker manufacturer
before doing this, as it may void the warranty.
■
When the RCA cables are connected, audio input
from the speaker terminal will
be
mixed.
■
Unplug the AC adapters from the AC outlet before
unplugging it from the transmitter
or
receiver.
• Use the supplied AC adapters only. Using an AC
adapter not designed for this product may cause
damage.
Place
the
Transmitter
and
Receiver
The transmitter and receiver
must
be placed within 100 feet
for proper operation. They can
be
placed horizontally on a
flat surface, vertically
in
the provided stands,
or
mounted on
a wall using the mounting holes on the bottom.
From amplifier speaker output
Produktspecifikationer
| Varumärke: | OSD Audio |
| Kategori: | Nätverkskort/adapter |
| Modell: | NERO-WRSKII |
Behöver du hjälp?
Om du behöver hjälp med OSD Audio NERO-WRSKII ställ en fråga nedan och andra användare kommer att svara dig
Nätverkskort/adapter OSD Audio Manualer

6 September 2024
Nätverkskort/adapter Manualer
Nyaste Nätverkskort/adapter Manualer
8 April 2025
3 April 2025
3 April 2025
2 April 2025
2 April 2025
1 April 2025
30 Mars 2025
29 Mars 2025
14 Mars 2025
14 Mars 2025