Prologue YT6981 Bruksanvisning
Prologue Väderstationer YT6981
Läs gratis den bruksanvisning för Prologue YT6981 (20 sidor) i kategorin Väderstationer. Guiden har ansetts hjälpsam av 39 personer och har ett genomsnittsbetyg på 4.5 stjärnor baserat på 8 recensioner. Har du en fråga om Prologue YT6981 eller vill du ställa frågor till andra användare av produkten? Ställ en fråga
Sida 1/20
Benämning
Art.no: XX-XXXX Model: XXXXX
Please read the entire instruction manual before use and save for future reference.
We apologise for any text or photo errors and any changes of technical data. If you have any questions con-
cerning technical problems please contact our Customer Service Department.
GREAT BRITAIN: For consumer contact, please visit www.clasohlson.co.uk and click on customer service.
Internet: www.clasohlson.co.uk
GREAT BRITAIN • CUSTOMER SERVICEtel: 020 8247 9300
e-mail: customerser[email protected] internet: www.clasohlson.co.uk
1
2
3
4
5
6
7
8
9
10
20150701
Wireless indoor/
outdoor thermometer
Art.no 36-4741 Model YT6981
36-4744 YT6981 EX
Please read theentire instruction manual before using theproduct
and save it for future reference. Wereserve theright for any errors in
text or images and any necessary changes made to technical data.
If you have any questions regarding technical problems please
contact our customer services.
Product description
• Main unit. Displays/monitors indoor temperature.
• 1 sensor (36-4744). Measurestheindoor/outdoor temperature
where it islocated.
• Max 3 sensors can be connected.
• Indoor temperature range: 0 to +50 °C
• Outdoor temperature range: −30 to +70 °C
• Memory for max-/min indoor/outdoor temperature readings.
• Low battery indicator.
Buttons and functions
Main unit
CH button
• Pressing [CH] will give you 4 options: Displaying temperature
readings from individual sensors on channel 1, 2 or 3 or
continuous display of all three channels. Depressuntil
thecircular icon appears to theleft of CH1 for continuous
display of all sensors.
• Press again to deactivate continuous display.
• Depress [CH] for three seconds to start theautomatic sensor scan.
Thescanning process lasts about 3 minutes.
MAX/MIN button
• Press MAX/MIN once to view themin temperature.
• Press again to display themax temperature.
• Depress for 2 seconds to reset.
°C/°F button
• Press to select between °C or °F.
Sensor
• Open thesensor’s battery cover by
unscrewing its 4 retaining screws.
Insertbatteries according to themarkings in
thebattery compartment.
• If several sensors are used, remove
thebattery covers on all of them and set their
channels using thechannel selector (11) to
1, 2 or 3.
TX button
• Press [TX] when you desire to send thelatest reading to
themain unit.
Care and maintenance
• Remove thebatteries if theproduct is not to be used for
alongtime.
• Clean theappliance’s exterior using alightly moistened cloth.
Onlyuse mild detergents, never solvents or corrosive chemicals.
Disposal
Disposal of this product should be in accordance with local regulations.
Ifyou are unsure how to proceed, contact your local authority.
Specifications
Temperature range Approx. −30 to +70 °C
Frequency 433.92 MHz
Range approximately 25 m
The sensor transmits in 35 second intervals.
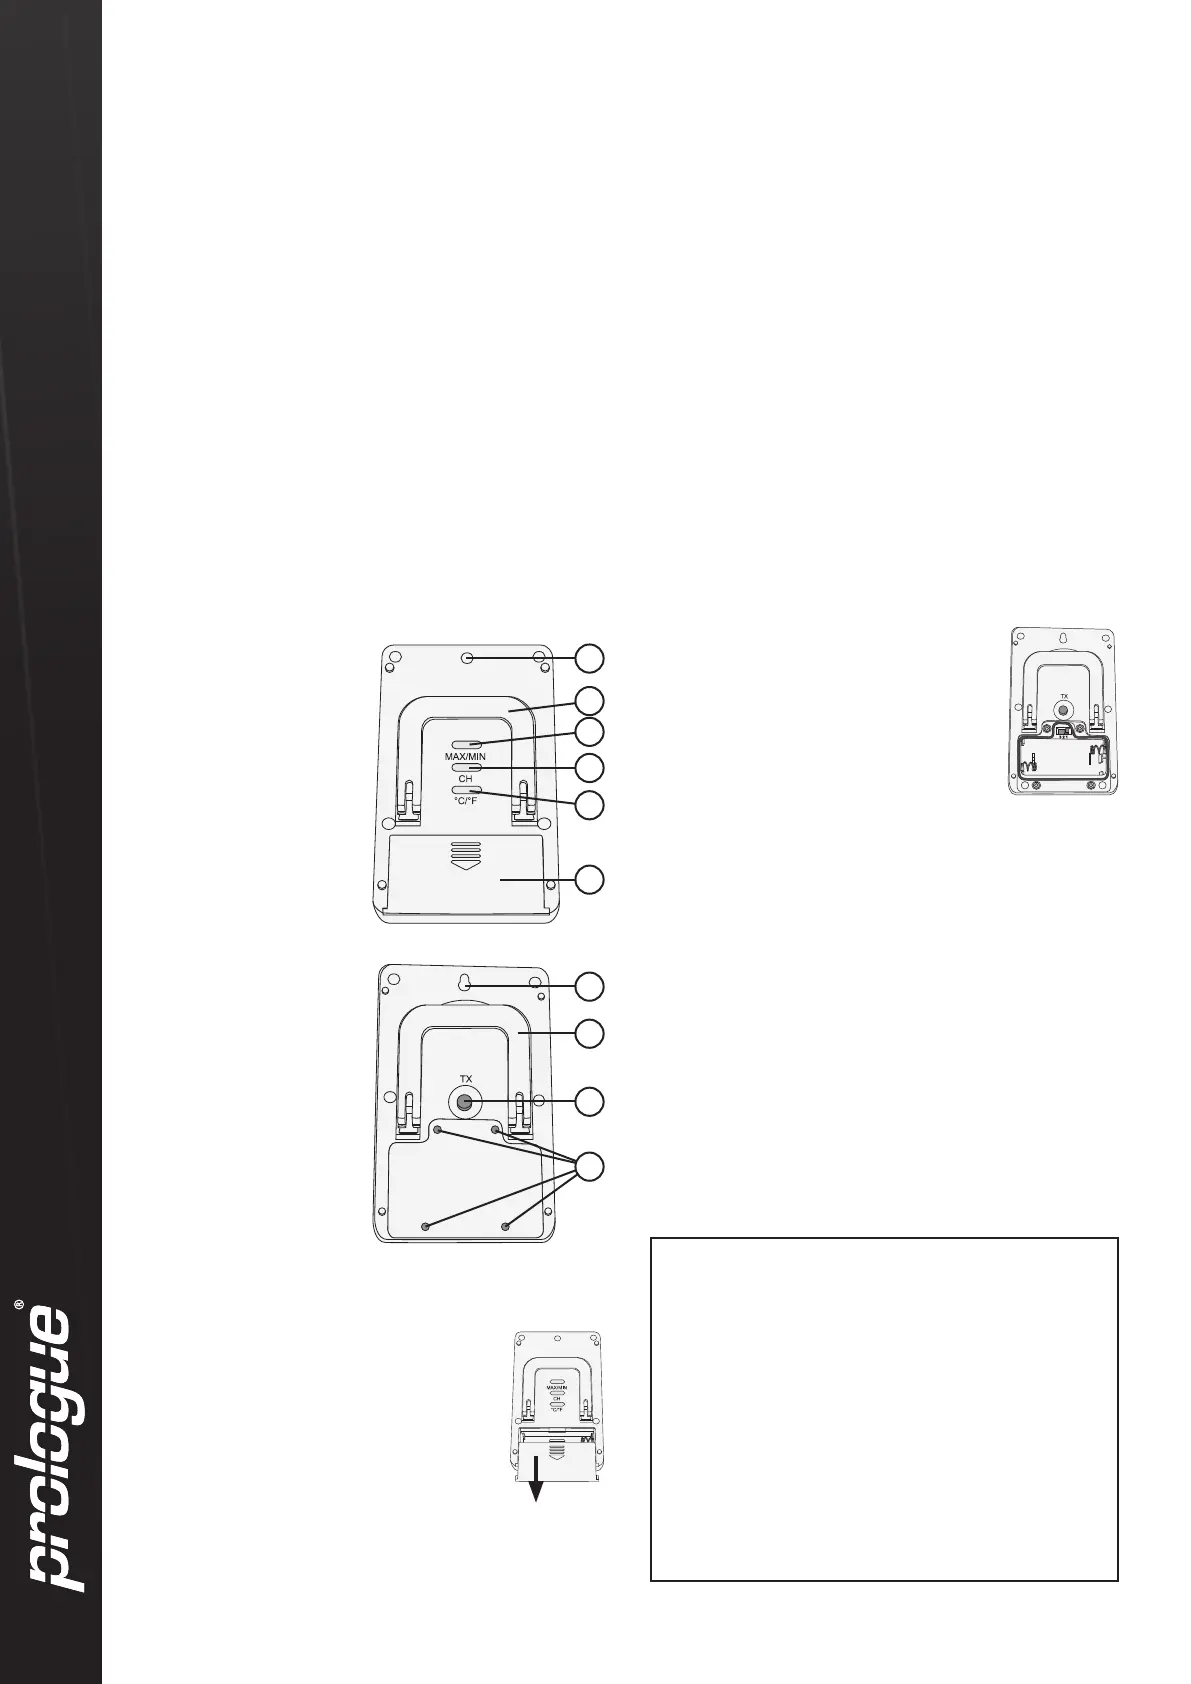
1. Wall bracket
2. Fold-out stand
3. [MAX/MIN] max-/min
temperature display.
4. [CH] Sensor channel
display selector, CH1,
CH2, CH3 or continuous
display. Sensorscan
control.
5. [°C/°F] Temperature unit
selector
6. Battery cover
Sensor
7. Wall bracket
8. Fold-out stand
9. [TX] Transmitter
10. Battery cover
retainingscrews
Operation
Main unit
• Open themain unit’s battery cover by sliding
it straight down. Insertthebatteries according
to themarkings in thebattery compartment.
• The main unit will display indoor temperature and
will automatically scan for asensor/s (the aerial
symbol will flash while scanning is in progress).
Thescanning process lasts about 3 minutes.
Display
• The display shows theINDOOR TEMPERATURE on top and
theOUTDOOR TEMPERATURE underneath.
• Under theOUTDOOR TEMPERATURE display will be
thechannel display: CH1, CH2 and CH3.
• The display also has trend arrows which show trends for rising,
falling or stable temperature readings and has alow battery
indicator as well for both themain unit and sensor.
Points worth bearing in mind!
• Other wireless equipment operating on the same frequency
band may reduce the range of the product.
• The range of all wireless equipment is affected by obstacles
between the transmitter and the receiver (aconcrete wall
reduces the signal far more than a plasterboard partition,
forexample).
If you are having problems with the operation of
the system, try the following solutions
• Switch off any other wireless equipment to check whether it
could be causing the problem.
• Move the wireless equipment and/or reduce the distance,
and reduce thenumber of obstacles (walls, furniture, etc.)
between the transmitter andthe receiver.
Produktspecifikationer
| Varumärke: | Prologue |
| Kategori: | Väderstationer |
| Modell: | YT6981 |
Behöver du hjälp?
Om du behöver hjälp med Prologue YT6981 ställ en fråga nedan och andra användare kommer att svara dig
Väderstationer Prologue Manualer

12 Oktober 2024
Väderstationer Manualer
Nyaste Väderstationer Manualer
9 Januari 2025
21 Oktober 2024
20 Oktober 2024
19 Oktober 2024
17 Oktober 2024
16 Oktober 2024
16 Oktober 2024
15 Oktober 2024
14 Oktober 2024
14 Oktober 2024