Sharper Image Pocket Video Drone Bruksanvisning
Sharper Image Radiostyrda leksaker Pocket Video Drone
Läs gratis den bruksanvisning för Sharper Image Pocket Video Drone (1 sidor) i kategorin Radiostyrda leksaker. Guiden har ansetts hjälpsam av 36 personer och har ett genomsnittsbetyg på 4.4 stjärnor baserat på 8 recensioner. Har du en fråga om Sharper Image Pocket Video Drone eller vill du ställa frågor till andra användare av produkten? Ställ en fråga
Sida 1/1
Thank you for purchasing the Pocket Video Drone. Please
read this guide and store it for future reference.
User Guide
POCKET VIDEO DRONE
-- 1
Item No. 207160
INSTALLATION OF FAN BLADES
The fan blades should be installed correctly. A corresponds with A,
B corresponds with B, etc. Press down the fan blades so that they
connect to the motor shaft.
FOLDING/UNFOLDING ARMS
Fold the front arms near the camera first, then fold the back arms.
Do the exact opposite when unfolding.
LITHIUM-ION BATTERY
Remove the battery from the battery holder and disconnect it from
the power socket. Next, connect the USB-plug charger to your
computer’s USB port, then connect it to the charging socket on
your drone. When charging, the LED will light up; when fully charged
the LED light will be off. Charging time is about 60 minutes.
LITHIUM-ION BATTERY WARNINGS
• There are certain risks involved when using lithium batteries.
They may cause fire, bodily injury, and/or property damage.
Users must be aware of the risks that come with using
this product. Manufacturers, retailers and dealers bear no
responsibility in regard to accidents
• If battery leakage occurs, please avoid contact with your eyes
and/or skin. If contact occurs, please flush your eyes with
clean water and seek medical care immediately
• Please remove the plug immediately if you sense any peculiar
smells
BATTERY CHARGING
• Please use only the charger included with this device
• Do not overcharge the battery. Please pull out the charger
once the device is fully charged
• Do not charge the battery next to open flames or on the
surface of electro-conductive objects. When charging,
observe the battery at all times
• Do not charge the battery if it hasn’t cooled down
• Charging temperature should be between 32°F-104°F
RECYCLING
• Do not dispose of this product or its battery with normal
household waste
• Please dispose of this product and its battery in accordance
with local laws
APP INSTRUCTIONS
WI-FI
1. Use your phone to scan the QR code. Download and install the
control software “WiFi UFO”
NOTE:Android, Google Play, and IOS are all supported.
-- -- -- -- -- 23456
GOOGLE PLAYIOS360
WIFI UFO
2. Turn on your drone and the lights will flash. Next, turn on your
mobile phone and connect to Wi-Fi (WIFI UFO-1111###), as
shown in Figure 2.
3. Open the App and enter the main interface as shown in Figure
3. Click “Play” in the manipulation interface, as shown in
Figure 4. Click “lill” to enter the ordinary control interface, as
shown in Figure 5. Click . The Altitude Hold Key becomes
yellow. Next, enter the Altitude Hold interface as shown in
Figure 6. Click for more settings, as shown in Figure 7.
4. When the video links successfully, you can view the images
that the Wi-Fi camera transmits through your mobile phone’s
screen.
FIGURE 2
FIGURE 3
FIGURE 4
FIGURE 5
FIGURE 6
FIGURE 7
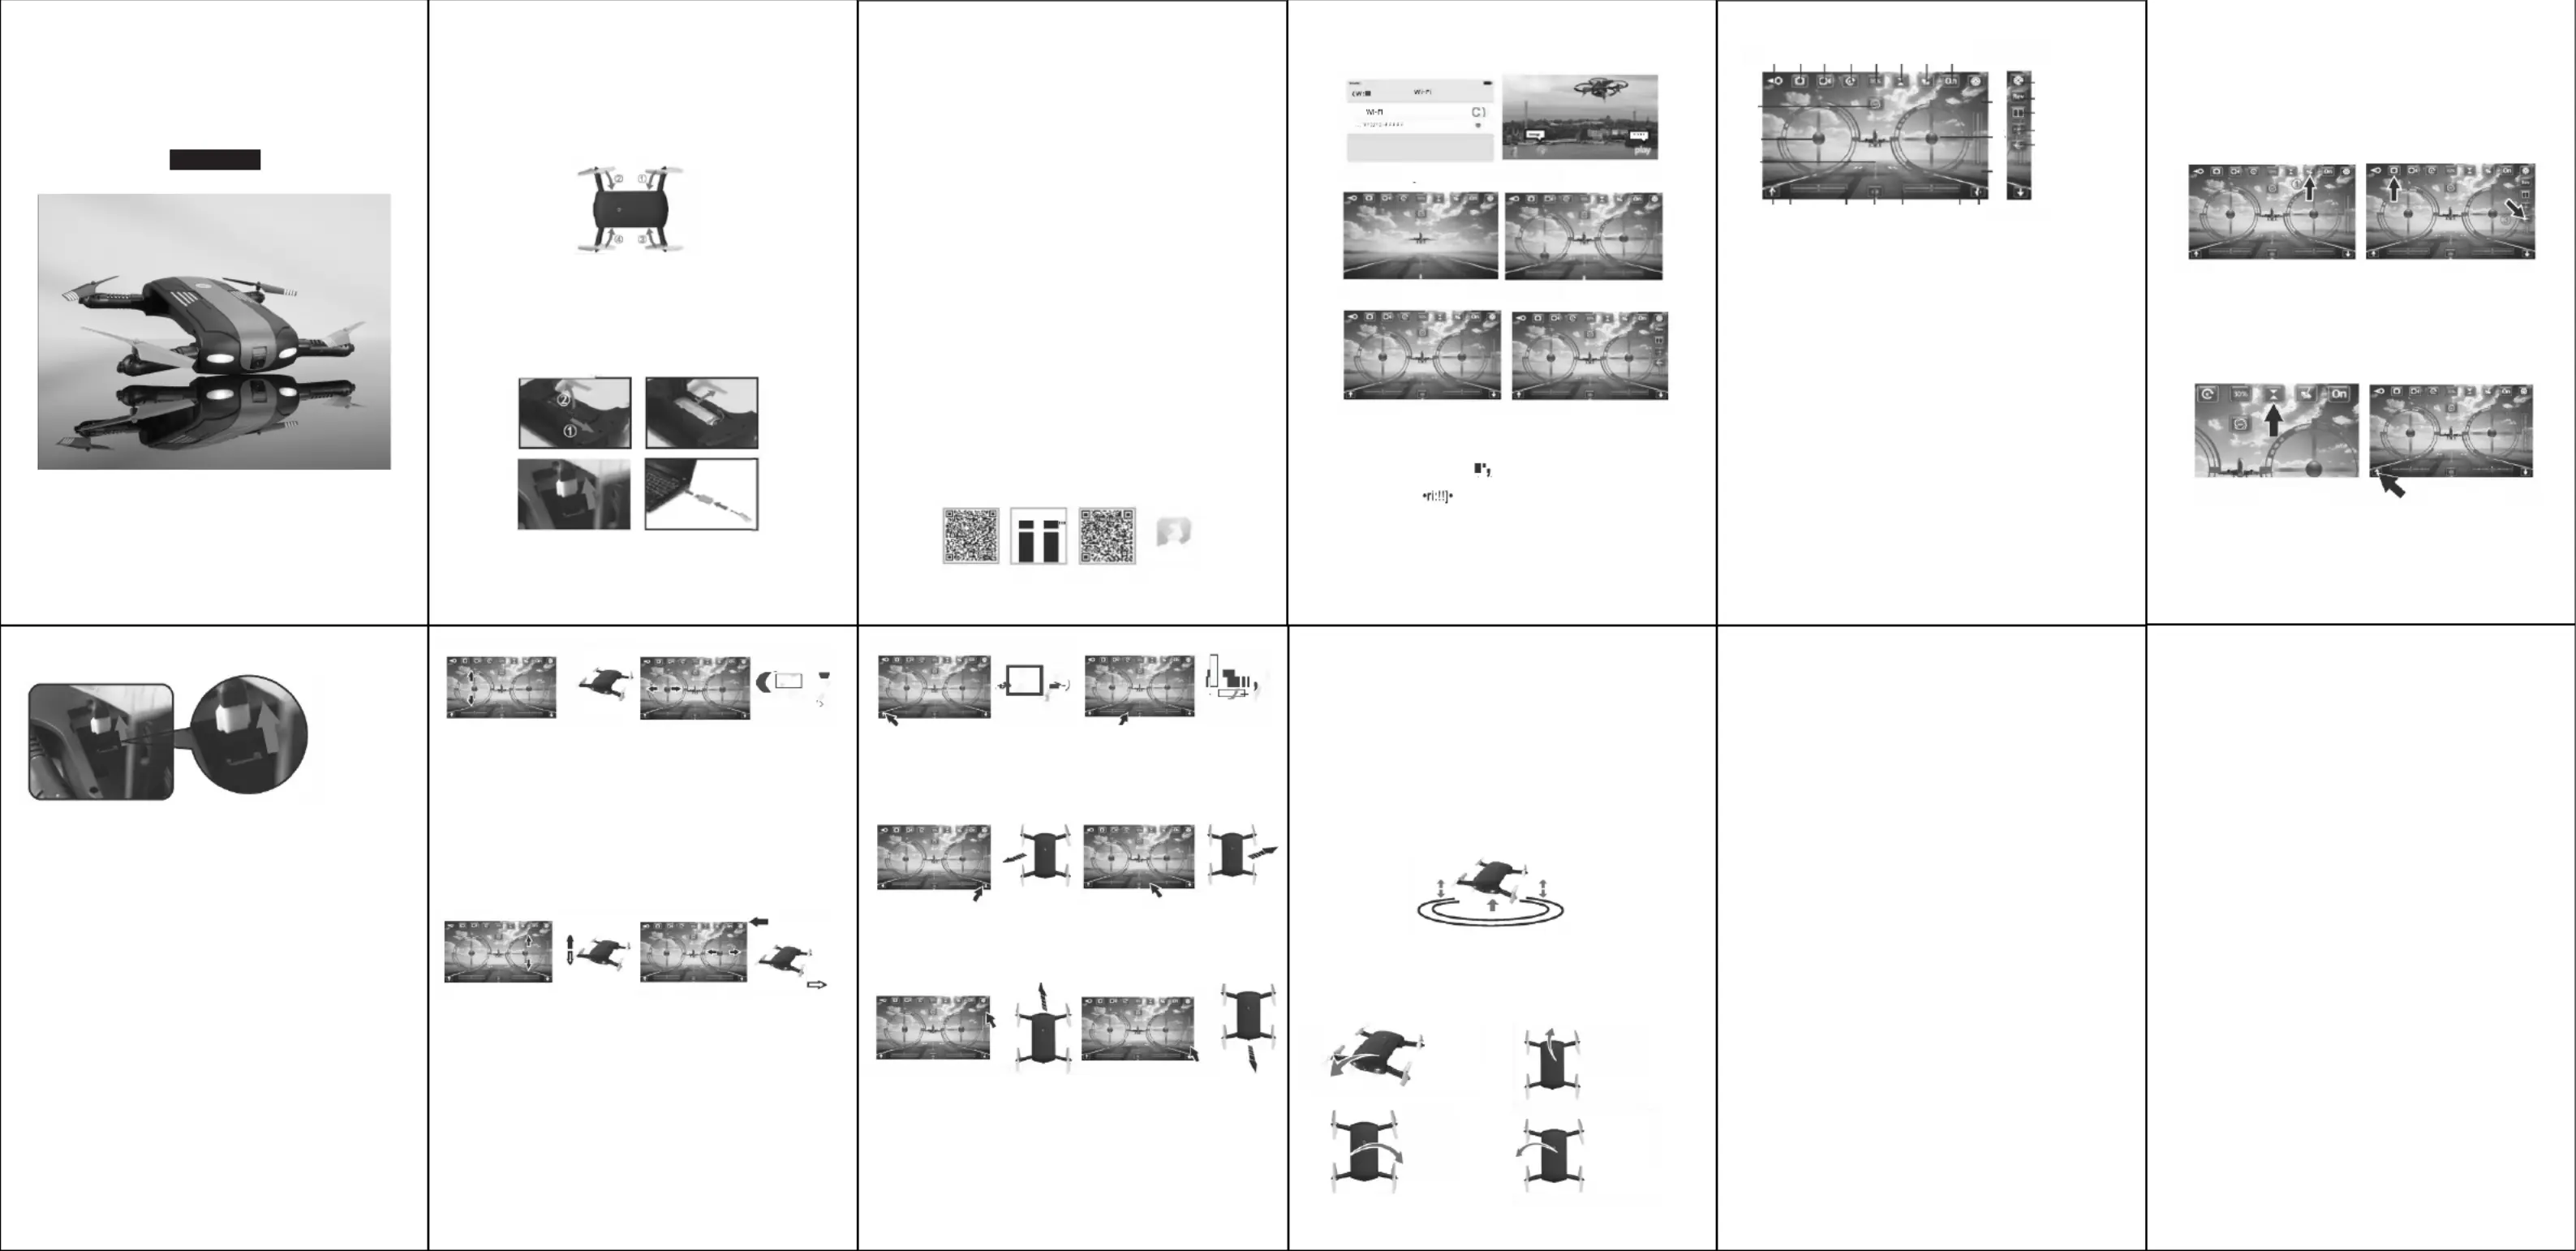
APP INTERFACE DESCRIPTION
1. Return
2. Photo
3. Video
4. Document (Album/Video)
5. Speed Control: 30%, 60%, 100%
6. Altitude Hold
7. Gravity Induction
8. Show/Hide Steering Wheel
9. 360° Flips/Rolls
10. One-Key Takeoff
11. One-Key Landing
12. Emergency Stop
13. Left Joystick (Throttle)
14. Right Joystick (Rudder)
15. Left Rotation Fine-Tuning
16. Right Rotation Fine-Tuning
17. Left Side Flight Fine-Tuning
18. Right Side Flight Fine-Tuning
19. Forward Fine-Tuning
20. Backward Fine-Tuning
21. More Settings
22. Camera Reverse
23. 3D Display
24. Headless Mode
25. One-Key Calibration
123456
7
8
9
13
10
19
14
20
10
15
1612
17
18
11
21
22
23
24
25
ACCELEROMETER MODE
• Click into Accelerometer Mode, then move the phone in any
direction for remote control (Figure 1)
SELFIE MODE
• In Altitude Hold Mode, you can control the drone and make the
camera view itself. Click the camera button on the screen to
take selfies (Figure 2)
ONE-KEY CALIBRATION
• This function is only allowed when the drone is on the ground
UNLOCKING YOUR DRONE
Unlock the drone prior to flight. Click the Altitude Hold icon shown in
Figure 1, then click on the area in Figure 2 to unlock.
FIGURE 1FIGURE 2
FIGURE 1FIGURE 2
-- -- -- -- -- 7891011
OPERATING YOUR DRONE
NOTE: After flight, please disconnect the battery plug from the
power connection.
1. Connect the power plug of your drone with the lithium-ion
battery socket as shown in the figure above. Place your drone
on a level surface (do not move it when the indicator light is
flashing).
2. Place the drone in an open space. Before flight, make sure
that the rear part of your drone is pointing directly at you.
Push up on the Left Joystick
(Throttle).
The rotating speed of the blades
will increase and the drone will
ascend.
Push down on the Left Joystick
(Throttle).
The rotating speed of the blades
will decrease and the drone will
descend.
Push the Left Joystick (Throttle)
to the left (the drone will turn
left).
Push the Left Joystick (Throttle)
to the right (the drone will turn
right).
Push up on the Right Joystick
(Rudder).
The drone will fly forward.
Push down on the Right Joystick
(Rudder).
The drone will fly backward.
Push the Right Joystick (Rudder)
to the right (the drone will turn
right).
Push the Right Joystick (Rudder)
to the left (the drone will turn left).
If the drone revolves to the
left while hovering, press the
Right Rotation Fine-Tuning key
continuously until it is back to
normal.
If the drone revolves to the
right while hovering, press the
Left Rotation Fine-Tuning key
continuously until it is back to
normal.
If the drone flies to the left while
hovering, press the Right Side
Flight Fine-Tuning key continuously
until it is back to normal.
If the drone flies to the right while
hovering, press the Left Side Flight
Fine-Tuning key continuously until
it is back to normal.
If the drone flies backwards while
hovering, press the Forward Fine-
Tuning key continuously until it is
back to normal.
If the drone flies forward while
hovering, press the Backward Fine-
Tuning key continuously until it is
back to normal.
NOTE:When the drone is roughly 11 inches from the ground, it will
become unstable due to a blade vortex. This is called the “Ground Effect.”
The lighter the drone is, the greater this effect will be.
NOTE:Push the Left Joystick (Throttle) to slowly take off. When the drone
revolves or flies sideways, make use of the fine-tuning functionality to
calibrate its movement.
PRE-FLIGHT ENVIRONMENT
1. When flying indoors, select a wide-open space free of barriers,
pets, and people.
2. When flying outdoors, choose a warm, sunny, windless day.
DO NOT fly in extreme temperatures. Flying in extreme
temperatures may affect the performance of this device. DO
NOT fly on windy days as the drone is easily affected by strong
winds. Flying in strong wind conditions could result in damage
to your drone.
ALTITUDE HOLD
When you release the Left Joystick (Throttle) after ascending/
descending, the drone will still hover when the joystick is released.
3D FLIPS/ROLLS
Once you’ve mastered basic flight maneuvers, you can try some more
adventurous rotations. Fly the drone 9 ft. in the air, then push the
rotation button and the Right Joystick (Rutter) to one direction. The
drone will rotate in the direction you push the joystick.
WARRANTY / CUSTOMER SERVICE
This item from SharperImage.com includes a 1-year limited
replacement warranty. If you have any questions not covered in this
guide, please call our Customer Service department at 1 (877) 210-
3449. Customer Service agents are available Monday through Friday,
9:00 a.m. to 6:00 p.m. ET.
FLIP FORWARD
FLIP BACKWARD
FLIP TO THE LEFT
FLIP TO THE RIGHT
FORWARD
BACKWARD
LEFT SIDE
FLIGHT
RIGHT SIDE
FLIGHT
ASCENT
DESCENT
TURN RIGHT
TURN LEFT
Produktspecifikationer
| Varumärke: | Sharper Image |
| Kategori: | Radiostyrda leksaker |
| Modell: | Pocket Video Drone |
Behöver du hjälp?
Om du behöver hjälp med Sharper Image Pocket Video Drone ställ en fråga nedan och andra användare kommer att svara dig
Radiostyrda leksaker Sharper Image Manualer

20 December 2024
20 December 2024
20 December 2024
20 December 2024
20 December 2024
Radiostyrda leksaker Manualer
Nyaste Radiostyrda leksaker Manualer
2 April 2026
30 Mars 2026
28 Mars 2026
15 Mars 2026
23 Februari 2026
27 September 2025
13 September 2025
13 September 2025
12 September 2025
12 September 2025