Shuttle X50V8 Bruksanvisning
Shuttle ej kategoriserat X50V8
Läs gratis den bruksanvisning för Shuttle X50V8 (2 sidor) i kategorin ej kategoriserat. Guiden har ansetts hjälpsam av 3 personer och har ett genomsnittsbetyg på 4.7 stjärnor baserat på 8 recensioner. Har du en fråga om Shuttle X50V8 eller vill du ställa frågor till andra användare av produkten? Ställ en fråga
Sida 1/2
Incorrectly replacing the battery may damage this computer. Replace only with the same or equivalent as recommended by Shuttle. Dispose of used batteries according to the manufacturer’s instructions.
Das unkorrekte Austauschen der Batterie kann diesen Computer beschädigen. Ersetzen Sie die Batterie nur durch den von Shuttle empfohlenen Typ oder ein gleichwertiges Modell. Entsorgen Sie gebrauchte Batterien gemäß den Herstellerangaben.
Ne pas replacer correctement la pile peut endommager l'ordinateur. Remplacez-la uniquement par un modèle identique ou un équivalent comme recommandé par Shuttle. Débarrassez-vous des piles usagées d’après les instructions du constructeur.
La sustitución incorrecta de la batería puede dañar este equipo. Sustituya la batería únicamente por una igual o equivalente recomendada por Shuttle. Deseche las baterías usadas según las instrucciones del fabricante.
!
This device complies with Part 15 of the FCC Rules. Operation is subject to the following two conditions: (1) this device may not cause
This device meets the requirements for the EU conformity in accordance to the currently valid EU directives.
Dieses Produkt erfüllt die Anforderungen für die EU-Konformität entsprechend der aktuell geltenden EU-Richtlinien.
Ce produit répond aux exigences de la conformité UE suivant les directives européennes actuellement en vigueur.
2000m
Placing on a desk
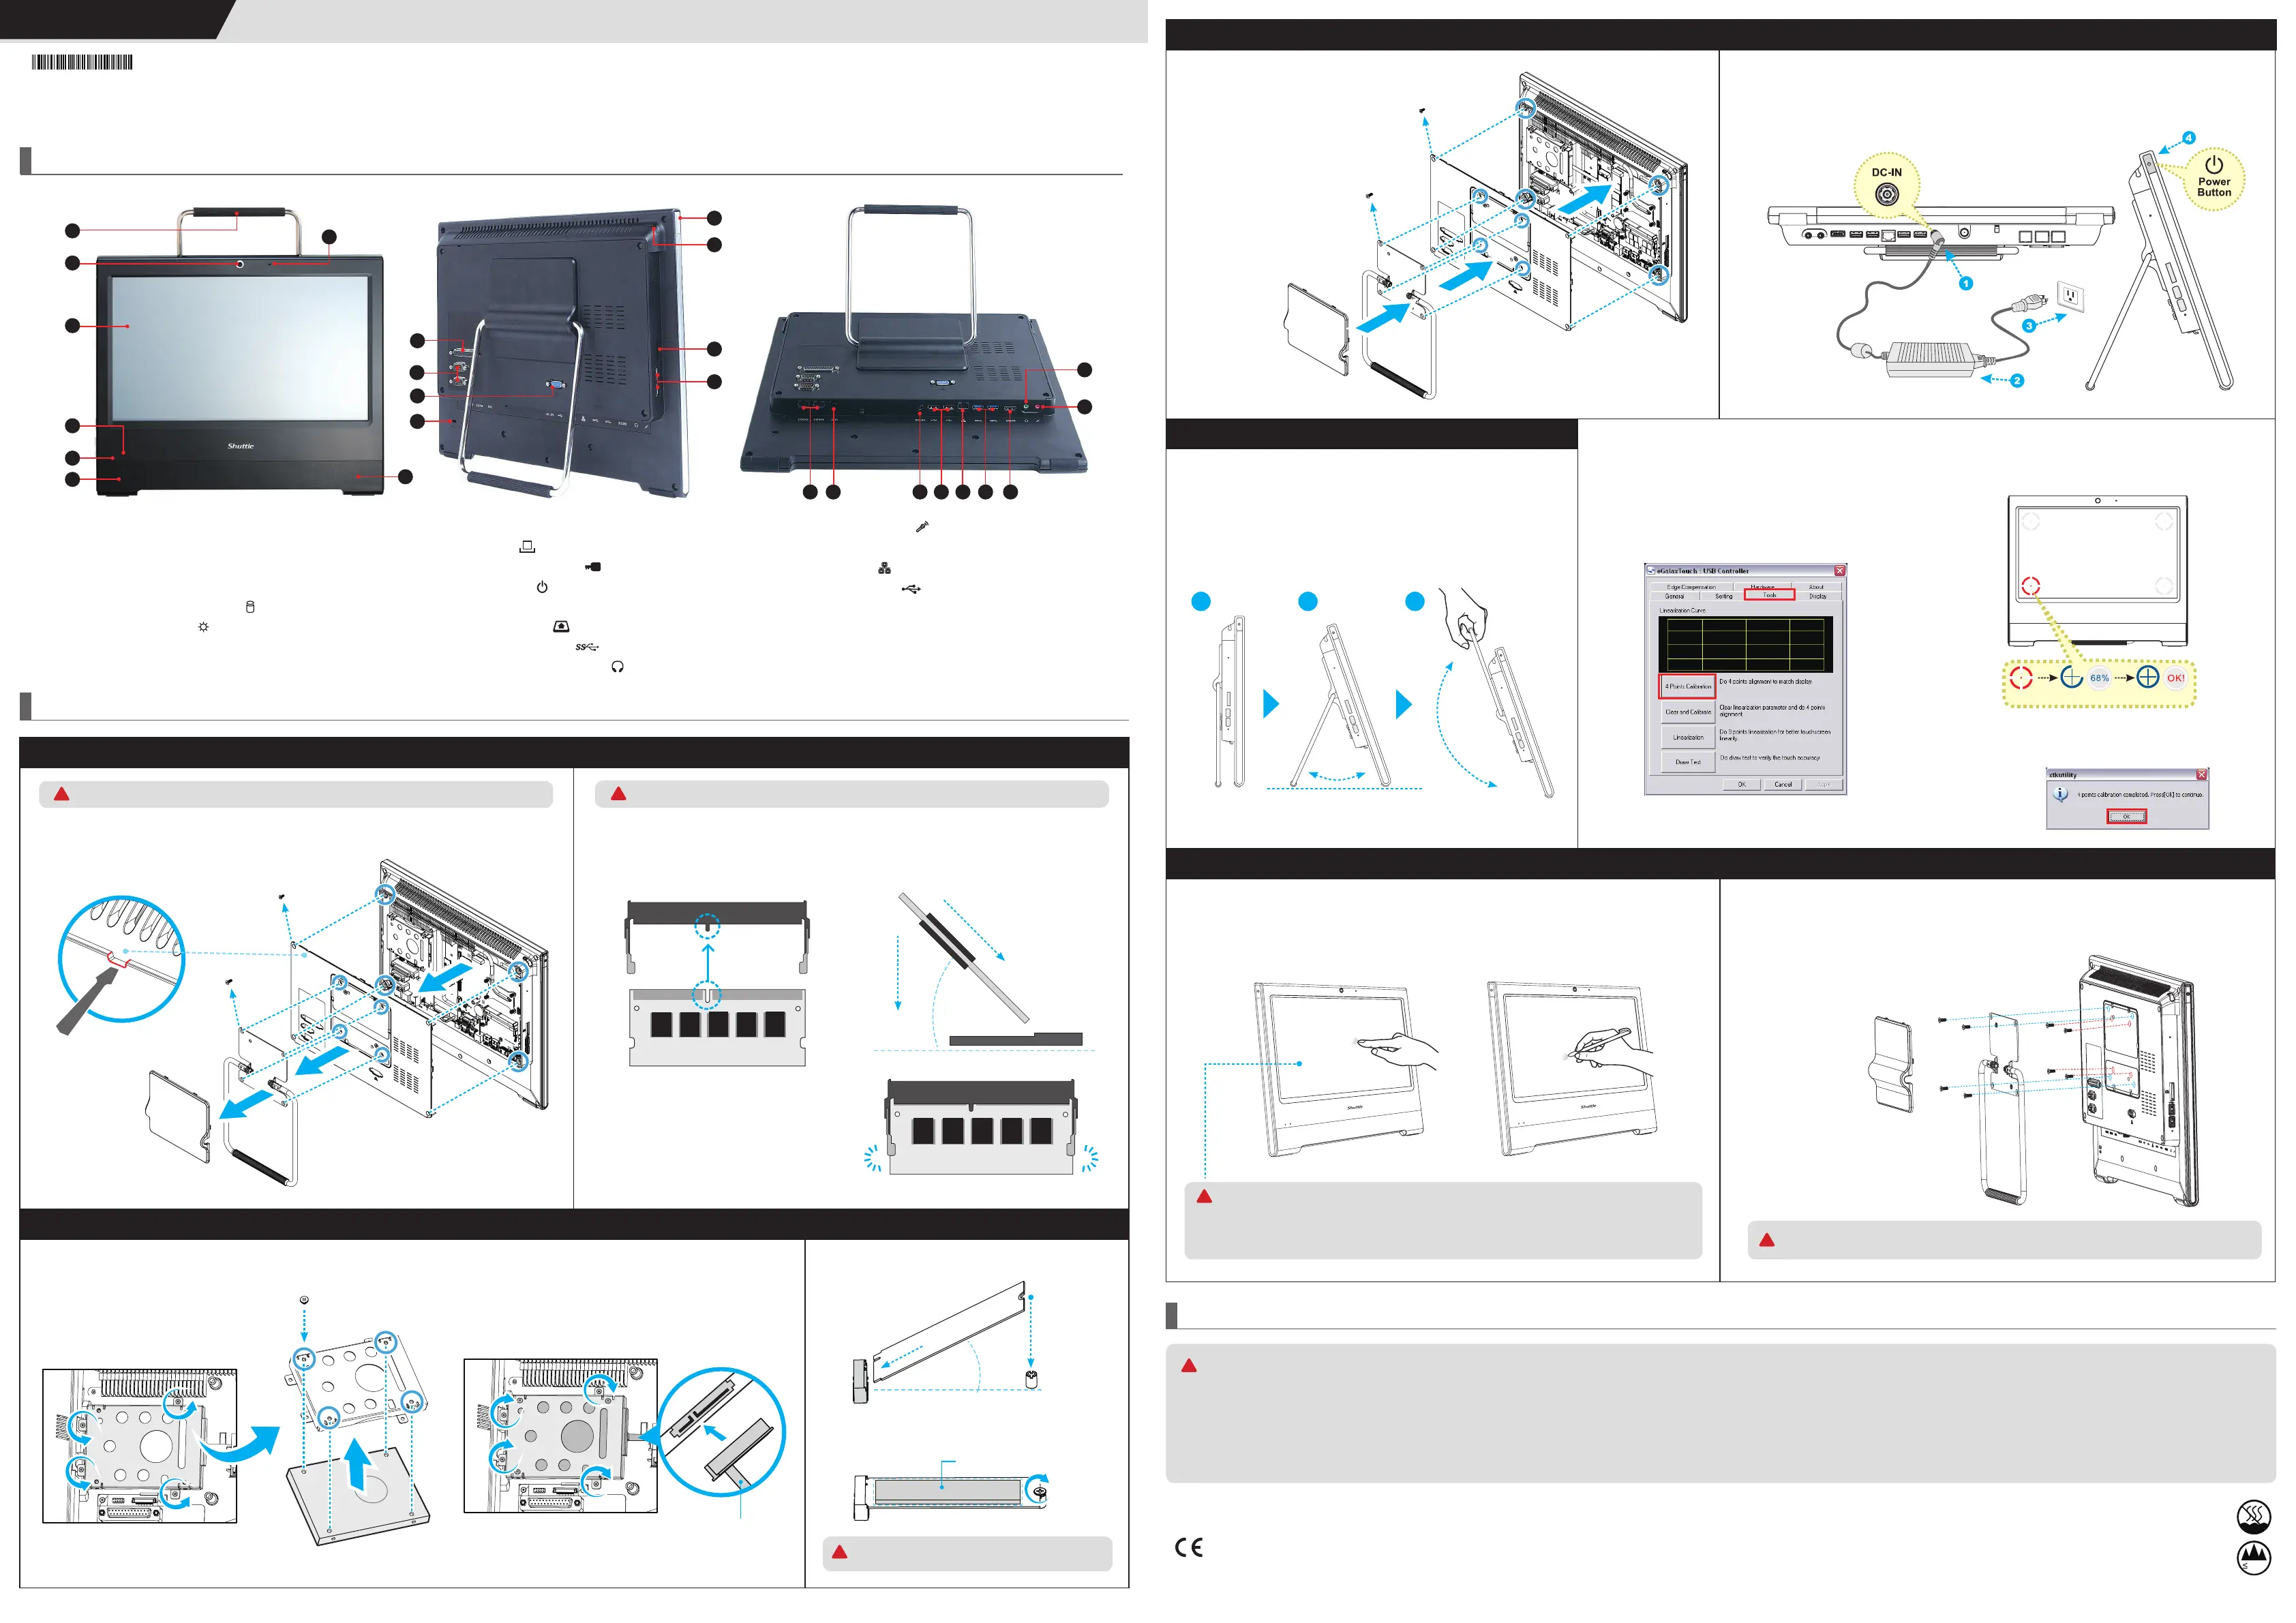
A. Begin Installation
Hardware Installation
L
The product’s colour and specifications may vary from the actually shipping product.
1. Locate the SO-DIMM slots on the motherboard.
Align the notch of the memory module with the one of the relevant memory slot.
until it snaps into the locking mechanism
and put the mylar back in place.
5. Repeat the above steps to install an
Notch
Cutout
SO-DIMM slot
angle
a
b
LatchLatch
!
How to use the Touch Panel
Cleaning the screen
Follow these guidelines for cleaning the outside and handling the screen of the computer:
damp to gently wipe the screen surface. Do not spray liquids directly onto the device.
!
Safety Information
C. HDD or SSD Installation
Experience the ease of managing your digital life with a few touches by using the stylus.
1
Unscrew four screws of the stand mount and remove the stand.
Please refer to the user guide of the wall/arm mount kit
you bought separately to install it.
75 x 75mm
wall/arm bracket.
!
Touch
HoldOK
on-screen calibration.
to continue.
E
Touch and hold the center of the target.
Repeat on four corners and the screen will adjust
automatically.
11. Kensington
®
Lock Hole
HDMI
DC-IN
02
04
03
05
07
13
14
07
06
09
08
12
10
11
15
16
17
18152119202223
01
four screws of the stand mount and remove the stand.
E. Complete
with the screw.
1.
B. Memory Module Installation
b
Serial ATA and power cable
a
1. Unscrew four screws of the bracket and
remove it.
with four screws.
c
d
a
b
Powering on the system
1. Replace the back cover. Refasten the stand
and the back cover with eight screws.
b
d
f
c
a
e
d
b
a
c
e
a
b
Slope angle
!
effectively reduce its temperature.
!
Thermal Pad
Produktspecifikationer
| Varumärke: | Shuttle |
| Kategori: | ej kategoriserat |
| Modell: | X50V8 |
| Produkttyp: | Allt-i-ett barebone-PC |
| Vikt: | 3500 g |
| Bredd: | 391 mm |
| Djup: | 42 mm |
| Höjd: | 327 mm |
| Strömförsörjning: | 65 W |
| LED-indikatorer: | HDD, Power |
| Skärm diagonal: | 15.6 " |
| Upplösning: | 1366 x 768 pixlar |
| Pekskärm: | Ja |
| Processorfrekvens: | 2.1 GHz |
| Processorfamilj: | Intel® Core™ i3 |
| Wi-Fi: | Ja |
| Wi-Fi-standarder: | 802.11b, 802.11g, Wi-Fi 4 (802.11n), Wi-Fi 5 (802.11ac) |
| Bluetooth-version: | 4.2 |
| Maximal upplösning: | 3840 x 2160 pixlar |
| Ljusstyrka: | 220 cd/m² |
| Snabbstartsguide: | Ja |
| Antal HDMI-portar: | 1 |
| Inbyggda högtalare: | Ja |
| Hörlursutgångar: | 1 |
| HDMI-version: | 1.4a |
| Bildförhållande: | 16:9 |
| Processor: | i3-10110U |
| Processorns cache: | 4 MB |
| Maximalt internminne: | 64 GB |
| Idle stater: | Ja |
| Intel® 64: | Ja |
| Intel® Virtualization Technology for Directed I/O (VT-d): | Ja |
| Intel® Trusted Execution Technology: | Nej |
| Intel® Stable Image Platform Program (SIPP): | Nej |
| Trusted Platform Module (TPM): | Ja |
| Minnesspänning: | 1.2 V |
| Antal lagringsenheter som stöds: | 1 |
| Minnestyper som stöds: | DDR4-SDRAM |
| Processorgenerering: | 10:e generationens Intel® Core™ i3 |
| Typer av lagringsenheter som stöds: | HDD & SSD |
| BIOS-typ: | AMI |
| Typ av minneskort: | SD, SDHC, SDXC |
| Produktens färg: | Svart |
| HD-typ: | HD |
| VESA-fäste: | Ja |
| Vikt inkl. förpackning: | 4200 g |
| Inbyggd kortläsare: | Ja |
| Uteffekt (RMS): | 2 W |
| processortillverkare: | Intel |
| Paneltyp: | LCD |
| Windows-operativsystem som stöds: | Windows 10, Windows 11 |
| Inbyggd processor: | Ja |
| Installerat operativsystem: | Nej |
| Antal LAN (RJ-45) anslutningar: | 1 |
| Temperatur vid drift: | 0 - 40 ° C |
| Intervall för relativ operativ luftfuktighet: | 10 - 90 % |
| AC-inspänning: | 100 - 240 V |
| Nätverksansluten (Ethernet): | Ja |
| Likströmsingång: | Ja |
| Växelström Frekvens: | 50 - 60 hz |
| AC-adapter inkluderad: | Ja |
| Strömkabel ingår: | Ja |
| På / av-knapp: | Ja |
| Intel Clear Video Technology: | Ja |
| Antal USB 2.0 anslutningar: | 2 |
| Minnesplatser, typ: | SO-DIMM |
| Minneskanaler: | Dubbla kanaler |
| Minnets hastigheter: | 2666 MHz |
| Icke ECC: | Ja |
| Antal USB 3.2 Gen 1 (3.1 Gen 1) typ A-portar: | 4 |
| Processorkärnor: | 2 |
| Processorboostfrekvens: | 4.1 GHz |
| Bluetooth: | Ja |
| Linux operativsystem som stöds: | Ja |
| Harmonized System (HS)-kod: | 84713000 |
| Produktvikt (oz): | Ja |
| Typ av kabellåsanslutning: | Kensington |
| Wi-Fi-standard: | Wi-Fi 5 (802.11ac) |
| Nätaggregatstyp: | Extern nätadapter |
| AC-adapter, nätspänning: | 19 V |
| AC-adapter, maxbelastning: | 3.42 A |
| Kvalitet på VGA (D-Sub) porten: | 1 |
| Processortrådar: | 4 |
| Processorlitografi: | 14 nm |
| Värmeavledningseffekt (TDP): | 15 W |
| Grafikadapterfamilj: | Intel |
| Ombord grafikkort modell: | Intel® UHD Graphics |
| Ombord grafikkort: | Ja |
| Uttag för mikrofon/linje in: | Ja |
| Förstärkt Intel Speedstep Technology: | Ja |
| Intel® Flex minnesåtkomst: | Ja |
| Intel® VT-x med utökad Sida Tabeller (EPT): | Ja |
| Execute Disable Bit-säkerhet: | Ja |
| CPU konfiguration (max): | 1 |
| Inbäddade alternativ: | Nej |
| Intel Virtualization Technology (VT-x): | Ja |
| Antal talare: | 2 |
| Lagringsenhetens gränssnitt: | Serial ATA III |
| Intel® TSX-NI: | Nej |
| Storlekar som stöds på lagringsenhet: | 2.5 " |
| Drivrutiner medföljer: | Ja |
| Kylning typ: | Passiv |
| Trusted Platform Module (TPM)-version: | 2.0 |
| Chassityp: | Allt-i-ett |
| Antal strömförsörjningsaggregat: | 1 |
| SSD-diskens formfaktor: | 2.5" |
| WLAN-kontrollens modell: | Realtek RTL8821CE |
Behöver du hjälp?
Om du behöver hjälp med Shuttle X50V8 ställ en fråga nedan och andra användare kommer att svara dig
ej kategoriserat Shuttle Manualer

18 Mars 2026
13 Augusti 2025
13 Augusti 2025
13 Augusti 2025
13 Augusti 2025
30 Juli 2025
30 Juli 2025
ej kategoriserat Manualer
Nyaste ej kategoriserat Manualer
3 April 2026
3 April 2026
3 April 2026
3 April 2026
3 April 2026
3 April 2026
3 April 2026
3 April 2026
3 April 2026