Solac CO8500 Bruksanvisning
Läs gratis den bruksanvisning för Solac CO8500 (4 sidor) i kategorin Värmare. Guiden har ansetts hjälpsam av 28 personer och har ett genomsnittsbetyg på 5.0 stjärnor baserat på 3 recensioner. Har du en fråga om Solac CO8500 eller vill du ställa frågor till andra användare av produkten? Ställ en fråga
Sida 1/4
ESPAÑOLes
1ATENCIÓN
•Lea completamente estas instrucciones antes de utilizar su aparato.
•Este manual es parte integrante del producto. Consérvelo en un
lugar seguro para futuras consultas.
•Este aparato es sólo para uso doméstico, no industrial. Cualquier uso
diferente al indicado podría ser peligroso.
•Los niños deberían ser supervisados para asegurar que no juegan con
el aparato.
•Este aparato no está destinado para ser utilizado por personas
(incluidos niños) cuyas capacidades físicas, sensoriales o mentales
estén reducidas, o carezcan de experiencia o conocimiento, salvo si
han tenido supervisión o instrucciones relativas al uso del aparato por
una persona responsable de su seguridad.
•No realice ninguna modificación ni reparación en el aparato. Ante
cualquier anomalía en el cable u otra parte del aparato, no lo use y
acuda a un servicio de asistencia autorizado.
•No utilice piezas o accesorios no suministrados o recomendados por
SOLAC.
•Antes de enchufar el aparato a la red eléctrica, compruebe que el
voltaje indicado coincide con el de su hogar.
•Desenchufe el aparato siempre después de su uso y antes de
desmontar o montar piezas y realizar cualquier tarea de mantenimiento
o limpieza. Desenchúfelo también en caso de apagón. Cuando enchufe
o desenchufe el aparato, debe estar desconectado.
•No tire nunca del cable ni cuelgue el aparato por él. Desenchufe el
aparato tirando siempre de la clavija, nunca del cable.
•Evite que el cable de alimentación entre en contacto con aristas
cortantes o superficies calientes. No deje el cable colgando por el borde
de la mesa o encimera, para evitar que los niños tiren de él y hagan
caer el aparato.
•Si el cable de alimentación está dañado, debe ser sustituido por el
fabricante, por su servicio post-venta o por personal cualificado similar
con el fin de evitar un peligro.
•Retire todas las bolsas de papel o de plástico, láminas plásticas,
cartones y pegatinas eventuales que se encuentran dentro o fuera del
aparato que sirvieron como protección de transporte o promoción de
venta.
•Sitúe el aparato de calefacción alejado de materiales inflamables
(pegamentos, cortinas, alfombras…).
•La colocación del aparato de calefacción debe ser elegida
correctamente y ha de realizarse según las reglas y conforme a las
normas.
•No instalar el aparato bajo una toma de corriente.
•Con el fin de evitar el olor a nuevo del aparato en su primer uso enciéndalo y
déjelo funcionando durante 2 horas en la temperatura más alta.
d
No usar este aparato de calefacción en el entorno inmediato de
una bañera, ducha o piscina.
d
El aparato debe instalarse de forma que los interruptores,
termostato, toma móvil de conexión, no puedan ser tocados
directa o indirectamente por una persona que se encuentre en la
bañera o ducha.
•Utilice siempre el aparato en posición horizontal.
•Mantenga el frontal del aparato alejado al menos 90 cm de muebles ,
materiales combustibles , cortinas, moquetas, sillones, etc.
•No use el aparato nunca sobre superficies mojadas ni en el exterior.
•El aparato debe conectarse a una base de toma de corriente que
disponga de un contacto de tierra adecuado.
q
Atención! Cuando desee desprenderse del aparato NUNCA lo
deposite en la basura sino que acuda al punto limpio o de
recogida de residuos más cercano a su domicilio para su posterior
tratamiento. De esta manera está contribuyendo al cuidado del
medio ambiente.
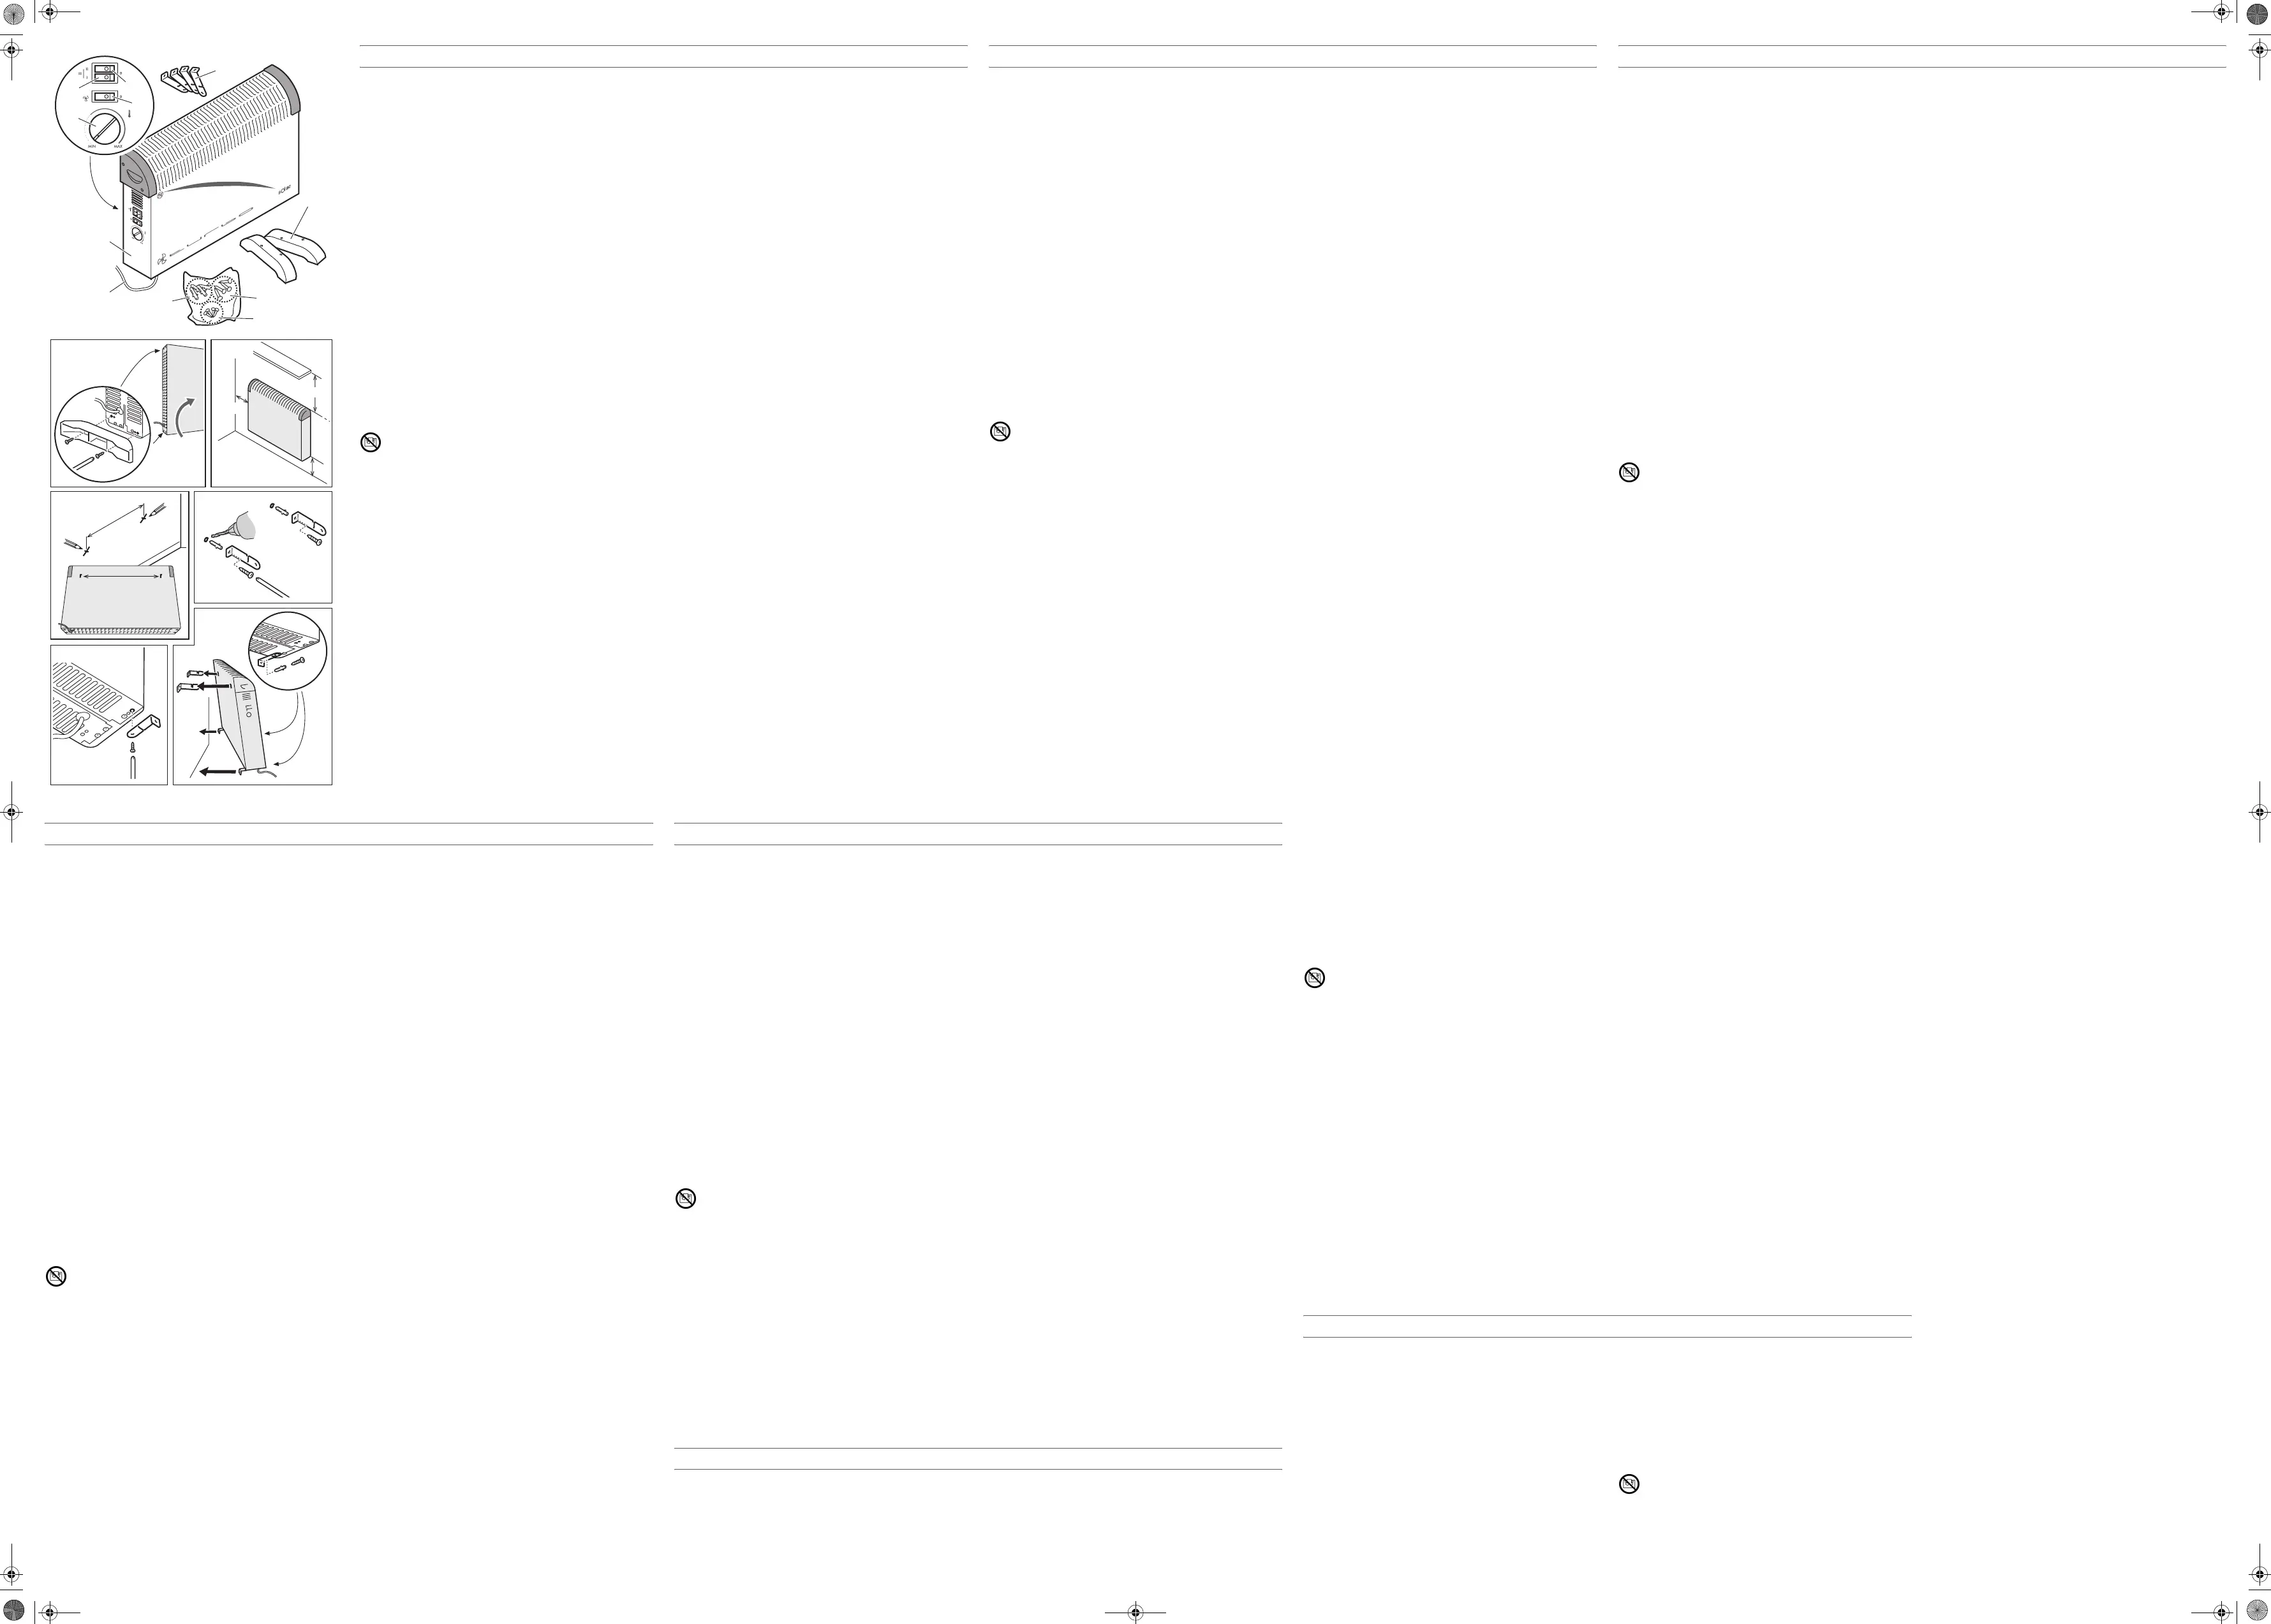
2COMPONENTES PRINCIPALES
1Cuerpo principal
2Interruptor I (750W)
3Interruptor II (1250W)
4Interruptor ventilador
5Termostato de temperatura
6Cable de conexión a la red
7Patas de plástico (2 unidades)
8Soportes pared (4 unidades)
9Tornillos para patas/soporte inferior pared (4 unidades)
10Tacos de nylon (4 unidades)
11Tirafondos (4 unidades)
3MONTAJE
Para su utilización sobre el suelo
1Fije las patas en la parte inferior del aparato mediante los tornillos (9)
suministrados (Fig. 1)
Para su utilización mural
ZNo instalar el aparato en una zona de ventilación.
ZInstale el aparato respetando las distancias de seguridad indicadas,
respecto de cualquier muro u obstáculo (Fig. 2).
1Marque las posiciones de los 2 orificios a taladrar para la fijación de los
soportes superiores (Fig. 3).
2Realice los 2 orificios y coloque los tacos suministrados (10) (Fig. 4).
3Fije los soportes superiores (8) a la pared mediante los tornillos
suministrados (11) (Fig. 4).
4Fije los soportes inferiores (8) al convector, utilizando los tornillos
suministrados (9) (Fig. 5).
5Cuelgue el convector de los soportes superiores (8).
ZAsegúrese de que el convector queda en posición horizontal.
6Con el convector colocado marque en la pared la posición donde se
debe realizar el orificio a taladrar para fijar el soporte inferior.
7Realice el orificio en la pared y coloque el taco suministrado (si fuera
necesario retire el convector para trabajar con mayor libertad y vuelva
a colocarlo al finalizar).
8Fije el soporte inferior (8) a la pared mediante el taco y el tornillo (Fig. 6).
ZPara el montaje a una pared de ladrillo recubierta de yeso utilizar los
tornillos y tacos suministrados, para otros tipos de superficie dirigirse al
vendedor experto.
4FUNCIONAMIENTO Y USO
1Conecte el aparato a la red.
2Seleccione la temperatura que desee utilizando los interruptores I (2) y
II (3) y el termostato de temperatura (5).
3Para alcanzar de forma correcta la temperatura en la habitación: Pulse
los interruptores I (750W) y II (1250W), obteniendo la potencia máxima
(III= 2.000W) y gire el termostato de temperatura (5) hasta el máximo.
4Cuando la habitación haya alcanzado la temperatura deseada, gire
lentamente el termostato de temperatura (5) hacia la izquierda. El
aparato se apagará y encenderá para mantener la temperatura
adecuada en la habitación.
5Si desea disminuir la temperatura de trabajo, deje seleccionado
únicamente uno de los dos interruptores I (750W) ó II (1250W) y repita
el proceso anterior con el termostato de temperatura (5).
6Pulse el interruptor ventilador (4) para obtener la opción ventilador.
iLa opción ventilador únicamente funcionará con el termostato (5)
encendido.
iUn dispositivo de seguridad interrumpe el funcionamiento del aparato
en caso de sobrecalentamiento accidental (ej. obstrucción de las
rejas de entrada y salida del aire,..). Una vez haya desaparecido este
sobrecalentamiento el aparato volverá a funcionar. Si el dispositivo de
seguridad interrumpe el funcionamiento repetidamente contacte con
el servicio post-venta mas cercano.
5MANTENIMIENTO Y LIMPIEZA
‹
Antes de proceder a su limpieza asegúrese de que el aparato está
desenchufado. Utilice un paño suave ligeramente humedecido.
‹No sumerja el aparato en el agua u otro líquido. Tampoco lo ponga
debajo del grifo.
•No utilice productos abrasivos ni que sean incompatibles con la pintura
epoxi, p1-ya que podría decolorar el aparato.
En orden a evitar un sobrecalentamiento no cubrir el aparato de
calefacción.
El aparato en ningún caso debe ser cubierto por ropa,
recipiente o cualquier otro objeto ni ser colocado debajo de un
armario o cualquier otro obstáculo a la circulación de aire
caliente.
No utilice el aparato de calefacción para secar ropa.
ENGLISHen
1CAUTION
•Read these instructions carefully before using the appliance.
•This manual is an integral part of the product. Keep it in a safe
place for future reference.
•This appliance is exclusively for household use and not for industrial
use. It is dangerous to use it for any purpose other than the one
indicated.
•Children must be supervised to ensure they do not play with the
appliance.
•This appliance is not to be used by persons (or children) whose
physical, sensorial or mental capacities are impaired, or who have no
experience or knowledge, unless supervised or instructed in the use of
the appliance by a person responsible for their safety.
•Do not make any modifications or repairs to the appliance. In the event
of any anomaly in the cord or any other part of the appliance, do not use
it and take it to an authorised service centre.
•Do not use any parts or accessories not supplied or recommended by
SOLAC.
•Before plugging the appliance into the mains, check that the indicated
voltage is the same as in your home.
•Always unplug the appliance after use and before assembling or
removing parts, and performing any maintenance or cleaning
operations. Also unplug it in the case of a power cut. The appliance
must be switched off before plugging or unplugging it into the mains
•Never pull the cord or use it to hang up the appliance. Always unplug
the appliance by pulling the connection pin, and not the cord.
•Make sure the cord does not come into contact with sharp edges or hot
surfaces. Do not leave the cord hanging over the edge of a table or
worktop, to prevent children from pulling it and causing the appliance to
fall.
•If the power cord is damaged, it should be replaced by the manufacturer
or by your after-sales service shop or similar qualified personnel to
prevent possible hazards.
•Remove all elements from the inside or outside of the appliance used
for protection during transport or for sales promotions, such as paper or
plastic bags, plastic sheets, cardboard and stickers.
•Position the fan heater away from inflammable materials (e.g. glues,
curtains, carpets).
•Choose the place where the heater is to be installed carefully according
to the instructions and in compliance with regulations.
•Do not install the appliance under a mains socket.
•To avoid the new smell of the appliance when using it for the first time,
switch it on and leave it operating for 2 hours at the highest temperature.
d
Do not use the heater near a bath, shower or swimming pool.
d
The appliance must be installed so that the switches, thermostat
and power cable cannot be touched directly or indirectly by a
person in the bath or shower.
•Always use the appliance in a horizontal position.
•Keep the front of the appliance at least 90 cm from furnishings,
inflammable materials, curtains, carpets, armchairs, etc.
•Do not use the appliance on wet surfaces or outdoors.
•The appliance must be connected to a power socket with a suitable
ground connection.
q
CAUTION! When you want to dispose of the appliance, NEVER
throw it in the rubbish bin. Take it to the CLEAN POINT or waste
collection centre closest to your home for processing. You will thus
be helping to take care of the environment.
2MAIN COMPONENTS
1Main body
2Switch I (750 W)
3Switch II (1250 W)
4Fan switch
5Temperature thermostat
6Mains power cable
7Plastic legs (2 units)
8Wall brackets (4 units)
9Screws for legs/lower wall bracket (4 units)
10Nylon wall plugs (4 units)
11Screws (4 units)
3ASSEMBLY
For floor use:
1Fix the legs to the bottom of the appliance using the screws (9) provided
(fig. 1)
For wall use:
ZDo not install the appliance in a ventilated area.
ZAlways observe the minimum safety distances between walls or
obstacles and the heater during installation (Fig. 2).
1Mark the positions of the 2 holes to be drilled for fixing the upper
brackets (fig. 3).
2Drill the 2 holes and insert the wall plugs provided (fig. 4).
3Fix the upper brackets (8) to the wall using the screws provided (11)
(Fig. 4).
4Fix the lower brackets (8) to the heater using the screws provided (9)
(fig. 5).
5Suspend the heater from the top brackets (8).
ZEnsure that the heater is horizontal.
6With the heater in place, mark on the wall the position of the hole to be
drilled for fixing the lower bracket.
7Drill the hole into the wall and insert the supplied wall plug (if necessary,
remove the heater so you can work without obstruction, replacing it
when you have finished).
8Fix the lower bracket (8) to the wall using the plug and screws provided
(fig. 6).
ZTo mount the heater on a plastered brick wall, use the screws and wall
plugs provided. For other surfaces, consult a specialist salesperson.
4OPERATION AND USE
1Plug the appliance into the mains socket.
2Select the desired temperature using switches I (2), II (3) and the
temperature thermostat (5).
3To achieve the correct temperature in the room: Press switches I (750
W) and II (1250 W), obtaining the maximum power (III= 2,000 W) and
turn the temperature thermostat (5) to the maximum setting.
4When the room reaches the desired temperature, slowly turn the
temperature thermostat (5) to the left. The appliance will switch on and
off in order to maintain the right temperature in the room.
5If you want to lower the operating temperature, choose only one of the
two switches I (750 W) or II (1250 W) and repeat the above process with
the temperature thermostat (5).
6Press the fan switch (4) to activate the fan option.
iThe fan option will only work when the thermostat (5) is switched on.
iThe fan heater has a safety thermostat that switches it off in the event
of accidental overheating (e.g. if the air input and output grilles
become blocked). When the fan heater cools down it will switch on
again. If the safety device switches the device off repeatedly, please
contact your nearest after-sales service.
5CLEANING AND MAINTENANCE
‹
Ensure that the apparatus is unplugged before cleaning. Use a slightly
damp soft cloth.
‹Never submerge in water or some other liquid or place it under the tap.
•Do not use abrasive products or those incompatible with epoxy paint:
this may discolour the apparatus.
To prevent overheating, do not cover the heating appliance.
The appliance should never be covered with clothes,
containers or any other objects, nor should it be placed under
a wardrobe or anything else that could obstruct the hot air
flow.
Do not use the heater to dry clothes.
FRANÇAISfr
1ATTENTION
•Lisez attentivement ce mode d'emploi avant d'utiliser l'appareil.
•Ce manuel fait partie du produit. Conservez-le dans un lieu sûr afin
de pouvoir le consulter ultérieurement.
•Cet appareil est destiné uniquement à un usage domestique, non
industriel. Tout usage autre que celui indiqué pourrait s’avérer
dangereux.
•Les enfants doivent être surveillés afin de s’assurer qu’ils ne jouent pas
avec l’appareil.
•À moins d’avoir été supervisées ou d’avoir reçu les instructions d’usage
de la personne responsable de leur sécurité, les personnes (y compris
des enfants) aux capacités physiques, sensorielles ou mentales
réduites, ou manquant d’expérience ou de connaissance, ne doivent
pas utiliser cet appareil.
•Ne modifiez ni ne réparez jamais l’appareil. Si vous constatez une
anomalie sur le cordon ou une autre partie de l’appareil, ne l’utilisez pas
et amenez-le à un centre de service technique agréé.
•N’utilisez pas de pièces ni d'accessoires non fournis ou recommandés
par SOLAC.
•Avant de brancher l’appareil au secteur, vérifiez que la tension indiquée
correspond bien à celle de votre logement.
•Débranchez toujours l’appareil après usage et avant de démonter ou de
monter des pièces et d'effectuer toute opération d’entretien ou de
nettoyage. Débranchez-le également en cas de coupure de courant.
Lorsque vous branchez ou débranchez l’appareil, celui-ci doit être en
position «arrêt».
•Ne tirez jamais sur le câble et ne suspendez pas l’appareil par le câble.
Débranchez l’appareil en tirant toujours sur la prise, jamais sur le
cordon.
•Prenez garde à ce que le cordon d'alimentation n'entre pas en contact
avec des éléments tranchants ou des surfaces chaudes. Ne laissez pas
le cordon pendre au bord de la table ou du plan de travail afin d’éviter
que les enfants ne tirent dessus et ne le fassent tomber.
•Si le cordon d’alimentation est endommagé, il devra être remplacé par
le fabricant, par un service après-vente ou par tout professionnel agréé
afin d’écarter tout danger.
•Retirez tous les sachets en papier ou en plastique, les films plastiques,
les cartons et autocollants éventuels apposés sur l'appareil ou à
l'extérieur lui servant de protection pendant le transport ou pour sa
promotion.
•Éloignez l’appareil de chauffage de matières inflammables (colles,
rideaux, tapis, etc.).
•L’emplacement de l’appareil de chauffage doit être choisi correctement
et son installation doit être réalisée conformément aux normes.
•Ne pas installer l’appareil sous une prise de courant.
•Afin d’éviter l’odeur de neuf de l’appareil, lors de sa première utilisation
allumez-le et laissez-le fonctionner à la température la plus élevée
pendant 2 heures.
d
Ne pas utiliser cet appareil de chauffage à proximité d’une
baignoire, d’une douche ou d’une piscine.
d
L’appareil doit être installé de sorte que les interrupteurs,
thermostats, prise de branchement mobile ne puissent pas être
touchés, directement ou indirectement, par une personne qui se
trouve dans la baignoire ou sous la douche.
•Utilisez toujours l’appareil en position horizontale.
•Tenez la partie frontale de l’appareil éloignée d’au moins 90 cm de tout
meuble, matériau combustible, rideau, moquette, fauteuil, etc.
•Ne l'utilisez jamais sur des surfaces mouillées ni à l'extérieur.
•L’appareil doit être branché à une prise de courant disposant d’une
prise de terre adaptée.
q
ATTENTION!: Pour mettre l’appareil au rebut, NE LE JETEZ
JAMAIS à la poubelle; déposez-le dans un POINT DE
RECYCLAGE ou à la déchetterie la plus proche afin qu’il y soit
recyclé. Vous contribuerez ainsi à la préservation de
l’environnement.
2PRINCIPAUX ÉLÉMENTS
1Corps principal
2Interrupteur I (750W)
3Interrupteur II (1250W)
4Interrupteur ventilateur
5Thermostat de température
6Cordon d'alimentation
7Pieds en plastique (2 unités)
8Supports muraux (4 unités)
9Vis pour pieds/supports inférieurs au mur (4 unités)
10Chevilles en nylon (4 unités)
11Vis (4 unités)
3MONTAGE
Pour son utilisation au sol
1Fixez les pieds sur la partie inférieure de l'appareil avec les vis (9)
fournies (Fig. 1)
Pour sa fixation au mur
ZNe pas installer l’appareil dans une zone de ventilation.
ZInstallez l’appareil en respectant les distances de sécurité indiquées,
par rapport au mur ou à tout autre obstacle (Fig. 2).
1Marquez la position des 2 orifices à percer pour la fixation des supports
supérieurs (Fig. 3).
2Percez les 2 orifices et introduisez-y les chevilles fournies (10) (Fig. 4).
3Fixez les supports supérieurs (8) au mur à l’aide des vis fournies (11)
(Fig. 4).
4Fixez les supports inférieurs (8) au convecteur à l’aide des vis fournies
(9) (Fig. 5).
5Accrochez le convecteur aux supports supérieurs (8).
ZAssurez-vous que le convecteur soit bien en position horizontale.
6Après avoir installé le convecteur, marquez au mur l’emplacement de
l’orifice que vous devrez percer pour fixer le support inférieur.
7Percez le trou au mur et introduisez-y la cheville fournie (si nécessaire,
retirez le convecteur pour travailler plus librement et fixez-le à nouveau
à la fin de l’opération).
8Fixez le support inférieur (8) au mur à l’aide de la cheville et de la vis
(Fig. 6).
ZPour monter l’appareil sur un mur de briques recouvert de plâtre,
utilisez les vis et les chevilles fournies ; pour d’autres types de surfaces,
renseignez-vous auprès d’un vendeur spécialisé.
4FONCTIONNEMENT ET UTILISATION
1Branchez l’appareil.
2Sélectionnez la température désirée au moyen des interrupteurs I (2)
etII (3) et du thermostat de température (5).
3Pour que la pièce atteigne correctement la température sélectionnée :
Appuyez sur les interrupteurs I (750W) et II (1250W), de sorte à obtenir
la puissance maximum (III= 2 000W) et tournez le thermostat de
température (5) au maximum.
4Quand la pièce a atteint la température désirée, tournez lentement le
thermostat de température (5) vers la gauche. L’appareil s'éteindra puis
s’allumera pour maintenir la température idéale dans la pièce.
5Si vous souhaitez baisser la température ambiante, ne sélectionnez
qu’un seul des interrupteurs I (750W) ou II (1250W) et réalisez la même
manipulation avec le thermostat de température (5).
6Appuyez sur l’interrupteur ventilateur (4) pour obtenir l’option
ventilateur.
iL’option ventilateur ne fonctionnera que si le thermostat (5) est
allumé.
iUn dispositif de sécurité arrête le fonctionnement de l’appareil en cas
de surchauffe accidentelle (par ex., obstruction des grilles d’entrée et
de sortie d’air, etc.). Lorsque cette surchauffe aura disparu, l’appareil
reprendra son fonctionnement normal. Si le dispositif de sécurité
interrompt le fonctionnement de manière répétée, prenez contact
avec le service après-vente le plus proche de chez vous.
5ENTRETIEN
‹
Avant de procéder à son nettoyage, assurez-vous d’avoir bien
débranché l’appareil. Utilisez un chiffon doux légèrement humide.
‹Ne trempez pas l’appareil dans l’eau ou dans tout autre liquide. Ne le
mettez pas non plus sous le robinet.
•N’utilisez pas de produits abrasifs ou incompatibles avec la peinture
Epoxy susceptibles de décolorer l’appareil.
Afin d’éviter une surchauffe, ne pas couvrir l’appareil de
chauffage.
L’appareil ne doit en aucun cas être couvert par des
vêtements, un récipient ou quelque autre objet, ni être placé
sous une armoire ou quelque autre obstacle à la circulation de
l’air chaud.
N'utilisez pas l’appareil de chauffage pour sécher des
vêtements.
DEUTSCHde
1ACHTUNG
•Lesen Sie diese Anweisungen vor Inbetriebnahme des Gerätes
aufmerksam durch.
•Diese Bedienungsanleitung ist Bestandteil des Produkts.
Bewahren Sie sie an einem sicheren Ort zum späteren Nachlesen
auf.
•Dieses Gerät ist ausschließlich für den Hausgebrauch und nicht für
gewerbliche Zwecke bestimmt. Jede andere Verwendung als die
vorgesehene kann gefährlich sein.
•Kinder nicht unbeaufsichtigt lassen um sicherzustellen, dass sie das
Gerät nicht als Spielzeug verwenden.
•Dieses Gerät darf nicht von Personen (einschließlich Kindern) mit
eingeschränkten körperlichen, sensorischen oder geistigen Fähigkeiten
bzw. ohne ausreichende Erfahrung und Kenntnisse benutzt werden, es
sei denn unter der Aufsicht oder entsprechenden Anleitung einer für
ihre Sicherheit verantwortlichen Person.
•Nehmen Sie keine Änderungen oder Reparaturen am Gerät vor.
Benutzen Sie das Gerät nicht im Falle eines Defekts am Netzkabel oder
einem anderen Geräteteil und bringen Sie es zu einem autorisierten
Kundendienst.
•Verwenden Sie ausschließlich von SOLAC gelieferte oder empfohlene
Teile bzw. Zubehör.
•Vergewissern Sie sich vor dem Netzanschluss des Geräts, dass die
angegebene Netzspannung mit derjenigen Ihres Haushalts
übereinstimmt.
•Trennen Sie das Gerät nach dem Gebrauch, vor dem Abnehmen bzw.
Aufsetzen eines Teils sowie vor jeder Reinigung oder Wartung stets
vom Netz. Bei Stromausfall ebenfalls vom Netz trennen. Das Gerät
muss ausgeschaltet sein, wenn Sie es an das Netz anschließen oder
vom Netz trennen.
•Ziehen Sie nicht am Kabel bzw. hängen Sie das Gerät nicht am Kabel
auf. Ziehen Sie stets am Netzstecker, nicht am Kabel, wenn Sie das
Gerät vom Netz trennen.
•Achten Sie darauf, dass das Netzkabel nicht mit scharfen Kanten oder
heißen Flächen in Berührung kommt. Lassen Sie das Kabel nicht über
die Tischkante bzw. Abstellfläche hängen, um zu verhindern, dass
Kinder daran ziehen und das Gerät zu Boden fällt.
•Sollte das Netzkabel beschädigt sein, darf es vorsichtshalber nur vom
Hersteller, seinem autorisierten Kundendienst oder ähnlichem
Fachpersonal ausgetauscht werden.
•Entfernen Sie alle Papier- und Kunststoffbeutel, Kunststofffolien,
Kartons bzw. Aufkleber in oder am Gerät, die als Transportschutz oder
Werbungselemente dienen.
•Stellen Sie den Heizstrahler nicht in der Nähe von entflammbaren
Materialien (Klebstoff, Vorhänge, Teppiche...) auf.
•Der Aufstellungsort des Geräts muss ordnungs- und vorschriftsgemäß
nach den geltenden Normen gewählt werden.
•Das Gerät nicht unter einer Steckdose montieren.
•Zur Vermeidung des unangenehmen Geruchs beim ersten Gebrauch
stellen Sie das Gerät auf die Höchststufe ein und lassen Sie es zwei
Stunden eingeschaltet.
d
Benutzen Sie das Gerät nicht in unmittelbarer Nähe einer
Badewanne, Dusche oder von Schwimmbädern.
d
Das Gerät muss so montiert werden, dass die Schalter, der
Thermostat und der Stecker nicht direkt oder indirekt von
Personen berührt werden können, die sich in der Badewanne oder
Dusche befinden.
•Das Gerät immer in waagerechter Stellung benutzen.
•Die Vorderseite des Geräts in einem Abstand von mindestens 90 cm
von Möbeln, entflammbaren Materialien wie Gardinen,
Fußbodenbelägen, Polstersesseln usw. aufstellen.
•Stellen Sie das Gerät niemals auf nassen Oberflächen oder im Freien
auf.
•Stellen Sie sicher, dass die Steckdose vorschriftsmäßig geerdet ist.
q
ACHTUNG! Das Gerät KEINESFALLS über den Hausmüll
entsorgen, sondern zum nächstgelegenen WERTSTOFFHOF
oder zu einer Abfallannahmestelle zur Weiterverwertung bringen.
So leisten Sie einen Beitrag zum Umweltschutz.
2HAUPTBESTANDTEILE
1Gehäuse
2Schalter I (750 W)
3Schalter II (125 W)
4Ventilatorschalter
5Thermostat
6Netzkabel
7Stützfüße aus Kunststoff (2 Stck.)
8Wandmontageteile (4 Stck.)
9Schrauben für Füße/ untere Wandhalterung (4 Stck.)
10Nylondübel (4 Stck.)
11Senkschrauben (4 Stck.)
3MONTAGE
Verwendung auf dem Boden
1Montieren Sie Stützfüße anhand der mitgelieferten Schrauben (9) an
der Unterseite des Geräts (Abb. 1)
Verwendung an der Wand
ZGerät nicht in einem Belüftungsbereich montieren.
ZHalten Sie bei der Montage des Geräts die angegebenen
Sicherheitsabstände zur Wand und zu etwaigen Hindernissen ein (Abb.
2).
1Markieren Sie die Positionen der 2 Bohrlöcher zur Befestigung der
oberen Wandhalterungen (Abb. 3).
2Bohren Sie die 2 Löcher und setzen Sie die mitgelieferten Dübel (10)
ein (Abb. 4).
3Montieren Sie die oberen Wandhalterungen (8) anhand der
mitgelieferten Schrauben (11) an der Wand (Abb. 4).
4Montieren Sie die unteren Wandhalterungen (8) anhand der
mitgelieferten Schrauben (9) am Konvektor (Abb. 5).
5Hängen Sie den Konvektor in die beiden oberen Wandhalterungen ein
(8).
ZStellen Sie sicher, dass sich der Konvektor in waagerechter Position
befindet.
6Markieren Sie nun die Stelle für das Bohrloch zur Montage der unteren
Wandhalterung.
7Bohren Sie das Loch in die Wand, und setzen Sie den mitgelieferten
Dübel ein (nehmen Sie den Konvektor ggf. von der Wand, um
ungehindert arbeiten zu können, und hängen Sie ihn danach wieder
ein).
8Montieren Sie die untere Wandhalterung (8) anhand des mitgelieferten
Dübels und der Schraube an der Wand (Abb. 6).
ZZur Montage auf einer Gipswand verwenden Sie die mitgelieferten
Schrauben und Dübel. Bei anderen Oberflächen wenden Sie sich bitte
an Ihren Fachhändler.
4BETRIEB UND VERWENDUNG
1Schließen Sie das Gerät ans Netz an.
2Stellen Sie die gewünschte Temperatur anhand der Schalter I (2) und II
(3) sowie des Thermostats (5) ein.
3So erreichen Sie die gewünschte Raumtemperatur: Drücken Sie auf die
Schalter I (750 W) und II (1250 W), um das Gerät auf Höchstleistung
(III= 2000 W) einzustellen, und drehen Sie den Thermostat (5) auf die
höchste Stufe.
4Sobald die gewünschte Raumtemperatur erreicht ist, drehen Sie den
Thermostat (5) langsam nach links. Das Gerät schaltet sich so aus bzw.
ein, dass die gewünschte Temperatur im Raum konstant gehalten wird.
5Wenn Sie die Betriebstemperatur senken möchten, lassen Sie nur
einen der beiden SchalterI (750 W) oder II (1250 W) eingeschaltet und
wiederholen den o.g Vorgang mit dem Thermostat (5).
6Drücken Sie auf den Ventilatorschalter (4), um die Ventilatorfunktion
einzuschalten.
iDer Ventilator funktioniert nur, wenn der Thermostat (5) eingeschaltet
ist.
iEine Sicherheitsvorrichtung unterbricht den Betrieb des Geräts, falls
es zu einer unbeabsichtigten Überhitzung (z.B. verstopfte Lufteintritts-
und Abluftgitter o.ä.) kommt. Nach dem Abklingen der Überhitzung
nimmt das Gerät seinen Betrieb wieder auf. Wird der Betrieb des
Geräts wiederholt durch die Sicherheitsvorrichtung unterbrochen, so
wenden Sie sich bitte an den nächsten Kundendienst.
5INSTANDHALTUNG UND REINIGUNG
‹
Vor der Reinigung Netzstecker ziehen. Ein leicht angefeuchtetes Tuch
verwenden.
‹Das Gerät nicht in Wasser oder andere Flüssigkeiten tauchen. Auch
nicht unter den Wasserhahn halten.
•Keine Scheuermittel oder Produkte verwenden, die für den Epoxy-Lack
schädlich sind, da das Gerät sonst seine Farbe verliert.
Zur Vermeidung von Überhitzung den Heizstrahler nicht
bedecken.
Benutzen Sie das Gerät keinesfalls als
Wäscheständer und stellen Sie keine Gefäße oder anderen
Gegenstände darauf. Stellen Sie es niemals unter einen Schrank
oder andere Gegenstände, welche die Warmluftzirkulation
behindern.
Benutzen Sie den Heizstrahler nicht zum Trocknen von Wäsche.
PORTUGUÊSpt
1ATENÇÃO
•Leia completamente estas instruções antes de utilizar o aparelho.
•Este manual é parte integrante do produto. Guarde-o em lugar seguro
para eventual consulta posterior.
•Este aparelho destina-se apenas à utilização doméstica, não industrial.
Qualquer utilização diferente da indicada poderia ser perigosa.
•As crianças devem ser supervisionadas para assegurar que não brincam
com o aparelho.
•Este aparelho não está destinado para as pessoas (incluindo crianças) que
apresentem capacidades físicas, sensoriais ou mentais reduzidas, ou falta
de experiência e conhecimento, excepto se forem supervisionadas ou
receberam instruções sobre a utilização do aparelho por uma pessoa
responsável pela sua segurança.
•Não realize qualquer modificação nem reparação ao aparelho. Perante
qualquer anomalia no cabo ou noutra parte do aparelho, não o utilize e
contacte um serviço de assistência autorizado.
•Não utilize peças ou acessórios que não tenham sido fornecidos ou
recomendados pela SOLAC.
•Antes de ligar o aparelho à rede eléctrica, verifique se a tensão indicada é
igual à da sua residência.
•Desligue sempre o aparelho depois da utilização e antes de desmontar ou
montar peças e realizar qualquer tarefa de manutenção ou limpeza.
Desligue-o também em caso de corte de energia. Quando ligar ou desligar o
aparelho da tomada, este deve estar desligado.
•Nunca puxe nem pendure o aparelho pelo cabo. Desligue o aparelho da
tomada puxando sempre pela ficha, nunca pelo cabo.
•Evite que o cabo de ligação entre em contacto com arestas cortantes ou
superfícies quentes. Não permita que o cabo fique pendurado na borda da
mesa, ou no tampo, de forma a evitar que as crianças puxem pelo mesmo e
façam cair o aparelho.
•Se o cabo de alimentação estiver danificado, deve ser substituído pelo
fabricante, pelo seu serviço de pós-venda ou por pessoal qualificado
semelhante, com o fim de evitar riscos.
•Retire todas as embalagens de papel ou de plástico, lâminas plásticas,
cartões e eventuais autocolantes que se encontrem dentro ou fora do
aparelho e que serviram como protecção de transporte ou promoção de
venda.
•Coloque o aparelho de aquecimento afastado de materiais inflamáveis
(colas, cortinas, tapetes…).
•A colocação do aparelho de aquecimento deve ser correctamente escolhida
e deve realizar-se segundo as regras e em conformidade com as normas.
•Não instale o aparelho sob uma tomada de corrente.
•Com o objectivo de evitar o odor a novo do aparelho na sua primeira
utilização ligue-o e deixe-o a funcionar durante 2 horas na temperatura mais
alta.
d
Não utilizar este aparelho de aquecimento próximo de uma banheira,
duche ou piscina.
d
O aparelho deve ser instalado de forma que os interruptores, o
termóstato, a tomada móvel de ligação, não possam ser tocados
directa ou indirectamente por uma pessoa que se encontre na banheira
ou no duche.
•Utilize sempre o aparelho na posição horizontal.
•Mantenha a parte da frente do aparelho afastada pelo menos 90 cm de
móveis, materiais combustíveis, cortinas, carpetes, poltronas, etc.
•Não utilize o aparelho sobre superfícies molhadas nem no exterior.
•O aparelho deve ligar-se a uma tomada de corrente que disponha de um
contacto de ligação à terra adequado.
q
ATENÇÃO!!: Quando pretender desfazer-se do aparelho, NUNCA o
deite no caixote do lixo, faça-o no seu ECOPONTO ou no ponto de
recolha de resíduos mais perto de sua casa, para o seu posterior
tratamento. Desta forma, está a contribuir para a protecção do meio
ambiente.
2COMPONENTES PRINCIPAIS
1Corpo principal
2Interruptor I (750W)
3Interruptor II (1250W)
4Interruptor ventilador
5Termóstato de temperatura
6Cabo de ligação à rede eléctrica
7Pés de plástico (2 unidades)
8Suportes de parede (4 unidades)
9Parafusos para pés/suporte inferior de parede (4 unidades)
10Buchas de nylon (4 unidades)
11Tira-fundos (4 unidades)
3MONTAGEM
Para a sua utilização sobre o chão
1Fixe os pés na parte inferior do aparelho através dos parafusos (9) fornecidos
(Fig. 1).
Para a sua utilização na parede
ZNão instale o aparelho sob uma zona de ventilação.
ZInstale o aparelho respeitando as distâncias de segurança indicadas
relativamente a qualquer parede ou obstáculo (Fig. 2).
1Marque as posições dos 2 orifícios a efectuar para a fixação dos suportes
superiores (Fig. 3).
2Faça os 2 orifícios e coloque as buchas fornecidas (10) (Fig. 4).
3Fixe os suportes superiores (8) na parede com os parafusos fornecidos (11) (Fig. 4).
4Fixe os suportes superiores (8) ao convector com os parafusos fornecidos (9) (Fig. 5).
5Pendure o convector dos suportes superiores (8).
ZCertifique-se de que o convector fica na posição horizontal.
6Com o convector colocado, marque na parede a posição onde deve realizar
o orifício para fixar o suporte inferior.
7Faça o orifício na parede e coloque a bucha fornecida (se for necessário retire
o convector para trabalhar com maior liberdade e volte a colocá-lo no final).
8Fixe o suporte inferior (8) na parede com a bucha e o parafuso (Fig. 6).
ZPara a montagem numa parede de tijolos, coberta de gesso, utilize os
parafusos e as buchas fornecidos, para outros tipos de superfície. Dirija-se
ao vendedor especializado.
4FUNCIONAMENTO E UTILIZAÇÃO
1Ligue o aparelho à rede.
2Seleccione a temperatura que deseja utilizando os interruptores I (2) e II (3)
e o termóstato de temperatura (5).
3Para atingir de forma correcta a temperatura na divisão: Prima os
interruptores I (750W) e II (1250W), obtendo a potência máxima (III= 2000W)
e rode o termóstato de temperatura (5) para o máximo.
4Quando a divisão tiver alcançado a temperatura desejada, rode lentamente
o termóstato de temperatura (5) para a esquerda. O aparelho desliga-se e
liga-se para manter a temperatura adequada na divisão.
5Se desejar diminuir a temperatura de trabalho, deixe seleccionado apenas
um dos dois interruptores I (750W) ou II (1250W) e repita o processo anterior
com o termóstato de temperatura (5).
6Prima o interruptor ventilador (4) para obter a opção ventilador.
iA opção ventilador funcionará apenas com o termóstato (5) ligado.
iUm dispositivo de segurança interrompe o funcionamento do aparelho em
caso de sobreaquecimento acidental (ex. obstrução das grelhas de entrada
e saída do ar, etc.). O aparelho voltará a funcionar logo que o
sobreaquecimento passe. Se o dispositivo de segurança interromper o
funcionamento repetidamente, contacte o serviço de pós-venda mais
próximo.
5MANUTENÇÃO E LIMPEZA
‹Antes de proceder a sua limpeza certifique-se de que o aparelho esteja
desligado. Utilize um pano macio levemente humidecido.
‹Não submerja o aparelho na água ou noutro líquido. Também não o ponha
debaixo da torneira.
•Não utilize produtos abrasivos nem que sejam incompatíveis com a pintura
epoxi, já que poderia descolorir o aparelho.
ITALIANOit
1ATTENZIONE
•Leggere le presenti istruzioni in ogni loro parte prima di utilizzare
l'apparecchio.
•Il presente manuale è parte integrante del prodotto. Conservarlo in un
luogo sicuro per poterlo consultare in futuro.
•Il presente apparecchio è destinato unicamente all'uso domestico e non
industriale. Per evitare pericoli, non utilizzare l'apparecchio per scopi diversi
da quelli a cui è destinato.
•Assicurarsi che i bambini non giochino con l'apparecchio.
•L’apparecchio non è indicato per essere utilizzato da persone (bambini
compresi) con capacità fisiche, sensoriali o mentali ridotte e prive
dell'esperienza e delle conoscenze necessarie, a meno che non abbiano
ricevuto una supervisione o istruzioni relative all’uso dell’apparecchio stesso
da una persona responsabile della loro sicurezza.
•Non apportare modifiche né riparazioni di sorta all’apparecchio. In presenza
di qualunque anomalia del cavo o di qualsiasi altra parte dell’apparecchio,
non utilizzarlo e consultare un servizio di assistenza autorizzato.
•Non usare pezzi o accessori non forniti o non raccomandati da SOLAC.
•Prima di collegare l’apparecchio alla rete elettrica, verificare che il voltaggio
indicato coincida con quello della sua abitazione.
•Scollegare sempre l’apparecchio dalla rete elettrica dopo l’uso e prima di
smontare o montare dei pezzi o svolgere qualsiasi attività di manutenzione o
pulitura. Scollegare l’apparecchio dalla rete elettrica anche in caso di black-
De forma a evitar um sobreaquecimento, não cubra o aparelho de
aquecimento.
O aparelho não deve, em caso algum, ser coberto por roupa, recipiente
ou qualquer outro objecto, nem ser colocado debaixo de um armário ou
de qualquer outro obstáculo à circulação do ar quente.
Não utilize o aparelho de aquecimento para secar roupa.
out. In fase di collegamento o scollegamento alla/dalla rete elettrica,
l’apparecchio deve restare sempre spento.
•Non tirare mai il cavo né appendere l’apparecchio allo stesso. Scollegare
l’apparecchio dalla rete elettrica impugnando sempre la spina e non il cavo di
alimentazione.
•Evitare che il cavo entri in contatto con schegge taglienti o superfici calde.
Non lasciare il cavo sospeso dal bordo di tavoli o ripiani; i bambini potrebbero
tirarlo e far cadere l'apparecchio.
•Se il cavo di alimentazione è danneggiato farlo sostituire dal produttore, da
un servizio di assistenza post-vendita o da personale qualificato per evitare
pericoli.
•Rimuovere tutti i sacchetti di carta o di plastica, i pezzi di plastica, i cartoncini
ed eventuali adesivi che si trovano dentro o fuori l'apparecchio e che sono
stati utilizzati per proteggerlo durante il trasporto o per promuoverne la
vendita.
•Posizionare l'apparecchio di riscaldamento lontano da materiali infiammabili
(colle, tende, tappeti e simili).
•La posizione dell'apparecchio di riscaldamento deve essere scelta
correttamente e il posizionamento deve avvenire in conformità con le regole
e le norme vigenti.
•Non installare l'apparecchio sotto una presa di corrente.
•Onde evitare l'odore di nuovo dell'apparecchio, al suo primo utilizzo
accenderlo e lasciarlo in funzione per 2 ore alla temperatura massima.
d
Non utilizzare questo apparecchio di riscaldamento nelle immediate
vicinanze di una vasca, doccia o piscina.
d
L'apparecchio deve essere installato in modo che interruttori,
termostato e presa mobile di collegamento non siano a contatto, diretto
o indiretto, con una persona che si trova nella vasca o nella doccia.
•Utilizzare sempre l'apparecchio in posizione orizzontale.
•Tenere la parte anteriore dell'apparecchio a una distanza di almeno 90 cm da
mobili, materiali combustibili, tende, moquette, poltrone e così via.
•Non utilizzare mai l'apparecchio su superfici umide e all'aperto.
•Collegare l'apparecchio a una presa di corrente dotata di messa a terra
adeguata.
q
ATTENZIONE: Non smaltire MAI l'apparecchio insieme ai rifiuti
domestici. Portarlo presso il CENTRO DI SMALTIMENTO o di raccolta
più vicino perché possa essere smaltito adeguatamente. In questo
modo si contribuirà alla tutela dell'ambiente.
2COMPONENTI PRINCIPALI
1Corpo principale
2Interruttore I (750 W)
3Interruttore II (1250 W)
4Interruttore del ventilatore
5Termostato
6Cavo di alimentazione
7Gambe di plastica (2 unità)
8Supporti a parete (4 unità)
9Viti per gambe/supporto inferiore a parete (4 unità)
10Ancoraggi di nylon (4 unità)
11Tirafondi (4 unità)
3MONTAGGIO
Per utilizzo a pavimento
1Fissare le gambe alla parte inferiore dell'apparecchio tramite le viti (9) in
dotazione (Fig. 1)
Per utilizzo a parete
ZNon installare l'apparecchio in una zona di ventilazione.
ZInstallare l'apparecchio rispettando le distanze di sicurezza indicate, rispetto
a qualsiasi muro od ostacolo (Fig. 2).
1Contrassegnare le posizioni dei 2 fori da praticare per il fissaggio dei supporti
superiori (Fig. 3).
2Praticare i 2 fori e posizionare i fissaggi in dotazione (10) (Fig. 4).
3Fissare i supporti superiori (8) alla parete tramite le viti in dotazione (11) (Fig. 4).
4Fissare i supporti inferiori (8) al convettore tramite le viti in dotazione (9) (Fig. 5).
5Appendere il convettore ai supporti superiori (8).
ZAccertarsi che il convettore sia in posizione orizzontale.
6Con il convettore in posizione, contrassegnare sulla parete la posizione in cui
occorre praticare il foro per fissare il supporto inferiore.
7Praticare il foro nella parete e posizionare l'ancoraggio fornito in dotazione
(se necessario, rimuovere il convettore per lavorare con maggiore libertà e
posizionarlo nuovamente alla fine).
8Fissare il supporto inferiore (8) alla parete mediante l'ancoraggio e la vite (Fig. 6).
ZPer il montaggio su una parete di mattoni rivestita di gesso, utilizzare le viti e
gli ancoraggi in dotazione; per altri tipi di superficie, rivolgersi a un rivenditore
esperto.
4FUNZIONAMENTO E UTILIZZO
1Collegare l'apparecchio alla rete.
2Selezionare la temperatura desiderata utilizzando gli interruttori I (2) e II (3) e
il termostato (5).
3Per raggiungere in modo corretto la temperatura nella stanza: Premere gli
interruttori I (750 W) e II (1250 W), ottenendo la potenza massima (III = 2.000
W), e ruotare il termostato (5) fino a raggiungere il valore massimo.
4Quando la stanza p1-ha raggiunto la temperatura desiderata, ruotare
lentamente il termostato (5) verso sinistra. L'apparecchio si spegnerà e si
accenderà per mantenere costante la temperatura nella stanza.
5Se si desidera diminuire la temperatura di esercizio, lasciare premuto
soltanto uno dei due interruttori I (750 W) o II (1250 W) e ripetere la procedura
precedente con il termostato (5).
6Premere l'interruttore del ventilatore (4) per ottenere l'opzione ventilatore.
i
L'opzione ventilatore funzionerà soltanto con il termostato (5) acceso.
i
L'apparecchio è dotato di un dispositivo di sicurezza che ne interrompe il
funzionamento in caso di surriscaldamento accidentale (ad esempio, a causa
di un'ostruzione delle griglie di ingresso e di uscita dell'aria e così via).
L'apparecchio tornerà a funzionare appena raggiungerà la temperatura
normale. Se il dispositivo di sicurezza interrompe ripetutamente il
funzionamento, contattare il servizio di assistenza post-vendita più vicino.
5MANUTENZIONE E PULIZIA
‹
Prima di procedere alla sua pulizia, si assicuri che l'apparecchio sia
connesso. Utilizzi un panno morbido leggermente inumidito.
‹Non immerga l'apparecchio in acqua o altro liquido. Non lo metta neppure
sotto il rubinetto.
•Non utilizzi prodotti abrasivi né che siano incompatibili con la vernice epoxi,
giacchè potrebbe decolorare l'apparecchio.
NEDERLANDSnl
1WAARSCHUWINGEN
•Lees deze gebruiksaanwijzingen helemaal door alvorens het apparaat in
gebruik te nemen.
•Deze gebruiksaanwijzing is onderdeel van het product. Bewaar de
gebruiksaanwijzing op een veilige plek om deze in de toekomst na te
kunnen slaan.
•Het apparaat is uitsluitend bedoeld voor huishoudelijk gebruik; niet voor
bedrijfsmatig gebruik. Elk ander gebruik dan hier vermeld kan gevaarlijk zijn.
•Laat kinderen niet zonder toezicht in de buurt van het apparaat om er zeker
van te zijn dat ze er niet mee spelen.
•Dit apparaat mag niet door mensen (met inbegrip van kinderen) met
lichamelijke, zintuiglijke of geestelijke beperkingen, of met een gebrek aan
ervaring en kennis gebruikt worden, met uitzondering van hen die door een
met hun veiligheid belaste persoon opgeleid of gesuperviseerd werden voor
het gebruik van dit apparaat.
•Voer geen enkele wijziging of reparatie aan het apparaat uit. Bij defecten aan
het netsnoer of een ander deel van het apparaat, het apparaat niet gebruiken
maar naar een erkende technische dienst brengen.
•Gebruik geen onderdelen of hulpstukken die niet door SOLAC geleverd of
aanbevolen zijn.
•Kijk, alvorens het apparaat op het lichtnet aan te sluiten, of het aangegeven
voltage overeenkomt met de netspanning bij u thuis.
•Trek altijd na gebruik de stekker uit het stopcontact en ook vóórdat u
onderdelen verwijdert of aanbrengt of onderhouds- of
reinigingswerkzaamheden aan het apparaat verricht. Trek de stekker er ook
bij stroomuitval uit. Wanneer u de stekker in of uit het stopcontact doet, dient
het apparaat uit te staan.
•Trek nooit aan het snoer of laat het apparaat nooit aan het snoer hangen.
Neem de stekker uit het stopcontact door aan de stekker, nooit aan het snoer,
te trekken.
•Zorg ervoor dat het netsnoer niet in contact komt met scherpe kanten of hete
oppervlakken. Laat het snoer niet over de rand van de tafel of het aanrecht
hangen om te voorkomen dat kinderen eraan trekken en het apparaat op de
grond valt.
•Laat als het netsnoer beschadigd is, dit door de fabrikant, zijn klantenservice
of door vergelijkbaar opgeleid personeel vervangen, om evt. risico’s te
vermijden.
•Verwijder alle papieren of plastic zakken, kunststof plaatjes, kaartjes en
stickers die evt. aan de binnen- of buitenkant van het apparaat aangebracht
werden ter bescherming tijdens het transport of voor reclamedoeleinden.
•Plaats het verwarmingsapparaat uit de buurt van brandbare materialen (lijm,
gordijnen, vloerkleden...).
•Het verwarmingsapparaat moet op een geschikte plek worden geplaatst,
volgens de regels en veiligheidsvoorschriften.
•Installeer het apparaat niet onder een stopcontact.
•Om te voorkomen dat het apparaat bij het eerste gebruik naar “nieuw” ruikt,
het apparaat gedurende 2 uur ingeschakeld laten staan op de hoogste stand.
d
Gebruik dit apparaat niet in de onmiddellijke nabijheid van een bad,
douche of zwembad.
Per evitare una situazione di surriscaldamento, non coprire
l'apparecchio di riscaldamento.
L'apparecchio non deve essere in nessun caso coperto da indumenti,
recipienti o qualsiasi altro oggetto e non deve essere posizionato sotto
un armadio o qualsiasi altro ostacolo alla circolazione di aria calda.
Non utilizzare l'apparecchio di riscaldamento per asciugare indumenti.
Om oververhitting te voorkomen, het verwarmingsapparaat nooit
bedekken.
Het apparaat mag nooit bedekt worden met kleding, bakken of andere
voorwerpen en mag niet geplaatst worden onder een kast of iets anders
wat de circulatie van de warme lucht belemmert.
Gebruik het verwarmingsapparaat niet om kleding te drogen.
d
Het apparaat moet zodanig geïnstalleerd worden dat de schakelaars,
de thermostaat en het verplaatsbare aansluitsnoer niet direct of indirect
aangeraakt kunnen worden door iemand die zich in bad of onder de
douche bevindt.
•Gebruik het apparaat altijd in horizontale stand.
•Houd de voorzijde van het apparaat op minimaal 90 cm afstand van meubels,
brandbaar materiaal, gordijnen, vloerbedekking, stoelen, enz.
•Gebruik dit apparaat nooit op een natte ondergrond of buitenshuis.
•Het apparaat dient aangesloten te worden op een stopcontact met een goede
aardleiding.
q
¡LET OP: Wanneer u het apparaat wilt afdanken, deponeer het dan IN
GEEN GEVAL bij het huisvuil, maar breng het voor verdere verwerking
naar het dichtstbijzijnde recyclingcentrum of vuilophaalpunt. Op deze
wijze draagt u bij aan het behoud van het milieu.
2BELANGRIJKSTE ONDERDELEN
1Romp
2Schakelaar I (750W)
3Schakelaar II (1250W)
4Ventilatorschakelaar
5Thermostaat
6Netsnoer
7Plastic poten (2 stuks)
8Wandsteunen (4 stuks)
9Schroeven voor de poten/onderste wandsteun (4 stuks)
10Nylon pluggen (4 stuks)
11Wandschroeven (4 stuks)
3MONTAGE
Voor gebruik op de grond
1Bevestig de poten aan de onderzijde van het apparaat met behulp van de
meegeleverde schroeven (9) (afb. 1)
Voor wandmontage
ZInstalleer het apparaat niet op een plek waar geventileerd wordt.
ZInstalleer het apparaat met inachtneming van de aangegeven
veiligheidsafstanden ten opzichte van wanden of obstakels (afb. 2).
1Markeer de positie van de twee gaten die geboord moeten worden voor de
bevestiging van de bovenste steunen (afb. 3).
2Boor de 2 gaten en doe de meegeleverde pluggen (10) erin (afb. 4).
3Bevestig de bovenste steunen (8) aan de wand met behulp van de
meegeleverde schroeven (11) (afb. 4).
4Bevestig de onderste steunen (8) aan het apparaat met behulp van de
meegeleverde schroeven (9) (afb. 5).
5Hang het apparaat op aan de bovenste steunen (8).
ZZorg ervoor dat het apparaat horizontaal blijft.
6Terwijl het apparaat aan de steunen hangt, de plek op de wand markeren
waar het gat geboord moet worden om de onderste steun te bevestigen.
7Boor het gat in de wand en doe er de meegeleverde plug in (haal het apparaat
indien nodig van de wand om gemakkelijker te kunnen werken en hang het
weer op als u klaar bent).
8Bevestig de onderste steun (8) aan de wand met behulp van de
meegeleverde plug en schroef (11) (afb. 6).
ZVoor wandmontage op een met gips bepleisterde bakstenen muur dient u de
meegeleverde schroeven en pluggen te gebruiken. Raadpleeg een
deskundige verkoper voor andere soorten oppervlakken.
4WERKING EN GEBRUIK
1Steek de stekker in het stopcontact.
2Stel de gewenste temperatuur in met behulp van de schakelaars I (2) en II (3)
en de thermostaat (5).
3Om op de juiste manier de gewenste temperatuur in het vertrek te verkrijgen:
Druk op de schakelaars I (750W) en II (1250W), zodat de maximale potentie
wordt verkregen (III= 2.000W) en draai de thermostaat (5) naar de hoogste stand.
4Als het vertrek de gewenste temperatuur heeft bereikt, draai dan de
thermostaat (5) langzaam naar links. Het apparaat gaat afwisselend uit en
aan om de juiste temperatuur in het vertrek te handhaven.
5Als u de werktemperatuur lager wilt zetten, laat dan slechts één van de twee
schakelaars I (750W) of II (1250W) aan staan en herhaal het bovenstaande
proces met de thermostaat (5).
6Door op de ventilatorschakelaar (4) te drukken zet u de ventilator aan.
iDe ventilator werkt alleen als de thermostaat (5) aan staat.
i
Het apparaat beschikt over een beveiligingsmechanisme dat de werking
onderbreekt als er per ongeluk oververhitting optreedt (bv. bij verstopping van
het luchtrooster). Als de oververhitting is verdwenen, gaat het apparaat weer
aan. Als het beveiligingsmechanisme de werking herhaaldelijk onderbreekt,
neem dan contact op met de dichtstbijzijnde onderhoudsservice.
5ONDERHOUD EN REINIGING
‹
Zorg dat voor de reiniging de stekker uit het wandcontact is losgenomen.
Gebruik een zachte, vochtige doek.
‹Dompel het apparaat nooit in water of andere vloeistof. Houd het nooit onder
de kraan.
•Gebruik, om de kleur te beschermen, geen bijtende middelen of middelen die
de epoxylaag kunnen aantasten.
600mm
400mm
300mm
8
7
9
11
10
1
6
Fig. 3
Fig. 4
Fig. 2
415mm
Fig. 5
Fig. 6
Fig. 1
3
2
4
5
DESPLEGABLE_CONVECTOR_CO8500.fm Page 1 Friday, May 14, 2010 11:56 AM
Produktspecifikationer
| Varumärke: | Solac |
| Kategori: | Värmare |
| Modell: | CO8500 |
Behöver du hjälp?
Om du behöver hjälp med Solac CO8500 ställ en fråga nedan och andra användare kommer att svara dig
Värmare Solac Manualer

13 September 2024
13 September 2024
13 September 2024
13 September 2024
13 September 2024
13 September 2024
13 September 2024
13 September 2024
13 September 2024
13 September 2024
Värmare Manualer
Nyaste Värmare Manualer
5 April 2025
4 April 2025
3 April 2025
2 April 2025
30 Mars 2025
30 Mars 2025
29 Mars 2025
29 Mars 2025
27 Mars 2025
27 Mars 2025