Speco Technologies N8WNRE Bruksanvisning

Läs gratis den bruksanvisning för Speco Technologies N8WNRE (108 sidor) i kategorin Videobandspelare. Guiden har ansetts hjälpsam av 7 personer och har ett genomsnittsbetyg på 4.9 stjärnor baserat på 4 recensioner. Har du en fråga om Speco Technologies N8WNRE eller vill du ställa frågor till andra användare av produkten? Ställ en fråga

Sida 1/108
NRE (8/16/32 Channel)
User Manual
N8NRE
N16NRE
N32NRE
Version 1.0
Features and specicaons are subject to change, please check www.specotech.com for rmware updates.
Notes& Contents NVR User Manual
Notes
Please read this user manual carefully to ensure that you can use the device correctly and safely.
There may be several technically incorrect places or prinng errors in this manual. The updates will be added into the new version of this
manual. The contents of this manual are subject to change without noce.
This device should be operated only from the type of power source indicated on the marking label. The voltage of the power must be veried
before using the same. Kindly remove the cables from the power source if the device is not to be used for a long period of me.
Do not install this device near any heat sources such as radiators, heat registers, stoves or other devices that produce heat.
Do not install this device near water. Clean only with a dry cloth.
Do not block any venlaon openings and ensure proper venlaon around the machine.
Do not power o the device at normal recording condion.
This machine is for indoor use only. Do not expose the machine in rain or moist environment. In case any solid or liquid get inside the
machine’s case, please turn o the device immediately and get it checked by a qualied technician.
Do not try to repair the device by yourself without technical aid or approval.
Contents
1 Introducon 1 ...............................................................................................................................................................................................
1.1 Welcome 1...........................................................................................................................................................................................................
1.2 Features ............................................................................................................................................................................................................. 1
1.3 Front Panel Descripons 3...................................................................................................................................................................................
1.4 Rear Panel Descripons ..................................................................................................................................................................................... 3
1.5 nnecons 3Co .......................................................................................................................................................................................................
2 Basic Operaon Guide 4 ...............................................................................................................................................................................
2.1 Startup & Shutdown .......................................................................................................................................................................................... 4
2.1.1 Startup .................................................................................................................................................................................................... 4
2.1.2 Shutdown ............................................................................................................................................................................................... 4
2.2 Remote Control ................................................................................................................................................................................................. 4
2.3 Mouse Control ................................................................................................................................................................................................... 5
2.4 Text-input Instrucon ........................................................................................................................................................................................ 5
2.5 Common Buon Operaon ............................................................................................................................................................................... 6
3 EZ Setup & Main Interface 7 .........................................................................................................................................................................
3.1 EZ Setup 7.............................................................................................................................................................................................................
3.2 Main Interface ................................................................................................................................................................................................. 10
3.2.1 Main Interface Introducon ................................................................................................................................................................. 10
3.2.2 Setup Panel ........................................................................................................................................................................................... 12
3.2.3 Main Funcons ..................................................................................................................................................................................... 12
4 Camera Management ..............................................................................................................................................................................14
4.1 Add/Edit Camera ............................................................................................................................................................................................. 14
4.1.1 Add Camera .......................................................................................................................................................................................... 14
4.1.2 Edit Camera .......................................................................................................................................................................................... 15
4.2 Add/Edit Camera Group .................................................................................................................................................................................. 16
4.2.1 Add Camera Group ............................................................................................................................................................................... 16
4.2.2 Edit Camera Group ............................................................................................................................................................................... 16
4.2.3 IP Planning ............................................................................................................................................................................................ 17
5 Live View Introducon ............................................................................................................................................................................. 18
5.1 Live View Interface Introducon ..................................................................................................................................................................... 18
5.2 View Mode ...................................................................................................................................................................................................... 19
5.2.1 Display Mode ........................................................................................................................................................................................ 19
5.2.2 Quick Sequence View ........................................................................................................................................................................... 20
5.2.3 Camera Group View In Sequence ......................................................................................................................................................... 20
5.2.4 Scheme View In Sequence .................................................................................................................................................................... 21
5.3 Image Conguraon ........................................................................................................................................................................................ 21
5.3.1 OSD Sengs ......................................................................................................................................................................................... 21
5.3.2 Image Setngs ...................................................................................................................................................................................... 22
5.3.3 Mask Setngs ....................................................................................................................................................................................... 22
5.3.4 Image Adjustment ................................................................................................................................................................................ 23
Notes& Contents NVR User Manual
10.2.1 Face Sear ch......................................................................................................................................................................................... 65
10.2.2 Track Playback .................................................................................................................................................................................... 69
10.2.3 Face Search by Snapshot .................................................................................................................................................................... 70
10.2.4 Human Body Search ........................................................................................................................................................................... 71
10.2.5 Vehicle Search .................................................................................................................................................................................... 71
10.2.6 Combinaon Search ........................................................................................................................................................................... 72
10.3 View Stascal Informaon .......................................................................................................................................................................... 73
10.4 Face Attendance ............................................................................................................................................................................................ 73
10.5 Face Check- In ................................................................................................................................................................................................ 74
11 General Event Management ..................................................................................................................................................................... 76
11.1 Sensor Alarm ................................................................................................................................................................................................. 76
11.2 Moon Alarm ................................................................................................................................................................................................ 77
11.2.1 Moon Conguraon ......................................................................................................................................................................... 77
11.2.2 Moon Alarm Handling Conguraon ............................................................................................................................................... 77
11.3 Combinaon Alarm ....................................................................................................................................................................................... 78
11.4 IPC Oine Setngs ........................................................................................................................................................................................ 78
11.5 Excepon Alarm Sengs ............................................................................................................................................................................... 78
11.6 Alarm Event Nocaon ............................................................................................................................................................................... 79
11.6.1 Alarm-out ........................................................................................................................................................................................... 79
11.6.2 E-mail .................................................................................................................................................................................................. 79
11.6.3 Display ................................................................................................................................................................................................ 79
11.6.4 Buzzer ................................................................................................................................................................................................. 79
11.6.5 Push Message ..................................................................................................................................................................................... 79
11.6.6 Digital Deterrent ................................................................................................................................................................................. 80
11.6.7 Light .................................................................................................................................................................................................... 81
11.6.8 Alarm Server ....................................................................................................................................................................................... 81
11.7 Manual Alarm ................................................................................................................................................................................................ 81
11.8 View Alarm Status ......................................................................................................................................................................................... 81
12 Account & Permission Management ........................................................................................................................................................ 83
12.1 Account Management ................................................................................................................................................................................... 83
12.1.1 Add User ............................................................................................................................................................................................. 83
12.1.2 Edit User ............................................................................................................................................................................................. 83
12.2 User Login & Logout ...................................................................................................................................................................................... 85
12.3 Permission Management ............................................................................................................................................................................... 85
12.3.1 Add Permission Group ........................................................................................................................................................................ 85
12.3.2 Edit Permission Group ........................................................................................................................................................................ 86
12.4 Block and Allow List ....................................................................................................................................................................................... 86
12.5 Preview On Logout ........................................................................................................................................................................................ 86
12.6 Network Security ........................................................................................................................................................................................... 87
12.7 Password Security ......................................................................................................................................................................................... 87
12.8 View Online User ........................................................................................................................................................................................... 87
13 Device Management ................................................................................................................................................................................ 88
13.1 Network Conguraon .................................................................................................................................................................................. 88
13.1.1 TCP/IP Conguraon .......................................................................................................................................................................... 88
13.1.2 Port Conguraon .............................................................................................................................................................................. 88
13.1.3 PPPoE Conguraon ........................................................................................................................................................................... 90
13.1.4 DDNS Conguraon ............................................................................................................................................................................ 91
13.1.5 E-mail Conguraon ........................................................................................................................................................................... 91
13.1.6 UPnP Conguraon ............................................................................................................................................................................ 92
13.1.7 802.1X ................................................................................................................................................................................................ 92
13.1.8 NAT Conguraon .............................................................................................................................................................................. 93
13.1.9 View Network Status .......................................................................................................................................................................... 93
13.2 Basic Conguraon ........................................................................................................................................................................................ 93
13.2.1 General Conguraon ........................................................................................................................................................................ 93
13.2.2 Date and Time Conguraon .............................................................................................................................................................. 94
13.2.3 Recorder OSD Setngs ........................................................................................................................................................................ 94
13.3 Factory Default .............................................................................................................................................................................................. 95
13.4 Device Soware Upgrade .............................................................................................................................................................................. 95
13.5 Backup and Restore ....................................................................................................................................................................................... 95
13.6 Restart Automacally .................................................................................................................................................................................... 95
13.7 View Log ........................................................................................................................................................................................................ 96
13.8 View System Informaon .............................................................................................................................................................................. 96
Notes& Contents NVR User Manual
14 Remote Surveillance ................................................................................................................................................................................ 97
14.1 Mobile Client Surveillance ............................................................................................................................................................................. 97
14.2 Web LAN Access ............................................................................................................................................................................................ 97
14.3 Web WAN Access .......................................................................................................................................................................................... 97
14.4 Web Remote Control ..................................................................................................................................................................................... 98
14.4.1 Remote Preview ................................................................................................................................................................................. 98
14.4.2 Remote Playback .............................................................................................................................................................................. 101
14.4.3 Remote Export .................................................................................................................................................................................. 101
14.4.4 Intelligent Analysis ............................................................................................................................................................................ 102
14.4.5 Remote Conguraon ...................................................................................................................................................................... 102
Appendix A FAQ ................................................................................................................................................................................................ 103
Appendix B Calculate Recording Capacity ....................................................................................................................................................... 107
Appendix C Specicaons .............................................................................................................................................................................. 108
Introducon NVR User Manual
1
1 Introducon
1.1 Welcome
Thank you for purchasing this NVR.
If technical assistance is needed, please contact Speco Technologies Technical Support.
Phone: 1-800- -5516 opon 3 645
Email: techsupport@specotech.com
1.2 Features
Basic Funcons
Supports network device access including IP camera/dome and the third party IP cameras
The NVR supports the latest H.265 video coding stream and mixture input of H.265 and H.264 IP cameras a
Supports standard ONVIF protocol
Supports dual stream recording of each camera
Supports IP cameras to be added quickly or manually
Supports collecve or individual configuration of the cameras’ OSD, video parameters mask, moon and so on ,
Supports a maximum of 8 user permission groups including Administrator, Advanced and Common which are the default permission groups of
the system
Supports a maximum of 16 users to be created mulple web clients login by using one username at the same me and , the users permission
control to be enabled or disabled
Supports mulple web clients login at the same me
Live View
Supports × × /1280×1024 HDMI and 1920× /1280×1024 VGA high denion synchronous display 4K 2K/1920 1080 1080
Supports mul-screen modes such as 1/4/6/8 /16/32
Supports auto adjustment of the camera’s image display proportion
Supports audio monitoring of the camera to be enabled or disabled
Supports manual snapshot of the camera
Supports the sequence of the cameras to be adjusted
Supports display mode to be added and saved and the saved modes can be called directly
Supports quick tool bar operaon of the preview window
Supports camera group view and scheme view in sequence, quick sequence view and dwell me seng
Supports moon detecon and video mask
Supports mulple popular P.T.Z. control protocol and setup of the preset and cruise
Supports direct mouse control of the IP dome including rotang, zoom, focusing and so on
Supports single camera image to be zoomed by sliding the scroll wheel of the mouse
Supports any area of the image to be zoomed in to a maximum of 16 mes of the current size
Supports image and lens adjustment (only available for some cameras)
Supports quick camera adding in the camera window of the live view interface
The live camera sequence of the web client will keep consistent with that of the NVR aer adjusng the live camera sequence of the NVR, but
the live camera sequence of the NVR will not be changed if that of the web client is changed
Disk Management
N8NRE supports 1 SATA HDD: N16NRE supports 2 SATA HDDs; N32NRE supports 8 SATA HDDs and 2 3-SATA HDDs
Each SATA interface of the NVR supports the HDDs with max TB storage capacity 14
Supports disk group conguraon and management and each camera can be added into different disk groups with dierent storage capaci ty
Supports disk informaon and disk working status viewing
Record Conguraon
Supports main stream and sub stream recording at the same me and collecve or individual conguraon of the record stream
Supports manual and auto record modes
Supports schedule recording, sensor alarm recording and moon detecon recording, etc
Supports hedule recording and event recording seng with dierent record streams sc
Supports record schedule setng and recycle recording
Supports pre recording and delay recording conguraon of the event recording
Record Playback
Introduction NVR User Manual
2
Supports me scale operaon in quick playback and the playback date and me can be set randomly by scrolling the mouse the me interval ;
of the me scale can be zoomed
Supports record searching by me slice/me/event/tag
Supports me view and camera view in searching by mode EZ
Supports EZ search by month, by day, by hour and by minute and me slice to be displayed with camera thumbnail
Supports a maximum of cameras to be searched by me 4/8/16
Supports event search by manual/moon/sensor/intelligent events
Supports bookmark search by the manual added bookmarks
Supports instant playback of the selected camera in the live view interface
Supports a maximum of 8 synchronous playback cameras
Supports acceleraon(maximum 32 mes of the normal speed), deceleraon (minimum 1/32 mes of the normal speed) and 30s’ addion or
reducon to current playing me
Record Export
Supports record to be exported through USB (U disk, mobile HDD).
Supports record to be exported by me/event/image search
Supports record cung for exporng when playing back
Supports a maximum of 10 export tasks in background and export status viewing
Alarm Management
Supports alarm schedule setng
Supports enabling or disabling of the moon detecon, external sensor alarm input, intelligence alarm and excepon alarms including IP address
conict alarm, disk IO error alarm, disk full alarm, no disk alarm, illegal access alarm, network disconnecon alarm, IPC ofine alarm and so on, alarm
trigger conguraon supportable
Supports IPC oine alarm trigger conguraon of PTZ, snapshot, pop-up video, etc.
Supports event nocaon modes of alarm-out, pop- video, pop- message box, buzzer, e-mail and so on up up
The captured images can be aached into the e-mail when alarm linkage is triggered
Supports alarm status view of alarm-in, alarm-out, moon detecon and excepon alarm
Supports alarm to be triggered and cleared manually
Supports system auto reboot when excepon happens
Supports face detecon and face match alarm
Face Function
Supports adding 10000 face pictures to the target database
Supports image search by image, track playback and database management
Supports face aendance and face check in
Supports face informaon stascs
Supports face match alarm
LPR Function
Support 50,000 license plate register
Support license plate detecon, match and search
Support vehicle informaon stascs
Support license plate match alarm
Network Functions
Supports TCP/IP and PPPoE, DHCP, DNS, DDNS, UPnP, NTP, SMTP protocol and so on
Supports allow and block list funcon and the allow and block IP address/IP segment address can be set
Supports mulple browsers including IE8/9/10/11, Firefox, Opera, Chrome (available only for the versions lower than and Safari in MAC 45)
system
Supports remote achievement conguraon, import and export of the NVR parameters and other system maintenance operaons including ,
remote upgrading and system restart
Supports remote camera conguraon of the NVR including video parameters, image quality and so on
Supports remote search, playback and export of the NVR
Supports ual alarm to be triggered and cleared remotely man
The motorized zoom camera can be adjusted through web client (Supports zoom in/out, but one key focus is not currently supported)
Supports NVMS or other plaorm management soware to access the NVR and manage it
Supports NAT funcon and QRCode scanning by mobile phone and PAD
Supports mobile surveillance by phones or PADs with iOS or Android OS
Supports NVR to be access remotely through telnet and the telnet funcon can be enabled or disabled ed
If one camera recording is enabled or disabled manually through web client, it will be simultaneously enabled or disabled in the N VR
Introducon NVR User Manual
3
Other Funcons
The NVR can be controlled and operated by the buons on the front panel, the remote controller and the mouse
Seng interfaces can be switched to one another conveniently by clicking the main menus on the top of the setng interfaces
Supports NVR informaon viewing including basic, camera status, alarm status, record status, network status, disk and export status
Supports factory restoring, import and export of the system conguraon, log view and export and local upgrading by USB mobile device
Supports auto recognion of the displayer’s resoluon
You can click the right mouse buon at any interface to go back to the upper interface
You can click the mouse wheel at any interface to go to the live view interface
The display language and video format of the NVR will not be changed and the system logs will be reserved if you reset the NVR to factory
default
Press and hold the right mouse button for 5 seconds in any interface to switch the output to VGA and the NVR will display the video at the
lowest resoluon which the NVR supports
1.3 Front Panel Descripons
The following descripons are for reference only.
Name
Descripons
REC
When recording, the light is blue
Net
When access to network , the light is blue
Power
Power indicator, when connecon , the light is blue
1.4 Rear Panel Descripons
To quickly get started, connect the following to your recorder in the following order, please refer to the following gure (N8 E NR
shown for reference).
1. Connect IP cameras to the PoE ports of the recorder.
2. Connect a monitor to the recorder via VGA or HDMI cable (not included).
3. Connect the included opcal mouse into any USB port of the recorder.
4. Connect the power adapter to the recorder and plug power cord into a 120VAC 50/60Hz outlet.
5. Connect recorder to network (oponal)
6. Turn on power switch and allow recorder to boot up.
1.5 Connecons
Video Connecons
Video Output: Supports VGA/HDMI video output. You can connect to monitor through these video output interfaces simultaneously or independently.
Audio Connecons
Audio Input: Connect to microphone, pickup, etc.
Audio Output: Connect to headphone, sound box or other audio output devices.
Basic Operaon Guide NVR User Manual
4
2 Basic Operaon Guide
2.1 Startup Shutdown &
Please make sure all the connecons are done properly before you power on the unit. Proper startup and shutdown are crucial to expending the life
of your device.
2.1.1 Startup
Connect the output display device to the VGA/HDMI interface of the NVR.
Connect with the mouse and power. The device will boot and the power LED would turn blue.
EZ setup window will pop up (you should select the display language the rst me you use the NVR) Refer to 3.1 EZ Setup for details. .
2.1.2 Shutdown
You can power off the device by using remote control or mouse.
By remote control:
Press Power buon. This will take you to a shutdown window. The unit will power o aer a while by clicking buon. OK
Disconnect the power.
By mouse:
Click Start Shutdown to pop up the Shutdown window. Select “Shutdown” in the window. The unit will power o aer a while by clicking “ ”OK
buon.
Disconnect the power.
2.2 Remote Control
It uses two AAA size batteries.
Open the baery cover of the remote control.
Place batteries. Please take care the polarity (+ and - ).
Replace the baery cover.
Key points to check in case the remote doesn’t work.
1. Check batteries polarity.
2. Check the remaining charge in the batteries.
3. Check IR controller sensor for any masking.
If it sll doesn t work, please change a new remote control to try, or contact your dealers. You can just turn the IR sensor of the remote control
towards the IR receiver of the NVR to control it when you are controlling mulple devices by remote control.
The interface of remote controller is shown as below.
There are two kinds of remote controller. The interface of remote controller is shown as below.
Buon
Funcon
REC
Record manually
Search
To enter search mode
MEUN
To enter menu
Exit
To exit the current interface
ENTER
To conrm the choice or setup
Direcon buon
To move cursor in setup
ZOOM
To zoom in
PIP
No funcon temporarily
To control playback. Play(Pause)/Next Frame/Speed
Up/Stop/Previous Frame/Speed Down
Mul
To choose mul screen display mode
Next
To switch the live image
SEQ
To go to sequence view mode
INFO
Get informaon about the device
Basic Operaon Guide NVR User Manual
5
2.3 Mouse Control
Mouse control in Live Display & Playback interface
In the live display & playback interface, double click on any camera window to show the window in single screen mode; double click the window
again to restore it to the previous size.
In the live display & playback interface, if the interfaces display in full screen, move the mouse to the boom of the interface to pop up a tool bar.
The tool bar will disappear automacally aer you move the mouse away from it for some me; move the mouse to the right side of the interface
to pop up a panel and the panel will disappear automacally aer you move the mouse away from it.
Mouse control in text-input
Move the mouse to the text-input box and then click the box. The input keyboard will pop up automacally.
2.4 Text-input Instrucon
Buon
Funcon
Power Buon
Switch o to stop the device
Record Button
To start recording
-/ - -- /0 9
Input number or choose camera
Fn1 Buon
Unavailable temporarily
Mul Button
To choose mul screen display mode
Next Button
To switch the live image
SEQ
To go to sequence view mode
Audio
To enable audio output in live mode
Switch
No funcon temporarily
Direcon buon
To move cursor in setup or pan/tle PTZ
Enter Buon
To conrm the choice or setup
Menu Buon
To go to menu
Exit Button
To exit the current interface
Focus/IRIS/Zoom/PTZ
To control PTZ camera
Preset Buon
To enter into preset seng in PTZ mode
Cruise Buon
To go to cruise setng in PTZ mode
Track Buon
No track funcon temporarily
Wiper Button
No funcon temporarily
Light Buon
No funcon temporarily
Clear Button
No funcon temporarily
Fn2 Buon
No funcon temporarily
Info Button
Get informaon about the device
To control playback. Play (Pause)/Stop/Previous
Frame/Next Frame/Speed Down/Speed Up
Snap Buon
To take snapshots manually
Search Button
To go to search mode
Cut Buon
No funcon temporarily
Backup Button
To go to backup mode
Zoom Button
To zoom in the images
PIP Buon
Not acve
Note: Mouse is the default tool for all operations unless an exception as indicated.
Basic Operation Guide NVR User Manual
6
The system includes two input boxes. Refer to the above pictures. The left box is the number input box and the right box is the input box which
provides inputs of numbers, letters and punctuation characters. The introductions of keys on the input boxes are shown below.
Meaning
Button
Meaning
Backspace key
Switch key of punctuation character
Delete Key
Enter key
Switch key between upper
and lower letter
Space key
Switch key of language
2.5 Common Button Operation
Button
Meaning
Click it to show the menu list.
Click it to change the sequence of the list.
Click it to change the camera displaying mode.
Click it to close the current interface.
Click it to go to the earliest date of camera recording.
Click it to go to the latest date of camera recording.
EZ Setup & Main Interface NVR User Manual
7
3 EZ Setup & Main Interface
3.1 EZ Setup
The disk icons will be shown on the top of the startup interface. You can view the number and status of each disk quickly and conveniently through
these icons ( : no disk; unavailable disk; available disk). : : RW
You can quickly configure the NVR by make the NVR work normally. You must configure the wizard if you start the NVR for the first clicking “OK” to
time (or click “Skip” to cancel the EZ Setup next time).
Click “ to start wizard. The setting steps are as followsOK .
System Login. Set your own password when you use the wizard for the first time (the default username of the system is ) select the login admin ;
username and enter the password you set by yourself.
Click “Edit Security Question” to set questions and answers for password security of admin. If you forget the password, please refer to Q4 in Appendix
A FAQ for details.
Click “Next” to continue or click “Cancel” to exit the wizard.
Date & Time. When booting up for the first time, the device will prompt you for time settings or go to Settings→System→Date and Time for
details.
System Time: Set the time and date format of the system
DST: Toggle Daylight Saving Time On or Off
Time format: Choose between 24-hour mode and -hour mode. 12
NTP: Specify an NTP server to synchronize the time (optional).
EZ Setup & Main Interface NVR User Manual
8
Disk Settings. You can view the disk number, disk capacity of the NVR and serial number, R&W status of the disk. Click “Format” to format the
disk. Click “Next” to continue. Then click “ Setup”.EZ
Network Settings. Select the network work pattern as required. Check “Obtain IP address automatically” and “Obtain DNS automaticallyto an
get the IP address and DNS automatically (the DHCP function of the router in the same LAN should also be enabled), or manually enter them. Enter
the HTTP port, RTSP port and Server port (please see 13. 2 Port Configuration for details 1. ). Click “Next” to continue.
If you use the NVR with the PoE network ports, the online state of the internal Ethernet port will be shown on the interface.
If the NVR has two network ports or above, you can select the network work pattern as required. Network Fault Tolerance and Multiple Address
Setting are available.
Other Network Settings.
UPnP settings: Check “Enable” in the interface and the port of external and then click “Test to test theenter effectiveness of the input
information. If the UPnP status were “Invalid UPnP”, the port number may be wrong. Click to modify the port until the UPnP status turns
to “Valid UPnP. Refer to the following picture. You can view the external IP address of the NVR. Enter the external IP address plus port in the
address bar of your browser to access the NVR. (please see 13.1.6 UPnP Configuration for details).
DDNS Settings: Check “Enable” and then select the DDNS type. Enter the server address, domain name, username and password according to
the selected DDNS type. And then click “Register” or “Test” to test the effectiveness of the domain name. If it is effective, you can enter the
domain name in the address bar of your browser to access the NVR. (please see 13.1.4 DDNS Configuration for details).
Note: Make sure the router supports UPnP function and the UPnP is enabled in the router. Set the NVR’s IP address, subnet mask and gateway and
so on corresponding to the router.
EZ Setup & Main Interface NVR User Manual
9
Add Camera. Add cameras via PoE first before adding any cameras from the LAN. Speco cameras added via the PoE ports will automatically be
added to the corresponding channel. To add cameras from the LAN, make sure all cameras are set to DHCP. Click “Refresh” to refresh the list of online
IP cameras which are in the same local network with NVR and then click to add the searched camera. Click “Add All” to add all the cameras in
the list. Click to delete the added camera. Click “Delete All” to delete all the added cameras.
Click to edit the searched IP camera as shown on the below left. Enter the new IP address, subnet mask, gateway, username and the password
of the camera. You can check “Sync to IPC” to modify the IP address of the IPC via different network segments for being in the same network segment
with the NVR. Click “OK” to save the settings.
Click to edit the added camera as shown on the above right Enter the new camera name, IP address. , port, username and the password of the
camera. You can click “Test” to test the effectiveness of the input information. Click “OK” to save the settings. You can change the IP camera name
only when the added camera is online . Click “Next” to continue.
Record Settings. Two record modes are available: auto and manual.
Auto: Select one auto mode in the interface as shown below and then click “Next button to save the settings . Click “Advanced” to self-define record
mode. 7.1.1 Mode Configuration for detail See s.
EZ Setup & Main Interface NVR User Manual
10
Manual: Set the “Sensor Record”, “Motion Record” and Record” of each camera. Click “OK” to save. See Schedule 7.1.1 Mode Configuration for
details.
QRCode. Enable the NAT function in the interface or set it in the network configuration after exiting the wizard (please refer to 13.1.8 NAT
Configuration for details). You can scan the QRCode through the SpecoBlue App available for iOS and Android to easily and securely view your cameras.
Please refer to 14.1 Mobile Client Surveillance for details. Click to save the settings. “OK”
3.2 Main Interface
3.2.1 Main Interface Introduction
EZ Setup & Main Interface NVR User Manual
11
The buttons in area are introduced in the table below.
Button
Meaning
Start button. Click it to pop up area .
Full screen button. Click it to show full screen; click it again to exit the full
screen.
Screen mode button.
Dwell button (see 5.2.2 Quick Sequence View and 5.2.4 Scheme View In
Sequence for details).
Click it to enable OSD; click again to disable OSD.
Click to set the default playback time before starting instant playback (8.1
Instant Playback) or going to the playback interface for playback operations
(8.2 Playback Interface Introduction); click to go to the playback
interface. For instance, if you choose “5 minutes ago” as the default playback
time, you can playback the record from the past five minutes.
Manual record button. Click it to enable/disable record.
Manual alarm button. Click it to trigger or clear the alarm-out manually in
the popup window.
Record status button. Click it to view the record status.
Alarm status button. Click it to view the alarm status.
Disk status button. Click it to view the disk status and RAID status.
Network status button. Click it to view the network status.
Information button. Click it to view system information.
Introduction of area :
Click “Camera” to view all the added cameras in the camera list. Select one camera window on the left side of the interface and then double click
one camera in the list to preview the camera image in the selected window.
Click “Single Channel Sequences” to view all the added groups in the group list; click one group in the list to view all the added cameras in the group
(refer to 4.2 Add/Edit Camera Group for detail configuration of the camera group). Select one camera window on the left side of the interface and
then double click one group in the group list to preview the cameras’ images one by one in the selected window.
Click “Customize to view all the display modes in Layout the display mode list (refer to 5.2.1 Display Mode for detail configuration of the display
mode). Double click one display mode in the list to switch to the display mode for previewing.
Introduction of area :
Icon Button /
Meaning
It shows the current login user.
Click it to go to the intelligent analytics interface.
Click it to go to record search and export interface, see 4 Record 8.
Search, Playback & Export for details.
Click it to go to playback interface (click on the tool bar at the
bottom of the live view interface to set the default playback time), see
8.2 Playback Interface Introduction for details.
Click it to pop up the setup panel, see 3.2.2 Setup Panel for details.
Click it to log out the system.
Click it and then select “Logout”, “Reboot” or “Shutdown” in the
popup window.
Click it to go to the EZ setup.
EZ Setup & Main Interface NVR User Manual
12
3.2.2 Setup Panel
Click Start Settings to pop up the setup panel as shown below.
The setup panel includes seven modules. Each module provides some function entries with links for convenient operation.
Here we take module as an example. The Camera Camera module provides convenient links such as “Add Camera”, “Edit Camera”, “Image Settings”,
“Motion”, “Intelli ” and “PTZ”. Click gence Analysis Camera to go to the camera management interface as shown below.
There are some function items on the left side o the camera management interface. Click each item to go to corresponding interface or window. For f
instance, click “Add Camera” to pop up the window as shown below.
Click the main menus on the top of the camera management interface to go to corresponding interfaces. Refer to the picture below. For instance,
you can go to the system setup interface by clicking “System” tag.
3.2.3 Main Functions
Camera
The module covers the functions such as ( Chapter 4 Camera Management for details ( 5.3 Image Camera Management see ), Image Settings see
Camera Management NVR User Manual
14
4 Camera Management
4.1 Add/Edit Camera
4.1.1 Add Camera
The network of the NVR should be set before adding IP camera (see 13 TCP/IP Configuration for details). .1.1
Refer to the pictures below. Click Add Camera in the setup panel or in the top right corner of the preview window to pop up the “Add Camera”
window as shown below. You can quickly add or add the IP camera manually.
Quickly Add
Check the cameras and then click “Add” to add cameras. Click to edit the camera’s IP address, username and password and so on. Click “Default
Password” to set the default username and password of each camera.
Add Manually
Enter the IP address or domain name (click in the IP address column to pop up the domain name input window, enter the domain name of the
IPC in the window and then click “OK” button select the protocol. Click Testto test the ), port username and password of the camera and then ,
effectiveness of the input information and then click “Add” button s information (you can input one camera or above such as IP address, username
Camera Management NVR User Manual
15
and password before clicking Add” button) Click “Default Password” to set the default username a. Click to delete the camera. nd password
of each camera.
Note: Some models may not support this function.
Click Start Settings System Basic General Settings to check “Enable Add IPC by Zero Operation”. If the NVR has unoccupied channels, it can
add IPC without any operation restarting. by
Add Recorder
Quickly AddSelect the searched NVR/DVR and the click “Add” to add NVR in the same local network.
Manually Add and then enter the IP address or domain name, port, username and password of the NVR/DVRClick “Manual Add” .
Check the added remote channel number and click “Test” to test the effectiveness of the input information. Then click “OK” button to
return to the previous interface.
Note: Only the local NVR has unoccupied channels, may the IPC of other NVR/DVR in the same local network be added. And the added IPC
supports previewing and recording.
4.1.2 Edit Camera
Click Edit Camera to go to the interface as shown below. Click to view the live image of the camera in the popup window. ” in the setup panel
Click to edit the camera (see in 3.1 Startup Wizard for details). Click to delete the camera. Click Add camera in the “Operation”
header line and then click “Modify IPC Password” to pop up a window(check the IPCs in the window, set the new password and then click “OK”
button; only the online IPCs’ passwords can be modified and a batch of IPCs’ passwords can be modified at the same time). Click to upgrade an
online IPC ( or click in the “Upgrade” header line and then click “IPC Batch Upgrade” to upgrade a batch of IPCs), select the device which stores
the upgrade file item of the popup window and the upgrade file in the list(you should select the upgrade IPC model in the in the “Device Name”
window if a batch of IPCs’ passwords need to be modified) and then click “Upgrade” button to start upgrading(the IPC will restart automatically after
the upgrade is completed successfully).
Camera Management NVR User Manual
16
The IP cameras with PoE function which directly connect to the PoE port of the NVR will be displayed automatically in the camera list. Refer to the
picture below. The camera which occupies the PoE resource has a prefix shown before its camera name. The prefix consists of PoE plus PoE port IP
number. The IP camera which connects to the PoE port cannot be deleted from the camera list manually.
The IP camera which directly connects to the PoE port of the NVR through private protocol will be shown automatically in the camera list.
One of the two conditions must be met if the IP camera which directly connects to the PoE port of the NVR through ONVIF protocol should be
shown automatically in the camera list.
The IP camera which directly connects to the PoE port is in the same network segment with the internal Ethernet port.
The DHCP (obtain an IP address automatically) of the IP camera which directly connects to the PoE port is enabled.
If the IP camera which connects to the PoE port cannot be displayed automatically in the camera list, please refer to Q6 in Appendix A FAQ for details.
4.2 Add/Edit Camera Group
4.2.1 Add Camera Group
Click “Edit Camera Group” in the above interface to go to the interface as shown below.
Click to pop up the window as shown below. Set the group name and dwell time (the dwell time of the camera group sequence view) in the
window. Check the cameras and then click “Add” to add group. Click to view the cameras in the group after adding group.
4.2.2 Edit Camera Group
Camera Management NVR User Manual
17
Click to modify the group information such as group name and dwell time. Click to delete the group.
4.2.3 IP Planning
Some models may not support this function.
Click “IP Planningto go to the interface as shown below. This function supports searching other NVRs/DVRs that is in the same local network as
the local NVR. The user may add camera channels of other NVRs/DVRs into the unoccupied channels of the local NVR.
Click to edit the IP address, user name or password and other information of the NVRs.
Click behind “A button to add the camera channels selected and the user may edit the IP address, user name or password by dd”
clicking E button. behind “ dit”
Live View Introduction NVR User Manual
18
5 Live View Introduction
5.1 Live View Interface Introduction
You should add camera first after logging on to the system (see 4.1.1 Add Camera for details). Refer to the interface as shown below, drag one camera
in t preview window to another window for camera window exchanging. he
The record symbols with different colors in the live view window refer to different record types when recording: green stands for manual record, red
stands for sensor based record, yellow stands for motion based record blue stands for schedule record and cyan stands for intelligence record , .
Click the preview window to show the tool bar as shown in area ; right click the preview window to show the menu list. T tool bar and menu he
list are introduced in the table below.
Button
Menu List
Meaning
--
Move tool. Click it to move the tool bar anywhere.
Manual Record Only
Click it to start recording.
Instant Playback
Click to playback the record; click “Instant Playback” to select
or self-define the instant playback time. See 8.1 Instant Playback for
details.
Enable Audio
Click it to enable audio. You can listen to the camera audio by
enabling audio.
Snap
Click it to pop up the snap window. Click “Save” in the window to
save the image. Click “Export” to export the image.
PTZ Control
Click it to go to PTZ control interface. See Chapter 6 PTZ for details.
Zoom In
Click it to go to single channel amplification interface.
--
Click it to to image adjustment interface. Refer to 5.3.4 Image go
Adjustment for details.
Target detection
Click it to go to single channel target detection interface; the target
includes faces, human bodies and vehicles.
--
Camera Info
Click it to view the camera information.
The single channel amplification interface is as shown below. Press and drag the blue box to select the zoom in area. Click to zoom the /
image. Click the camera selection box to select other cameras for amplification. Click “Back” to return to the live view interface.

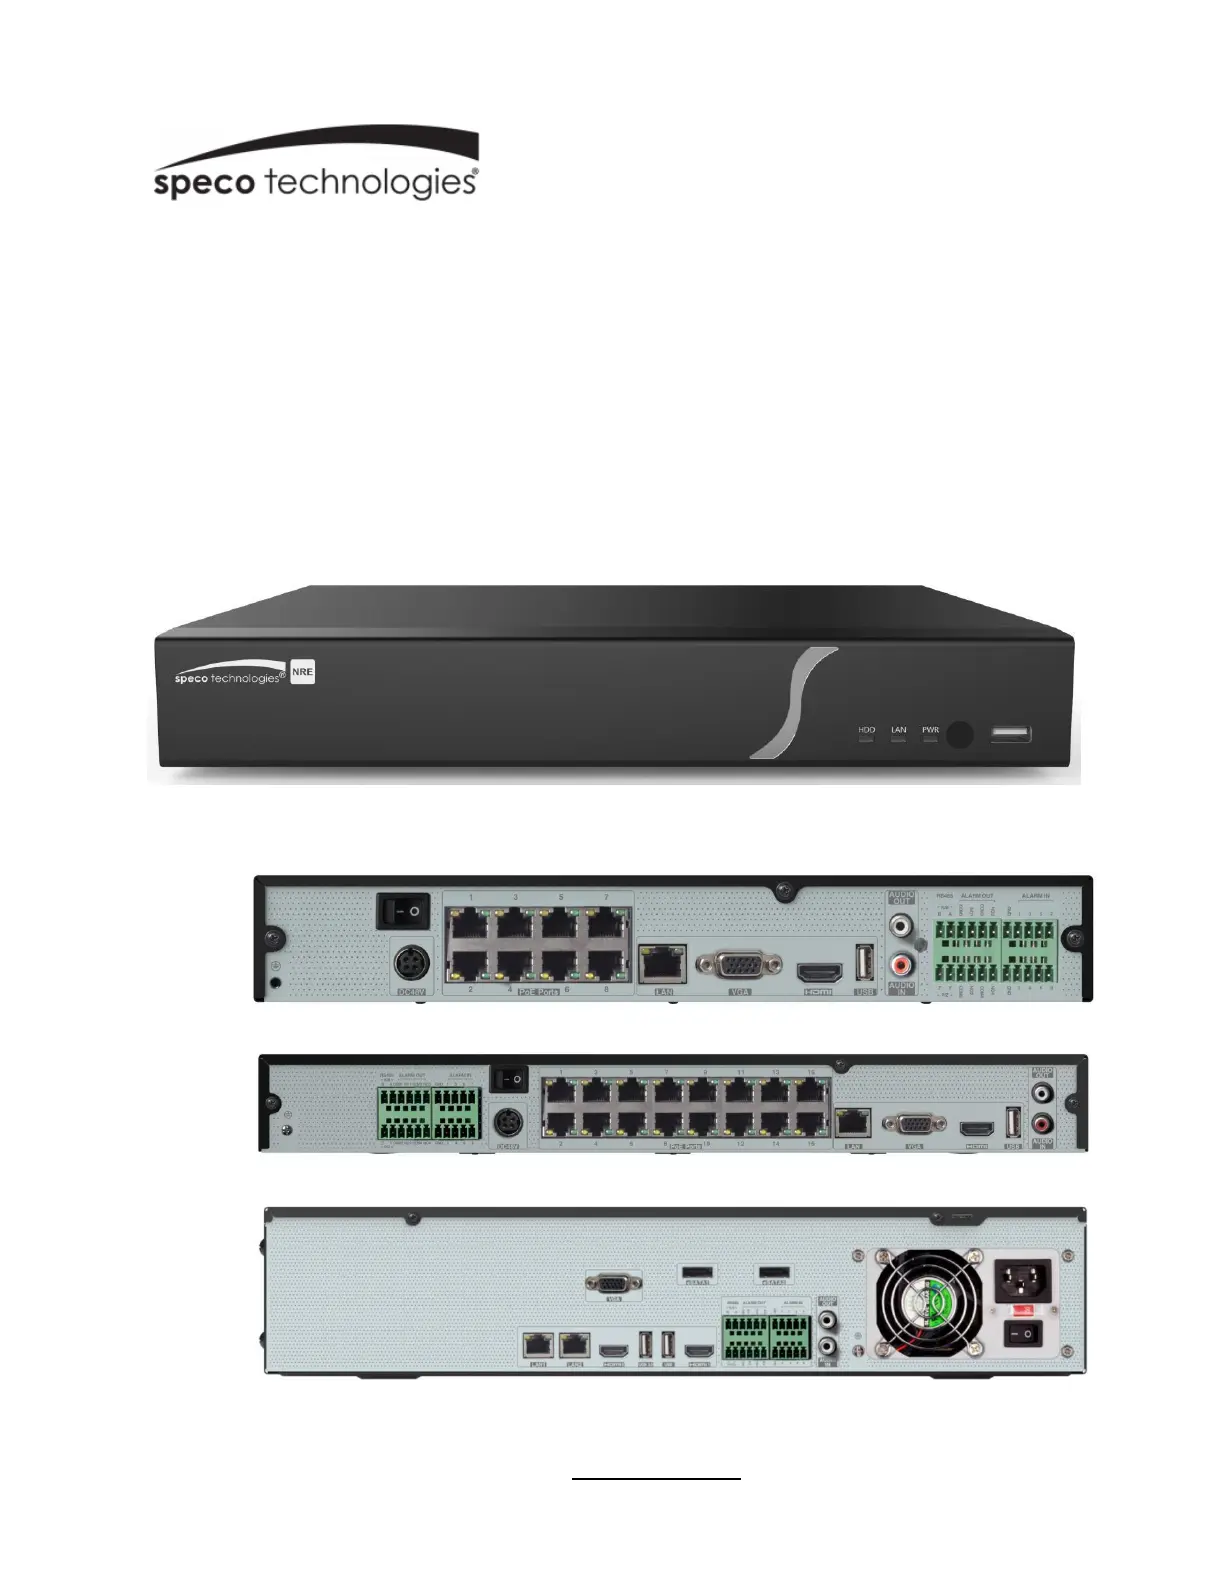
Produktspecifikationer

Varumärke: Speco Technologies
Kategori: Videobandspelare
Modell: N8WNRE

Behöver du hjälp?

Om du behöver hjälp med Speco Technologies N8WNRE ställ en fråga nedan och andra användare kommer att svara dig