StarTech.com EXTEND-HDMI-4K40C6P1 Bruksanvisning
StarTech.com AV extender EXTEND-HDMI-4K40C6P1
Läs gratis den bruksanvisning för StarTech.com EXTEND-HDMI-4K40C6P1 (2 sidor) i kategorin AV extender. Guiden har ansetts hjälpsam av 15 personer och har ett genomsnittsbetyg på 4.1 stjärnor baserat på 6 recensioner. Har du en fråga om StarTech.com EXTEND-HDMI-4K40C6P1 eller vill du ställa frågor till andra användare av produkten? Ställ en fråga
Sida 1/2
Quick-Start Guide
To view manuals, FAQs, videos, drivers, downloads, technical drawings, and more, visit www.startech.com/support.
Manual Revision: October 22, 2021 7:09 PM
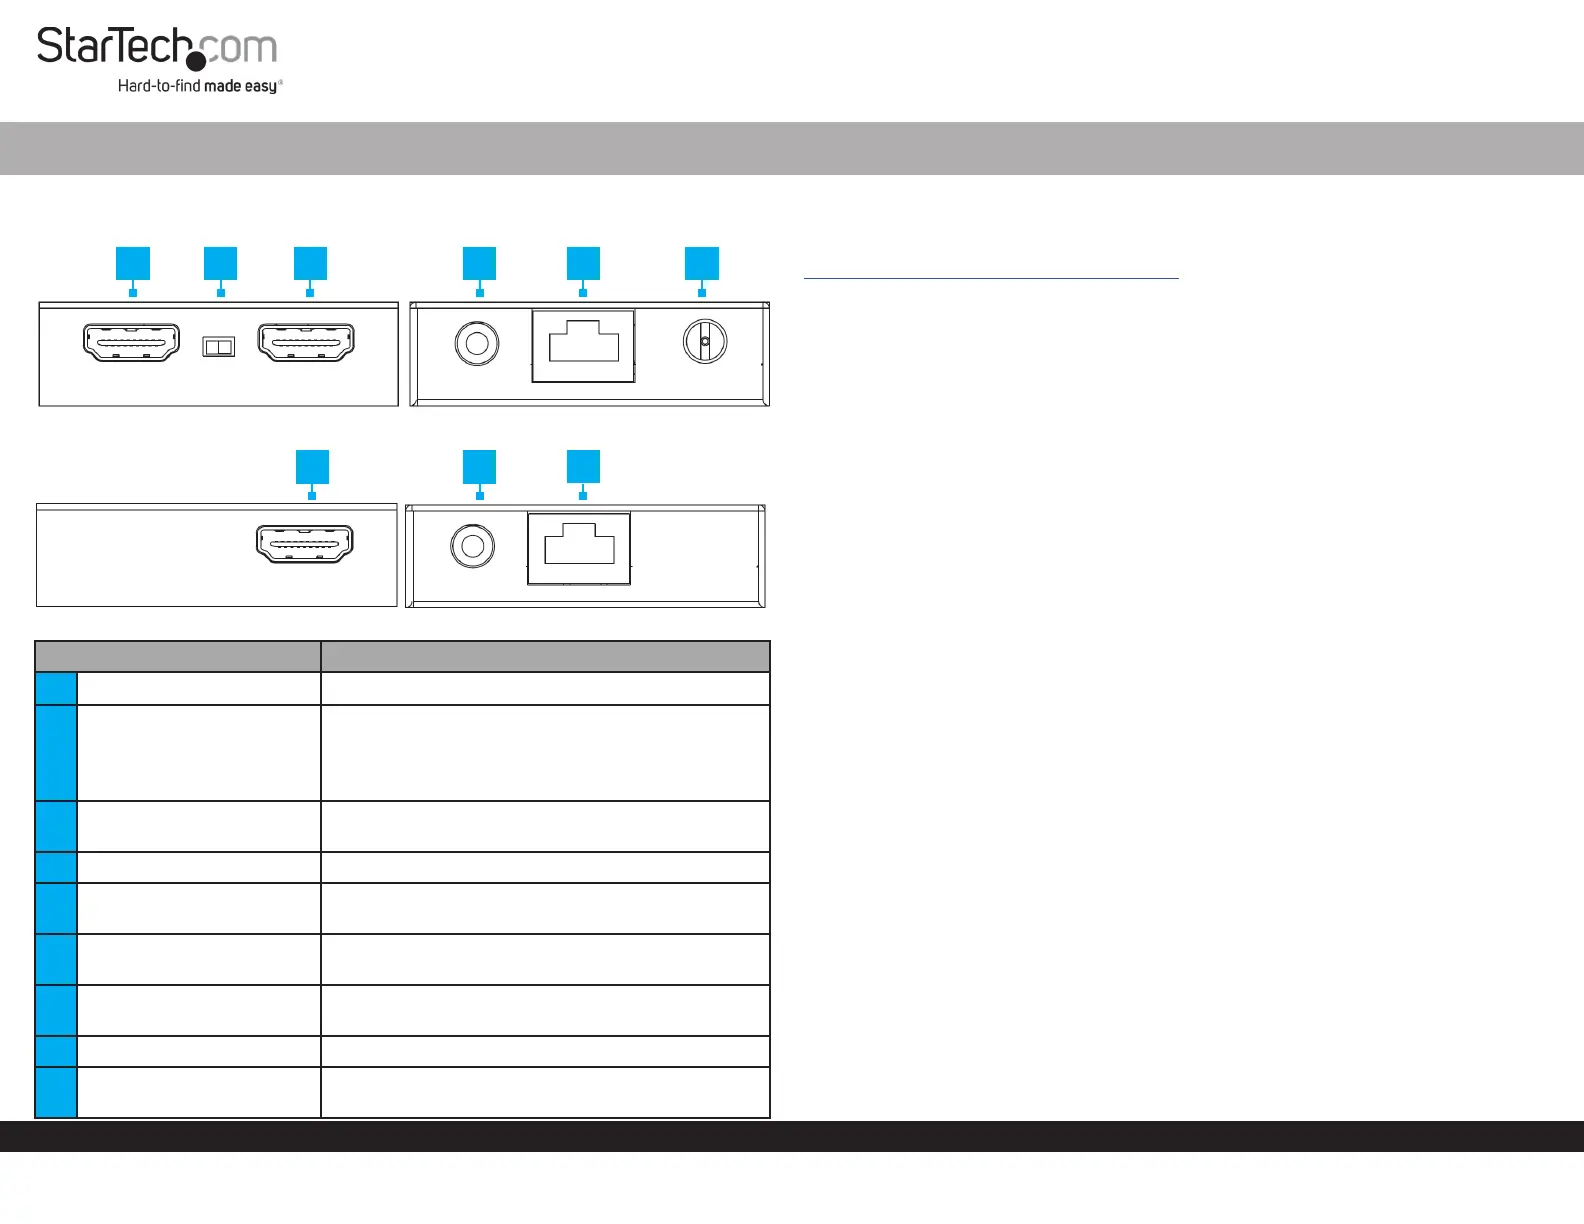
Product Diagram (EXTEND-HDMI-4K40C6P1)
Transmitter
Receiver
PortFunction
1HDMI Input Port• Connect an HDMI Source Device
2EDID Selector Switch
• TX: Copys EDID data from the display connected
to the HDMI Output Port on the Transmitter
• RX: Copys EDID data from the display connected
to the HDMI Output Port on the Receiver
3
HDMI Output Port
(Transmitter)
• Connect an HDMI Display to the Transmitter
4IR Output Port• Connect the IR Blaster to the Transmitter
5
RJ45 Output Port
(Transmitter)
• Connect to the Receiver, using a CAT5e/6
Ethernet Cable (Sold Separately)
6DC 12V Port
• Power the Transmitter using the Power Adapter
(included)
7
HDMI Output Port
(Receiver)
• Connect an HDMI Display to the Receiver
8IR Input Port• Connect the IR Receiver to the Receiver
9RJ45 Port (Receiver)
• Connect to the Transmitter with a CAT5e/6
Ethernet Cable
HDMI over CAT5e/6 Extender - 4K 30Hz - 130ft (40m)
Requirements
For the latest manuals, product information, technical specications, and declarations of
conformance, please visit:
www.startech.com/EXTEND-HDMI-4K40C6P1
Package Contents
• Local HDMI Transmitter Unit
• Remote HDMI Receiver Unit
• IR Blaster
• IR Receiver
• Power Adapter
• Quick-Start Guide
Installation
Installing the HDMI Transmitter and Receiver
1. Position the Transmitter near the HDMI Source Device.
2. Connect an HDMI Cable (not included) to the HDMI Source Device and to the
HDMI Input Port on the Transmitter.
3. (Optional) Connect an HDMI Cable to the Local HDMI Display and to the HDMI
Output Port on the Transmitter.
4. Connect a CAT5e/6 Cable (not included) to the RJ45 Port on the Transmitter and
to the RJ45 Port on the Receiver.
Note: The cabling cannot go through any networking equipment (e.g. router,
switch, etc.).
5. Position the HDMI Receiver near the HDMI Display Device.
6. Connect an HDMI Cable to the HDMI Output Port on the Receiver and to the HDMI
Display Device.
7. Connect the Universal Power Adapter to the DC 12V Port on the Transmitter to an
AC Electrical Outlet.
Installing the IR Blaster and IR Receiver
Control the HDMI Source Device from the Receiver
1. Connect the IR Blaster (Rounded Shape) to the IR Output Port on the Transmitter.
2. Peel the Film o of the Adhesive Pad that is located on the IR Blaster. Position
the IR Blaster so that it is pointing directly at the IR Sensor on the HDMI Source
Device.
Note: Consult the HDMI Source Device’s manual to determine the location of the IR
Sensor.
123456
78
9
Produktspecifikationer
| Varumärke: | StarTech.com |
| Kategori: | AV extender |
| Modell: | EXTEND-HDMI-4K40C6P1 |
| Vikt: | 130 g |
| Bredd: | 69 mm |
| Djup: | 57 mm |
| Höjd: | 77 mm |
| Förpackningens bredd: | 200 mm |
| LED-indikatorer: | Link, Power |
| Maximal upplösning: | 3840 x 2160 pixlar |
| HDCP: | Ja |
| Material: | Metall |
| Modell: | Sändare och mottagare för AV-utrustning |
| Uteffekt: | 1 A |
| Rackmontering: | Nej |
| Ljudutgångskanaler: | 7.1 kanaler |
| Bandbredd: | 10.2 Gbit/s |
| RJ-45 utgångsportar: | 1 |
| HDCP-version: | 1.4 |
| Antal HDMI-utgångar: | 2 |
| RJ-45 ingångsportar: | 1 |
| Driftspänning: | 12 V |
| Kabeltyper som stöds: | Cat5e, Cat6 |
| IR-sändare ingår: | Ja |
| Produktens färg: | Svart |
| Låddjup: | 116 mm |
| Vikt inkl. förpackning: | 500 g |
| Ytterförpackningens höjd: | 370 mm |
| Produkter per ytterförpackning: | 30 styck |
| Ytterförpackningens längd: | 420 mm |
| Ytterförpackningens bredd: | 410 mm |
| Typ av strömkontakt: | Typ M |
| Strömförbrukning (vanlig): | 0.1 W |
| Temperatur vid drift: | 0 - 40 ° C |
| Temperaturintervall (förvaring): | -20 - 60 ° C |
| Intervall för relativ operativ luftfuktighet: | 20 - 90 % |
| Extern strömadapter: | Ja |
| Hållbarhetscertifiering: | CE, RoHS |
| AC-inspänning: | 100 - 240 V |
| Anslutningsteknologi: | Kabel |
| Likströmsingång: | Ja |
| AC-adapter inkluderad: | Ja |
| Max uppdateringsfrekvens: | 60 hz |
| Harmonized System (HS)-kod: | 85176200 |
| Ingående ström: | 0.3 A |
| Maximal överföringshastighet avstånd: | 70 m |
| Fjärrstyrd IR-utgång: | 1 |
| Seriekoppling (daisy chain): | Ja |
| HDMI-in: | 1 |
| Fjärrstyrd (IR) ingång: | 1 |
| IR-mottagare ingår: | Ja |
Behöver du hjälp?
Om du behöver hjälp med StarTech.com EXTEND-HDMI-4K40C6P1 ställ en fråga nedan och andra användare kommer att svara dig
AV extender StarTech.com Manualer

2 Januari 2025
2 Januari 2025
2 Januari 2025
2 Januari 2025
2 Januari 2025
2 Januari 2025
2 Januari 2025
2 Januari 2025
2 Januari 2025
2 Januari 2025
AV extender Manualer
Nyaste AV extender Manualer
8 April 2025
1 April 2025
1 April 2025
1 April 2025
1 April 2025
1 April 2025
26 Februari 2025
25 Februari 2025
20 Februari 2025
20 Februari 2025