StarTech.com KEYBOARD-TRAY-CLAMP1 Bruksanvisning
StarTech.com Inte kategoriserad KEYBOARD-TRAY-CLAMP1
Läs gratis den bruksanvisning för StarTech.com KEYBOARD-TRAY-CLAMP1 (2 sidor) i kategorin Inte kategoriserad. Guiden har ansetts hjälpsam av 13 personer och har ett genomsnittsbetyg på 4.5 stjärnor baserat på 9 recensioner. Har du en fråga om StarTech.com KEYBOARD-TRAY-CLAMP1 eller vill du ställa frågor till andra användare av produkten? Ställ en fråga
Sida 1/2
Quick-Start Guide
To view manuals, FAQs, videos, drivers, downloads, technical drawings, and more, visit www.startech.com/support
Manual Revision: January 28, 2022 3:27 PM
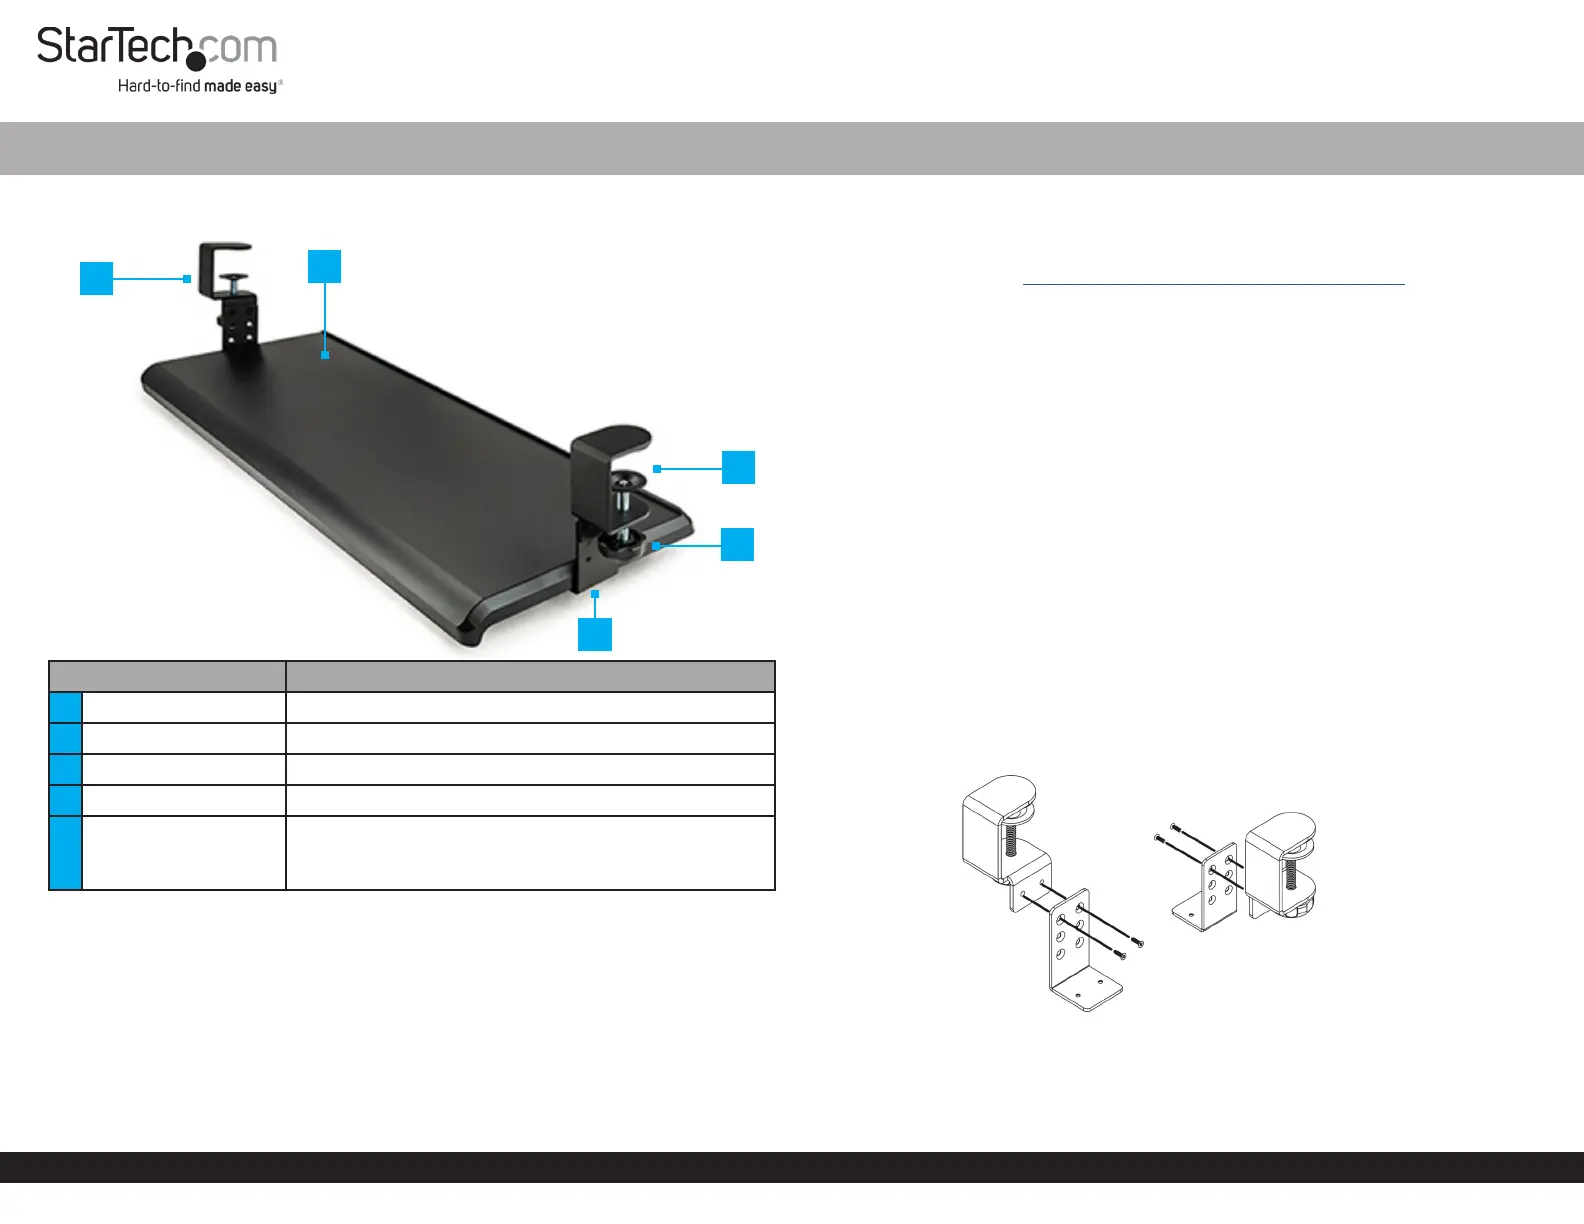
Product Diagram (KEYBOARD-TRAY-CLAMP1)
ComponentFunction
1Desk Clamp, Left• Attach the Keyboard Tray to the Desk
2Keyboard Tray• Place a keyboard and a mouse on the Keyboard Tray
3Desk Clamp, Right• Attach the Keyboard Tray to the Desk
4Clamp Knob• Turn by hand to secure the Clamp to the Desk
5
Height Adjustment L
Bracket
• Adjust the height between the Desk and the
Keyboard Tray
• Attach the Keyboard Tray to the Desk Clamp
Package Contents
• Keyboard Tray x 1
• Height Adjustment Screws x 5
• Tray Mounting Screws x 5
• Height Adjustments L Brackets x 2
• Desk Clamp Left x 1
• Desk Clamp Right x 1
• Quick-star Guide x1
Desk Clamp Keyboard Tray
Requirements
For the latest manuals, product information, technical specications, and declarations of
conformance, please visit: www.startech.com/KEYBOARD-TRAY-CLAMP1
• Phillips Head Screwdriver
Installation
WARNING!
Do not exceed the weight capacity of this product. Overloading this product might
result in injury or property damage. This product can support the following weight: up
to 11.8 kg (26 lbs).
Ensurethe mounted Keyboard Tray is properly secured to the Desk before use.
Attach the Desk Clamp to the Height Adjustment L
Brackets
1. Determine the desired height between the Desk and the Keyboard Tray: 100,
120, or 140 mm (3.9, 4.7, or 5.5 in). Each row of holes on the Height Adjustment
L Bracket are spaced 20 mm apart. The row of holes, located closest to the bend
of the Height Adjustment L Brackets, provides the minimum height adjustment
setting of 100 mm (3.9 in).
2. Secure the Height Adjustment L Bracket to the Desk Clamps using the Height
Adjustment Screws (x2 shorter screws) and tighten using a Phillips Head
Screwdriver to complete the rst Desk Clamp Assembly (Figure 1).
3. Repeat steps 2 and 3 to install the second Desk Clamp Assembly
Attach the Desk Clamp Assemblies to the Keyboard Tray
1. Flip the Keyboard Tray upside down and align the mounting holes located on
3
1
2
5
4
Figure 1
Produktspecifikationer
| Varumärke: | StarTech.com |
| Kategori: | Inte kategoriserad |
| Modell: | KEYBOARD-TRAY-CLAMP1 |
| Bredd: | 310 mm |
| Djup: | 700 mm |
| Höjd: | 62 mm |
| Förpackningens bredd: | 830 mm |
| Form: | Rektangulär |
| Material: | Stål |
| Antal skruvar: | 10 |
| Maxvikt: | 12 kg |
| Produktens färg: | Svart |
| Låddjup: | 340 mm |
| Vikt inkl. förpackning: | 3200 g |
| Ytterförpackningens höjd: | 370 mm |
| Produkter per ytterförpackning: | 4 styck |
| Ytterförpackningens längd: | 280 mm |
| Ytterförpackningens bredd: | 840 mm |
| Manual: | Ja |
| Skruvar medföljer: | Ja |
| Tangentbordsfack: | Ja |
| Tangentbordslåda (B x D): | 700 x 310 mm |
| Maximal vikt per tangentbordslåda: | 12 kg |
Behöver du hjälp?
Om du behöver hjälp med StarTech.com KEYBOARD-TRAY-CLAMP1 ställ en fråga nedan och andra användare kommer att svara dig
Inte kategoriserad StarTech.com Manualer

18 Mars 2025
18 Mars 2025
3 Januari 2025
2 Januari 2025
2 Januari 2025
2 Januari 2025
2 Januari 2025
2 Januari 2025
2 Januari 2025
2 Januari 2025
Inte kategoriserad Manualer
Nyaste Inte kategoriserad Manualer
9 April 2025
9 April 2025
9 April 2025
9 April 2025
9 April 2025
9 April 2025
9 April 2025
9 April 2025
9 April 2025
9 April 2025