StarTech.com MONSTND Bruksanvisning
StarTech.com Inte kategoriserad MONSTND
Läs gratis den bruksanvisning för StarTech.com MONSTND (2 sidor) i kategorin Inte kategoriserad. Guiden har ansetts hjälpsam av 17 personer och har ett genomsnittsbetyg på 4.7 stjärnor baserat på 8 recensioner. Har du en fråga om StarTech.com MONSTND eller vill du ställa frågor till andra användare av produkten? Ställ en fråga
Sida 1/2
Quick-Start Guide
To view manuals, FAQs, videos, drivers, downloads, technical drawings, and more, visit www.startech.com/support.
Manual Revision: March 25, 2019 2:04 PM
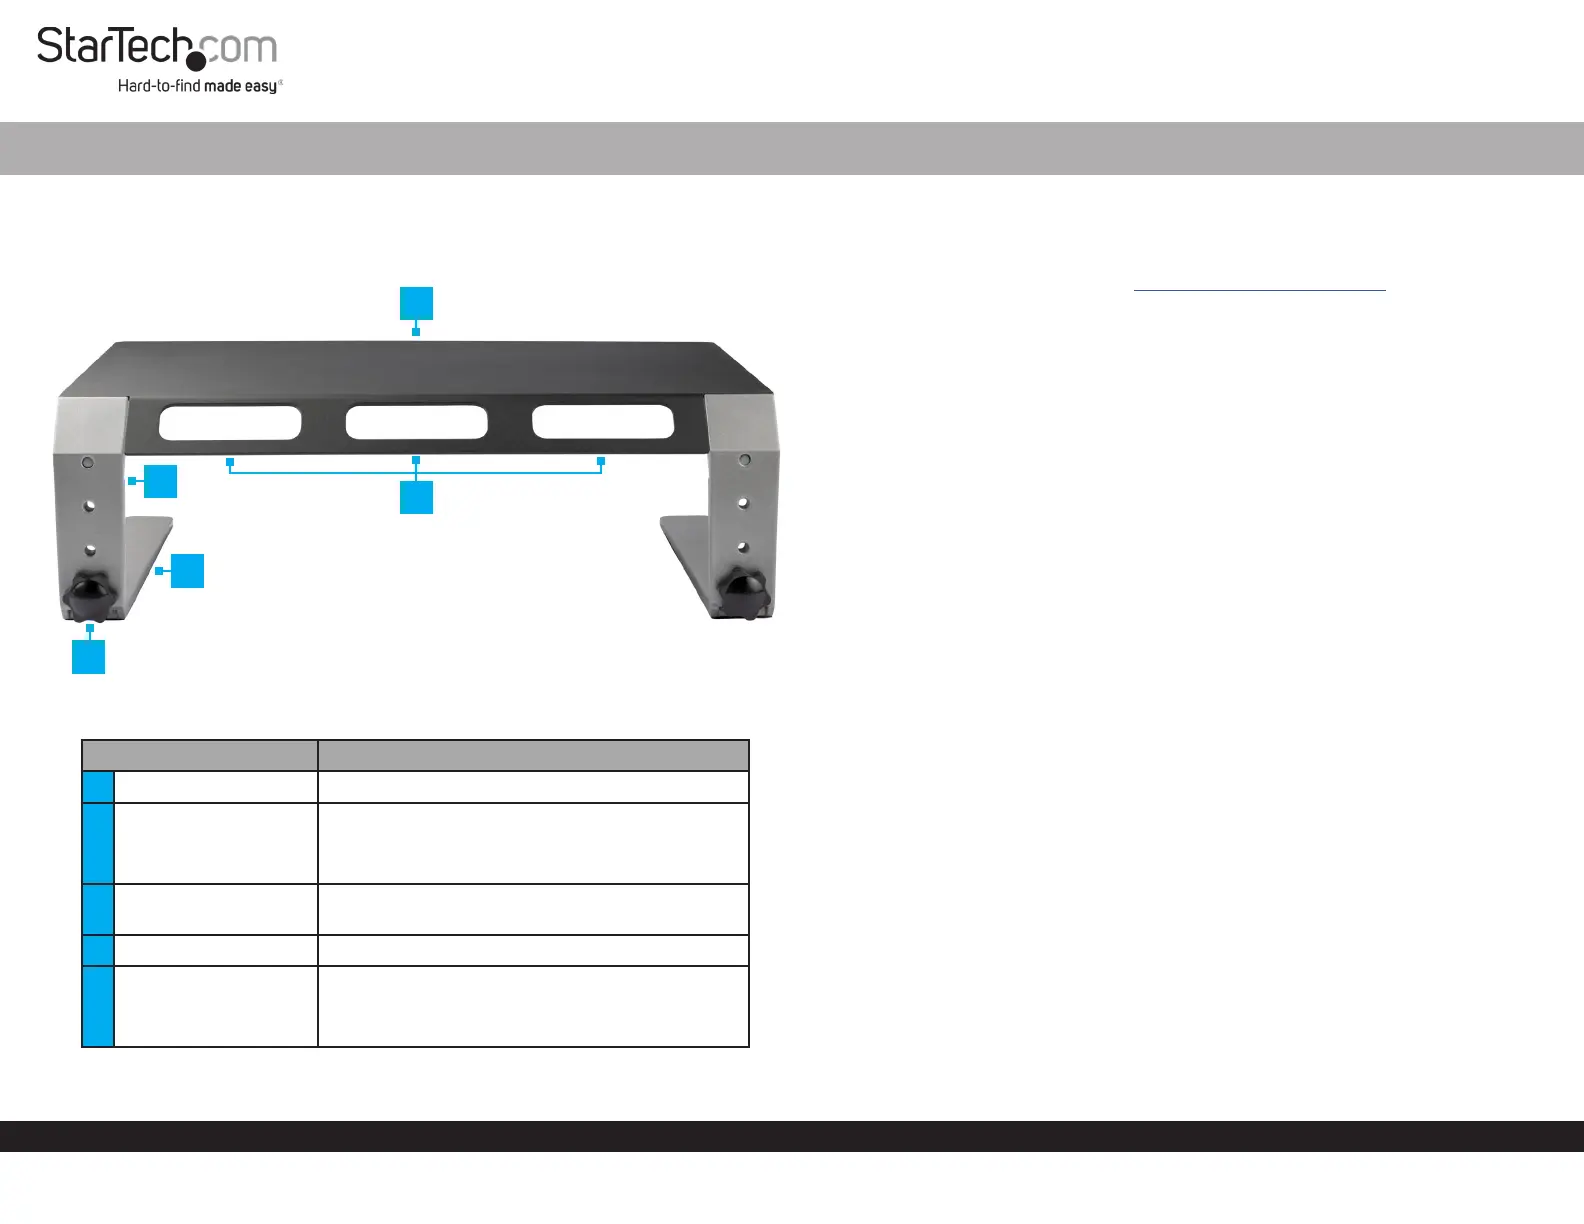
Product Diagram (MONSTND)
Rear View
PartFunction
1Top Plate• Used as a platform for a Monitor or Laptop
2Upper Leg
• Attaches to the Top Plate
• Congurable with three height-adjustment
settings
3
Cable-Management
Slots
• Used for organizing and routing Cables
4Lower Leg• Attaches to the Upper Leg
5
Height-Adjustment
Screw
• Used to secure the Upper Legs and Lower
Legs together
• Can be removed to adjust height settings
Monitor Riser - Metal - Height Adjustable
1
Requirements
• Clean, Flat, and Stable Surface x 1
For the latest requirements please visit: www.startech.com/MONSTND.
Installation
Assembly
1. Place the Top Plate, top side down, onto a Clean, Flat, and Stable Surface.
2. Place the Upper Legs onto the Top Plate. Ensure the Holes in the Upper Legs are
aligned with the Holes in the Top Plate. The slanted portion of the Upper Legs
should be aligned with the slanted portion of the Top Plate.
3. Secure the Upper Legs to the Top Plate, using two M6x10 mm Screws for each
side. Fasten the M6x10 mm Screws using the 4 mm Hex Key.
4. Align the Lower Leg against the Upper Leg at the desired Monitor height setting.
5. Insert the Height-Adjustment Screw through the Upper Leg and into the Lower
Leg, then hand-tighten.
Note: Tighten the Height-Adjustment Screws by hand. Do not over-tighten.
6. Repeat steps 4 and 5 to attach the second Lower Leg.
7. Turn the Monitor Riser Assembly upright.
Operation
Height Adjustment
1. Place the assembled Monitor Riser, top side down, on a Clean, Flat, and Stable
Surface.
2. Remove the Height-Adjustment Screws.
3. Adjust the height of the Lower Legs to the desired height.
4. Insert the Height-Adjustment Screws through the Upper Legs and into the Lower
Legs, then hand-tighten.
5. Turn the Monitor Riser Assembly upright.
2
5
4
3
Produktspecifikationer
| Varumärke: | StarTech.com |
| Kategori: | Inte kategoriserad |
| Modell: | MONSTND |
| Vikt: | 3200 g |
| Bredd: | 305 mm |
| Djup: | 405 mm |
| Höjd: | 125 mm |
| Förpackningens bredd: | 354 mm |
| Antal skruvar: | 6 |
| Förbättrad kabelhantering: | Ja |
| Maximal skärmstorlek: | 32 " |
| Arbetsyta: | 410 - 270 mm |
| Maxvikt: | 10 kg |
| Produktens färg: | Svart, silver |
| Låddjup: | 460 mm |
| Vikt inkl. förpackning: | 3700 g |
| Hållbarhetscertifiering: | CE, RoHS |
| Manual: | Ja |
| Harmonized System (HS)-kod: | 94038900 |
| Uppfyller hållbarhetskrav: | Ja |
| Ram material: | Aluminium, Steel |
| Höjdjustering: | Ja |
| Skruvar medföljer: | Ja |
| Antal displayer som stöds: | 1 |
| Höjdjusteringsintervall: | 125 - 175 mm |
| Typ av skruvnyckel: | Sexkantsnyckel |
Behöver du hjälp?
Om du behöver hjälp med StarTech.com MONSTND ställ en fråga nedan och andra användare kommer att svara dig
Inte kategoriserad StarTech.com Manualer

18 Mars 2025
18 Mars 2025
3 Januari 2025
2 Januari 2025
2 Januari 2025
2 Januari 2025
2 Januari 2025
2 Januari 2025
2 Januari 2025
2 Januari 2025
Inte kategoriserad Manualer
Nyaste Inte kategoriserad Manualer
9 April 2025
9 April 2025
9 April 2025
9 April 2025
9 April 2025
9 April 2025
9 April 2025
9 April 2025
9 April 2025
9 April 2025