StarTech.com PEXUSB312A3 Bruksanvisning
StarTech.com Inte kategoriserad PEXUSB312A3
Läs gratis den bruksanvisning för StarTech.com PEXUSB312A3 (2 sidor) i kategorin Inte kategoriserad. Guiden har ansetts hjälpsam av 25 personer och har ett genomsnittsbetyg på 5.0 stjärnor baserat på 3 recensioner. Har du en fråga om StarTech.com PEXUSB312A3 eller vill du ställa frågor till andra användare av produkten? Ställ en fråga
Sida 1/2
Quick-Start Guide
To view manuals, FAQs, videos, drivers, downloads, technical drawings, and more, visit www.startech.com/support.
Manual Revision: May 14, 2020 1:26 PM
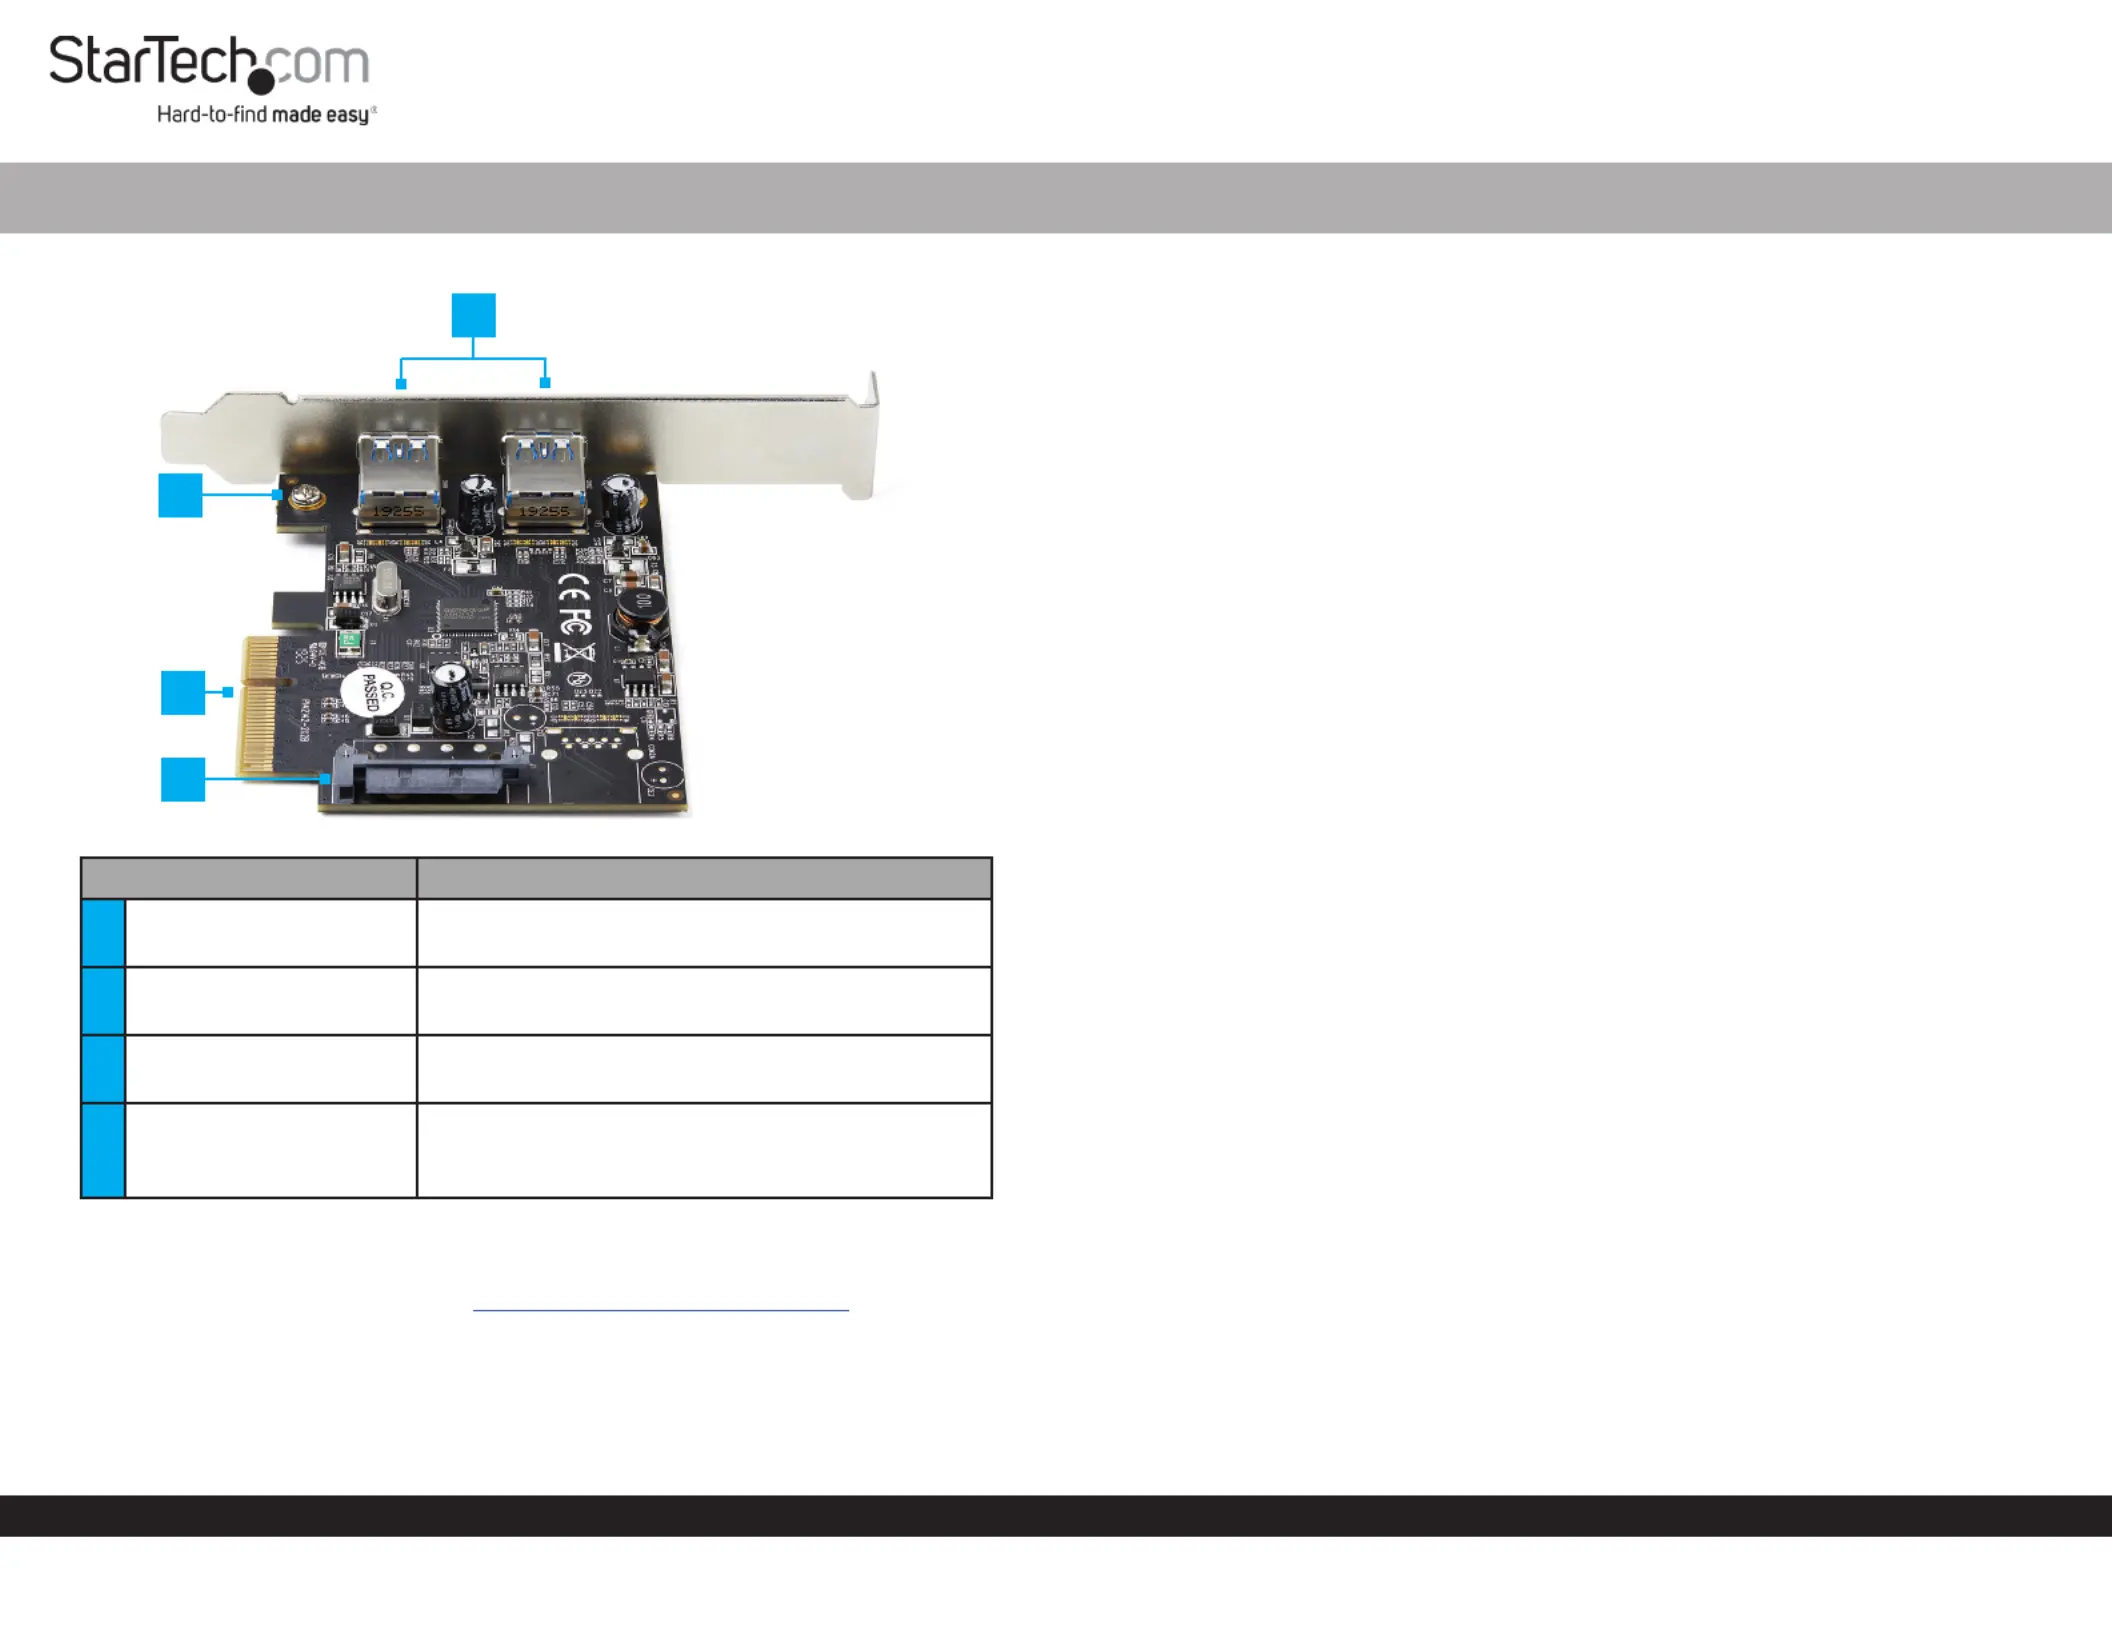
Product Diagram (PEXUSB312A3)
ComponentFunction
1USB-A Ports
• Used to connect a to USB Peripheral Device
the. USB Card
2Bracket Screws
• Used to theorSecure Low Prole Full Prole
Bracket USB Card.to the
3PCI Express Connector
• Used to connect the to the USB CardPCI
Express SlotHost Computer on the .
4SATA Power Connector
• (Optional) Connect a 15 Pin SATA Power
ConnectorUSB to provide extra power to the
Type-A Ports.
Requirements
For the latest requirements, please visit www.startech.com/PEXUSB312A3
• Computer with an available PCI Express® slot (x4, x8, or x16)
• (Optional) SATA Power Source
Tools
• Small Phillips® Head Screwdriver
2-Port USB 3.1 Card | 10Gbps per port | 2x USB-A | PCIe
Hardware Installation
Installing the Low Prole Bracket
By default the is attached to the . Depending on your Full Prole BracketUSB Card
system conguration you may need to remove the and replace it Full Prole Bracket
with the (included).Low Prole Bracket
1. Using a (sold separately), remove the two Small Phillips Head Screwdriver Bracket
ScrewsFull Prole BracketUSB Card securing the to the .
2. Align the on the with the on the Screw HolesUSB CardScrew HolesLow Prole
BracketUSB CardScrew HolesLow . Making sure the is sitting on top of the on the
Prole Bracket.
3. Insert the through the and into the on the Bracket ScrewsUSB CardScrew Holes
Low Prole Bracket.
4. Using the , tighten the being Small Phillips Head ScrewdriverBracket Screws,
careful not to over-tighten.
Installing the USB Card
Warning: USB cards can be damaged by static electricity. Make sure that you are
properly grounded before you open the computer case or touch the . You USB Card
should wear an anti-static strap when you install any computer components. If an
anti-static strap is not available, discharge any built-up static electricity by touching
a large grounded metal surface for several seconds. Only handle the by its USB Card
edges and do not touch the gold connectors.
1. Turn o the and disconnect any that are HostComputerPeripheral Devices
connected (e.g. printer, external hard drives, etc.).
2. Unplug the from the back of the .Power CableHost Computer
3. Remove the from the . CoverHost Computer’s Case
Note: Consult the documentation that came with the for details Host Computer
about how to remove the safely.Cover
4. Locate an open (x4, x8, or x16) and remove the corresponding PCI Express Slot
Metal Cover PlateHost Computer’s Case from the back of the .
5. Gently insert the into the open and fasten the USB CardPCI Express SlotBracket
to the back of the .Host Computer’s Case
6. (Optional) Connect a from the to the 15 Pin SATA Power ConnectorPower Supply
SATA Power ConnectorUSB Card on the .
2
1
3
4
Produktspecifikationer
| Varumärke: | StarTech.com |
| Kategori: | Inte kategoriserad |
| Modell: | PEXUSB312A3 |
Behöver du hjälp?
Om du behöver hjälp med StarTech.com PEXUSB312A3 ställ en fråga nedan och andra användare kommer att svara dig
Inte kategoriserad StarTech.com Manualer

18 Mars 2025
18 Mars 2025
3 Januari 2025
2 Januari 2025
2 Januari 2025
2 Januari 2025
2 Januari 2025
2 Januari 2025
2 Januari 2025
2 Januari 2025
Inte kategoriserad Manualer
Nyaste Inte kategoriserad Manualer
9 April 2025
9 April 2025
9 April 2025
9 April 2025
9 April 2025
9 April 2025
9 April 2025
9 April 2025
9 April 2025
9 April 2025