StarTech.com UNIRAILS1UB Bruksanvisning
StarTech.com Inte kategoriserad UNIRAILS1UB
Läs gratis den bruksanvisning för StarTech.com UNIRAILS1UB (2 sidor) i kategorin Inte kategoriserad. Guiden har ansetts hjälpsam av 26 personer och har ett genomsnittsbetyg på 4.8 stjärnor baserat på 3 recensioner. Har du en fråga om StarTech.com UNIRAILS1UB eller vill du ställa frågor till andra användare av produkten? Ställ en fråga
Sida 1/2
Quick-Start Guide
To view manuals, FAQs, videos, drivers, downloads, technical drawings, and more, visit www.startech.com/support.
Manual Revision: August 23, 2019 10:33 AM
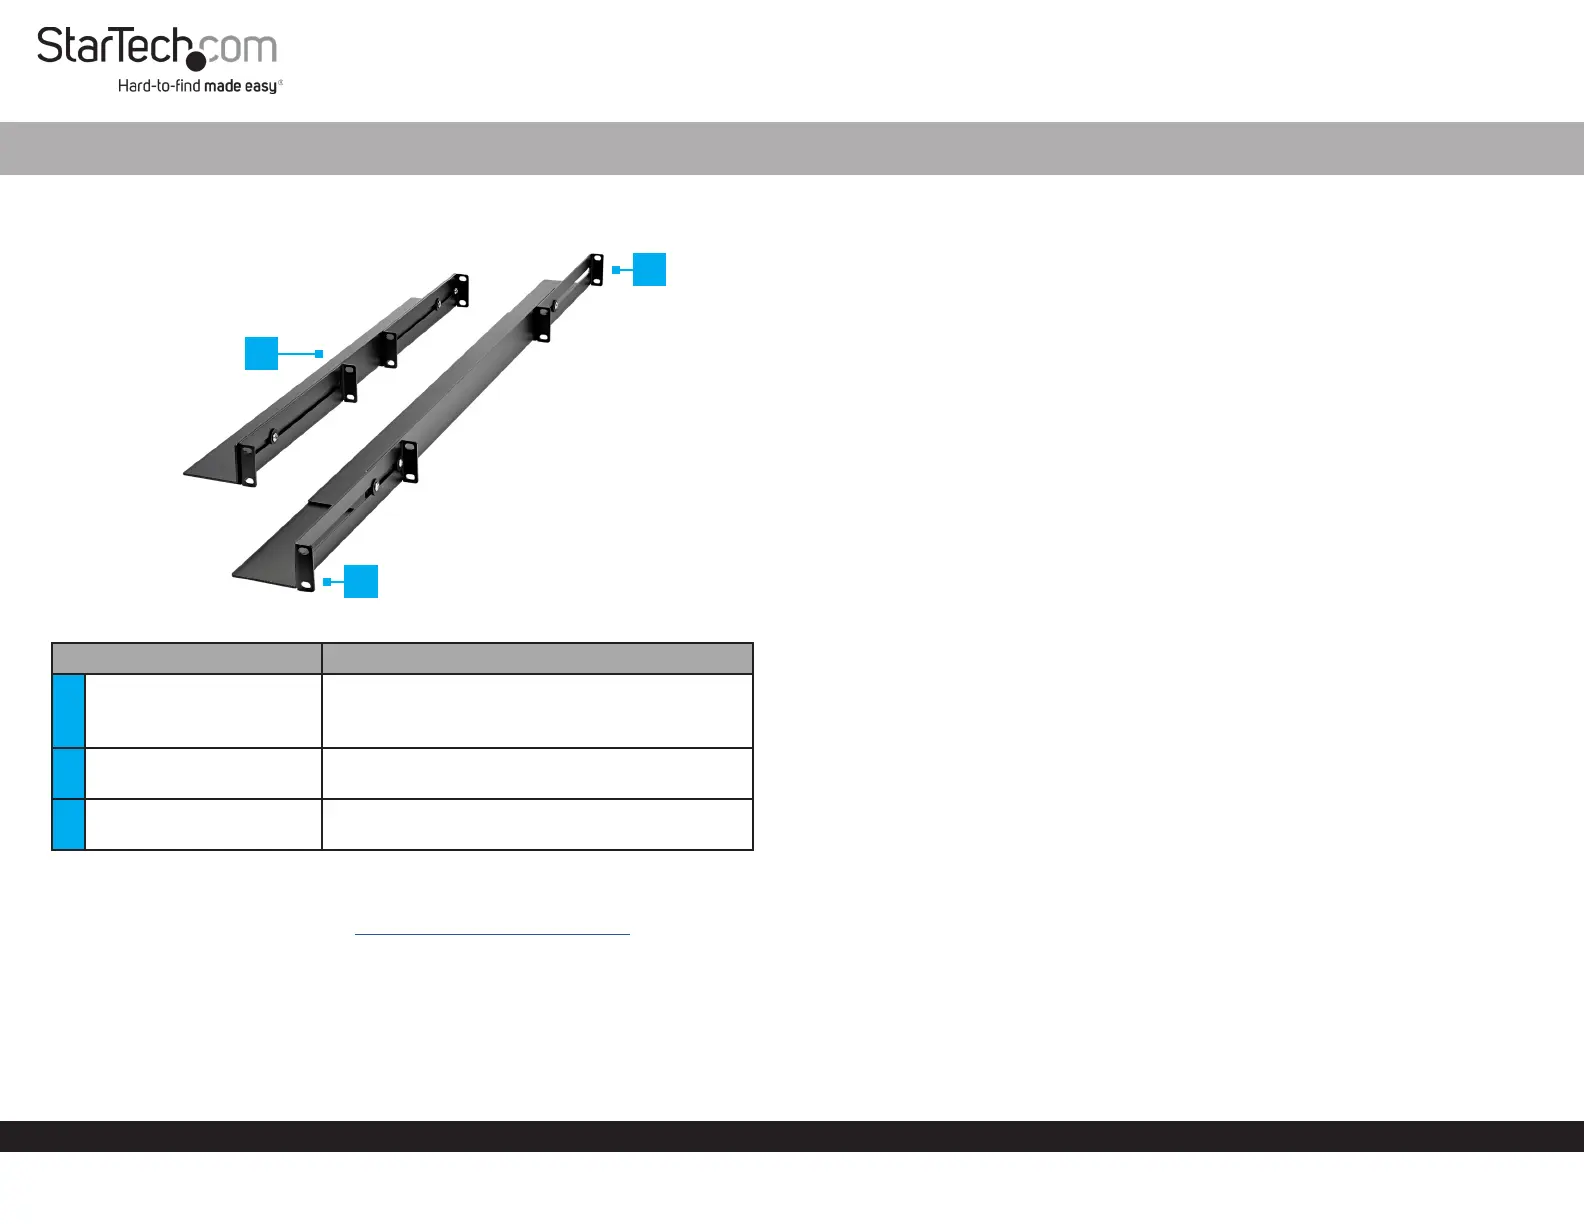
Product Diagram (UNIRAILS1UB)
ComponentFunction
1
Adjustable Depth Basic 1U
Universal Server Rail
• Used to securely mount equipment (1U in
height) in a Server Rack.
• Maximum Weight Capacity = 200 lb. (91.7 kg)
2Front Bracket
• Used to secure the Server Rail to a Server
Rack.
3Back Bracket
• Used to secure the Server Rail to a Server
Rack.
Requirements
For the latest requirements, please visit www.startech.com/UNIRAILS1UB
• Cage Nut Tool x 1 (Optional)
• Phillips Head Screwdriver x 1
4-Post 1U Universal Adjustable Mounting Depth Rack Rail
Package Contents
• Adjustable Depth Basic 1U Universal Server Rail x 2
• M6-12 Screws x 8
• Cage Nuts x 8
• M6 Plastic Cap Washers x 8
• Quick-Start Guide x 1
Installing the Server Rail
1. Insert the Cage Nuts x 4 into the Cage Nut Holes on the front and back Rails of the
Server Rack.
Note: You can use a Cage Nut Tool to aid in the installation of the Cage Nuts.
2. Align the Screw Hole on the Back Bracket on the Server Rail with the Cage Nuts
(inserted in step 1) on the back Rail on the Server Rack.
3. Slide an M6 Plastic Cap Washer over-top of the M6-12 Screw.
4. Insert an M6-12 Screw through the Server Rail Screw Hole and into the Cage Nut.
5. Insert a second M6-12 Screw through the bottom Washer and Server Rail Screw
Hole and into the Cage Nut.
6. Using a Phillips Head Screwdriver tighten the M6-12 Screws, being careful not to
over-tighten.
7. Align the Screw Hole on the Front Bracket on the Server Rail with the Cage Nuts
(inserted in step 1) on the front Rail on the Server Rack.
8. Slide an M6 Plastic Cap Washer over-top of the M6-12 Screw.
9. Insert an M6-12 Screw through the Server Rail Screw Hole and into the Cage Nut.
10. Insert a second M6-12 Screw through the bottom Washer and Server Rail Screw
Hole and into the Cage Nut.
11. Using a Phillips Head Screwdriver tighten the M6-12 Screws, being careful not to
over-tighten.
12. Repeat Steps 1 - 11 to install the second Server Rail.
2
3
1
Produktspecifikationer
| Varumärke: | StarTech.com |
| Kategori: | Inte kategoriserad |
| Modell: | UNIRAILS1UB |
| Vikt: | 222 g |
| Bredd: | 596.9 mm |
| Djup: | 0.25 mm |
| Höjd: | 335.3 mm |
| Förpackningens bredd: | 596.9 mm |
| Djuppackning: | 335.3 mm |
| Förpackningshöjd: | 0.25 mm |
| Snäll: | Randloze privacyfilter voor schermen |
| Lämplig för: | Monitor |
| Modell: | Skena till rackskåp |
| Bildförhållande: | 16:9 |
| Skärmdiameter i centimeter: | 68.6 cm |
| Snabbinstallationsguide: | Ja |
| Antal skruvar: | 8 |
| Displaytyper som stöds: | LCD |
| Maximal skärmstorlek: | 27 " |
| Ytfinish: | Glanzend/mat |
| Lätt avtagbar: | Ja |
| Lätt att applicera: | Ja |
| Egenskaper: | 1 |
| Maxvikt: | 90.7 kg |
| Beeldformaat: | Breedbeeld |
| Produktens färg: | Svart |
| Låddjup: | 640 mm |
| Vikt inkl. förpackning: | 4000 g |
| Antal per förpackning: | 2 styck |
| Ytterförpackningens höjd: | 490 mm |
| Produkter per ytterförpackning: | 10 styck |
| Ytterförpackningens längd: | 660 mm |
| Ytterförpackningens bredd: | 460 mm |
| Hållbarhetscertifiering: | CE, RoHS |
| Harmonized System (HS)-kod: | 85389099 |
| Efterlever industristandard: | EIA-310-D |
| Skruvar medföljer: | Ja |
| Antal inkluderade brickor: | 8 |
| Muttrar inkluderade: | Ja |
| Antal muttrar: | 8 |
| Brickor inkluderade: | Ja |
| Inbyggnadsdjup (max): | 914 mm |
| Inbyggnadsdjup (min): | 610 mm |
Behöver du hjälp?
Om du behöver hjälp med StarTech.com UNIRAILS1UB ställ en fråga nedan och andra användare kommer att svara dig
Inte kategoriserad StarTech.com Manualer

18 Mars 2025
18 Mars 2025
3 Januari 2025
2 Januari 2025
2 Januari 2025
2 Januari 2025
2 Januari 2025
2 Januari 2025
2 Januari 2025
2 Januari 2025
Inte kategoriserad Manualer
Nyaste Inte kategoriserad Manualer
9 April 2025
9 April 2025
9 April 2025
9 April 2025
9 April 2025
9 April 2025
9 April 2025
9 April 2025
9 April 2025
9 April 2025